
[TOC]
Shell脚本编程示例大全
|[TOC]
0x00 基础案例
示例1.变量叠加与单双引i号得异同
1 | #!/bin/bash |
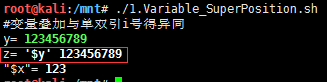
weiyigeek.top-单双引号
示例2.五种计算方法Method
1 | #!/bin/bash |
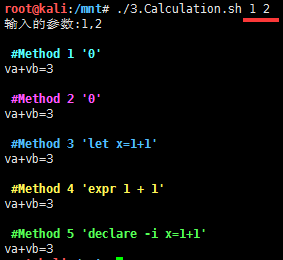
weiyigeek.top-数值计算的几种方式
示例3.精密计算之小数计算
1 | #!/bin/bash |
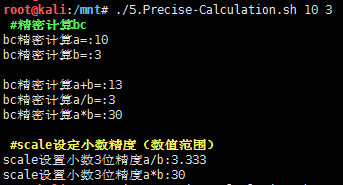
weiyigeek.top-
示例4.字符串与数组处理
1 | #!/bin/bash |

weiyigeek.top-
0x01 语法记忆
示例1.分支与判断1
2
3
4
5
6
7
8
9
10
11
12
13
14
15
16
17
18
19
20
21
22
23
24
25
26
27
28
29
30
31
32
33
34
35#!/bin/bash
#if分支语句
read -p "Please INput A:" a
read -p "Please INput B:" b
read -p "Please INput C:" c
#单分支语句(1)
if [ $a == $b ];then
echo "a is equal to b!!"
fi
if [ $a != $b ];then
echo "a is not equal to b!!"
fi
#单分支语句(2)
if [ $c == $b ];then
echo "c is equal to b!!"
else
echo -e "c is not equal to b!!\n"
fi
#双分支语句
a=10
b=20
if [ $a == $b ]
then
echo "a is equal to b"
elif [ $a -gt $b ];then
echo "a is greater than b"
elif [ $a -lt $b ]
then
echo "a is less than b"
else
echo "None of the condition met"
fi
示例2.Case多分支语句 weiyigeek.top-1
2
3
4
5
6
7
8
9
10
11
12
13
14
15
16
17
18
19
20
21
22
23
24
25
26
27
28
29
30
31
32#!/bin/bash
#case 多分支语句
echo 'Input a number between 1 to 4'
echo -e 'Your number is:\c'
read aNum
case $aNum in
1) echo -e 'You select 1\n'
;;
2) echo -e 'You select 2\n'
;;
3) echo -e 'You select 3\n'
;;
4) echo -e 'You select 4\n'
;;
*) echo -e 'You do not select a number between 1 to 4'
;;
esac
#新颖的思路可以利用这个来写小脚本
option="${1}"
case ${option} in
-f) FILE="${2}"
echo "File name is $FILE"
;;
-d) DIR="${2}"
echo "Dir name is $DIR"
;;
*)
echo "`basename ${0}`:usage: [-f file] | [-d directory]"
exit 1 # Command to come out of the program with status 1
;;
esac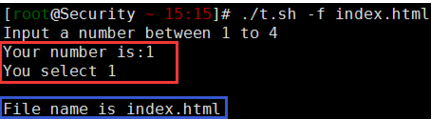
示例3.For循环(Circulation)语句 weiyigeek.top-1
2
3
4
5
6
7
8
9
10
11
12
13
14
15
16
17
18
19
20
21
22
23
24
25
26
27
28
29
30
31
32
33
34
35
36
37
38
39
40
41
42
43#!/bin/bash
#For circulation Method 1
#一行一行得读取家目录总中.bash开头的文件
for FILE in $HOME/.bash*
do
echo $FILE
done
#依次输出
for t in 1 2 3 4 5
do
echo "输出第${t}个数字:$t"
done
#For Method2
sum=0
for((i=0;i<=100;i++))
do
sum=$[ $sum + $i ]
done
echo "一到一百相加得:$sum"
# 嵌套循环
read -p "打印矩阵星星:" w
for((i=0;i<=${w};i++))
do
for((j=0;j<=${w};j++))
do
echo -n "*"
done
echo ""
done
#批量解压缩
ls *.tar.gz >> gz.log 2>/dev/null
ls *.tgz >> gz.log 2>/dev/null
echo "正在解压缩 : Wait,Please!!"
for i in $(cat gz.log)
do
tar -zxf $i &> /dev/null
done
rm -rf gz.log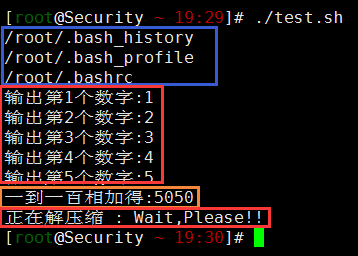
示例4.While 与 Until 语句: weiyigeek.top-1
2
3
4
5
6
7
8
9
10
11
12
13
14
15
16
17
18
19
20
21
22
23
24
25
26#!/bin/bash
#while Circulation
num=0
sum=0
while [ $num -le 100 ]
do
sum=$(($sum+$num))
num=$[$num+1]
done
echo "1+2+....+100=$sum"
#Until Circulation
#输出 0 - 4
a=0
until [ ! $a -lt 5 ] #到5得时候就不成立了
do
echo $a
a=`expr $a + 1`
done
echo -e "\n"
#输出 0 - 5
b=0
until [ $b -gt 5 ] # 可以等于5
do
echo $b
b=$(($b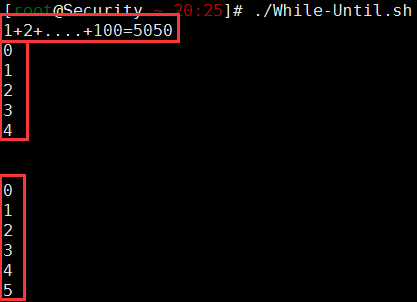
示例5.函数嵌套与调用 weiyigeek.top-1
2
3
4
5
6
7
8
9
10
11
12
13
14
15
16
17
18
19
20
21
22
23
24
25
26
27
28
29
30
31
32
33
34
35
36
37
38#!/bin/bash
# Define your function here
Hello () {
echo -e "Hello Shell Program!!\n"
}
# Invoke your function
Hello
# Return Arguments!!
funWithReturn(){
echo "The function is to get the sum of two numbers..."
echo -n "Input first number: "
read aNum
echo -n "Input another number: "
read anotherNum
echo "The two numbers are $aNum and $anotherNum !"
return $(($aNum+$anotherNum)) # 2
}
funWithReturn
# Capture value returnd by last command
ret=$?
echo "The sum of two numbers is $ret !"
#函数嵌套
# Calling one function from another
number_one () {
echo "Url_1 is http://see.edu.cn/cpp/shell/"
number_two
}
number_two () {
echo "Url_2 is http://see.edu.cn/cpp/"
}
# unset -f number_two #删除number_two函数
number_one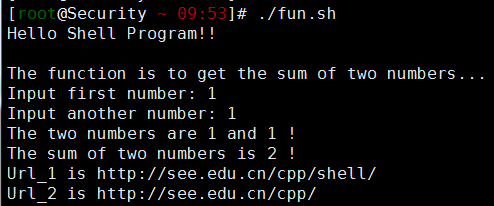
0x02 标准输入
示例1.命令行中输入参数,shell中使用位置参数变化 weiyigeek.top-参数命令1
2
3
4
5
6
7
8
9
10
11
12
13
14
15
16
17
18
19
20
21
22#!/bin/bash
#接受 输出得参数(Arguments),位置参数num1=$1
num2=$2
echo -e "输入得参数:"
echo $num1,$num2
let num3=$num1+$num2 #Add输入得参数
echo -e "num1+num2=\e[1;35m $num3 \e[0m"
##
echo -e "\n代表所有参数的个数:"
echo -e " A total of\e[1;32m $# \e[0m Parameters" #所有参数的个数:
##
echo -e "\n整体参数:"
for i in "$*"
do
echo -e "ioutput:\e[1;31m $i \e[0m" #整体参数
done
##
echo -e "\n个体参数:"
for j in "$@"
do
echo -e "joutput:\e[1;36m $j \e[0m" #个体参数
done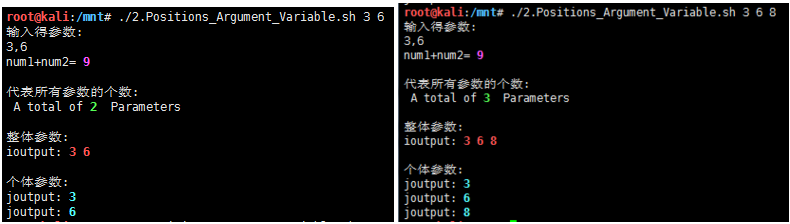
示例2.标准输入和命令行输入验证1
2
3
4
5
6
7
8
9
10
11
12
13
14
15
16
17
18
19
20
21
22
23
24
25
26
27
28#!/bin/bash
# 实现标准输入格式验证的几种方法
read -p "Please two number:" NUM1 NUM2
function CheckNumberFormat(){
local value=$1
flag=$(echo $value | grep -E '[a-zA-Z_\.]'| wc -l) #字符输入时候也的值得参考
if [ $flag -eq 1 ];then
echo "please input Number!"
return 1
else
return 0
fi
}
function CheckNumberLength(){
local value=$1
if [ ${#value} -lt 1 -o -z ${value} -o ! -n ${value} -o "${value}" == "" ];then
echo "输入为空!"
fi
}
function CheckNumber(){
expr $1 + $2 + 0 > /dev/null
if [ $? -ne 0 ];then
echo "Input not number!"
fi
}
示例3.匹配更改文件名称思路
1 | #!/bin/bash |
0x03 进制随机编码
示例1.进制转换采用bc weiyigeek.top-1
2
3
4
5
6
7
8#!/bin/bash
#进制之间的转换 B->O->D->H
read -p "Please INput NUmeric:" abc
echo -e "\e[1;33;5m 进制转换结果 \e[0m"
echo "二进制(BIN):`echo "obase=2;$abc"|bc`"
echo "八进制(OCTAL):`echo "obase=8;$abc"|bc`"
echo "十进制(DEC):`echo "obase=10;$abc"|bc`"
echo "十六进制(HEX):`echo "obase=16;$abc"|bc`"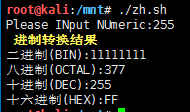
示例2.Ascii码与进制转换 weiyigeek.top-printf相互转换1
2
3
4
5
6
7
8
9
10
11
12
13
14
15
16
17
18
19#!/bin/bash
#Printf里的进制转换
exec 4<>test.txt #绑定文件描述符号
while read line<&4
do
echo -e "\e[1;37;5m 进制数据进行相互转换: \e[0m"
printf "%-10s \n" Octal-Dec-hex:
printf "%-10o" $line
printf "%-10d" $line
printf "%-10x \n" $line
done
#Printf里的Ascll编码
##Octal -> ASCLL(123456789)
echo -e "\e[1;36m Octal-> Ascll\e[0m"
for i in 60 61 62 63 64 65 66 67 70 71
do
printf "Octal=$i,Ascll=\\$i \n"
done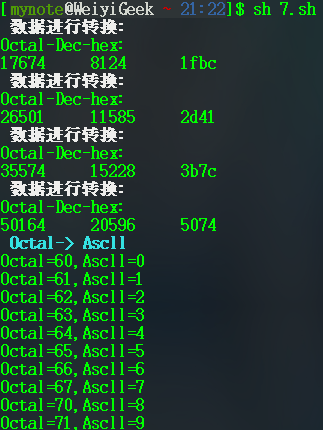
示例3.Shell脚本随机密码生成1
2
3
4
5
6
7
8
9
10
11
12
13
14
15
16
17
18
19
20
21
22
23
24
25
26
27
28
29
30
31
32
33
34
35
36
37
38
39
40
41
42
43
44
45
46
47
48
49
50#!/bin/bash
#(方式1) /dev/urandom文件是Linux内置的随机设备文件,内容有些太随机,包括很多特殊符号
#tr -dc '_A-Za-z0-9' #将随机文件中其他的字符删除,仅保留大小写字母,数字,下划线
cat /dev/urandom | tr -dc '_a-zA-Z0-9' | head -c 12 #2hCOmV9AWAHA
</dev/urandom tr -dc '!@#$%^&*()-+=0-9a-zA-Z'| head -c14 #这样的方法值得学习
cat /dev/urandom | tr -dc '_a-zA-Z0-9!@#$%&*.' | fold -w 12 | head -1
cat /dev/urandom | tr -dc 'a-zA-Z0-9-_!@#$%^&*()_+{}|:<>?=' | fold -w 12| head -n 4 # 生成四组随机密码
.g0VvfzPooh*
#(方式2)利用上面的随机数来生成随机密码
echo $RANDOM | md5sum | cut -c 1-8
60354ab3
#(方式2)生成随机密码(字串截取版本)设置变量key,存储密码的所有可能性(密码库),如果还需要其他字符请自行添加其他密码字符
#使用$#统计密码库的长度
key="0123456789abcdefghijklmnopqrstuvwxyzABCDEFGHIJKLMNOPQRSTUVWXYZ"
num=${#key}
pass='' #设置初始密码为空
#循环8次,生成8为随机密码
for i in {1..8}
do
index=$[RANDOM%num] #无论怎么变都在key长度范围内
pass=$pass${key:$index:1} #拼接字符串
done
echo $pass
#(方式3)生成随机密码(UUID版本,16进制密码)
uuidgen | cut -c 1-8
a1cb0776
uuidgen | md5sum | cut -c 1-8
70101a14
#(方式4)当前进程号生成随机密码(进程ID版本,数字密码)-并不是一定随机一个shell的终端pid
echo $$ | md5sum | cut -c 1-8
93c6b48c
#(方式5)通过openssl产生随机数
openssl rand -base64 8
R1NSJ4rZGXQ=
#(方式6)通过date方式获取随机数
date +%s%S | md5sum | cut -c 1-8
# 259f7c4a
date +%s%S | sha1sum
date +%s%S | sha512sum | cut -c 1-8
# 03663f46
0x04 批量操作
示例1.批量创建用户以及采用随机密码
1 | #!/usr/bin/env bash |
示例2.排除A文件中每一行在B文件中存在的字符串
1 | for i in $(cat a.txt);do |
0x05 文件读取
示例1.监测网站首页是否宕掉以及首页是否被修改
Step1.将需要监测的网站地址放入ip.txt中1
2
3
4
5
6
7
8cat > ip.txt <<END
192.168.100.197
192.168.100.198
192.168.100.199
192.168.100.200
192.168.100.201
192.168.100.202
END
Step2.写入一个监测函数思路就是利用网页的MD5指纹进行判断;1
2
3
4
5
6
7
8
9
10
11
12
13
14
15
16
17
18
19
20
21
22#!/usr/bin/env bash
function check(){
cat ip.txt|while read line
do
url="http://${line}:$1/Login.do"
urlmd5=$(curl -s -m 2 ${url} | md5sum | cut -f 1 -d " ")
if [ "$urlmd5" == "6fc523910cb417d2247078125dd06782" ];then
echo "$url OK"
elif [ "$urlmd5" == "d41d8cd98f00b204e9800998ecf8427e" ];then
echo "$url Connect Fail";
else
echo "$url content change";
fi
done
}
check 30082
check 40082
#执行结果
./check.sh
http://192.168.100.197:30082/Login.do OK
http://192.168.100.198:30082/Login.do Connect Fail
示例2.绑定输入与文件读取使用while语实现的三种方式1
2
3
4
5
6
7
8
9
10
11
12
13
14
15
16
17
18
19
20
21
22
23
24
25
26
27
28
29
30#!/bin/bash
## read input Variable
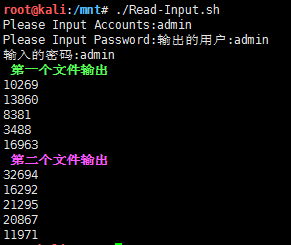
read -t 10 -p "Please Input [Accounts|Password]:" user pass
echo "输出的用户:$user"
echo "输入的密码:$pass"
## 方法1:While Read Line 绑定文件描述
echo -e "\e[1;32m 第一个文件输出\e[0m"
exec 3<>file.txt
while read line<&3
do
echo $line
done
## 方法2:Cat FILE.TXT 读取文件中每一行
echo -e "\e[1;35m 第二个文件输出\e[0m"
cat file1.txt |\
while read line
do
echo $line
done
## 方法3
export number=0
while read line
do
sed -i "3i\ pageid: ${number}" $line
let number++
done < all.md
执行结果: weiyigeek.top-1
2
3
4
5
6
7
8
9
10
11
12
13
14
15
16
17
18
19
20while read line
do
echo " - ${line} - "
done < ip.txt
- eth0 Link encap:Ethernet HWaddr 02:42:ac:00:00:08 -
- inet addr:172.0.0.8 Bcast:172.0.255.255 Mask:255.255.0.0 -
- UP BROADCAST RUNNING MULTICAST MTU:1500 Metric:1 -
- RX packets:481 errors:0 dropped:0 overruns:0 frame:0 -
- TX packets:447 errors:0 dropped:0 overruns:0 carrier:0 -
- collisions:0 txqueuelen:0 -
- RX bytes:354214 (354.2 KB) TX bytes:74829 (74.8 KB) -
- -
- lo Link encap:Local Loopback -
- inet addr:127.0.0.1 Mask:255.0.0.0 -
- UP LOOPBACK RUNNING MTU:65536 Metric:1 -
- RX packets:56 errors:0 dropped:0 overruns:0 frame:0 -
- TX packets:56 errors:0 dropped:0 overruns:0 carrier:0 -
- collisions:0 txqueuelen:0 -
- RX bytes:5520 (5.5 KB) TX bytes:5520 (5.5 KB) -
-
示例3.读取文件中的字符串,对里面的词组进行排序及出现1
2
3
4
5
6
7
8
9
10
11
12
13
14
15
16
17
18
19
20
21
22
23
24
25
26
27
28
29
30
31
32
33
34
35
36
37
38
39
40
41#!/bin/bash
eng="Making peace with what you don't have, that's what it's all about. I am a technical geek who is interested in learning computer technology."
#方式1:
echo $eng | sed -e 's#[ , . ]#\n#g' | sort | uniq -c | sort -nr #值得学习
# 2 what
# 1 you
# 1 with
# 1 who
# 1 that's
# 1 technology.
# 1 technical
# 1 peace
# 1 Making
# 1 learning
#方式2:
echo $eng | tr " " '\n' | sort | uniq -c | sort -nr
#(1)读取文件中内容,将词组中的各个字母进行排序,sed -r 使用正则匹配任意字符降序排列;
echo $eng | sed 's# ##g' | sed -r 's#(.)#\1\n#g' | sort |uniq -c | sort -rn -k1
# 13 t
# 12 e
# 12 a
# 8 n
# 8 i
# 8 h
# 7 o
#(2)采用方式2
echo $eng | grep -oE '[[:lower:]]' | sort | uniq -c | sort -rn
# 13 t
# 12 e
# 12 a
# 8 n
# 8 i
# 8 h
# 7 o
示例4.读取文件中的字符串,对里面的词组按照长度限定进行输出1
2
3
4
5
6
7
8
9
10
11
12
13
14
15
16
17
18
19
20
21
22
23
24
25
26
27
28
29
30
31#!/bin/bash
eng="Making peace with what you don't have, that's what it's all about. I am a technical geek who is interested in learning computer technology."
arr=($eng)
#方式1:
for value in $eng
do
if [ ${#value} -gt 6 ];then
echo ${#value}-${value}
fi
done
#方法2:
for value in ${arr[*]}
do
if [ ${#value} -gt 6 ];then
echo ${#value}-${value}
fi
done
#方法3:
echo $eng | tr ' ' '\n'| awk '{len=length($1); if(len > 6){print len"-"$1}}'
#执行的结果
9-technical
10-interested
8-learning
8-computer
11-technology.
0x06 执行效率
示例1.评定一个算法的效率打印所用时间1
2
3
4
5
6
7
8
9
10#!/bin/bash
start=$(date +%s) #start=`date +%s`,等号不能有空格,如果有空格,会被变量当成命令
for(( i = 0; i < 5; i++ ));do
echo $i >/dev/null
sleep 1
done
end=`date +%s`
diff=$(($end-$start)) #执行时间之差
echo "use times(ms):"$diff
echo "use times(ms):"$(($end-$start))
0x07 安全运维
示例1.防止rm误删操作
解决方法:建立类似回收站机制1
2
3
4
5
6
7
8
9
10
11
12
13
14
15
16
17
18
19
20
21
22
23
24
25
26
27
28
29
30
31
32
33
34
35
36#1.建立回收站目录(此步骤可省略)
$ mkdir ~/.trash
#2.建立别名脚本
$ sudo vi /tmp/remove.sh
#!/bin/sh
#定义文件夹目录.trash
# home=$(env | grep ^HOME= | cut -c 6-)
trash="/.trash"
deltime=$(date +%Y%m%d-%H%M%S)
TRASH_DIR="${HOME}${trash}/${deltime}"
# 建立回收站目录当不存在的时候
if [ ! -e ${TRASH_DIR} ];then
mkdir -p ${TRASH_DIR}
fi
for i in $*;do
if [ "$i" = "-rf" ];then continue;fi
#定义秒时间戳
STAMP=`date +%s`
#得到文件名称(非文件夹),参考man basename
fileName=`basename $i`
#将输入的参数,对应文件mv至.trash目录,文件后缀,为当前的时间戳
mv $i ${TRASH_DIR}/${fileName}.${STAMP}
done
sudo chmod +x /tmp/remove.sh
#3.建立别名机制
$sudo vi /etc/bashrc
# User specific aliases and functions
alias rm="sh /home/user/tool/remove.sh"
source /etc/bashrc
#4.每日03:00定时执行清空隐藏目录.trash当然您也可以清理前一天删除的
0 3 * * * find ~/.trash/ -mtime +1 -delete
0x08 防火墙应用
示例1.防止web的ddos攻击与反爬虫1
2
3
4
5
6
7
8
9
10
11
12
13
14
15
16
17
18
19
20#!/bin/bash
# 实现要求:
# 1.根据web日志或者网络连接数,监控某个IP并发连接数或者段时间内达到PV到100,即调用防火墙封掉对应IP;
function main(){
cat access.log | awk '{print $1}' | sort | uniq -c | sort -r > a.log
exec<a.log
while read line
do
pv=$(echo $line|awk '{print $1}')
ip=$(echo $line|awk '{print $2}')
if [ $pv -gt $1 ] && [ $(iptables -L -n|grep "$ip"|wc -l) -eq 0];then
itables -A INPUT -s $ip -j DROP
fi
done
}
main 1024
0x09 字符串截取
描述: 在shell中截取字符串的常用方法,前面基础文章也将近过此处简单的做一个总结。
语法示例:1
2
3
4
5
6
7
8
9
10
11
12
13
14
15
16
17
18
19${#var} # 字符串长度
${var#*/} # 获取尾部子字符串 *号在分隔符的前面,就去掉其之前的字符 (首个 / 后的值)
${var##*/} # (最尾 / 后的值)
${var%/*} # 获取头部子字符串 *号在分隔符的前面,就去掉其之前的字符 (最尾 / 前的值)
${var%%/*} # (首个 / 前的值)
${var:start:len} # 指定从左边第几个字符开始以及子串中字符的个数
${var:start} # 从左边第几个字符开始一直到结束
${var:0-start:len} # 从右边第几个字符开始以及字符的个数
${var:0-start} # 从右边第几个字符开始一直到结束
${var/dir/path} # 表示将变量中第一个 dir 提换为 path
${var//dir/path} # 表示将变量中全部 dir 提换为 path
${file-my.txt} # 表示假如 $file 没设定,则使用 my.txt 作传回值。(空值及非空值时不作处理)
${file:-my.txt} # 表示假如 $file 没设定或为空值,则使用 my.txt 作传回值。 (非空值时不作处理)
${file+my.txt} # 表示假如 $file 设为空值或非空值,均使用 my.txt 作传回值。(没设定时不作处理)
${file:+my.txt} # 表示假如 $file 为非空值,则使用 my.txt 作传回值。 (没设定及空值时不作处理)
${file=my.txt} # 表示假如 $file 没设定,则使用 my.txt 作传回值,同时将 $file 赋值为 my.txt 。 (空值及非空值时不作处理)
${file:=my.txt} # 表示假如 $file 没设定或为空值,则使用 my.txt 作传回值,同时将 $file 赋值为 my.txt 。 (非空值时不作处理)
${file?my.txt} # 表示假如 $file 没设定,则将 my.txt 输出至 STDERR。 (空值及非空值时不作处理)
${file:?my.txt} # 表示假如 $file 没设定或为空值,则将 my.txt 输出至 STDERR。 (非空值时不作处理)
总结说明:1
2
3
4# 删除最小的匹配前缀
## 删除最大的匹配前缀
% 删除最小的匹配后缀
%% 删除最大的匹配后缀
示例演示:1
2
3
4
5
6
7
8
9
10
11
12
13
14
15
16
17
18
19
20
21
22
23
24
25
26
27#!/bin/bash
# Description: Shell总字符串截取总结.
str="https://blog.weiyigeek.top/about/me"
# 原字符串输出
echo "string: [${str}]"
# 获得字符串的长度
length=${#str}; echo "length: [${length}]"
# 获得尾部字符串,分割符为'/'
substr=${str#*/};echo "substr: [${substr}]"
substr=${str##*/};echo "substr: [${substr}]"
# 获得头部字符串,分割符为'/'
headstr=${str%/*};echo "headstr: [${headstr}]"
headstr=${str%%/*};echo "headstr: [${headstr}]"
# 获得指定数量的字符串
numstr=${str:0:8};echo "numstr: [${numstr}]"
numstr=${str:8};echo "numstr: [${numstr}]"
numstr=${str:0-${length}:8};echo "numstr: [${numstr}]"
numstr=${str:0-8};echo "numstr: [${numstr}]"
# 指定字符替换字符串中字符
replstr=${str/https/ftp};echo "replstr: [${replstr}]"
replstr=${str/./-};echo "replstr: [${replstr}]"
replstr=${str//about/index};echo "replstr: [${replstr}]"
# 针对不同的变量状态赋值 (没设定、空值、非空值)
appid=${APP_ID:-NULL}; echo "appid: [${appid}]" # 加有 : 没设定或为空值
appname=${APP_NAME:=null} ;echo "appname: [${appname}]"
appstderr=${APP_STDERR:?null};echo "appstderr: [${appstderr}]"
appadd=${APP_ADD:+null};echo "appadd: [${appadd}]"
执行结果:1
2
3
4
5
6
7
8
9
10
11
12
13
14
15
16
17./demo.sh
string: [https://blog.weiyigeek.top/about/me]
length: [35]
substr: [/blog.weiyigeek.top/about/me]
substr: [me]
headstr: [https://blog.weiyigeek.top/about]
headstr: [https:]
numstr: [https://]
numstr: [blog.weiyigeek.top/about/me]
numstr: [https://]
numstr: [about/me]
replstr: [ftp://blog.weiyigeek.top/about/me]
replstr: [https://blog-weiyigeek.top/about/me]
replstr: [https://blog.weiyigeek.top/index/me]
appid: [NULL]
appname: [null]
./demo.sh: line 26: APP_STDERR: null
0x0n 杂类脚本
示例1.Linux系统信息获取 weiyigeek.top-1
2
3
4
5
6
7
8
9
10
11
12
13
14
15
16
17
18
19
20
21
22
23
24
25
26
27
28
29
30
31
32
33
34
35
36
37
38
39
40
41
42
43
44
45
46
47
48
49
50
51
52
53
54#!/bin/bash
#zhushi:Linux 系统信息获取
#Author_Name=Weiyi
clear
if [ $# -eq 0 ];then # "$#" 提取位置参数的个数
reset_terminal=$(tput sgr0) #设置高亮输出
#Check OS Type (系统类型)
os=$(uname -o)
echo -e '\E[32m' "OS Type (系统类型):" $reset_terminal $os
#Check OS Release Version and Name (系统发行版本及名字)
os_Rv=$(lsb_release -a | grep "Description" |awk '{print $2 " " $3 " " $4 " "$5$6 }')
echo -e '\E[32m' "OS Release Version and Name (系统发行版本及名字):" $reset_terminal $os_Rv
#Check Architecture (系统Cpu 386 还是 X64架构)
os_Ar=$(uname -m)
echo -e '\E[32m' "Architecture (系统Cpu 386 还是 X64架构):" $reset_terminal $os_Ar
#Check Kernel Release (内核版本)
os_Kr=$(uname -r)
echo -e '\E[32m' "Kernel Release (内核版本)" $reset_terminal $os_Kr
#Check hostname
os_hostname=$(echo $HOSTNAME)
echo -e '\E[32m' "OS Hostname (主机名):" $reset_terminal $os_hostname
#Check Internal IP (内部IP)
os_InIP=$(hostname -I)
echo -e '\E[32m' "Internal IP (内部IP):" $reset_terminal $os_InIP
#Check External IP (外部IP)
os_ExIP=$(curl -s http://ipecho.net/plain)
echo -e '\E[32m' "External IP (外部IP):" $reset_terminal $os_ExIP
#Check DNS
os_Dns=$(cat /etc/resolv.conf |grep -E "\<nameserver[ ]+" |awk '{print $NF}')
# "\<nameserver[ ]+" 表示匹配以nameserver开头的多个[ ]+ //空格
# "$NF" 默认以空格为分割符打印他得最后一行
echo -e '\E[32m' "OS DNS (系统DNS):" $reset_terminal $os_Dns
#Check IF Connected To Internet or not (是否能连接英特网)
ping -c 2 www.baidu.com &>/dev/null && echo "Internet:Connected(正常通信)" || echo "Internet:Disconnected(不能正常通信)"
#Check logged In Users (当前登陆的用户)
who >/tmp/who
echo -e '\E[32m' "Logged In Users (当前登陆的用户)" $reset_terminal && cat /tmp/who
rm -rf /tmp/who
#Check Proc Information
echo -e '\E[35m]' "########### Proc info (内存使用信息) ##############\n"
system_mem_usages=$(awk '/MemTotal/{total=$2}/MemFree/{free=$2}END{print (total-free)/1024}' /proc/meminfo)
echo -e '\E[32m' "System Mem Usages (当前系统使用内存信息-MB):" $reset_terminal $system_mem_usages
application_mem_usages=$(awk '/MemTotal/{total=$2}/MemFree/{free=$2}/^Cached/{cached=$2}/Buffers/{buffers=$2}END{print (total-free-cached-buffers)/1024}' /proc/meminfo)
echo -e '\E[32m' "Application Mem Usages (当前应用使用内存信息-MB):" $reset_terminal $application_mem_usages
#Check Cpu Information >> load average后面分别是1分钟、5分钟、15分钟的负载情况
echo -e '\E[35m]' "########### Cpu load info (Cpu负载信息) ##############\n"
load_average=$(top -n 1 -b |grep "load average:" |awk '{print $10 $11 $12}')
echo -e '\E[32m' "Cpu load info (Cpu负载信息):" $reset_terminal $load_average
#Check Disk Information
echo -e '\E[35m]' "########### Disk info (磁盘使用信息) ##############\n"
disk_info=$(df -h |grep -vE "Filesystem|tmpfs" |awk '{printf $1 "\t" $5 "\n"}')
# -p 使用输出更紧凑
echo -e '\E[32m' "Disk Usages (磁盘使用信息):" $reset_terminal $disk_info
fi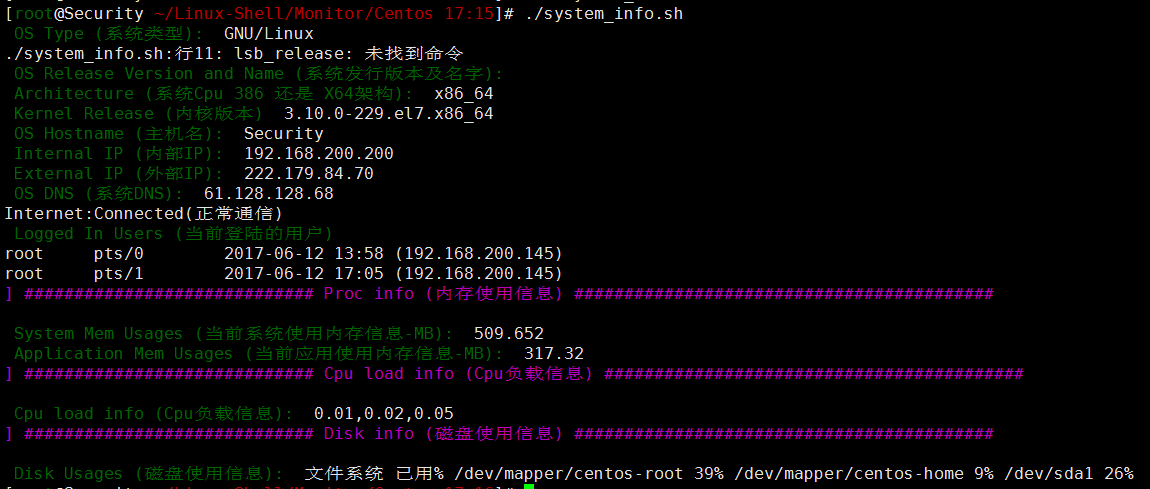
示例2.进程监控1
2
3
4
5
6
7
8
9
10
11
12#!/bin/bash
#zhushi:httpd进程restart and if
test=$(ps aux | grep "httpd" | grep -v "grep") #截取Httpd进程,并把结果赋予变量test
if [ -n "$test" ];then
#if test 的值不为空,则执行then中的命令
echo "$(date) httpd is ok!" >> /tmp/autostart-acc.log
echo "httpd服务正常"
else
echo "http服务异常/正在重新启动httpd服务"
/etc/rc.d/init.d/httpd restart &> /dev/null
echo "$(date) restart httpd!!" >> /tmp/autostart-err.log
fi
示例3.apachelog日志分析1
2
3
4
5
6
7
8
9
10
11
12
13
14
15
16
17
18
19
20
21
22
23
24
25
26
27
28
29
30
31
32
33
34
35
36
37
38
39
40
41
42
43
44
45
46
47
48
49
50
51#!/bin/bash
#zhushi:Http status number
#author_Name:Weiyi
resettem=$(tput sgr0)
read -t 30 -p "Please,Input access Httpd log pash:" logfile
#Check http status Functions
Check_http_status(){
http_status_codes=$(cat $logfile |grep -ioE 'HTTP\/1\.[0|1]\"[[:blank:]][0-9]{3}' |awk -F "[ ]+" '{
if ( $2>100 && $2<200 )
{i++}
else if ( $2>200 && $2<300 )
{j++}
else if ( $2>300 && $2<400 )
{k++}
else if ( $2>400 && $2<500 )
{n++}
else if ( $2>500 )
{p++}
}END{
print i?i:0,j?j:0,k?k:0,n?n:0,p?p:0,i+j+k+n+p
}')
echo -e '\E[33m' "The Number of http status[100+]:" $resettem ${http_status_codes[0]}
echo -e '\E[33m' "The Number of http status[200+]:" $resettem ${http_status_codes[1]}
echo -e '\E[33m' "The Number of http status[300+]:" $resettem ${http_status_codes[2]}
echo -e '\E[33m' "The Number of http status[400+]:" $resettem ${http_status_codes[3]}
echo -e '\E[33m' "The Number of http status[500+]:" $resettem ${http_status_codes[4]}
echo -e '\E[33m' "All Request numbers:" $resettem ${http_status_codes[5]}
}
#Check http Code 404/403 Functions
Check_http_code()
{
http_code=$(cat $logfile |grep -ioE 'HTTP\/1\.[0|1]\"[[:blank:]][0-9]{3}' |awk -v total=0 -F '[ ]+' '{
if ( $2 != "" )
{code[$2]++;total++}
else
{exit}
}END{
print code[404]?code[404]:0,code[403]?code[403]:0,total
}')
echo -e '\E[33m' "The Number of http status[404]:" $resettem ${http_status_codes[0]}
echo -e '\E[33m' "The Number of http status[403]:" $resettem ${http_status_codes[1]}
echo -e '\E[33m' "All Request numbers:" $resettem ${http_status_codes[2]}
}
#调用函数
Check_http_status
echo -e '\n'
Check_http_code
示例4.Monitor脚本设置1
2
3
4
5
6
7
8
9
10
11
12
13
14
15
16
17
18
19
20
21
22
23
24#!/bin/bash
# tput sgr0 终端号关闭
resettem=$(tput sgr0)
declare -A ssharray
i=0
number=""
for script_file in `ls -I "monitor_man.sh" ./`;do
echo -e "\e[1;35m" "The script file:" ${i} '==>' ${resettem} ${script_file}
grep "#zhushi:" ${script_file} # 获取备注信息
ssharray[$i]=${script_file} # 将每个文件传人数组之中
number="${number} | ${i}" # 拼接子符
i=$(( i+1 ))
done
while true
do
read -t 30 -p "Please input a number[ ${number} ]:" file # 输出number变量
if [[ ! ${file} =~ ^[0-9]+ ]];then
exit 0
fi
/bin/sh ./${ssharray[$file]} # 传入数组之中,并执行
done
实例5:日志访问数量统计1
2
3
4
5
6
7
8
9# 错误输入到err.txt
result=0
for i in {20..30};
do
count=$(grep -c "/cj/get.do?ksh=" localhost_access_log.2020-11-${i}.txt 2> err.txt)
echo $count
result=$(expr $result + $count)
done
echo $result
示例5.字符串截取之文件拷贝1
for i in $(cat 1.txt); do src=${i%-*} ; target=${i#*-}; srcname="${src%.*}"; targetname="${target%/*}";mkdir -p ${targetname}; find ${srcname}* -exec cp {} ${target} \; ; done
示例6.按照身份证进行字符串分隔创建目录1
2
3
4
5
6
7
8
9
10
11
12
13
14
15
16
17
18
19
20
21
22
23
24
25
26
27
28
29
30
31
32
33
34
35
36#!/bin/bash
#
# $ find gz2020/photo -type f > ks.txt
for id in $(cat ks.txt); do
# 判断路径以及身份证类别
if [[ ${#id} -ne 29 ]]; then
echo ${id} >> exception.txt
else
photo_name="${id##*/}"
id_split="${id:7:2}/${id:9:4}/${id:13:4}"
target_dir="/mnt/f/2020/pz_webchat/${id_split}"
target_file="${target_dir}/${photo_name}"
if [[ ! -e ${target_dir} ]]; then
mkdir -p ${target_dir}
fi
# 区分后缀大小写
ignore_case=$(echo "${target_file}" | grep -c "JPG")
if [[ ${ignore_case} -eq 0 ]];then
if [[ ! -e ${target_file} ]]; then
cp -a ${id} ${target_file} || echo ${id} >> notcopy.txt
else
echo "normal - ${target_file}" >> exsit.txt
fi
else
photo_name_case="${photo_name%.*}.jpg"
target_file_case="${target_dir}/${photo_name_case}"
if [[ ! -e ${target_file_case} ]]; then
cp -a ${id} ${target_file_case} || echo ${id} >> notcopy.txt
else
echo "case - ${target_file} -> ${target_file_case}" >> exsit_case.txt
fi
fi
fi
done
示例7.Jenkins与K8s集群部署脚本实现部署、回退以及覆盖部署
脚本清单:1
2
3
4
5
6
7
8
9
10
11
12
13
14
15
16
17
18
19
20
21
22
23
24
25
26
27
28
29
30
31
32
33
34
35
36
37
38
39
40
41
42
43
44
45
46
47
48
49
50
51
52
53
54
55
56
57
58
59
60
61
62
63
64
65
66
67
68
69
70
71
72
73
74#!/bin/sh
export K8sMaster="${DEPLOY_USER}@${DEPLOY_HOST}"
export AppName="${APP_FILE##*/}"
export FindAppName=$(find ${WORKSPACE} -maxdepth 2 -type f -name ${AppName})
if [ "${FindAppName}" != "" ]; then
echo "[-Msg]: ${FindAppName} ./${APP_NAME} Copying...."
cp -rf ${FindAppName} ./${APP_NAME}
else
echo "[-Error]: FindAppName param error!"
exit 1
fi
function judge () {
export ExistResult=$(ssh -p ${DEPLOY_PORT} ${K8sMaster} "ls ${APP_DIR} | grep ${RELEASE_VERSION} | wc -l")
}
function deploy () {
if [[ ${ExistResult} -eq 0 || "${RELEASE_VERSION}" == "master" ]];then
scp -P ${DEPLOY_PORT} "${APP_NAME}" ${K8sMaster}:${APP_DIR}${APP_NAME}
else
echo "[-Msg]: /${APP_NAME} current Deploy....."
fi
# 部署脚本
if [[ "${RELEASE_VERSION}" == "master" ]];then
ssh -p ${DEPLOY_PORT} ${K8sMaster} "kubectl -n ${K8S_NAMESPACE} delete pod -l ${K8S_SELECTOR}"
else
ssh -p ${DEPLOY_PORT} ${K8sMaster} "kubectl apply -f ${APP_DIR}${JOB_NAME}.yaml"
fi
}
function rollback () {
if [[ ${ExistResult} -ne 0 ]];then
ssh -p ${DEPLOY_PORT} ${K8sMaster} "kubectl apply -f ${APP_DIR}${JOB_NAME}.yaml"
else
echo "[-Eroor]: /${APP_NAME} version not exsit....."
exit 1
fi
}
function redeploy () {
# 如果是以前部署过则删除以前部署的项目目录,否则重新部署;
if [[ "v${GIT_COMMIT}" = "v${GIT_PREVIOUS_SUCCESSFUL_COMMIT}" || ${ExistResult} -gt 0 ]];then
echo -e "[-Message]: ${RELEASE_VERSION} Version Exsit !"
ssh -p ${DEPLOY_PORT} ${K8sMaster} "find ${APP_DIR} -d -maxdepth 1 -type f -name ${APP_NAME}"
scp -P ${DEPLOY_PORT} "${APP_NAME}" ${K8sMaster}:${APP_DIR}${APP_NAME}
fi
# 重新部署
deploy
}
# 判断是否存在历史版本
judge
case ${PREJECT_OPERATION} in
"deploy")
echo "1.deploy"
deploy
;;
"rollback")
echo "2.rollback"
rollback
;;
"redeploy")
echo "3.redeploy"
redeploy
;;
*)
echo "[-Error] : params.PREJECT_OPERATION Param Error!"
exit 1
;;
esac
X

你好看友,欢迎关注博主微信公众号哟! ❤
这将是我持续更新文章的动力源泉,谢谢支持!(๑′ᴗ‵๑)
温馨提示: 未解锁的用户不能粘贴复制文章内容哟!
方式1.请访问本博主的B站【WeiyiGeek】首页关注UP主,
将自动随机获取解锁验证码。
Method 2.Please visit 【My Twitter】. There is an article verification code in the homepage.
方式3.扫一扫下方二维码,关注本站官方公众号
回复:验证码
将获取解锁(有效期7天)本站所有技术文章哟!
@WeiyiGeek - 为了能到远方,脚下的每一步都不能少
欢迎各位志同道合的朋友一起学习交流,如文章有误请在下方留下您宝贵的经验知识,个人邮箱地址【master#weiyigeek.top】或者个人公众号【WeiyiGeek】联系我。
更多文章来源于【WeiyiGeek Blog - 为了能到远方,脚下的每一步都不能少】, 个人首页地址( https://weiyigeek.top )

专栏书写不易,如果您觉得这个专栏还不错的,请给这篇专栏 【点个赞、投个币、收个藏、关个注、转个发、赞个助】,这将对我的肯定,我将持续整理发布更多优质原创文章!。
最后更新时间:
文章原始路径:_posts/系统运维/Linux/Shell编程/Shell脚本编程示例大全.md
转载注明出处,原文地址:https://blog.weiyigeek.top/2019/7-8-
本站文章内容遵循 知识共享 署名 - 非商业性 - 相同方式共享 4.0 国际协议