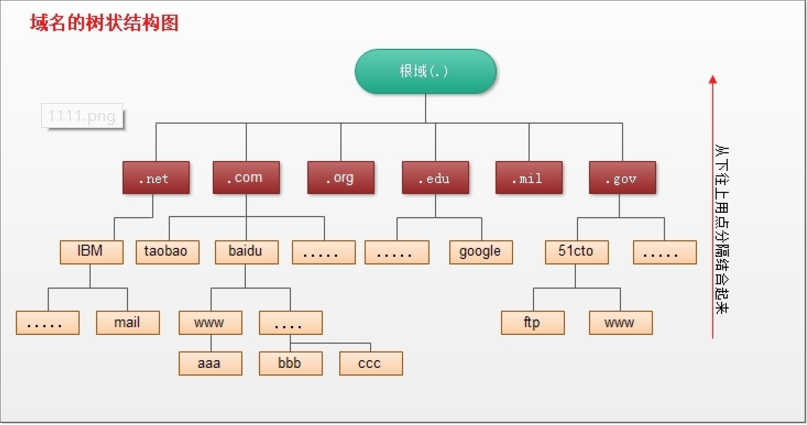
3.次级域(Second Level Domains): 个人/企业能够买到的域名,比如 baidu.com, 每个次级域名都有一到多个权威 DNS 服务器,这些 DNS 服务器会以 NS 记录的形式保存在对应的顶级域名(TLD)服务器中。权威域名服务器则负责给出最终的解析结果:ip 地址(A 记录 ),另一个域名(CNAME 记录)、另一个 DNS 服务器(NS 记录)等。
4.子域(Sub Domians): *.baidu.com 统统都是 baidu.com 的子域。每一个子域都可以有自己独立的权威 DNS 服务器,这通过在子域中添加 NS 记录实现。
Tips: 目前国际 DNS 系统中已有上千个 TLD,包括中文「.我爱你」甚至藏文域名,详细列表参见 IANA TLD 数据库(http://www.iana.org/domains/root/db) , 除了国际可用的 TLD 还有一类类似「内网 IP 地址」的“私有 TLD”,最常见的比如 xxx.local xxx.lan,被广泛用在集群通信中。
公共 DNS 服务器:缓存了大量的 DNS 记录,有效地降低了上游 DNS 服务器的压力,也加快了网络上的 DNS 查询速度。例如Google 的 8.8.8.8,腾讯 的 114.114.114.114, 阿里 的 233.6.6.6。
DNS 泛解析通配符 : DNS 记录允许使用通配符 ,并且该通配符可匹配任意级数的子域!!!比如 *.example.com 就可以匹配所有的一二三四级域名等等,但是无法匹配 example.com 本身!
TTL (Time To Live): 上面讲了公共 DNS 服务器通过缓存技术,降低了上游 DNS 服务器的压力,也加快了网络上的 DNS 查询速度。可缓存总得有个过期时间吧!为了精确地控制 DNS 记录的过期时间,每条 DNS 记录都要求自定义设置一个时间属性——TTL,单位为秒。任何一条 DNS 缓存,在超过过期时间后都必须丢弃!另外在没超时的时候,DNS 缓存也可以被主动或者被动地刷新。
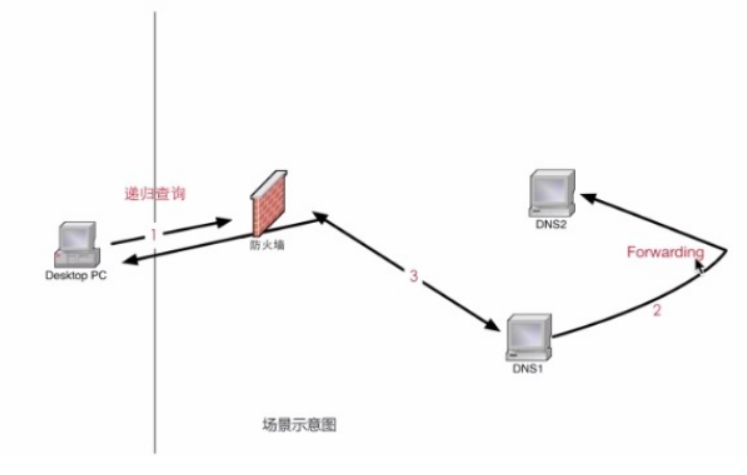
本地 DNS 服务器:它只在当前局域网内有效,企业常用一般通过 DHCP 或者手动配置的方式,使内网的服务器都默认使用局域网 DNS 服务器进行解析,该服务器可以只解析自己的私有 DNS 域,而将其他 DNS 域的解析 forward 到公网 DNS 解析器去。
# 2.0 A的RDATA格式 # ADDRESS:IPV4地址 www.baidu.com. 1154 IN CNAME www.a.shifen.com. www.a.shifen.com. 36 IN A 111.13.100.92 www.a.shifen.com. 36 IN A 111.13.100.91
# 2.1 PTR的RDATA格式(注意地址是反着来的此处为域名对应的地址192.168.100.7) 7.100.in-addr.arpa. IN PTR www.example.com.
# (3) make 执行构建 /usr/local/bind-9.16.9# make && make install
# (4) 版本验证 /usr/local/bind# ls & ls bin/ # bin include lib sbin share # arpaname delv dig host mdig named-rrchecker nslookup nsupdate /usr/local/bind# named -v # BIND 9.16.9 (Stable Release) <id:b3f41b7>
# (5 )dns 解析软件相关软连接 for i in /usr/local/bind/sbin/*; do ln -f -s $i /usr/local/sbin; done for i in /usr/local/bind/bin/*; do ln -f -s $i /usr/local/bin; done
Step 3.运行Bind用户以及组创建
1 2
# 选项 -r 系统不会创建家目录 sudo groupadd -g 53 -r named && sudo useradd -g named -r named
# (2) 区域数据文件验证 root@ubuntu-253:/var/named/private# /usr/local/bind/sbin/named-checkzone weiyigeek.top weiyigeek.top.zone # zone weiyigeek.top/IN: loaded serial 20200711 # OK root@ubuntu-253:/var/named/private# /usr/local/bind/sbin/named-checkzone 12.168.192.in-addr.arpa 192.168.12.zone # zone 12.168.192.in-addr.arpa/IN: loaded serial 20200711 # OK
# (3) 使用默认选项测试您的二进制文件 named 启动错误信息查看(Debug) named -u named -g # 28-Nov-2020 21:30:44.008 found 4 CPUs, using 4 worker threads # 28-Nov-2020 21:30:44.008 using 4 UDP listeners per interface # 28-Nov-2020 21:30:44.012 using up to 21000 sockets # 28-Nov-2020 21:30:44.012 loading configuration from '/etc/named.conf' # 28-Nov-2020 21:30:44.012 reading built-in trust anchors from file '/etc/bind.keys' # 28-Nov-2020 21:30:44.012 using default UDP/IPv4 port range: [32768, 60999] # 28-Nov-2020 21:30:44.012 using default UDP/IPv6 port range: [32768, 60999] # 28-Nov-2020 21:30:44.016 listening on IPv4 interface lo, 127.0.0.1#53 # 28-Nov-2020 21:30:44.016 listening on IPv4 interface ens160, 192.168.1.254#53 # 28-Nov-2020 21:30:44.016 listening on IPv4 interface docker0, 172.17.0.1#53 # 28-Nov-2020 21:30:44.016 IPv6 socket API is incomplete; explicitly binding to each IPv6 address separately # 28-Nov-2020 21:30:44.016 listening on IPv6 interface ens160, fe80::250:56ff:fe8a:cf24%2#53 # 28-Nov-2020 21:30:44.020 generating session key for dynamic DNS # 28-Nov-2020 21:30:44.020 sizing zone task pool based on 0 zones # 28-Nov-2020 21:30:44.020 none:98: 'max-cache-size 90%' - setting to 7165MB (out of 7961MB) # 28-Nov-2020 21:30:44.040 obtaining root key for view _default from '/etc/bind.keys' # 28-Nov-2020 21:30:44.040 set up managed keys zone for view _default, file 'managed-keys.bind' ..... # 30-Nov-2020 21:48:53.576 none:98: 'max-cache-size 90%' - setting to 7165MB (out of 7961MB) # 30-Nov-2020 21:48:53.592 configuring command channel from '/etc/bind/rndc.key' # 30-Nov-2020 21:48:53.592 command channel listening on 127.0.0.1#953 # 30-Nov-2020 21:48:53.592 configuring command channel from '/etc/bind/rndc.key' # 30-Nov-2020 21:48:53.592 couldn't add command channel ::1#953: address not available # 30-Nov-2020 21:48:53.592 not using config file logging statement for logging due to -g option # 30-Nov-2020 21:48:53.604 managed-keys-zone: loaded serial 9 # 30-Nov-2020 21:48:53.612 zone 12.168.192.in-addr.arpa/IN: loaded serial 20200711 # 30-Nov-2020 21:48:53.612 zone weiyigeek.top/IN: loaded serial 20200711 # 30-Nov-2020 21:48:53.612 all zones loaded # 30-Nov-2020 21:48:53.612 running # 30-Nov-2020 21:48:53.612 zone weiyigeek.top/IN: sending notifies (serial 20200711) # 30-Nov-2020 21:48:53.612 zone 12.168.192.in-addr.arpa/IN: sending notifies (serial 20200711) # 30-Nov-2020 21:48:53.668 managed-keys-zone: No DNSKEY RRSIGs found for '.': success
# (2) 软件源设置与系统更新 sudo cp /etc/apt/sources.list{,.bak} sudo tee /etc/apt/sources.list <<'EOF' #阿里云Mirrors - Ubuntu deb http://mirrors.aliyun.com/ubuntu/ focal main restricted universe multiverse deb-src http://mirrors.aliyun.com/ubuntu/ focal main restricted universe multiverse
deb http://mirrors.aliyun.com/ubuntu/ focal-security main restricted universe multiverse deb-src http://mirrors.aliyun.com/ubuntu/ focal-security main restricted universe multiverse
deb http://mirrors.aliyun.com/ubuntu/ focal-updates main restricted universe multiverse deb-src http://mirrors.aliyun.com/ubuntu/ focal-updates main restricted universe multiverse
deb http://mirrors.aliyun.com/ubuntu/ focal-proposed main restricted universe multiverse deb-src http://mirrors.aliyun.com/ubuntu/ focal-proposed main restricted universe multiverse
deb http://mirrors.aliyun.com/ubuntu/ focal-backports main restricted universe multiverse deb-src http://mirrors.aliyun.com/ubuntu/ focal-backports main restricted universe multiverse EOF sudo apt autoclean && sudo apt update
# (3) 判断时间与时区 ~$ date Sat 20 Mar 2021 11:35:19 PM CST ~$ timedatectl status Local time: Sat 2021-03-20 23:35:00 CST Universal time: Sat 2021-03-20 15:35:00 UTC RTC time: Sat 2021-03-20 15:35:00 Time zone: Asia/Shanghai (CST, +0800) System clock synchronized: yes NTP service: n/a RTC inlocal TZ: no
# (4) 在DNS服务器上安装 bind9 apt install bind9
# (5) 安装成功后目录结构查看主要是配置文件存放目录以及内部域名解析为对应IP的文件 ~$ tree /etc/bind/ /etc/bind/ ├── bind.keys ├── db.0 ├── db.127 ├── db.255 ├── db.empty ├── db.local ├── named.conf # named 主配置文件入口 ├── named.conf.default-zones # - named 本地默认域 ├── named.conf.local # - named 自定义域名(我们内网创建的域名解析相应的配置在此处) ├── named.conf.options # - named 全局配置段 ├── rndc.key └── zones.rfc1918
chmod 755 /etc/init.d/named chkconfig named on && chkconfig --list named
(3) 入坑解决
问题1.error: Python >= 2.7 or >= 3.2 and the PLY package are required for dnssec-keymgr and other Python-based tools. 错误信息:
1 2
configure: error: Python >= 2.7 or >= 3.2 and the PLY package are required for dnssec-keymgr and other Python-based tools. PLY may be available from your OS package manager as python-ply or python3-ply; it can also be installed via pip. To build without Python/PLY, use --without-python. 配置:错误:Python >= 2.7或>= 3.2和PLY包是需要的dnssec-keymgr和其他基于Python的工具。PLY可以从你的OS包管理器作为pythonply或python3 PLY可用;也可以通过pip进行安装。如果不使用Python/PLY进行构建,请使用——不使用Python。
checking whether compiling and linking against OpenSSL works... no configure: error: in'/usr/local/bind-9.16.9': configure: error: OpenSSL/LibreSSL not found
$ cat /etc/bind/named.conf // This is the primary configuration file for the BIND DNS server named. // // Please read /usr/share/doc/bind9/README.Debian.gz for information on the // structure of BIND configuration files in Debian, *BEFORE* you customize // this configuration file. // // If you are just adding zones, please do that in /etc/bind/named.conf.local
include "/etc/bind/named.conf.options"; include "/etc/bind/named.conf.local"; include "/etc/bind/named.conf.default-zones";
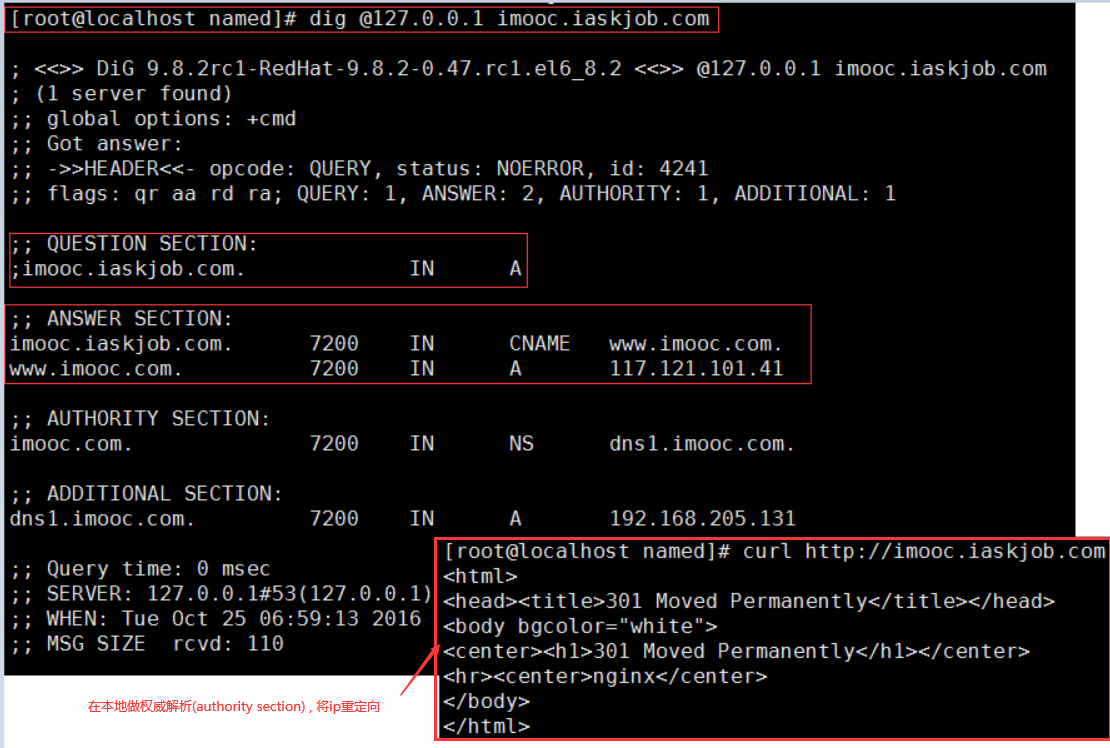
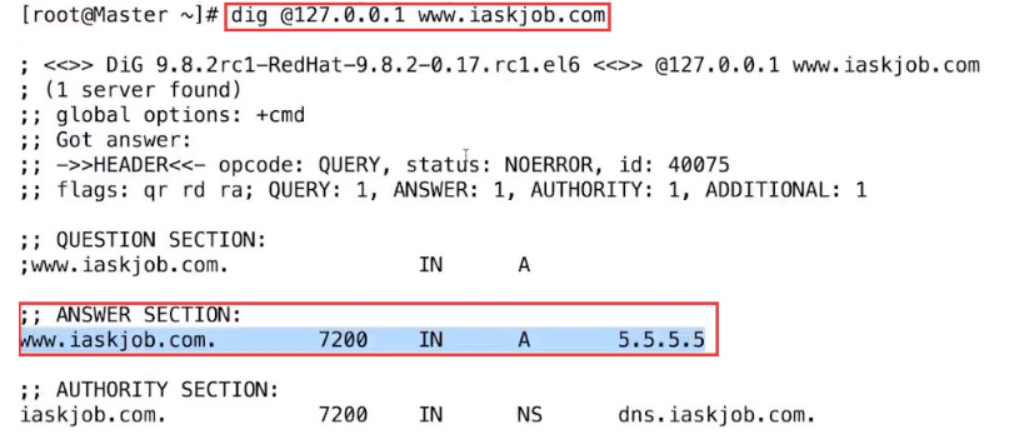
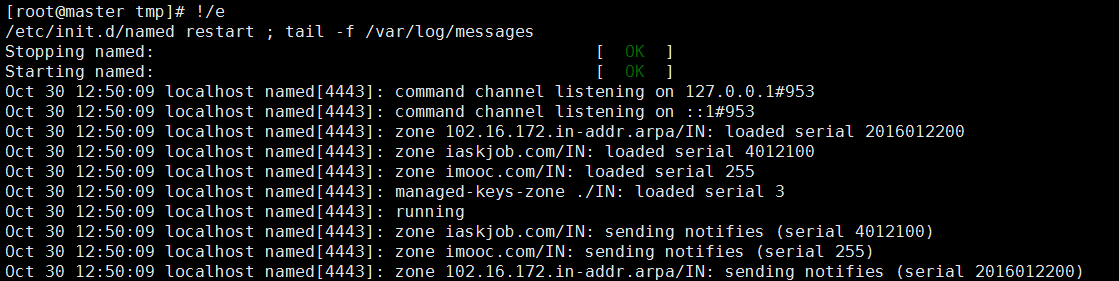
# named.conf 配置 zone "iaskjob.com"{ type master; file "iaskjob.com.zone"; };
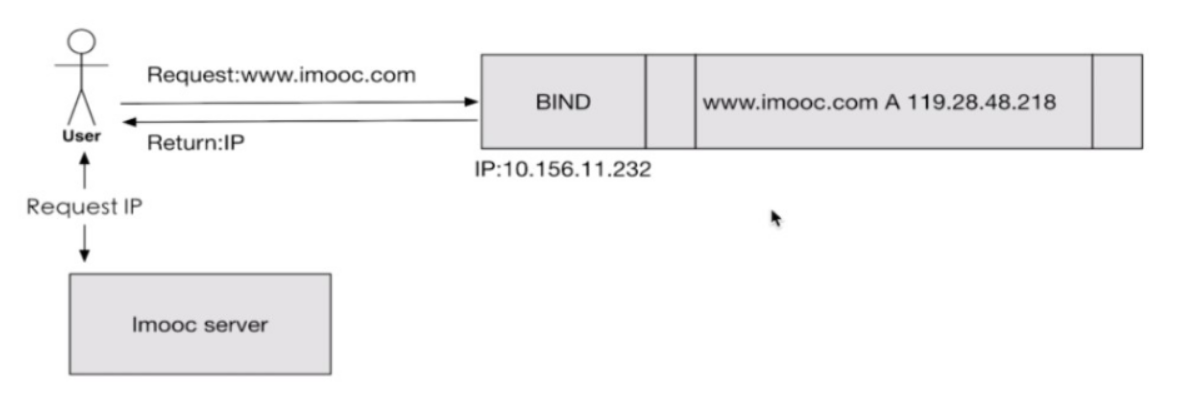
# 修改上面/var/named/imooc.com.zone文件将www的A记录IP地址替换成imooc的IP地址; www.imooc.com. IN A 119.28.48.218
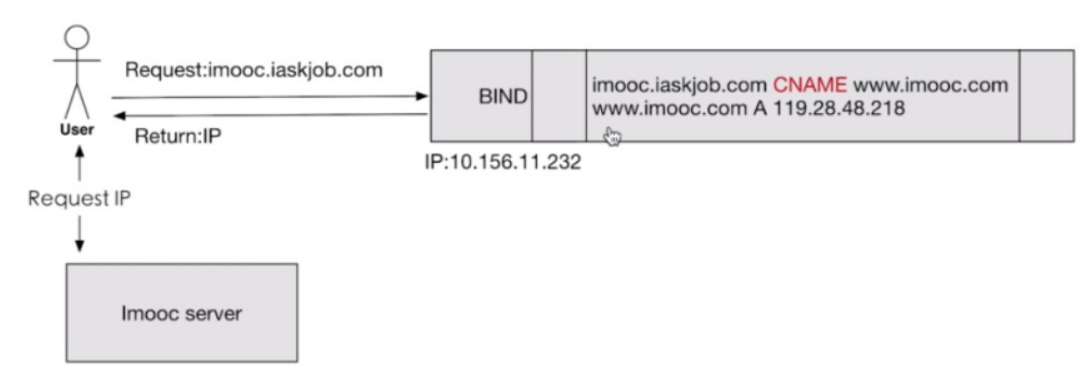
$ vim /var/named/iaskjob.com.zone $TTL 7200 iaskjob.com. IN SOA isakjob.com. iaskjob.163.com. (4012100 1H 15M 1W 1D) iaskjob.com. IN NS dns1.iaskjob.com. dns1.iaskjob.com. IN A 192.168.199.202 # DNS 服务器地址 imooc.iaskjob.com. IN CNAME www.imooc.com. # CNAME 别名记录
# named.conf zone "imooc.com" IN { type master; file "imooc.com.zone"; };
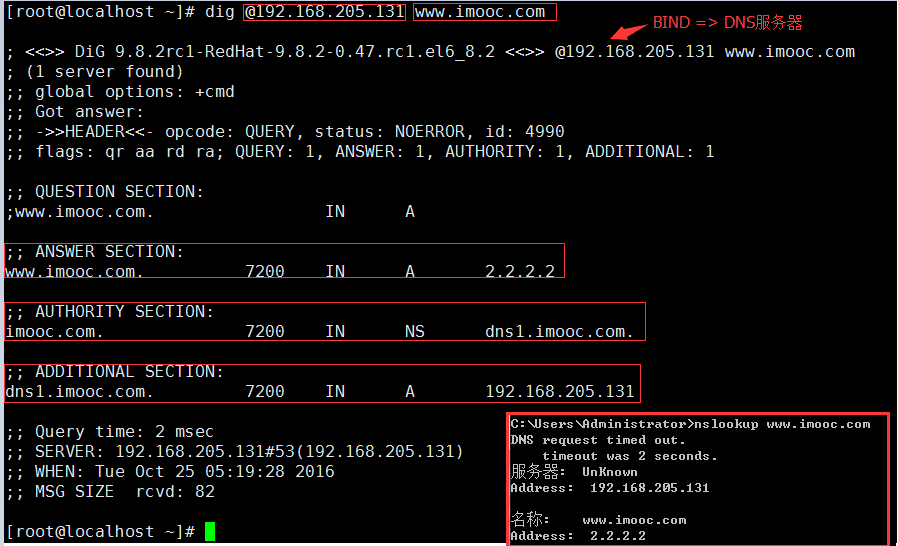
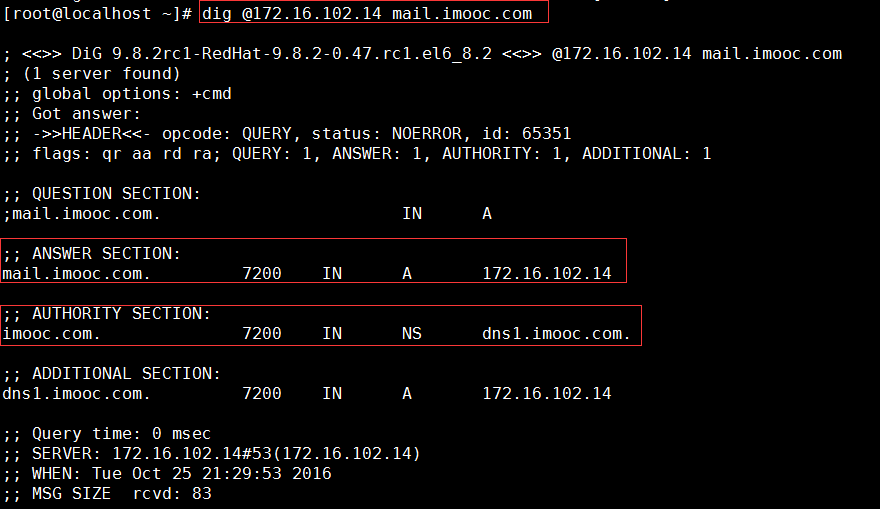
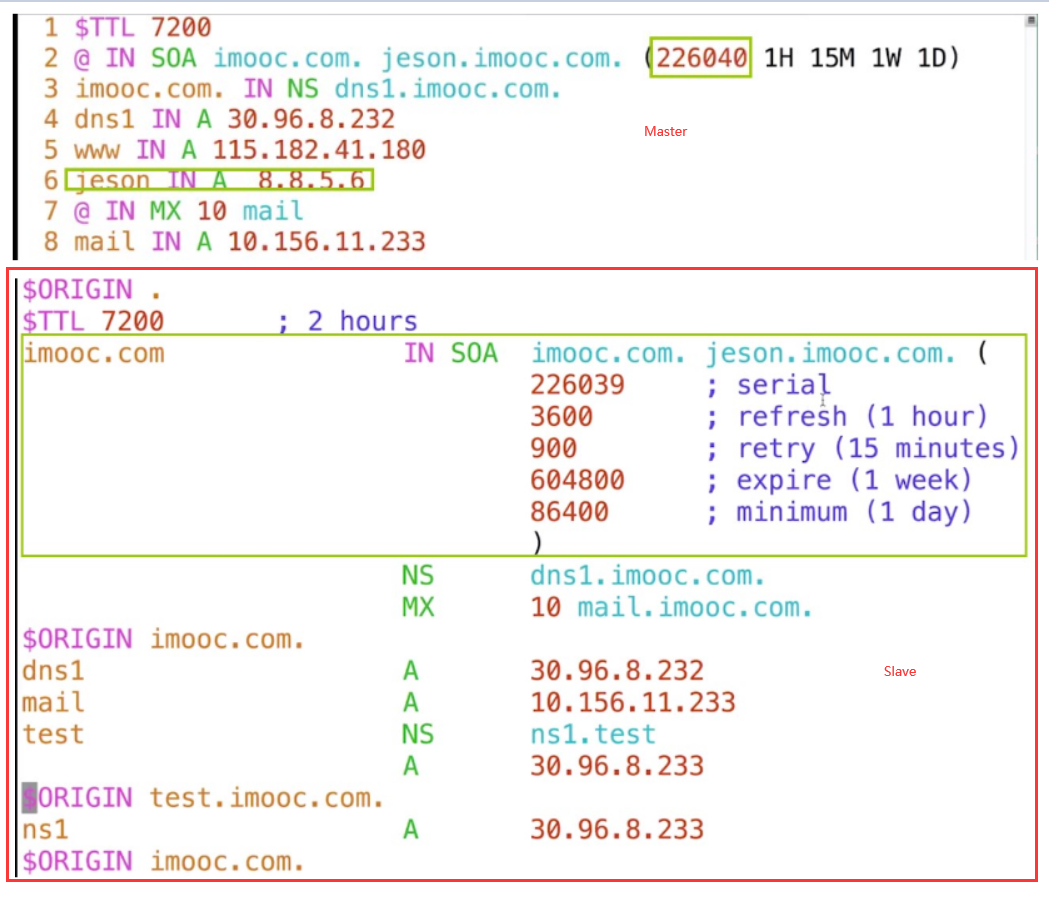
# imooc.com.zone $TTL 7200 imooc.com. IN SOA imooc.com. jeson.imooc.com. ( 222 1H 15M 1W 1D # jeson.imooc.com.其实为邮箱地址:jeson@imooc.com. imooc.com. IN NS dns1.imooc.com. dns1.imooc.com. IN A 172.16.102.14 @ IN MX 10 mail # 邮箱mx解析,总是需要A记录的配合 10为优先级 mail IN A 172.16.102.14 # 内网地址为DNS服务主机的地址
测试:dig @172.16.102.14 mail.imooc.com
weiyigeek.top-正向解析
反向解析(重点)
1 2 3 4 5 6 7 8 9 10 11 12
zone "102.16.172.in-addr.arpa" IN { type master; file "102.16.172.zone"; };
# /var/named/102.16.172.zone $TTL 3600 # SOA起始记录解析,@代172.16.102这个段的主机 @ IN SOA 102.16.172.in-addr.arpa iaskjob.163.com. ( 2016012200 1H 15M 1W 1D ) @ IN NS dns1.imooc.com. 14 IN PTR dns1.imooc.com. # 表示 102.16.172.14 指向 dns.imooc.com 116 IN PTR mail.imooc.com. # 表示 102.16.172.116 指向 mail.imooc.com
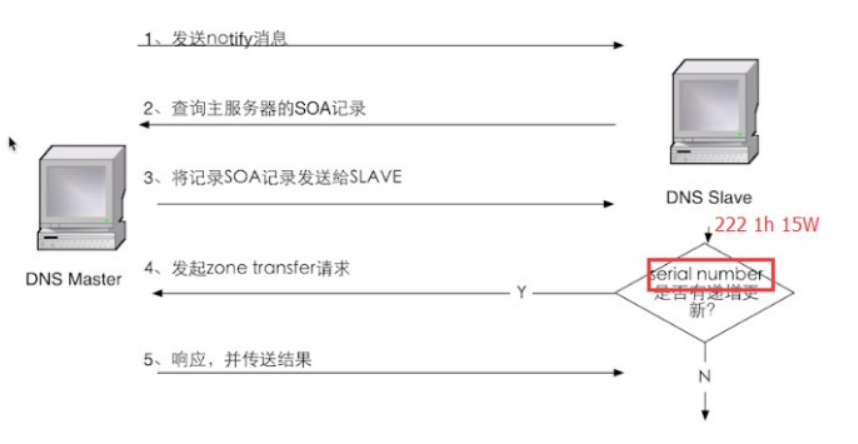
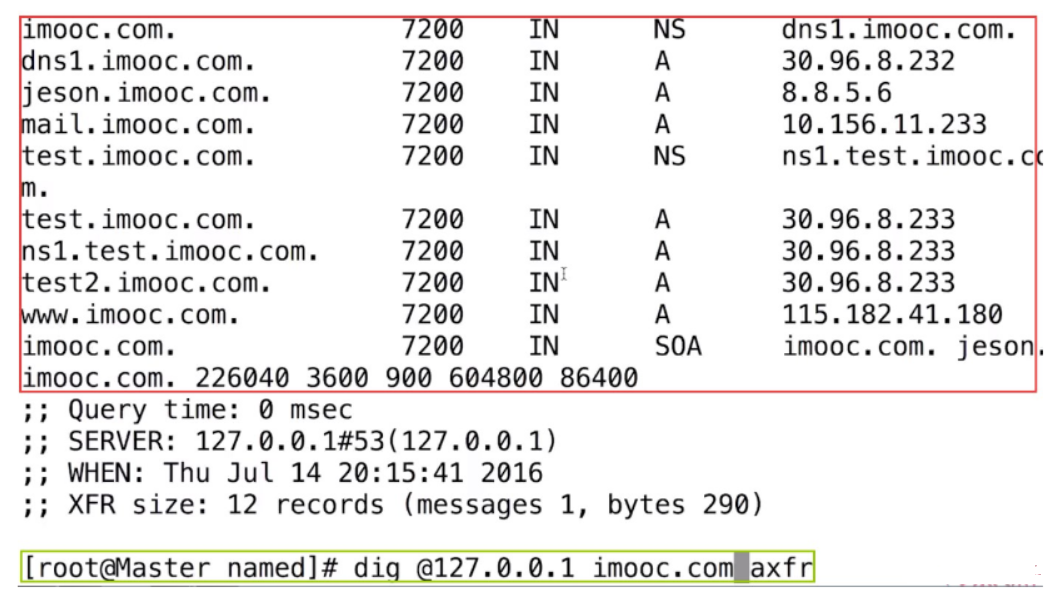
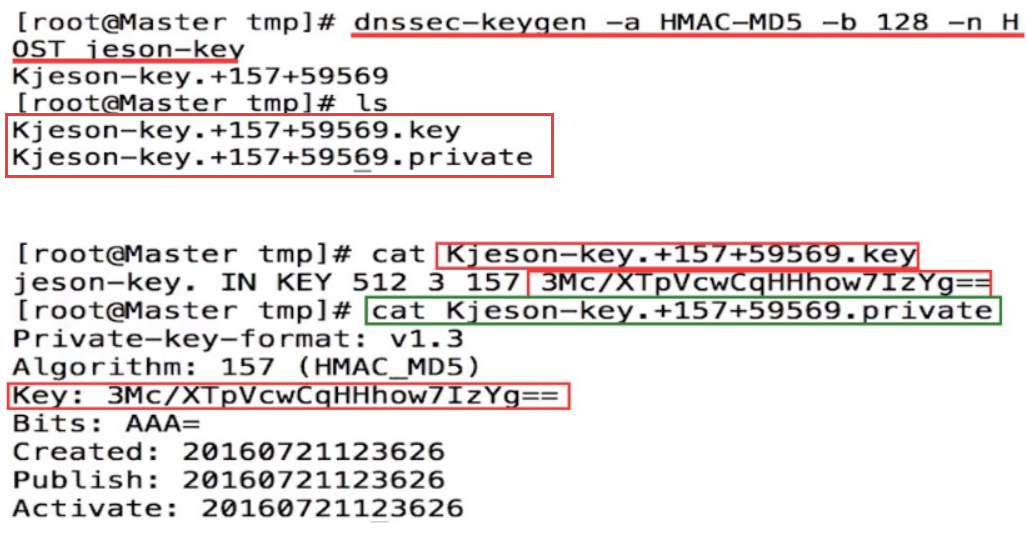
include "/var/named/chroot/etc/jeson-key"; # 注意文件名 zone "imooc.com" IN { type master; notify yes; also-notify {172.16.102.16;}; allow-transfer { key "jeson-key";}; file "imooc.com.zone";
# 配置 Named.conf options { directory "/var/named"; } include "/var/named/chroot/etc/jeson-key"; # 注意文件名 server 30.96.8.232 { # 主DNS服务器 keys {"jeson-key"} }
zone "weiyigeek.com" { type master; file "weiyigeek.com.zone" }
zone "imooc.com" { type slave; masters {30.96.8.232;}; file "slaves/imooc.com.zone" }
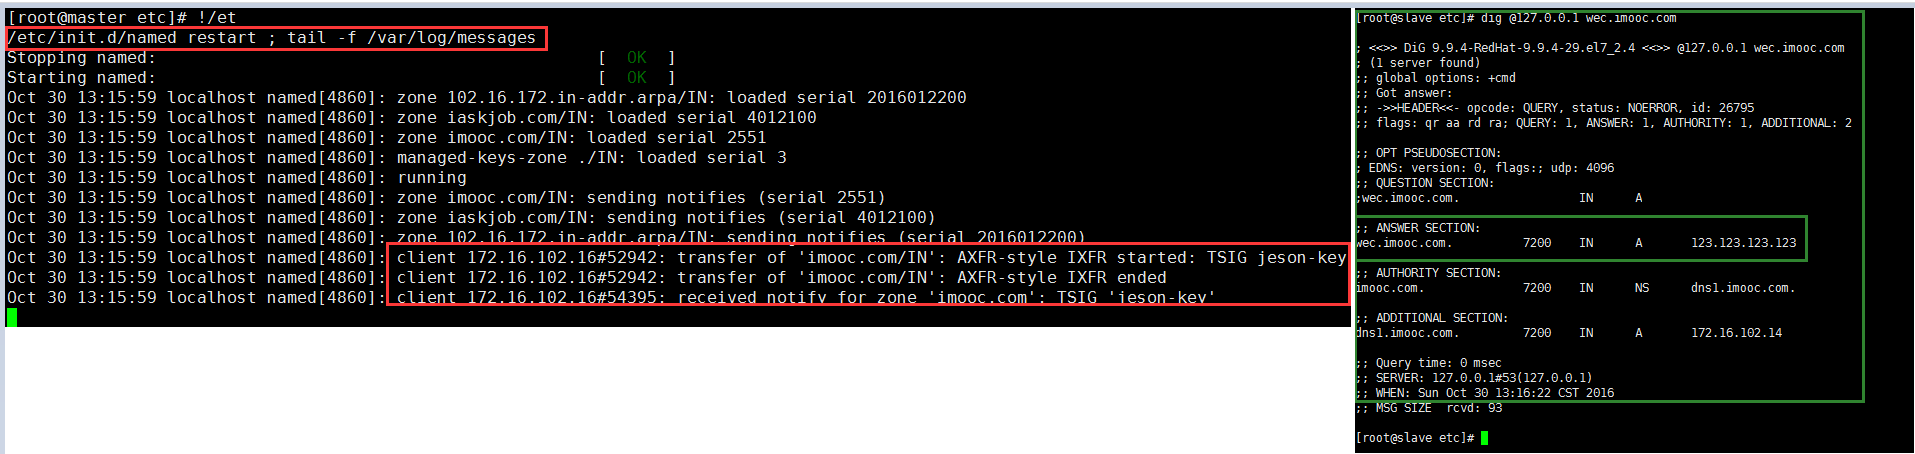
Step 5.验证搭建然后在Slave服务上看看新增加的wec域名的A记录,
1 2 3
Oct 30 13:15:59 localhost named[4860]: client 172.16.102.16#52942: transfer of 'imooc.com/IN': AXFR-style IXFR started: TSIG jeson-key Oct 30 13:15:59 localhost named[4860]: client 172.16.102.16#52942: transfer of 'imooc.com/IN': AXFR-style IXFR ended Oct 30 13:15:59 localhost named[4860]: client 172.16.102.16#54395: received notify for zone 'imooc.com': TSIG 'jeson-key'
# 主配置 named.conf 文件: zone "vcsa.weiyigeek.top" { type master; file "private/vcsa.weiyigeek.top.zone"; };
# 区域空间: $ cat /var/named/private/vcsa.weiyigeek.top.zone $TTL 7200 @ IN SOA ns.weiyigeek.top. root.weiyigeek.top. ( 20201201 3600 1200 84600 1200 ) @ IN NS ns ns IN A 192.168.12.253 @ 640 IN A 192.168.12.251 t 641 IN A 192.168.12.250 v 642 IN CNAME vcsa.weiyigeek.top.
验证配置与启动:
1 2 3 4 5 6 7 8 9 10
root@ubuntu-253:~# named-checkzone vcsa.weiyigeek.top /var/named/private/vcsa.weiyigeek.top.zone # zone vcsa.weiyigeek.top/IN: loaded serial 20201201 # OK root@ubuntu-253:~# named-checkconf
# Debug 启动信息查看 $ named -u named -g # 01-Dec-2020 15:50:17.862 zone weiyigeek.top/IN: sending notifies (serial 20200711) # 01-Dec-2020 15:50:17.862 zone vcsa.weiyigeek.top/IN: sending notifies (serial 20201201) # 01-Dec-2020 15:50:17.862 zone 12.168.192.in-addr.arpa/IN: sending notifies (serial 20200712)
-j # When loading a zonefile read the journal if it exists.
-l # List all the configured zones. Each line of output contains the zone name, class (e.g. IN), view, and type (e.g. master or slave).
-c # Check "core" configuration only. This suppresses the loading of plugin modules, and causes all parameters to plugin statements to be ignored.
-i # Ignore warnings on deprecated options.
-p # Print out the named.conf and included files in canonical form if no errors were detected. See also the -x option.
-t directory #Chroot to directory so that include directives in the configuration file are processed as if run by a similarly chrooted named.
-v # Print the version of the named-checkconf program and exit.
-x # When printing the configuration files in canonical form, obscure shared secrets by replacing them with strings of question marks ('?'). This allows the contents of named.conf and related files to be shared — for example, when submitting bug reports — without compromising private data. This option cannot be used without -p.
-z # Perform a test load of all master zones found in named.conf.
filename #The name of the configuration file to be checked. If not specified, it defaults to /etc/named.conf.
# (1) 对named.conf中找到的所有主区域执行测试负载。 $ named-checkconf -z /etc/bind/named.conf # zone weiyigeek.cn/IN: loaded serial 3 # zone weiyigeek.top/IN: loaded serial 2 # zone 168.192.in-addr.arpa/IN: loaded serial 4 # zone 12.168.192.in-addr.arpa/IN: loaded serial 1 # zone localhost/IN: loaded serial 2 # zone 127.in-addr.arpa/IN: loaded serial 1 # zone 0.in-addr.arpa/IN: loaded serial 1 # zone 255.in-addr.arpa/IN: loaded serial 1
# (2) named以及包含文件配置文件无错误则输出所有配置参数项 $ named-checkconf -p acl "trusted" { "localhost"; 10.0.0.0/8; 192.168.0.0/16; 172.16.0.0/16; }; options { directory "/var/cache/bind"; listen-on-v6 { "any"; }; allow-query-cache { "any"; }; auth-nxdomain no; dnssec-validation no; allow-query { "any"; }; forwarders { 223.6.6.6; 223.5.5.5; 114.114.114.114; }; }; zone "weiyigeek.cn" { type master; file "db.weiyigeek.cn"; allow-transfer { trusted; }; }; zone "weiyigeek.top" { type master; file "db.weiyigeek.top"; allow-transfer { trusted; }; }; zone "168.192.in-addr.arpa" { type master; file "db.168.192"; allow-transfer { trusted; }; }; zone "12.168.192.in-addr.arpa" { type master; file "db.12.168.192"; allow-transfer { trusted; }; }; zone "." { type hint; file "/usr/share/dns/root.hints"; }; zone "localhost" { type master; file "/etc/bind/db.local"; }; zone "127.in-addr.arpa" { type master; file "/etc/bind/db.127"; }; zone "0.in-addr.arpa" { type master; file "/etc/bind/db.0"; }; zone "255.in-addr.arpa" { type master; file "/etc/bind/db.255"; };
-v Print the version of the named-checkzone program and exit.
-j When loading a zone file, read the journal if it exists. The journal file name is assumed to be the zonefile name appended with the string .jnl.
-J filename When loading the zone file read the journal from the given file, if it exists. (Implies -j.)
-c class Specify the class of the zone. If not specified, "IN" is assumed.
-i mode Perform post-load zone integrity checks. Possible modes are "full" (default), "full-sibling", "local", "local-sibling" and "none".
Mode "full" checks that MX records refer to A or AAAA record (both in-zone and out-of-zone hostnames). Mode "local" only checks MX records which refer to in-zone hostnames.
Mode "full" checks that SRV records refer to A or AAAA record (both in-zone and out-of-zone hostnames). Mode "local" only checks SRV records which refer to in-zone hostnames.
Mode "full" checks that delegation NS records refer to A or AAAA record (both in-zone and out-of-zone hostnames). It also checks that glue address records in the zone match those advertised by the child. Mode "local" only checks NS records which refer to in-zone hostnames or that some required glue exists, that is when the nameserver is in a child zone.
Mode "full-sibling" and "local-sibling"disable sibling glue checks but are otherwise the same as "full" and "local" respectively.
Mode "none" disables the checks.
-f format Specify the format of the zone file. Possible formats are "text" (default), "raw", and "map".
-F format Specify the format of the output file specified. For named-checkzone, this does not cause any effects unless it dumps the zone contents.
Possible formats are "text" (default), which is the standard textual representation of the zone, and "map", "raw", and "raw=N", which store the zone in a binary format for rapid loading by named. "raw=N" specifies the format version of the raw zone file: if N is 0, the raw file can be read by any version of named; if N is 1, the file can be read by release 9.9.0 or higher; the default is 1. -l ttl Sets a maximum permissible TTL for the input file. Any record with a TTL higher than this value will cause the zone to be rejected. This is similar to using the max-zone-ttl option in named.conf.
-L serial When compiling a zone to "raw" or "map" format, set the "source serial" value in the header to the specified serial number. (This is expected to be used primarily for testing purposes.)
-m mode Specify whether MX records should be checked to see if they are addresses. Possible modes are "fail", "warn" (default) and "ignore".
-M mode Check if a MX record refers to a CNAME. Possible modes are "fail", "warn" (default) and "ignore".
-n mode Specify whether NS records should be checked to see if they are addresses. Possible modes are "fail" (default for named-compilezone), "warn" (default for named-checkzone) and "ignore".
-o filename Write zone output to filename. If filename is - then write to standard out. This is mandatory for named-compilezone.
-r mode Check for records that are treated as different by DNSSEC but are semantically equal in plain DNS. Possible modes are "fail", "warn" (default) and "ignore".
-s style Specify the style of the dumped zone file. Possible styles are "full" (default) and "relative". The full format is most suitable for processing automatically by a separate script. On the other hand, the relative format is more human-readable and is thus suitable for editing by hand. For named-checkzone this does not cause any effects unless it dumps the zone contents. It also does not have any meaning if the output format is not text.
-S mode Check if a SRV record refers to a CNAME. Possible modes are "fail", "warn" (default) and "ignore".
-t directory Chroot to directory so that include directives in the configuration file are processed as if run by a similarly chrooted named.
-T mode Check if Sender Policy Framework (SPF) records exist and issues a warning if an SPF-formatted TXT record is not also present. Possible modes are "warn" (default), "ignore".
-w directory chdir to directory so that relative filenames in master file $INCLUDE directives work. This is similar to the directory clause in named.conf.
-D Dump zone file in canonical format. This is always enabled for named-compilezone.
-W mode Specify whether to check for non-terminal wildcards. Non-terminal wildcards are almost always the result of a failure to understand the wildcard matching algorithm (RFC 1034). Possible modes are "warn" (default) and "ignore".
基础示例:
1 2 3 4 5 6 7 8 9 10 11 12 13 14 15 16 17
# (1) 对区域文件/var/cache/bind/db.weiyigeek.top进行有效性检查和转换。
~# named-checkzone db.weiyigeek.top /var/cache/bind/db.weiyigeek.top
zone db.weiyigeek.top/IN: loaded serial 2
OK

# (2) named-compilezone 编译 zone 会对 zone 文件做一个备份
$ named-compilezone -o test.zone db.12.168.192 /var/cache/bind/db.12.168.192
  # zone db.12.168.192/IN: loaded serial 1
  # dump zone to test.zone...done
  # OK
$ /var/cache/bind# cat test.zone
  # db.12.168.192.                                604800 IN SOA     weiyigeek.top. admin.weiyigeek.top. 1 604800 86400 2419200 604800
  # db.12.168.192.                                604800 IN NS      ns1.weiyigeek.top.
  # db.12.168.192.                                604800 IN NS      ns2.weiyigeek.top.
  # 13.db.12.168.192.                             604800 IN PTR     s.weiyigeek.top.
  # 18.db.12.168.192.                             604800 IN PTR     www.weiyigeek.top.
  # 254.db.12.168.192.                            604800 IN PTR     ns1.weiyigeek.top.
-a algorithm This option specifies the algorithm to use for the TSIG key. Available choices are: hmac-md5, hmac-sha1, hmac-sha224, hmac-sha256, hmac-sha384, and hmac-sha512. The default is hmac-sha256. Options are case-insensitive, and the “hmac-” prefix may be omitted. -h This option prints a short summary of options and arguments. -k keyname This option specifies the key name of the DDNS authentication key. The default is ddns-key when neither the -s nor -z option is specified; otherwise, the default is ddns-key as a separate label followed by the argument of the option, e.g., ddns-key.example.com. The key name must have the format of a valid domain name, consisting of letters, digits, hyphens, and periods. -q (ddns-confgen only) This option enables quiet mode, which prints only the key, with no explanatory text or usage examples. This is essentially identical to tsig-keygen. -s name (ddns-confgen only) This option generates a configuration example to allow dynamic updates of a single hostname. The example named.conf text shows how to set an update policy for the specified name using the “name” nametype. The default key name is ddns-key.name. Note that the “self” nametype cannot be used, since the name to be updated may differ from the key name. This option cannot be used with the -z option. -z zone (ddns-confgen only) This option generates a configuration example to allow dynamic updates of a zone. The example named.conf text shows how to set an update policy for the specified zone using the “zonesub” nametype, allowing updates to all subdomain names within that zone. This option cannot be used with the -s option.
方式1.请访问本博主的B站【WeiyiGeek】首页关注UP主, 将自动随机获取解锁验证码。
Method 2.Please visit 【My Twitter】. There is an article verification code in the homepage.
方式3.扫一扫下方二维码,关注本站官方公众号
回复:验证码
将获取解锁(有效期7天)本站所有技术文章哟!