[TOC]
10.Python 文件操作与处理 描述: 我们所知道常用的操作系统有Windows,Mac,LINUX,UNIX,这些操作系统底层对于文件系统的访问工作原理是不一样的,因此您可能要针对不同的操作系统来考虑使用那些系统模块,即修改不同的代码。但是Python中有了OS模块,我们不需要关心什么操作系统下使用什么模块,OS模块会帮你选择正确的模块并调用。
在Python对于FILE文件最重要的方法是open()方法Z,用于打开一个文件,并返回文件对象,对文件进行处理过程都需要使用到这个函数;1 2 3 4 5 6 7 8 9 10 11 12 13 14 open(file, mode='rt' ) open(file, mode='rt' , [buffering=-1 , encoding=None , errors=None , newline=None , closefd=True , opener=None ]) file: 必需,文件路径(相对或者绝对路径)。 mode: 可选,文件打开模式 buffering: 设置缓冲 encoding: 一般使用utf8 errors: 报错级别 newline: 区分换行符 closefd: 传入的file参数类型
10.1 Python文件系统 使用Python进行文件的打开与内容的读取,写入内容,需要注意写入中文字符 (选择utf-8编码) 1 2 3 4 5 6 7 8 9 10 11 12 13 14 15 16 17 18 19 20 21 22 23 24 25 26 27 28 29 30 31 32 33 34 35 36 37 38 39 40 41 42 43 44 45 46 47 48 49 50 51 52 53 54 55 56 57 58 59 60 61 62 63 64 65 66 67 68 69 70 file = open('python.txt' ,'r+' ,encoding='utf-8' ) print("文件描述符为: %d" %file.fileno()) print("是否连接到一个终端设备" ,file.isatty()) file.seek(0 ,0 ) for eachline in file: print(eachline,end="" ) file.close() def save_file (boy,girl,count) : file_name_boy = 'boy_' +str(count)+'.txt' file_name_girl = 'girl_' +str(count)+'.txt' afile = open(file_name_boy,'w' ,encoding='utf-8' ) bfile = open(file_name_girl,'w' ,encoding='utf-8' ) afile.writelines(girl) bfile.writelines(boy) afile.close() bfile.close() def split_file (filename) : f = open(filename,'r' ,encoding='utf-8' ) Aauthor = [] Bauthor = [] count = 1 for lines in f: if lines[:6 ] != '======' : (role,spoken) = lines.split(':' ) if role == 'A' : Aauthor.append(spoken) elif role == 'B' : Bauthor.append(spoken) else : save_file(Bauthor,Aauthor,count) Aauthor = [] Bauthor = [] count += 1 save_file(Bauthor,Aauthor,count) f.close() split_file('demo2-10.txt' )
10.2 Python文件写入反序列化 描述:采用二进制的形式将python各类数据类型存储进磁盘中,相当于数据库反序列化,需要导入pickle包进行读入读出操作;
pickle的实质就是利用一些算法将你的数据对象“腌制”成二进制文件,存储在磁盘上,当然也可以放在数据库或者通过网络传输到另一台计算机上。
1 2 3 4 5 6 7 8 9 10 11 12 13 14 15 16 17 18 19 20 21 22 23 24 25 import pickleimport osvalue = dict.fromkeys((1 ,2 ,3 ,5 ,6 ),'pickle' ) print(value) def pkldown (filename) : if os.path.exists(filename): print("文件已经存在正在打开" ,end="" ) f = open(filename,'wb' ) else : f = open(filename,'wb' ) pickle.dump(value,f) f.close() def pklget (filename) : f = open(filename,'rb' ) getv = pickle.load(f) f.close() print(" %s " %getv) pkldown('test.pkl' ) pklget('test.pkl' )
weiyigeek.top-open函数mode属性参数
注意:使用pickle可以保存为”*.txt”类型的文件,但是存入是二进制文件,直接打开是乱码;
11.Python 错误和异常抛出 总结下异常处理机制的重要性:
try 语句语法: 1 2 3 4 5 6 try : 检测的代码块 execpt Exception [as reaon]: 出现异常后执行的代码 else : 当没有异常发生时,else 中的语句将会被执行
try - finally 语句: 1 2 3 4 5 6 7 8 9 10 11 12 13 14 15 16 17 18 try : 检测的代码块 execpt Exception [as reaon]: 出现异常后执行的代码 else : 当没有异常发生时,else 中的语句将会被执行 finally : 无论怎么样都会被执行的代码 raise 系统异常名称('错误描述' )with open('data.txt' ,'w' ) as 文件对象:with A() as a, B() as b: suite
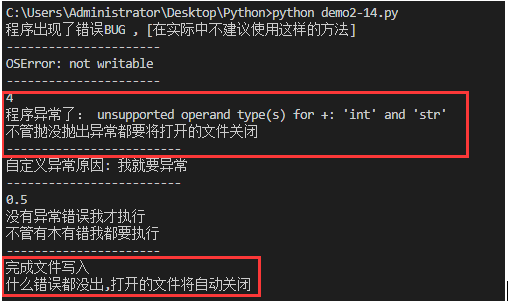
错误与异常抛出案例: 1 2 3 4 5 6 7 8 9 10 11 12 13 14 15 16 17 18 19 20 21 22 23 24 25 26 27 28 29 30 31 32 33 34 35 36 37 38 39 40 41 42 43 44 45 46 47 48 49 50 51 52 53 54 55 56 57 58 59 60 61 62 63 64 65 66 67 try : sum = 1 + 'a' except : print("程序出现了错误BUG , [在实际中不建议使用这样的方法]" ) try : f = open('noexsitfile.txt' ) print("----------------------" ) f.write("我存在了" ) sum = 1 + 'b' except OSError as err: print("OSError:" ,str(err)) except TypeError as err: print("TypeError:" ,str(err)) print("----------------------" ) try : f = open('noexsitfile.txt' ,'w' ,encoding='utf-8' ) print(f.write("我存在了" )) sum = 1 + 'b' except (OSError,TypeError) as identifier: print("程序异常了:" ,str(identifier)) finally : print("不管抛没抛出异常都要将打开的文件关闭" ) f.close() print("-------------------------" ) try : if 'a' > 'b' : raise TypeError("我们异常了" ) else : raise NameError("我就要异常" ) except (TypeError,NameError) as errvalue: print("自定义异常原因:" ,errvalue) print("-------------------------" ) try : print( 1 / 2 ) except TypeError as identifier: print("错误原因:" ,str(identifier)) else : print("没有异常错误我才执行" ) finally : print("不管有木有错我都要执行" ) print("----------------------" ) try : with open('with.txt' ,'w' ,encoding='utf-8' ) as f: f.write("Test ... Test" ) print("完成文件写入" ) except OSError as reson: print("出错误了" ,str(reson)) else : print("什么错误都没出,打开的文件将自动关闭" )
weiyigeek.top-错误与异常抛出案例
With 语句案例: 1 2 3 4 5 6 7 8 9 10 11 12 13 14 15 16 17 18 19 20 21 22 23 24 def file_compare (file1, file2) : with open(file1) as f1, open(file2) as f2: count = 0 differ = [] for line1 in f1: line2 = f2.readline() count += 1 if line1 != line2: differ.append(count) return differ file1 = input('请输入需要比较的头一个文件名:' ) file2 = input('请输入需要比较的另一个文件名:' ) differ = file_compare(file1, file2) if len(differ) == 0 : print('两个文件完全一样!' ) else : print('两个文件共有【%d】处不同:' % len(differ)) for each in differ: print('第 %d 行不一样' % each)
12.Python 面向对象 Q:类和对象是什么关系呢?
OOP思想:
类的属性定义应该尽可能抽象,因为这样更符合面向对象的思维;
对象中的属性和方法,在实际编程中是变量(属性)和函数(方法);
面向对象的几个特征:
封装:对外部隐藏对象的工作细节
继承:子类自动共享父类之间数据和方法的机制 (子类继承父类)
多态:可以对不同类的对象调用相同的方法,产生不同的结果 (不同对象对同一方法响应不同行动)
Q:面向对象技术名词?
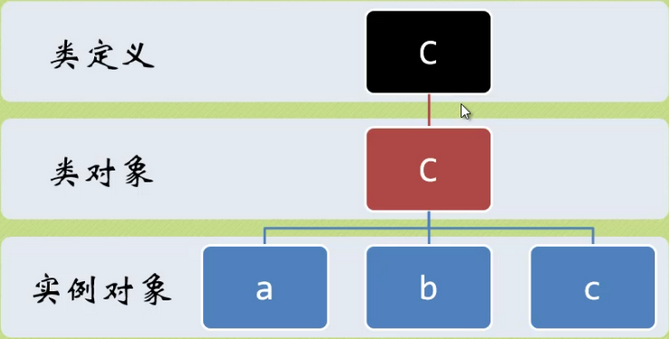
类定义: 指的是类定义,用来描述具有相同的属性和方法的对象的集合,特点“Python无处不对象”
类对象: 类定义完之后自然就是类对象,这时你可以对类的属性(变量)进行直接访
实例对象: 一个类可以实例化出无数的对象(实例对象,类的具体对象),为了区分是哪个实例对象调用了方法所以采用上面所说的self;
数据成员:类变量或者实例变量用于处理类及其实例对象的相关的数据。
局部变量:定义在方法中的变量,只作用于当前实例的类。
实例变量:在类的声明中,属性是用变量来表示的。这种变量就称为实例变量,是在类声明的内部但是在类的其他成员方法之外声明的。
方法重写:如果从父类继承的方法不能满足子类的需求,可以对其进行改写,这个过程叫方法的覆盖(override),也称为方法的重写。
继承:即一个派生类(derived class)继承基类(base class)的字段和方法,继承也允许把一个派生类的对象作为一个基类对象对待。
weiyigeek.top-类/类对象与实例对象
类属性与方法
私有变量: private_attrs:两个下划线开头,声明该属性为私有,不能在类的外部被使用或直接访问,但可以通过 对象._类名 属性名称 在外部进行调用;
类的私有方法:private_method:两个下划线开头,声明该方法为私有方法,只能在类的内部调用( self. private_methods), 在类的外部调用类似于上面;
self参数的作用是绑定方法,有了这个参数Python 再也不会傻傻分不清是哪个对象在调用方法了,self 其实就是实例对象的唯一标志。
1 2 3 4 5 6 7 8 9 10 11 12 13 14 15 16 17 18 19 20 21 22 23 24 25 26 27 28 29 30 31 32 33 class Test : count = 0 public_attrs = 0 __private_attrs = 0 def __init__ (self) : C.count = C.count + 1 def prt (self) : print('这是公共方法' ) print(self) print(self.__class__) self.__foo() def __foo (self) : print('这是私有方法' ) def getCount (self) : return C.count t = Test() t.prt() t._Test__private_attrs t._Test__foo()
12.1 封装 对象封装案例:1 2 3 4 5 6 7 8 9 10 11 12 13 14 15 16 17 18 19 20 21 22 23 24 25 26 27 28 29 30 31 32 33 34 35 36 37 38 39 40 41 42 43 44 45 46 47 48 49 50 51 52 53 class Person : name = 'WeiyiGeek' age = 20 msg = 'I Love Python' __weight = 120 def printname (self) : print(self.name,self.age,self.msg,self.__weight) people = Person() people.printname() print("体重:" ,people._Person__weight,'KG' ) class Rectangle : length = 5 width = 6 def setRect (self,length,width) : self.length = length self.width = width def getRect (self) : print("矩形的长宽为:%d , %d" %(self.length,self.width)) def getArea (self) : print("矩形面积 =" ,self.width * self.length) def getGirth (self) : print("矩形周长 =" ,2 * (self.width + self.length)) rect = Rectangle() rect.setRect(15 ,16 ) rect.getRect() rect.getArea() rect.getGirth()
总结:
利用继承和组合机制来进行扩展时候,在类名/属性名(用名词)/方法名(用动词)的命名建议要规范化
私有属性就是在属性或方法名字前边加上双下划线,从外部是无法直接访问到并会显示AttributeError错误
当你把类定义完的时候,类定义就变成类对象,可以直接通过“类名.属性”或者“类名.方法名()”引用或使用相关的属性或方法。
类中属性名与方法名一定不要一致,否则属性会覆盖方法,导致BUG的发生;
12.2 继承 Q:继承机制给程序猿带来最明显的好处是?
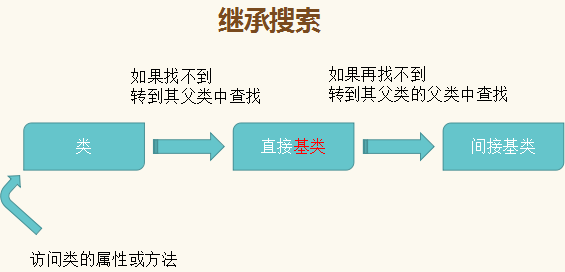
继承的搜索:
weiyigeek.top-继承的搜索
继承语法:
案例:1 2 3 4 5 6 7 8 9 10 11 12 13 14 15 16 17 18 19 20 21 22 23 24 25 26 27 28 29 30 31 32 33 34 35 36 37 38 39 40 41 42 43 44 45 46 47 48 49 50 51 52 53 54 55 56 57 58 59 60 61 62 63 class Person : name = '' __UID = 0 def __init__ (self, *args) : self.name = args[0 ] self.__UID = args[1 ] def speak (self) : print("%s 的身份证号为 %d" %(self.name,self.__UID)) class Student (Person) : grade = '' def __init__ (self, *args) : Person.__init__(self,args[0 ],args[1 ]) self.grade = args[2 ] def speak (self) : print("姓名: %s , 年级:%s ,身份证号%d 由于是父类的私有变量不能这样调用 self._Person__UID " %(self.name,self.grade,Person._Person__UID)) xs = Student('WeiyiGEEK' ,512301031998010937 ,'2018级' ) xs.speak() class A : def get_a (self) : print 'a' class B : def get_b (self) : print 'b' class C (A, B) : pass c = C() c.get_a() c.get_b() BaseAlias = BaseClass class Derived (BaseAlias) : def meth (self) : BaseAlias.meth(self) ...
(补充):组合介绍 Q:什么是组合(组成)? 直接在类定义中把需要的类放进去实例化就可以了 。
简单的说,组合用于“有一个”的场景中,继承用于“是一个”的场景中
1 2 3 4 5 6 7 8 9 10 11 12 13 14 15 16 17 18 19 20 21 22 class Turtle : def __init__ (self, x) : self.num = x class Fish : def __init__ (self, x) : self.num = x class Pool : def __init__ (self, x, y) : self.turtle = Turtle(x) self.fish = Fish(y) def print_num (self) : print("水池里总共有乌龟 %d 只,小鱼 %d 条!" % (self.turtle.num, self.fish.num)) >>> pool = Pool(1 , 10 )>>> pool.print_num()
(补充):super()超类 1 2 3 4 5 6 7 8 9 10 11 12 13 14 15 16 17 18 19 20 21 22 23 24 25 26 27 28 29 30 31 32 33 34 35 36 import random as r class Fish : def __init__ (self) : self.x = r.randint(0 ,10 ) self.y = r.randint(0 ,10 ) def move (self) : self.x -= 1 print("我得位置是:" ,self.x,self.y) class Shark (Fish) : def __init__ (self) : super().__init__() self.hungry = True def eat (self) : if self.hungry: print("饿了,要吃饭@!" ) self.hungry = False else : print("太撑了,吃不下了" ) demo1 = Shark() demo1.move() demo1.eat() demo1.eat() demo1.move()
总结:
当子类与父类定义相属性性或方法时,Python 不会删除父类的相关属性或方法而是将父类属性或方法覆盖;子类对象调用的时候会调用到覆盖后的新属性或方法,但父类的仍然还在,只是子类对象“看不到”
多重继承使用不当会导致重复调用(也叫钻石继承、菱形继承)的问题
12.3 多态
12.4 魔法方法 魔法方法体现再它们总能够再适当得时候被自动调用;new (cls[,…]) #第一个执行魔术方法,通常返回类得实例化对象,当您继承到不可变类型得时候但又需要对其修改得时候;init (self[,…])del (self) #垃圾回收机制,类似于C++里面得析构方法
(3) add (self,other) #魔术方法计算-其他也类似and (self,other) #魔术方法逻辑运算符
(5) radd (self,other) #魔术方法反运算 比如 a + b ,如果a对象不支持 + 操作的时候,这时候就使用b的处理方案进行相加;rsub (self,other) #魔术方法 同上
(7) str (self) #字符串需要被输出的情况下,必须采用print输出repr (self) #字符串直接被输出,无需外部函数
(9) getattr (self,name) #属性访问的魔术方法,定义当用户试图获取一个不存在的属性时候;getattribute (self,name) #定义当该类的属性被访问时的行为setattr (self,name,value) #定义一个属性被设置时候的行为delattr (self,name) #定义一个属性被删除时的行为
(13) get (self,instance,owner) #描述符,用于访问属性它返回属性的值set (self,instance,value) #将在属性分配操作中调用,不返回任何内容delete (self,instance) #控制删除操作,返回任何内容
(16) len () #容器在进行 len(对象) 方法得意触发getitem () #获取容器键值的时候触发,比如字典dict[‘key’]setitem () #设置容器中指定元素的行为比如字典dict[‘key’] = 1024
案例1:按照以下要求定义一个游乐园门票的类,并尝试计算2个成人+1个小孩平日票价,面向对象编程的难点在于思维的转换。1 2 3 4 5 6 7 8 9 10 11 12 13 14 15 16 17 18 19 20 21 22 23 24 25 26 27 28 29 30 31 32 33 34 35 36 37 38 39 40 41 42 43 44 45 46 47 48 49 50 51 52 53 54 55 56 57 58 59 60 61 62 63 64 class Ticket () : def __init__ (self, weekend=False, child=False) : self.exp = 100 if weekend: self.inc = 1.2 else : self.inc = 1 if child: self.discount = 0.5 else : self.discount = 1 def calcPrice (self, num) : return self.exp * self.inc * self.discount * num adult = Ticket() child = Ticket(child=True ) print("2个成人 + 1个小孩平日票价为:%.2f" % (adult.calcPrice(2 ) + child.calcPrice(1 ))) class Count : count = 0 def __init__ (self) : Count.count += 1 def __del__ (self) : Count.count -= 1 def getCount (self) : print("当前 count 的 %d 值" %Count.count) a = Count() b = Count() c = Count() d = a e = a print(Count.count) del d del e del a print(Count.count) class CapStr (str) : def __new__ (cls,string) : string = string.upper() return str.__new__(cls,string) a = CapStr('I love Study Python3!' ) print(a)
(2) 类的算法运算魔术方法
1 2 3 4 5 6 7 8 9 10 11 12 13 14 15 16 17 18 >>> type (len) <class 'builtin_function_or_method' > >>> type (int) <class 'type' > >>> type (tuple) <class 'type' > >>> class C: ... pass ... >>> type (C) <class 'type' > a = int('123' )
案例2:1 2 3 4 5 6 7 8 9 10 11 12 13 14 15 16 17 18 19 20 21 22 23 24 25 26 27 28 29 30 31 32 33 34 class Newint (int) : def __add__ (self, value) : return super().__add__(value) def __sub__ (self, value) : return int(self) - int(value) def __and__ (self, value) : return super().__and__(value) a = Newint(8 ) b = Newint(6 ) print("a + b =" ,a + b) print("a - b =" ,a - b) print("a & b =" ,a & b) class int (int) : def __add__ (self,other) : return int.__sub__(self,other) a = int('5' ) b = int('4' ) print("运算符重载:a + b => a - b =" , a + b)
(3) 类的反算法运算魔术方法 1 2 3 4 5 6 7 8 9 10 11 12 13 14 15 16 17 18 19 20 21 22 23 24 25 26 27 28 29 30 31 32 33 34 35 36 37 38 class Newint (int) : def __radd__ (self, value) : return int.__sub__(value,self) def __rsub__ (self, value) : return super().__add__(value) def __rmul__ (self, value) : return super().__truediv__(value) a = Newint(5 ) b = Newint(3 ) print(a + b) print(a - b) print("1 + b =" ,1 + b) print("1 - b =" ,1 - b) print("1 * b =" ,5 * b) class OneInt (int) : def __pos__ (self) : return super().__pos__() a = OneInt(-1 ) print("-(a) =" ,-a)
(4) 类的补充魔术方法 1 2 3 4 5 6 7 8 9 10 11 12 13 14 15 16 17 18 class Demo : def __str__ (self) : return '我是__str__魔术方法,需要print()输出' class Demo1 : def __repr__ (self) : return '2 - 我是__repr__魔术方法,直接对象输出' a = Demo() print("1 -" ,a) b = Demo1() print(b)
(5) 类属性访问魔术方法
1 2 3 4 5 6 7 8 9 10 11 12 13 14 15 16 17 18 19 20 21 22 23 24 25 26 27 28 29 30 31 32 33 34 35 36 37 38 39 40 41 42 43 44 45 46 47 48 49 50 51 52 53 54 55 56 57 58 59 60 61 class AttrView : def __getattribute__ (self, name) : print("调用 getattribute 魔法方法" ) return super().__getattribute__(name) def __getattr__ (self,name) : print('调用 getattr 魔法方法' ) def __setattr__ (self,name,value) : print("调用 setattr 魔法方法" ) super().__setattr__(name,value) def __delattr__ (self, name) : print('调用 delattr 魔法方法' ) super().__delattr__(name) demo = AttrView() demo.x setattr(demo,'x' ,1 ) demo.y = 1 demo.y delattr(demo,'y' ) class Rectangle : def __init__ (self, width = 0 , height = 0 ) : self.width = width self.height = height def __setattr__ (self, name, value) : if name == 'square' : self.height = value self.width = value else : super.__setattr__(self, name, value) def getArea (self) : return self.width * self.height def getPeri (self) : return (2 * (self.width) + 2 * (self.height)) r1 = Rectangle(4 ,5 ) print("矩形面积:" ,r1.getArea()) r1.square = 10 print("正方形面积: " ,r1.getArea()) print("正方形周长:" ,r1.getPeri()) print("__dict__" ,r1.__dict__)
(6) 定制序列的魔术方法
要求:编写一个不可改变的自定义列表,要求记录每个元素被访问的次数;1 2 3 4 5 6 7 8 9 10 11 12 13 14 15 16 17 18 19 20 21 22 23 24 25 26 27 28 29 30 31 32 class Countnum : def __init__ (self,*args) : self.value = [x for x in args] self.count = {}.fromkeys(range(len(self.value)),0 ) def __len__ (self) : return len(self.value) def __getitem__ (self,index) : self.count[index] += 1 return self.value[index] a = Countnum(1 ,3 ,5 ,7 ,9 ) b = Countnum(2 ,4 ,6 ,8 ,10 ) print(a[1 ],b[1 ]) print(a[1 ],b[1 ]) print("两个对象数列之和:" ,a[3 ]+b[3 ]) print("A对象访问的次数:" ,a.count) print("B对象访问的次数:" ,b.count)
12.5 描述符 描述:描述符就是将某种特殊类型的类的实例指派给另外一个类的属性;比如property() 是一个比较奇葩的BIF,它的作用把方法当作属性来访问,从而提供更加友好访问方式;
描述符就是一个类,一个至少实现 get ()、set () 或 delete () 三个特殊方法中的任意一个的类
1 2 3 4 5 6 7 8 9 10 11 12 13 14 15 16 17 18 19 20 21 22 23 24 25 26 27 28 29 30 31 32 33 34 35 36 37 38 39 40 41 42 43 44 45 46 47 48 49 50 51 52 53 54 55 56 57 58 59 60 61 62 63 64 65 66 67 68 69 70 71 class Decriptor : def __get__ (self,instance,owner) : print("getting ... " ,self, instance, owner) def __set__ (self,instance,value) : print("setting ... " ,self, instance, value) def __delete__ (self,instance) : print("deleting ..." ,self,instance) class Test : x = Decriptor() test = Test() test.x test.x = 'ceshi' del test.x class MyProperty : def __init__ (self, fget=None, fset=None,fdel=None) : self.fget = fget self.fset = fset self.fdel = fdel def __get__ (self,instance,owner) : return self.fget(instance) def __set__ (self,instance,value) : self.fset(instance,value) def __delete__ (self,instance) : self.fdel(instance) class C : def __init__ (self) : self._x = None def getX (self) : return self._x def setX (self, value) : self._x = value def delX (self) : print("delete 销毁属性!" ) del self._x x = MyProperty(getX,setX,delX) c = C() c.x = 'Property' print(c.x,c._x) del c.x
总结:
init 特殊方法不应当返回除了 None 以外的任何对象。add 特殊方法中不应直接return self + other会导致无限递归(深坑)。radd 特殊方法中反运算需要注意 运算符支持前后顺序。
12.6 修饰符(装饰器) 修饰符是一个很著名的设计模式,经常被用于有切面需求的场景,较为经典的有插入日志、性能测试、事务处理等;有了修饰符我们就可以抽离出大量函数中与函数功能本身无关的雷同代码并继续重用。
1)@ 修饰符的介绍使用
使用案例:1 2 3 4 5 6 7 8 9 10 11 12 13 14 15 16 17 18 19 20 21 22 23 24 25 26 27 28 29 30 31 32 33 34 35 36 37 38 39 40 41 42 43 44 45 46 47 48 49 50 51 52 53 54 55 56 57 58 59 60 61 62 63 64 65 66 67 68 69 70 71 72 73 74 75 76 77 78 79 80 81 82 83 84 85 86 87 88 89 90 91 92 93 94 95 96 97 98 99 100 101 import time class Demo (object) : def __init__ (self,foo) : self.foo = foo self.foo() @Demo #将 f() 函数作为参数传入到类里 def f () : print("I love Python.org!" ) def funcA (A) : print("function A" ) def funcB (B) : print(B(2 )) print("function B" ) @funcA @funcB def func (c) : print("function C" ) return c**2 def timeslong (func) : def call () : start = time.perf_counter() print("It's time starting ! " ) func() print("It's time ending ! " ) end = time.perf_counter() return "It's used : %s ." % (end - start) return call @timeslong #先执行 timelong 再调用执行 func => f() def func () : y = 0 for i in range(5 ): y = y + i + 1 print(y) return y print(func()) class timeslong1 (object) : def __init__ (self,func) : self.f = func def __call__ (self) : start = time.perf_counter() print("It's time starting ! " ) self.f() print("It's time ending ! " ) end = time.perf_counter() print("It's used : %s ." % (end - start)) @timeslong1 #将下面的函数或者类作为自己的参数 def f () : y = 0 for i in range(3 ): y = y + i + 1 print(y) return y f()
2) 内置的修饰符
1 2 3 4 5 6 7 8 9 10 11 12 13 14 15 16 17 18 19 20 21 22 23 24 25 26 27 28 29 30 31 32 33 34 35 36 37 38 39 40 41 42 43 44 45 46 47 48 49 50 51 52 53 54 55 56 57 58 59 60 61 62 63 64 65 66 67 68 69 70 71 72 73 74 class Hello (object) : def __init__ (self) : pass @classmethod def print_hello (cls) : print("方式1:调用类方法 print_hello()" ,) def foo (cls) : print("方式2:调用类方法 foo()" ) foo = classmethod(foo) @staticmethod def static_hello (arg) : return "方式4:调用静态方法 static_hello Value =" + str(arg) Hello.print_hello() Hello.foo() print(Hello.static_hello(1 ),Hello.static_hello) class C : def __init__ (self, size=10 ) : self.size = size @property #关键点 类属性 / 绑定的属性是x def x (self) : return self.size @x.setter # def x (self, value) : self.size = value @x.deleter def x (self) : del self.size demo = C() print("获取属性的值:" ,demo.x) demo.x = 1024 print("获取更改后属性的值:" ,demo.x) del demo.x
总结:
静态方法最大的优点是:不会绑定到实例对象上,换而言之就是节省开销。
静态方法并不需要 self 参数,因此即使是使用对象去访问,self 参数也不会传进去。


