[TOC]
0x00 系统初始化
CentOS7 初始化脚本:[2020年5月8日 09:09:54]

[TOC]
CentOS7 初始化脚本:[2020年5月8日 09:09:54]1
2
3
4
5
6
7
8
9
10
11
12
13
14
15
16
17
18
19
20
21
22
23
24
25
26
27
28
29
30
31
32
33
34
35
36
37
38
39
40
41
42
43
44
45
46
47
48
49
50
51
52
53
54
55
56
57
58
59
60
61
62#!/bin/bash
# @Desc:Centos7安装后初始化脚本
# @Author: WeiyiGeek
# @Time: 2020年5月6日 11:04:42
# @Version: 1.0
echo -e "\e[32m#########\n#网卡配置\n##########\e[0m"
sed -i 's/ONBOOT=no/ONBOOT=yes/g' /etc/sysconfig/network-scripts/ifcfg-ens192
sed -i 's/BOOTPROTO=dhcp/BOOTPROTO=static/g' /etc/sysconfig/network-scripts/ifcfg-ens192
sed -i 's/BOOTPROTO=\"dhcp\"/BOOTPROTO=\"static\"/g' /etc/sysconfig/network-scripts/ifcfg-ens192
cat >> /etc/sysconfig/network-scripts/ifcfg-ens192 <<EOF
IPADDR=10.10.107.192
NETMASK=255.255.255.0
GATEWAY=10.10.107.1
EOF
service network restart
echo nameserver 223.6.6.6 >> /etc/resolv.conf
echo -e"--[网卡配置结束]--"
echo -e "\e[32m#########\n#SSH服务配置\n#########\e[0m"
echo 'PermitRootLogin yes' >> /etc/ssh/sshd_config
echo 'PasswordAuthentication yes' >> /etc/ssh/sshd_config
systemctl restart sshd
echo "--[SSH服务配置结束]--"
echo -e "\e[32m#########\n#Yum源设定\n#########\e[0m"
curl -o /etc/yum.repos.d/CentOS-Base.repo http://mirrors.aliyun.com/repo/Centos-7.repo
curl -o /etc/yum.repos.d/CentOS-epel.repo http://mirrors.aliyun.com/repo/epel-7.repo
yum clean all
yum makecache
yum update -y && yum upgrade -y && yum -y install epel*
echo "--[YUM替换更新应用软件完成]--"
echo -e "\e[32m#########\n#系统内核版本升级\n#########\e[0m"
rpm --import https://www.elrepo.org/RPM-GPG-KEY-elrepo.org
yum -y install https://www.elrepo.org/elrepo-release-7.el7.elrepo.noarch.rpm
yum --disablerepo="*" --enablerepo=elrepo-kernel repolist
yum --disablerepo="*" --enablerepo=elrepo-kernel list kernel*
yum -y --enablerepo=elrepo-kernel install kernel-ml.x86_64 kernel-ml-devel.x86_64
awk -F \' '$1=="menuentry " {print i++ " : " $2}' /etc/grub2.cfg
sudo grub2-set-default 0
reboot
#yum -y --enablerepo=elrepo-kernel install kernel-ml-tools.x86_64
#sudo grub2-set-default 0
echo -e "\n############################\n#安装常用的运维软件\n####################################\n"
#编译依赖
yum install -y gcc gcc-c++ openssl-devel bzip2-devel
#常规软件
yum install -y nano vim net-tools tree wget dos2unix unzip htop ncdu bash-completion
echo "--[安装安装完成]--"
echo -e "\n############################\n#bash终端美化\n####################################\n"
yum install -y git
git clone --depth=1 \
https://github.com/Bash-it/bash-it.git \
~/.bash_it
cd !$ && ./install.sh -s
官方镜像列表状态地址:
建议使用阿里云的源其他发行版等同:http://mirrors.aliyun.com/help/centos
Aliyun下载最新的CentOS-Base.repo 到/etc/yum.repos.d/1
2
3
4
5
6
7
8
9
10
11
12#备份CentOS-Base.repo
$ mv /etc/yum.repos.d/CentOS-Base.repo /etc/yum.repos.d/CentOS-Base.repo.backup
#下载更新源
CentOS 5:wget -O /etc/yum.repos.d/CentOS-Base.repo http://mirrors.aliyun.com/repo/Centos-5.repo
CentOS 6:wget -O /etc/yum.repos.d/CentOS-Base.repo http://mirrors.aliyun.com/repo/Centos-6.repo
CentOS 7:wget -O /etc/yum.repos.d/CentOS-Base.repo http://mirrors.aliyun.com/repo/Centos-7.repo
#清除源数据并生成镜像缓存
yum clean all
yum makecache
yum update
注意:不建议使用yum进行删除软件,因为他会删除多余得依赖程序,导致意外发生(运维必须注意)
系统环境:CentOS Linux release 7.6.1810 (Core)
升级原因:在使用 Docker 时发现其对 Linux 内核版本的最低要求是 3.10(这也刚好是 CentOS 7.6 的内核版本),但是在这个版本上有部分功能无法实现。
注:对于线上环境的内核版本还需要根据实际情况谨慎选择,越新的版本未来可能遇到的问题越多;
Linux 内核分两种:
1 | #系统 当前内核版本 小版本升级 |
CentOS和Fedora都是基于Redhat的常见Linux分支。
关于内核版本的定义:
版本性质:主分支版本ml(mainline),稳定版(stable),长期维护版lt(longterm-long term support),内核预发行版(内核预发行版本)
版本命名格式为 :A.B.C1
2
3
4
5
6A:是内核版本号:版本号只有在代码和内核的概念有重大改变的时候才会改变,历史上有两次变化:
第一次是1994年的 1.0 版,第二次是1996年的 2.0 版,第三次是2011年的 3.0 版发布,但这次在内核的概念上并没有发生大的变化
B:是内核主版本号:主版本号根据传统的奇-偶系统版本编号来分配:奇数为开发版,偶数为稳定版
C:是内核次版本号:次版本号是无论在内核增加安全补丁、修复bug、实现新的特性或者驱动时都会改变
Linux 发行版内核
一般来说只有从 kernel.org 下载并编译安装的内核才是官方内核;大多数 Linux 发行版提供自行维护的内核,可以通过 yum 或 rpm 等包管理系统升级(仓库升级内核);
各大 Linux 发行版(RedHat、Ubuntu、CentOS 等)在内核基础上集成了其他的一系列软件,按照各自的版本规则发布;使用 uname -r 区分你用的是官方内核还是 Linux 发行版内核,横线后面有任何东西都表示这不是官方内核;
例如: 3.10.0-514.26.2.el7.x86_64,表示对应的 Linux 内核版本是 3.10,后面514是代表发行版规则编号;
虚拟文件系统
内核空间和用户空间通过 /proc 虚拟文件系统可以通信; /proc 目录中包含一些目录和虚拟文件,这些虚拟文件可以向用户呈现内核信息或者从用户空间向内核发送信息。1
2
3
4
5
6
7[root@zabbix ~]# cat /proc/version
Linux version 3.10.0-957.10.1.el7.x86_64 (mockbuild@kbuilder.bsys.centos.org) (gcc version 4.8.5 20150623 (Red Hat 4.8.5-36) (GCC) ) #1 SMP Mon Mar 18 15:06:45 UTC 2019
cpuinfo:标识了处理器的类型和速度
pci:显示在 PCI 总线上找到的设备
modules:当前加载到内核中的模块
version:系统版本及内核版本
(1)小版本升级流程步骤:1
2
3
4
5
6
7
8
9
10
11
12
13#1.查看当前和可升级版本
yum list kernel
Installed Packages
kernel.x86_64 3.10.0-957.el7 @anaconda
Available Packages
kernel.x86_64 3.10.0-957.5.1.el7 updates
#2 升级
yum update kernel -y
#3.重启并检查
reboot
uname -r
(2)大版本升级流程步骤:
1 | #1. 首先更新仓库 |
内核升级完毕后,目前内核还是默认的版本,需要进行内核版本插入顺序修改: weiyigeek.top-grub1
2
3
4
5
6
7
8
9
10
11
12
13
14
15
16
17
18
19
20
21
22
23
24
25
26
27
28
29
30
31
32
33
34
35
36#8.我们可以通过命令查看默认启动顺序,然后修改grub中默认的内核版本:
$ awk -F \' '$1=="menuentry " {print i++ " : " $2}' /etc/grub2.cfg
0 : CentOS Linux (4.20.12-1.el7.elrepo.x86_64) 7 (Core)
1 : CentOS Linux (3.10.0-957.5.1.el7.x86_64) 7 (Core)
2 : CentOS Linux (3.10.0-957.el7.x86_64) 7 (Core)
3 : CentOS Linux (0-rescue-ca0f6fb3c5f24478abc0a2e275281d7a) 7 (Core)
#说明:
# - 默认新内核是从头插入,默认启动顺序也是从0开始(当前顺序还未生效)或者使用
# - 其中文件 /etc/grub2.cfg 和 /boot/grub2/grub.cfg 内容一致
$ grep "^menuentry" /boot/grub2/grub.cfg | cut -d "'" -f2
CentOS Linux (4.20.12-1.el7.elrepo.x86_64) 7 (Core)
CentOS Linux (3.10.0-957.5.1.el7.x86_64) 7 (Core)
CentOS Linux (3.10.0-957.el7.x86_64) 7 (Core)
CentOS Linux (0-rescue-ca0f6fb3c5f24478abc0a2e275281d7a) 7 (Core)
#9.查看当前实际启动顺序
$grub2-editenv list
saved_entry=CentOS Linux (3.10.0-957.5.1.el7.x86_64) 7 (Core)
#10.设置默认启动
sudo grub2-set-default 'CentOS Linux (4.20.12-1.el7.elrepo.x86_64) 7 (Core)'#方式1
sudo grub2-set-default 0 #方式2
grub2-editenv list
saved_entry=CentOS Linux (4.20.12-1.el7.elrepo.x86_64) 7 (Core)
#由上面可以看出新内核(5.0.10)目前位置在0,原来的内核(3.10.0)目前位置在1,所以如果想生效最新的内核,还需要我们修改内核的启动顺序为0:
# vim /etc/default/grub
# GRUB_DEFAULT = 0
#注:Centos 6 更改的文件相同,使用命令确定新内核位置后,然后将参数default更改为0即可。
#接着运行grub2-mkconfig命令来重新创建内核配置,如下:
#grub2-mkconfig -o /boot/grub2/grub.cfg
#11.修改grub中默认的内核版本后重新启动
reboot
补充说明:1
2
3
4
5
6
7
8grub2-set-default 0
#传统启动方式
grub2-mkconfig -o /boot/grub2/grub.cfg
grubby --default-kernel
#UEFI启动方式
grub2-mkconfig -o /boot/efi/EFI/centos/grub.cfg
方法2:1
2
3
4
5
6
7
8
9
10
11
12
13
14#对于一些无法上网的服务器,或者需要安装指定版本内核的需求,我们可以把kernel image的rpm包下载下来安装,下载地址如下:
下载指定版本 kernel: http://rpm.pbone.net/index.php3?stat=3&limit=1&srodzaj=3&dl=40&search=kernel
下载指定版本 kernel-devel:http://rpm.pbone.net/index.php3?stat=3&limit=1&srodzaj=3&dl=40&search=kernel-devel
官方 Centos 6: http://elrepo.org/linux/kernel/el6/x86_64/RPMS/
官方 Centos 7: http://elrepo.org/linux/kernel/el7/x86_64/RPMS/
历史版本:http://mirror.rc.usf.edu/elrepo/kernel/el7/x86_64/RPMS/
历史版本:http://ftp.osuosl.org/pub/elrepo/kernel/el7/x86_64/RPMS/
将rpm包下载上传到服务器上,使用下面的命令安装即可:
# yum -y install kernel-ml-devel-4.12.4-1.el7.elrepo.x86_64.rpm
# yum -y install kernel-ml-4.12.4-1.el7.elrepo.x86_64.rpm
#rpm -ivh kernel-ml-headers-5.2.4-1.el7.elrepo.x86_64.rpm
#rpm -ivh kernel-ml-devel-5.2.4-1.el7.elrepo.x86_64.rpm
方法3:
还可以通过源码包编译安装,这种方式可定制性强但也比较复杂,有需要的可自行查找资料安装,下面只给出各系统版本内核源码包的下载地址:https://www.kernel.org/pub/linux/kernel/
补充:
1 | # 在yum update的时不会更新内核 |
系统环境:CentOS Linux release 7.6.1810 (Core)
默认网卡信息: weiyigeek.top-grub修改1
2
3
4
5
6
7[root@data1 network-scripts]# ip addr | grep "enp"
2: enp0s3: <BROADCAST,MULTICAST,UP,LOWER_UP> mtu 1500 qdisc pfifo_fast state UP group default qlen 1000
link/ether 08:00:27:46:9b:14 brd ff:ff:ff:ff:ff:ff
3: enp0s8: <BROADCAST,MULTICAST,UP,LOWER_UP> mtu 1500 qdisc pfifo_fast state UP group default qlen 1000
link/ether 08:00:27:36:63:b1 brd ff:ff:ff:ff:ff:ff
4: enp0s9: <BROADCAST,MULTICAST,UP,LOWER_UP> mtu 1500 qdisc pfifo_fast state UP group default qlen 1000
link/ether 08:00:27:0b:01:7d brd ff:ff:ff:ff:ff:ff
目的:将上面得enp0s3/8/9 得网卡名称变成 eth0/1/2,以下是配置流程:1
2
3
4
5
6
7
8
9
10
11
12
13
14
15
16
17
18
19
20
21
22
23
24
25
26
27
28
29
30
31
32
33
34
35
36
37
38
39
40
41
42
43
44
45#网卡配置目录
cd /etc/sysconfig/network-scripts
#1. 更改网卡名称 (目录中自留下网卡名称得ifcfg-文件,将默认得要删除)
[root@data1 network-scripts]# ls ifcfg-*
ifcfg-eth0 ifcfg-eth1 ifcfg-eth2 ifcfg-lo
#2. 修改各个网卡得配置文件
sed -i 's/NAME=enp0s3/NAME=eth1/g' ifcfg-eth1
sed -i 's/DEVICE=enp0s3/DEVICE=eth1/g' ifcfg-eth1
sed -i 's/NAME=enp0s3/NAME=eth2/g' ifcfg-eth2
sed -i 's/DEVICE=enp0s3/DEVICE=eth2/g' ifcfg-eth2
#3. 关闭"一致性网络设备命名法”
cp /etc/sysconfig/grub /etc/sysconfig/grub.bak
在 GRUB_CMDLINE_LINUX 添加 net.ifnames=0 biosdevname=0
#修改后更新GRUB、内核配置
$ grub2-mkconfig -o /boot/grub2/grub.cfg
Generating grub configuration file ...
Found linux image: /boot/vmlinuz-3.10.0-957.el7.x86_64
Found initrd image: /boot/initramfs-3.10.0-957.el7.x86_64.img
Found linux image: /boot/vmlinuz-0-rescue-a21bd1at 810ca4597ae7f6a7c26299389
Found initrd image: /boot/initramfs-0-rescue-a21bd1a810ca4597ae7f6a7c26299389.img
done
#4. 添加设备规则配置文件
#修改/etc/udev/rules.d/70-persistent-net.rules,没有该文件则新建文件
#注意MAC地址与NAME相匹配(可以用ip addr查看)
SUBSYSTEM=="net", ACTION=="add", DRIVERS=="?*", ATTR{address}=="08:00:27:46:9b:14", ATTR{type}=="1", KERNEL=="eth*", NAME="eth0"
SUBSYSTEM=="net", ACTION=="add", DRIVERS=="?*", ATTR{address}=="08:00:27:36:63:b1", ATTR{type}=="1", KERNEL=="eth*", NAME="eth1"
SUBSYSTEM=="net", ACTION=="add", DRIVERS=="?*", ATTR{address}=="08:00:27:0b:01:7d", ATTR{type}=="1", KERNEL=="eth*", NAME="eth2"
#5. 配置完成后重启系统即可
$reboot #重启后ip addr 查看修改得网卡信息
2: eth0: <BROADCAST,MULTICAST,UP,LOWER_UP> mtu 1500 qdisc pfifo_fast state UP group default qlen 1000
link/ether 08:00:27:46:9b:14 brd ff:ff:ff:ff:ff:ff
inet 10.0.2.15/24 brd 10.0.2.255 scope global noprefixroute dynamic eth0
3: eth1: <BROADCAST,MULTICAST,UP,LOWER_UP> mtu 1500 qdisc pfifo_fast state UP group default qlen 1000
link/ether 08:00:27:36:63:b1 brd ff:ff:ff:ff:ff:ff
4: eth2: <BROADCAST,MULTICAST,UP,LOWER_UP> mtu 1500 qdisc pfifo_fast state UP group default qlen 1000
link/ether 08:00:27:0b:01:7d brd ff:ff:ff:ff:ff:ff
1 | #!/bin/bash |
注意事项:
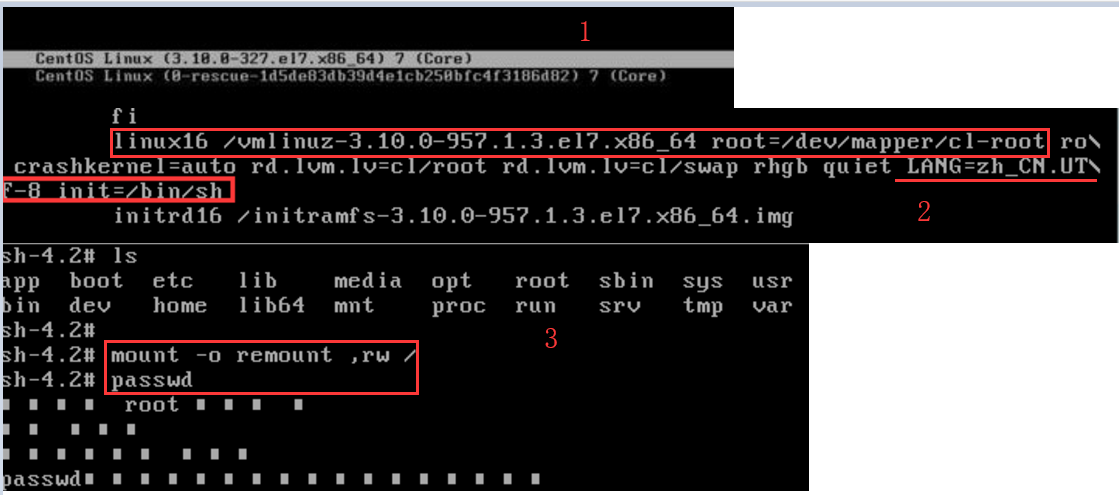
方式1:(如有登陆次数则不行)
LANG=zh_cn.UTF-8“ 同行后面加上“init=/bin/sh” Ctrl+X进入“单用户模式”passwd root重新设置Root密码touch /.autorelabel
weiyigeek.top-
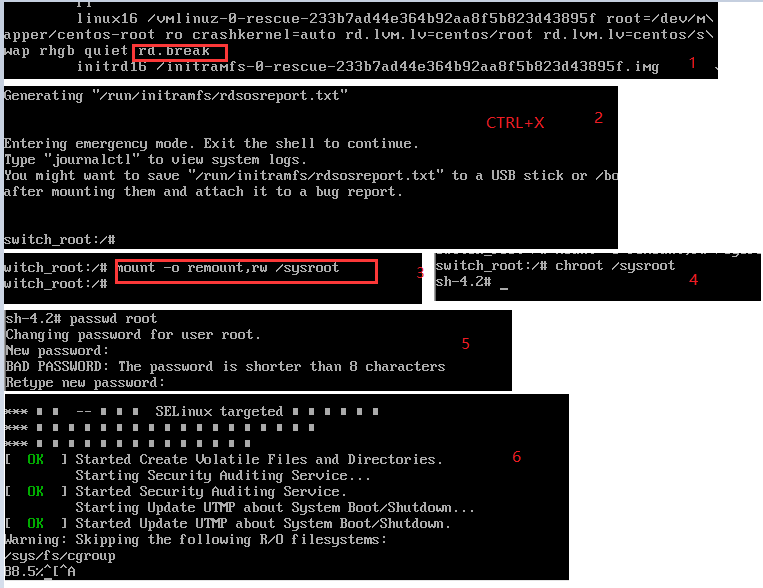
方式2:
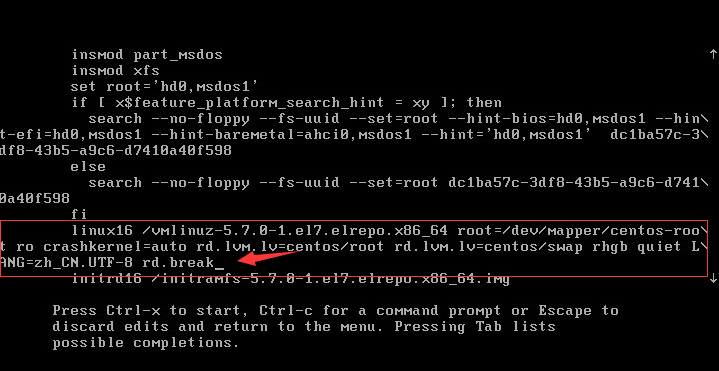
linux16 /vmlinuz-0-resuce 这一行在行末尾添加 rd.breakCtrl+x 进入单用户shell模式mount -o remount, rw /sysrootchroot /sysrootpasswd roottouch /.autorelabel
weiyigeek.top-centos7密码重置
流程步骤:
追加"rd.break"参数,然后按下Ctrl + X组合键 来运行修改过的内核程序,然后进入到系统的紧急救援模式;
weiyigeek.top-
1 | mount -o remount,rw /sysroot |
1 | pam_tally2 --user=root |
1 | exit #退出 |
Step 1.常用Language Codes Reference1
2
3
4
5
6
7
8
9
10
11
12
13
14
15
16
17
18
19
20
21
22
23# Language $LANG value
Englist(US) en_US.utf8
Assamese as_IN.utf8
Bengali bn_IN.utf8
Chinese(Simplified) zh_CN.utf8
chinese(Traditional) zh_TW.utf8
French fr_FR.utf8
German de_DE.utf8
Gujarati gu_IN.utf8
Hindi hi_IN.utf8
Italian it_IT.utf8
Japanese ja_JP.utf8
Kannada kn_IN.utf8
Korean ko_KR.utf8
Malayalam ml_IN.utf8
Marathi mr_IN.utf8
Odia or_IN.utf8
Portuguese(Brazilian) pt_BR.utf8
Punjabi pa_IN.utf8
Russian ru_RU.utf8
Spanish es_ES.utf8
Tamil ta_IN.utf8
Telugu te_IN.utf8
Step 2.查看系统默认的语言设置
1 | $ locale |
Step 3.查看当前区域配置
1 | ~$ localectl status |
Step 4.查看系统支持的汉语区域语言
1 | localectl list-locales| grep zh |
Step 5.设置区域语言
1 | localectl set-locale LANG=zh_CN.utf8 |
Step 6.查看对应的配置文件之后刷新bash或者重启使设置生效
1 | $ cat /etc/locale.conf |
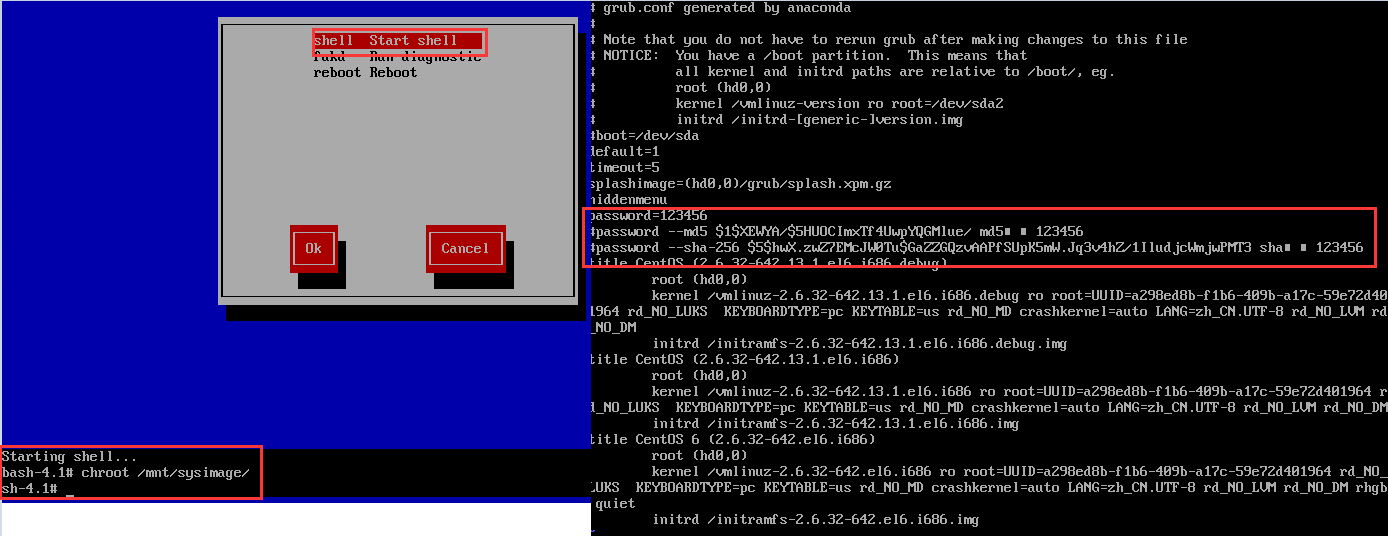
描述: 默认GRUB启动参数可以的进入单用户模式从而修改root密码,所以为了完整的安全性我们需要给GRUB引导菜单设置密码。
操作流程:1
2
3
4
5
6
7
8
9# 1.生成GRUB认证密码可以采用md5或者sha256加密
password # 明文密码
grub-md5-crypt # 生成md5密码
grub-crypt # 生成sha256密码
# 2.CentOS6在/etc/grub.conf前`title CentOS (2.6.32-642.13.1.el6.i686.debug)`,重启系统进入grub输入p此时会提示输入密码。
password=123456 #明文密码
password --md5 $1$XEWYA/$5HUOCImxTf4UwpYQGMlue/ #密文密码 md5密码123456
password --sha-256 $5$hwX.zwZ7EMcJW0Tu$GaZZGQzvAAPfSUpK5mW.Jq3v4hZ/1IludjcWmjwPMT3 #密文密码sha密码123456
描述: 各位朋友常常在CentOS7中升级Kernel后,Linux系统重启时仍然会进入旧的内核版本中,这肯定不是我们想要看到的,此时你可以参照此篇文章进行CentOS7下Linux启动时默认内核的设置.
温馨提示: 此处实践是在CentOS7 操作系统中。
步骤 01.查看对应的配置文件,验证grub启动是efi模式还是legacy模式?1
2EFI 模式配置文件: /boot/efi/EFI/centos/grub.cfg
Legacy 模式配置文件: /boot/grub2/grub.cfg
步骤 02.查看对应启动模式下,目前所有的centos7内核的启动项。1
2EFI模式: cat /boot/efi/EFI/centos/grub.cfg | grep menuentry
legacy模式: cat /boot/grub2/grub.cfg | grep menuentry
步骤 03.修改默认Kernel版本启动项,此处已EFI启动模式为例。1
2
3
4
5
6
7
8
9
10# 方式一: grub2-set-default+'对应内核版本',若遇到错误`environment block too small.`请采用方式二。
grub2-set-default 'CentOS Linux (4.20.13-1.el7.elrepo.x86_64) 7 (Core)'
# 方式二:使用 saved_entry 指定内核版本启动顺序。(未验证)
cat /boot/efi/EFI/centos/grub.cfg |grep 'menuentry ' | cut -c1-50 | nl -v 0
0 menuentry 'CentOS Linux (3.10.0-1160.66.1.el7.x86_
1 menuentry 'CentOS Linux (4.20.13-1.el7.elrepo.x86_
2 menuentry 'CentOS Linux (3.10.0-957.el7.x86_64) 7
3 menuentry 'CentOS Linux (0-rescue-d9fa041058b24c51
saved_entry=1
步骤4.查看默认的内核启动项,并重启服务器验证配置即可。
1 | $ grub2-editenv list |
1.解决 error: the HTTP XSLT module requires the libxml2/libxslt 错误1
2yum -y install libxml2 libxml2-dev
yum -y install libxslt-devel
2.解决 error: the HTTP image filter module requires the GD library. 错误1
yum -y install gd-devel
3.解决 error: the GeoIP module requires the GeoIP library. 错误1
yum -y install GeoIP GeoIP-devel GeoIP-data
4.解决 error: the Google perftools module requires the Google perftools 错误1
yum -y install gperftools
5.解决 error: libatomic_ops library was not found. 错误1
yum -y install libuuid-devel libblkid-devel libudev-devel fuse-devel libedit-devel libatomic_ops-devel
6.解决 error trying to exec ‘cc1plus’: execvp: No such file or directory 错误1
yum -y install gcc-c++
7.解决 error: [pool www] cannot get uid for user ‘www-data’ 错误1
2groupadd www-data
useradd -g www-data www-data
8.解决configure: error: mbed TLS libraries not found. 错误。需要安装mbedtls,教程:https://www.24kplus.com/linux/281.html
9.解决 error: Cannot find OpenSSL’s <evp.h> 错误1
2yum install openssl openssl-devel
ln -s /usr/lib64/libssl.so /usr/lib/
10.解决 error: Libtool library used but ‘LIBTOOL’ is undefined 错误1
yum install libtool
11.解决 exec: g++: not found 错误1
2yum -y update gcc
yum -y install gcc+ gcc-c++
12.解决 configure: error: tss lib not found: libtspi.so 错误1
yum install trousers-devel
13.解决 Can’t exec “autopoint”: No such file or directory 错误1
yum install gettext gettext-devel gettext-common-devel
14.解决 configure: error: libcrypto not found. 错误1
2yum remove openssl-devel
yum -y install openssl-devel
15.解决 configure: error: Package requirements (libffi >= 3.0.0) were not met: No package ‘libffi’ found 错误1
yum install libffi-devel
16.解决 fatal error: uuid.h: No such file or directory 错误1
yum install e2fsprogs-devel uuid-devel libuuid-devel
17.解决 configure: error: openssl lib not found: libcrypto.so 错误1
yum install openssl-devel
18.解决 tar (child): lbzip2: Cannot exec: No such file or directory 错误1
yum -y install bzip2
19.解决 configure: error: C++ preprocessor “/lib/cpp” fails sanity check 错误1
yum install gcc-c++
20.解决 configure: error: Please reinstall the BZip2 distribution 错误1
yum install bzip2 bzip2-devel
21.解决 configure: error: cURL version 7.15.5 or later is required to compile php with cURL support 错误1
yum install curl-devel
22.解决 configure: error: not found. Please provide a path to MagickWand-config or Wand-config program 错误1
yum install ImageMagick-devel
21.解决 configure: error: no acceptable C compiler found in $PATH 错误1
yum install gcc
22.解决 configure: error: Package requirements (icu-uc >= 50.1 icu-io icu-i18n) were not met: 错误1
yum install libicu-devel
23.解决 configure: error: Package requirements (sqlite3 > 3.7.4) were not met: No package ‘sqlite3’ found 错误1
yum install sqlite-devel
24.解决 configure: error: Package requirements (oniguruma) were not met: No package ‘oniguruma’ found 错误1
yum install oniguruma oniguruma-devel
解决办法:
Bescure installed system. /mnt/sysimage目录。chroot /mnt/sysimage.vi /etc/grup.conf删除配置文件中的密码然后关机重启系统即可。
weiyigeek.top-CentOS-grub-密码清除
解决办法: 安装ntfs-3g软件包,执行yum install ntfs-3g命令,安装完成后你会发现多了个mount.ntfs-3g的命令。1
2
3
4
5
6
7
8
9
10
11
12
13# 如果更新源没有该软件包,请采用阿里云的提供的CentOS-Base.repo仓库。
wget -O /etc/yum.repos.d/CentOS-Base.repo http://mirrors.aliyun.com/repo/Centos-7.repo
yum clean all && yum makecache
# 执行mount挂载,此时你会发现显示的类型为fuseblk,这是由于ntfs-3g并不是内核模块,而是调用fuse来挂载的。
$ fdisk -l | grep "/dev/sdb1" # 查看类型
$ mount /dev/sdb1 /mnt
The disk contains an unclean file system (0, 0).
The file system wasnt safely closed on Windows. Fixin
# 执行 `df -hT` 命令后的结果会认为是 fuseblk(blk=block).
$ df -Th | grep "/mnt/ntfs"
/dev/sdb1 fuseblk 932G 437G 495G 47% /mnt/ntfs
温馨提示: 由于是采用的fuse如果系统没有安装也是不行的,建议执行如下命令查看rpm -q fuse。
问题描述: 当前在Windows系统中使用的U盘或者移动设备,大多都是exFat格式默认的Linux系统一般是无法识别的我们可以按照如下方式进行挂载。
解决办法:1
2
3
4
5
6
7
8
9
10
11
12# 安装 nux repo 如果您的安装源存在 exfat-utils fuse-exfa 则不用安装。
yum install -y http://li.nux.ro/download/nux/dextop/el7/x86_64/nux-dextop-release-0-5.el7.nux.noarch.rpm
# 安装 fuse 包
yum install exfat-utils fuse-exfa -y
# 验证系统是否可以识别exFat格式的移动社保
fdisk -l
# 挂载设备到系统
mount -t exfat /dev/sdb1 /mnt
# FUSE exfat 1.2.7
你好看友,欢迎关注博主微信公众号哟! ❤
这将是我持续更新文章的动力源泉,谢谢支持!(๑′ᴗ‵๑)
温馨提示: 未解锁的用户不能粘贴复制文章内容哟!
方式1.请访问本博主的B站【WeiyiGeek】首页关注UP主,
将自动随机获取解锁验证码。
Method 2.Please visit 【My Twitter】. There is an article verification code in the homepage.
方式3.扫一扫下方二维码,关注本站官方公众号
回复:验证码
将获取解锁(有效期7天)本站所有技术文章哟!

@WeiyiGeek - 为了能到远方,脚下的每一步都不能少
欢迎各位志同道合的朋友一起学习交流,如文章有误请在下方留下您宝贵的经验知识,个人邮箱地址【master#weiyigeek.top】或者个人公众号【WeiyiGeek】联系我。
更多文章来源于【WeiyiGeek Blog - 为了能到远方,脚下的每一步都不能少】, 个人首页地址( https://weiyigeek.top )

专栏书写不易,如果您觉得这个专栏还不错的,请给这篇专栏 【点个赞、投个币、收个藏、关个注、转个发、赞个助】,这将对我的肯定,我将持续整理发布更多优质原创文章!。
最后更新时间:
文章原始路径:_posts/系统运维/Linux/系统配置/CentOS/CentOS7.x服务器系统安装配置运维实践.md
转载注明出处,原文地址:https://blog.weiyigeek.top/2019/4-28-196.html
本站文章内容遵循 知识共享 署名 - 非商业性 - 相同方式共享 4.0 国际协议