[TOC]
0x00 前言简述 最近看了@Tualatrix Chou所写的使用 jsDelivr 来优化网站访问速度,深受启发又加之自己采用Hexo博客框架搭建了一个静态化的博客,同时采用github Page 进行托管,虽然加上Cloudflare的CDN来加速,但是实际上某些情况下还没有直接访问的速度快,当然加了总比没加好;
我们先来说说优化原理想要提升网站的访问速度,基本上切入点无非是优化前后端的访问性能,根据我的实际情况来说,想前面所说的我的博客采用的是github page搭建问题不出在后端;
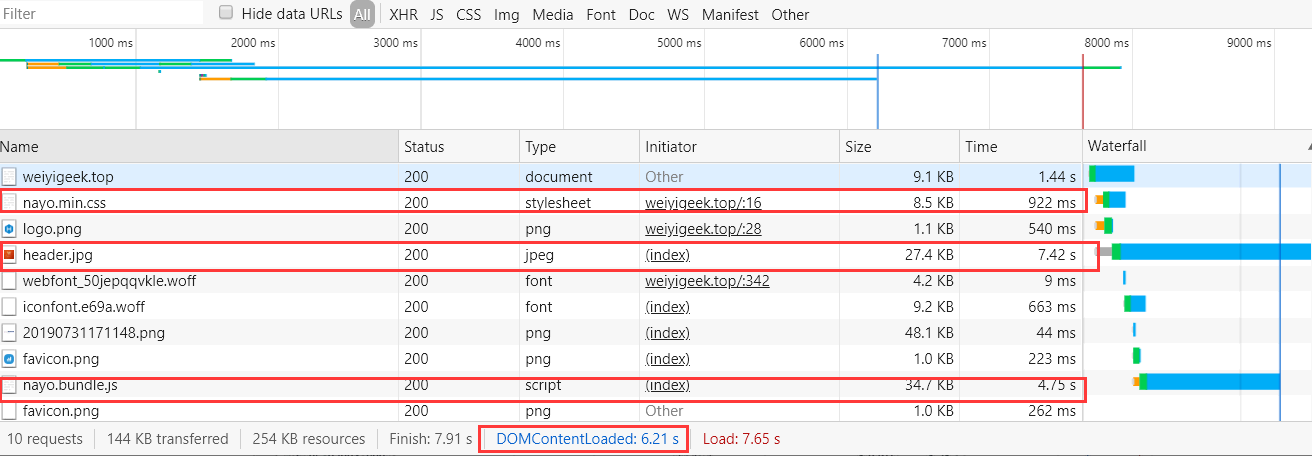
先来看看我优化前的网站访问速度(真的惨不忍睹),通过 Chrome 的 Developer Tools 的 Network 面板工具可以得到加上请求加载的时间:
DOMContentLoaded (6.21s)
weiyigeek.top-
从图中我们可以看出静态资源的加载是从github上面走的所有速度真的是,从中我们需要解决的是图片资源、字体资源、css资源、js资源等访问请求连接问题;
0x01 优化方法 常用的优化网站速度的方法(针对于包含了国外的资源访问请求)
npmjs + jsDelivr
github + jsDelivr
1.npmjs + jsDelivr
1)创建 npmjs 账号:可以把网站静态资源作为 npm 包的形式放在 npmjs.org 网站上前提我们需要注册一个账号: npmjs.org;
2)建立并发布一个自定义 npm 包,创建一个目录,然后放一个名为 package.json 的文件,写简单的两行即可:
[TOC]
0x00 前言简述 最近看了@Tualatrix Chou所写的使用 jsDelivr 来优化网站访问速度,深受启发又加之自己采用Hexo博客框架搭建了一个静态化的博客,同时采用github Page 进行托管,虽然加上Cloudflare的CDN来加速,但是实际上某些情况下还没有直接访问的速度快,当然加了总比没加好;
我们先来说说优化原理想要提升网站的访问速度,基本上切入点无非是优化前后端的访问性能,根据我的实际情况来说,想前面所说的我的博客采用的是github page搭建问题不出在后端;
先来看看我优化前的网站访问速度(真的惨不忍睹),通过 Chrome 的 Developer Tools 的 Network 面板工具可以得到加上请求加载的时间:
DOMContentLoaded (6.21s)
weiyigeek.top-
从图中我们可以看出静态资源的加载是从github上面走的所有速度真的是,从中我们需要解决的是图片资源、字体资源、css资源、js资源等访问请求连接问题;
0x01 优化方法 常用的优化网站速度的方法(针对于包含了国外的资源访问请求)
npmjs + jsDelivr
github + jsDelivr
1.npmjs + jsDelivr
1)创建 npmjs 账号:可以把网站静态资源作为 npm 包的形式放在 npmjs.org 网站上前提我们需要注册一个账号: npmjs.org;
2)建立并发布一个自定义 npm 包,创建一个目录,然后放一个名为 package.json 的文件,写简单的两行即可:1 2 3 4 { "name" : "imtx" , "version" : "1.0.0" }
3)使用 jsDelivr 来引用这个包等待发布完这个 npm 包后就可以在线使用它了1 2 3 https://cdn.jsdelivr.net/npm/imtx@1.0.0/imtx.js https://cdn.jsdelivr.net/npm/imtx@1.0.0/imtx.css
2.github + jsDelivr
1.在我们的Github中创建一个项目Blog里面存放了静态资源文件比如index.js以及index.css
2.假设项目的访问路径http://github.com/weiyigeek/blog
3.采用CDN加速访问github上面的项目资源的路径1 2 https://cdn.jsdelivr.net/gh/weiyigeek/blog/index.js https://cdn.jsdelivr.net/gh/weiyigeek/blog/index.css
3.hexo permalink_defaults 持久化链接 permalink_defaults 参数下调整永久链接中各变量的默认值,方便网站收录与网站SEO排名上升,而不是一串中文字符为URL的链接;
需要配置地方:
1 2 3 4 permalink: :year/:i_month/:pageid.html permalink_defaults: pageid: en
1 2 title: Hexo博客优化访问速度与持续集成和部署实践 pageid: 378
批量持久化链接shell脚本在您的source/_post目录中执行即可:
1 2 3 4 5 6 7 8 9 export number=0find /blog/source /_posts -name *.md > /tmp/all.md while read linedo sed -i "3i\ pageid: ${number} " $line let number++ done < /tmp/all.md
0x02 优化实操 我们的博客框架采用Hexo然后通过Github Page进行访问的,所以我们需要在本地修改配置和代码,比如我们采用的是Hexo Theme By Nayo主题;
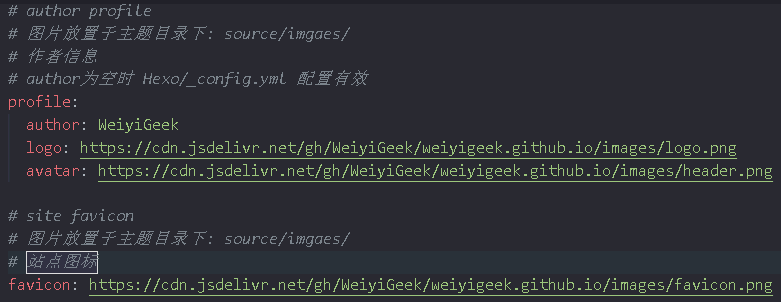
将博客中所有使用到的静态资源CSS/JS/字体/图片都加上jsdelivr CDN的访问;1 2 3 4 5 6 7 8 9 10 11 12 13 14 15 16 17 18 19 <!-- <%- css('nayo.min' ) %> --> <script src="https://cdn.jsdelivr.net/gh/WeiyiGeek/weiyigeek.github.io/nayo.min.css" ></script> <!-- <%- js('nayo.bundle' )%> --> <script src="https://cdn.jsdelivr.net/gh/WeiyiGeek/weiyigeek.github.io/nayo.bundle.js" ></script> @font-face { font-family:iconfont; src:url(https://cdn.jsdelivr.net/gh/WeiyiGeek/weiyigeek.github.io/fonts/iconfont.6239.eot); src:url(https://cdn.jsdelivr.net/gh/WeiyiGeek/weiyigeek.github.io/fonts/iconfont.6239.eot? url(https://cdn.jsdelivr.net/gh/WeiyiGeek/weiyigeek.github.io/fonts/iconfont.e69a.woff) format("woff" ), url(https://cdn.jsdelivr.net/gh/WeiyiGeek/weiyigeek.github.io/fonts/iconfont.7c23.ttf) format("truetype" ), url(https://cdn.jsdelivr.net/gh/WeiyiGeek/weiyigeek.github.io/fonts/iconfont.32d1.svg }
weiyigeek.top-
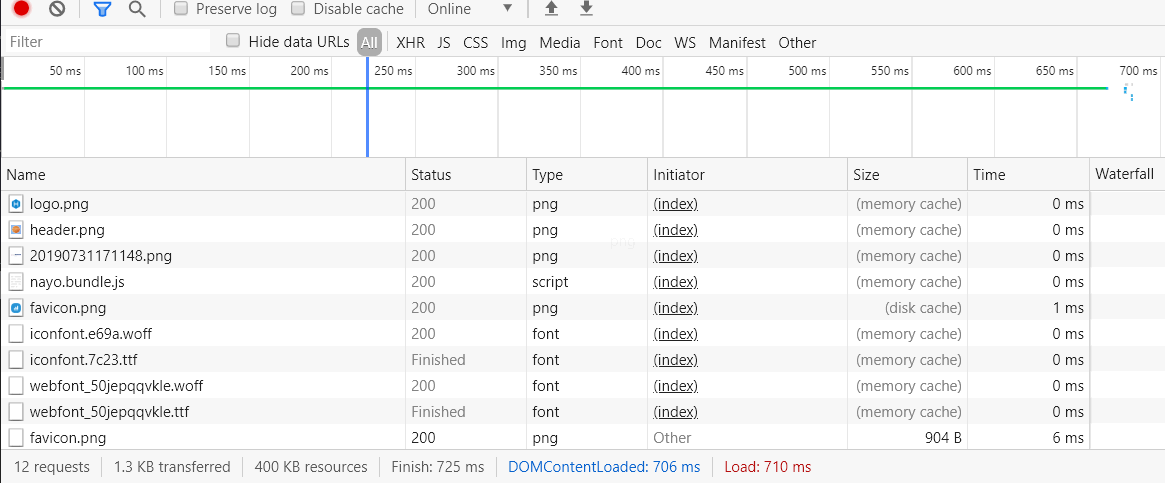
部署后查看一哈修改之后的访问速度效果:1 [root@WeiyiGeek F:\blog]
weiyigeek.top-
补充说明:[2020年4月23日 23:51:19]
JsDelivr 全站托管转化脚本1 2 3 4 5 6 7 8 9 10 11 12 13 14 15 16 17 18 19 20 21 22 23 GitHub rul: https://github.com/ohmyzsh/ohmyzsh/blob/master/tools/install.sh jsDelivr url: https://cdn.jsdelivr.net/gh/ohmyzsh/ohmyzsh/tools/install.sh #!/bin/bash if [ "$2 " = "wget" ] || [ -z $2 ];then echo -e "#DownURL : $1 " wget $(echo $1 | sed 's/raw.githubusercontent.com/cdn.jsdelivr.net\/gh/' \ | sed 's/github.com/cdn.jsdelivr.net\/gh/' \ | sed 's/\/master//' | sed 's/\/blob//' ) elif [ "$2 " = "curl" ];then echo -e "#DownURL : $1 " curl $(echo $1 | sed 's/raw.githubusercontent.com/cdn.jsdelivr.net\/gh/' \ | sed 's/github.com/cdn.jsdelivr.net\/gh/' \ | sed 's/\/master//' | sed 's/\/blob//' ) else echo -e "\e[33m#Usage: $0 github.com/WeiyiGeek/peoject [wget|curl]\e[0m" fi
参考站点:
0x03 Hexo CI/CD 描述:在用hexo写博客记录自己心得以及工作所遇问题的时候是非常方便的,但是每次更改后都需要将修改添加的文件通过git上传到github或者gitee中,同时还需再本机hexo d -g 生成博客的静态化文件然后再上传到github page,由于需要在机器上按照npm环境才能正常使用hexo所以当换了电脑后是非常不方便,因此自建了gitlab来实现hexo 静态化页面的持续集成和部署;
环境说明:
Gitlab : 12.9.2
操作系统: CentOS7
系统已安装: Gitlab-Runner(12.9.0) / docker-ce / docker-compose / git 等
主要安装环境参考本博客文章:
配置流程: 1 2 3 4 5 6 7 8 9 10 11 12 13 14 15 16 17 18 19 20 21 22 $ git remote add gitlab git@gitlab.weiyigeek.top:WeiyiGeek/blog.git $ git add . $ git commit -m "Init inner gitlab" $ git push -u gitlab master Enumerating objects: 5906, done . Counting objects: 100% (5906/5906), done . Delta compression using up to 4 threads Compressing objects: 100% (5085/5085), done . Writing objects: 100% (5906/5906), 16.27 MiB | 14.65 MiB/s, done . Total 5906 (delta 3672), reused 1508 (delta 681) remote: Resolving deltas: 100% (3672/3672), done . remote: remote: ======================================================================== remote: remote: Welcome To WeiyiGeek Gitlab Code Repository remote: remote: ======================================================================== remote: To gitlab.weiyigeek.top:WeiyiGeek/blog.git * [new branch] master -> master Branch 'master' set up to track remote branch 'master' from 'gitlab' .
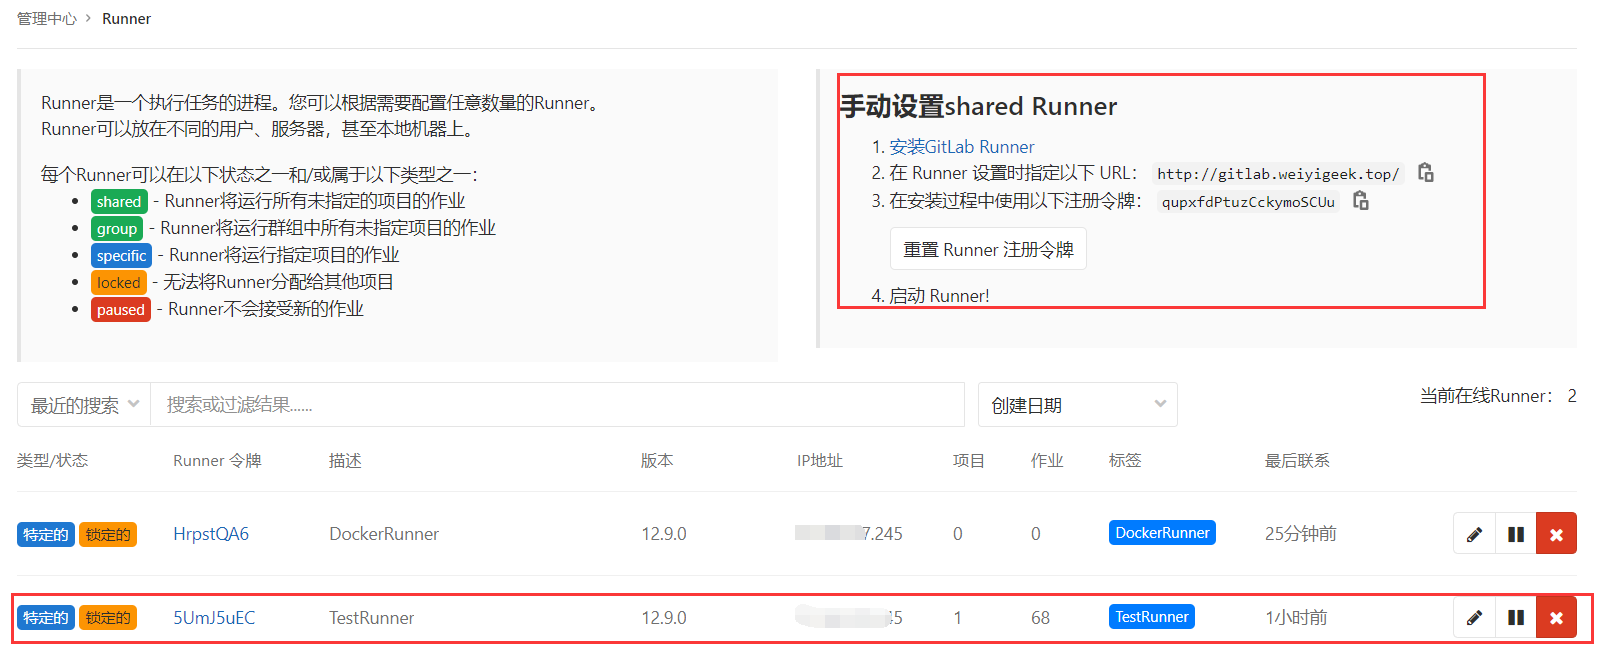
Step2.在gitlab-ci中注册Runner在上面的文章中有详细的说明,以及将项目加入runner之中,注意此处Excuter是使用的shell,当然您也可以使用docker;
weiyigeek.top-gitlab-runner
Step3.在CentOS7即Gitlab-Runner机器上安装git和ssh避免首次登录服务时候需要输入yes;1 2 3 4 5 6 7 8 9 10 11 12 13 14 15 16 17 18 19 20 21 22 23 24 25 26 [gitlab-runner@initiator blog]$ git --version git version 2.22.0 yum install http://opensource.wandisco.com/centos/7/git/x86_64/wandisco-git-release-7-2.noarch.rpm sudo yum install –y git git --version $vim /etc/ssh/ssh_configHost * ...... StrictHostKeyChecking no systemctl restart sshd
Step4.拷贝已经在Github以及gitee中认证的公钥/密钥到/home/gitlabp-runner/.ssh之中1 2 3 4 5 6 7 8 [gitlab-runner@initiator .ssh]$ chmod +600 * [gitlab-runner@initiator .ssh]$ ls -alh 总用量 8.0K drwxr-xr-x. 2 root root 38 4月 19 12:54 . drwx------. 5 gitlab-runner gitlab-runner 140 4月 19 14:47 .. -rw-------. 1 gitlab-runner gitlab-runner 2.6K 4月 19 12:54 id_rsa -rw-------. 1 gitlab-runner gitlab-runner 573 4月 19 12:54 id_rsa.pub
Step5.测试是否可以连接到github以及gitee仓库之中;1 2 3 4 5 6 [gitlab-runner@initiator .ssh]$ ssh -T git@github.com Failed to add the host to the list of known hosts (/home/gitlab-runner/.ssh/known_hosts). Hi WeiyiGeek! You've successfully authenticated, but GitHub does not provide shell access.' [gitlab-runner@initiator .ssh]$ ssh -T git@gitee.com Hi WeiyiGeek! You've successfully authenticated, but GITEE.COM does not provide shell access.'
Step6.编写CI/CD hexo博客的.gitlab-ci.yaml 以及 docker-compose.yaml
1 2 3 4 5 6 7 8 9 10 11 12 13 14 15 16 17 18 19 20 21 22 23 24 25 26 27 28 29 30 31 32 33 34 35 36 37 38 stages: - build - deploy cache: untracked: true paths: - node_modules/ hexo_build: stage: build cache: untracked: true paths: - node_modules/ policy: pull script: - docker stop blog - docker-compose -v - chmod +x ./startHexo.sh - docker-compose up -d hexo_deploy: stage: deploy script: - sleep 70 - cp db.json ./public/ && cd ./public - git init - git remote add origin git@github.com:WeiyiGeek/weiyigeek.github.io.git - git remote add gitee git@gitee.com:WeiyiGeek/WeiyiGeek.git - git add . && git commit -m "Gitlab-ci blog" - git push -f -u origin master - git push -f -u gitee master - docker stop blog
docker-compose.yaml1 2 3 4 5 6 7 8 9 10 11 12 13 14 15 16 17 18 version: "3.0" services: blog: image: mhart/alpine-node:latest container_name: blog labels: - "com.example.author=weiyigeek" - "com.example.description=blog" - "com.example.department=IT" - "com.example.release=v1.0" ports: - "8080:4000" volumes: - "$PWD:/opt/blog/" working_dir: /opt/blog/ entrypoint: /opt/blog/startHexo.sh build 996 command: /opt/blog/startHexo.sh start
startHexo.sh1 2 3 4 5 6 7 8 9 10 11 #!/bin/sh if [ $1 == "build" ];then addgroup -S gitlab-runner && echo -e "WeiyiGeek1\nWeiyiGeek1" | adduser gitlab-runner -u $2 -G gitlab-runner -D -S -s /bin/ash npm config set unsafe-perm true && npm config set registry https://registry.npmmirror.com \ && npm install -g hexo-cli --save \ && npm install --save fi pkill hexo && npm install hexo --save hexo clean && chown -R gitlab-runner:gitlab-runner ./ && su gitlab-runner -c "hexo generate" && su gitlab-runner -c "hexo server"
补充说明:
上面docker-compose.yaml我们给脚本指定了996参数,这个参数是gitlab-runner主机上的gitlab-runner用户的uid值,由于gitlab-ci执行用户是gitlab-runner这里避免权限不足才进行这样设置的,您需要根据您们机器上gitlab-runner值来修改;1 2 [gitlab-runner@initiator .ssh]$ grep "gitlab-runner" /etc/passwd gitlab-runner:x:996:497:GitLab Runner:/home/gitlab-runner:/bin/bash
在yaml我们设置一个sleep 120命令由于当build工作执行完成时候 hexo geneater 可能还没生成环境此时便会进行deploy阶段工作这样会导致CI/CD失败,所以这样做防止管道阻塞以及构建失败;
git命令:本地分支强制推送到远程代码库执行 git push -f origin master,由于远程 github|gitee Page 仓库我们不需要git pull 只需要 git push 所以这里我们强制推送来防止在runner中运行构建失败;
缓存目录查看:/home/gitlab-runner/cache/WeiyiGeek/blog/default-24/cache.zip
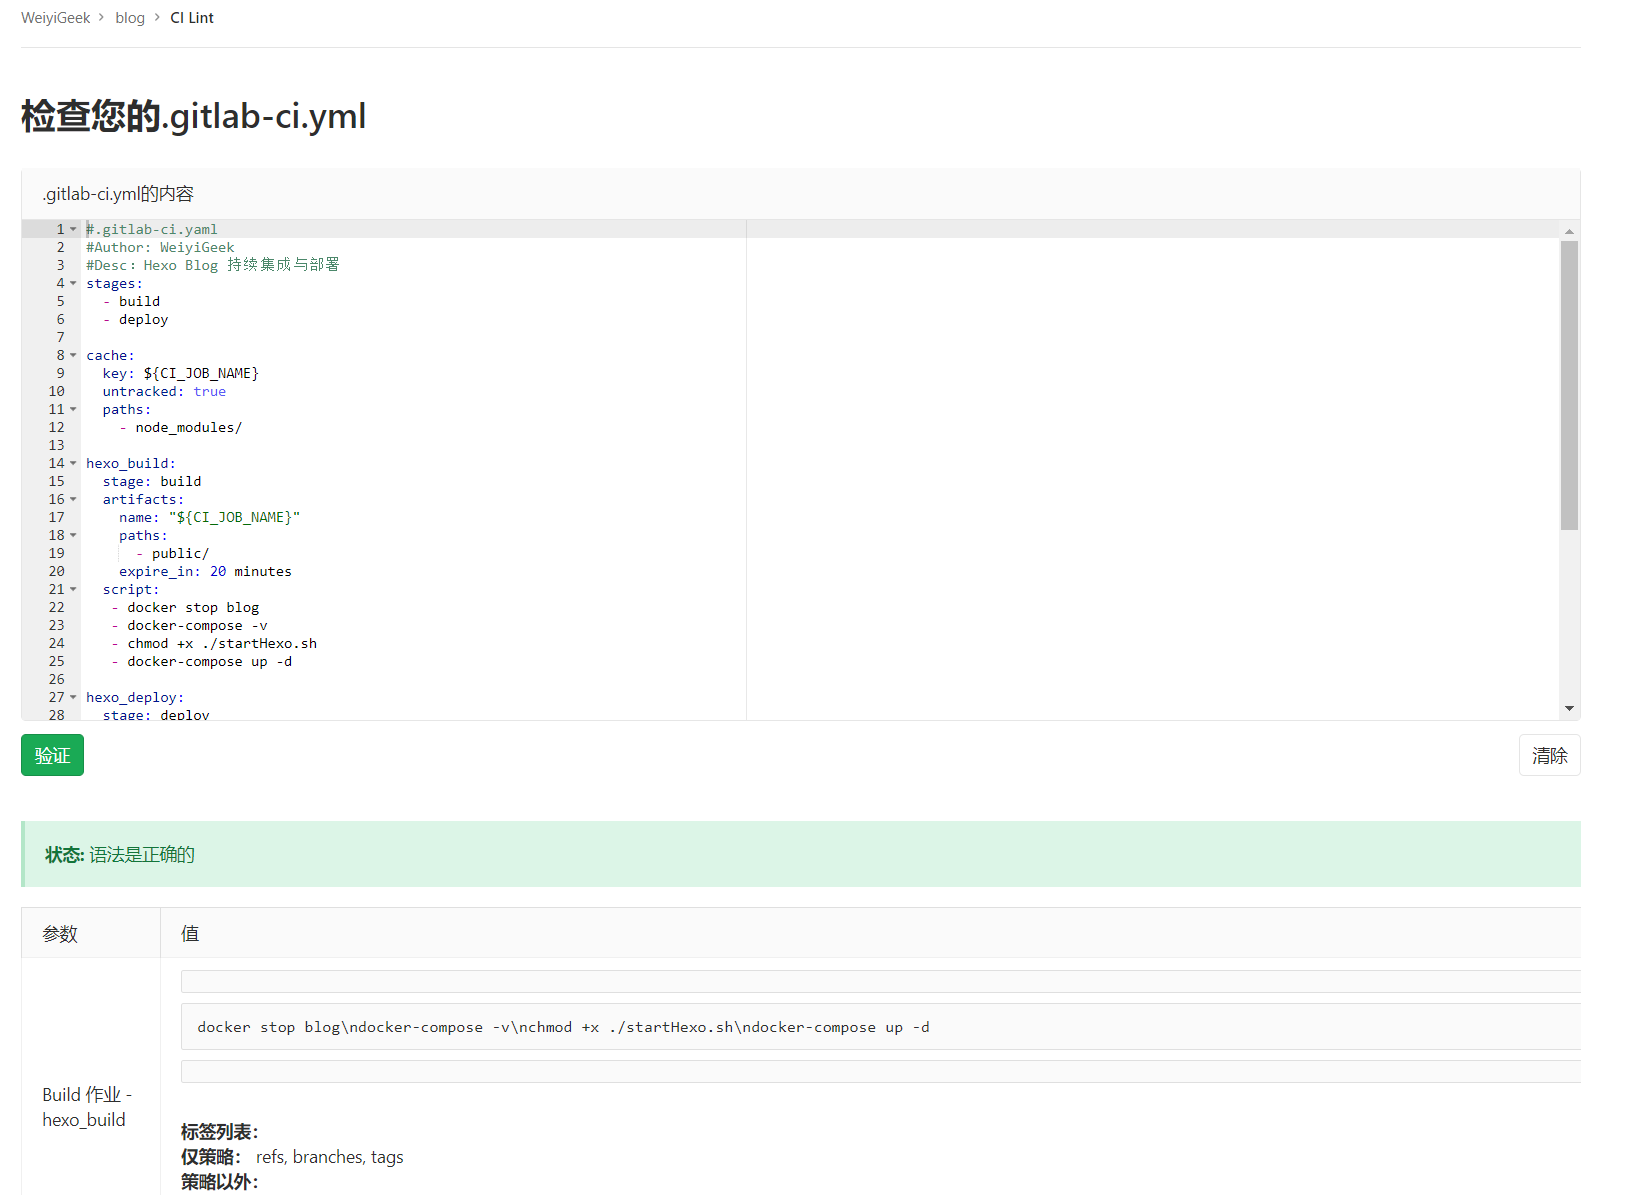
Step7.验证我们编写gitlab-CI/CD 文件 .gitlab-ci.yaml
weiyigeek.top-
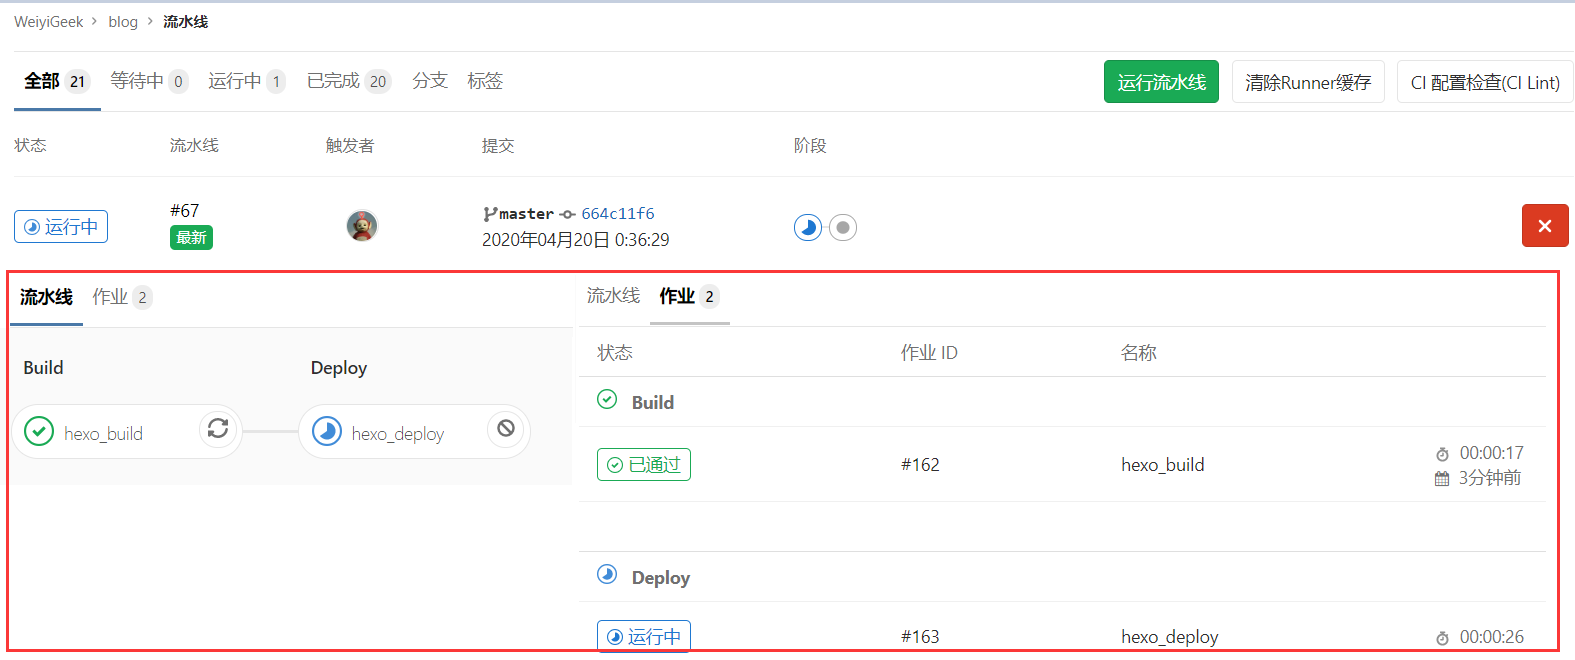
Step8.重新上传更改的文件到gitlab之中,然后它便会自动触发CI/CD流水线我们也可以在Gitlab-CI进行查看;
weiyigeek.top-
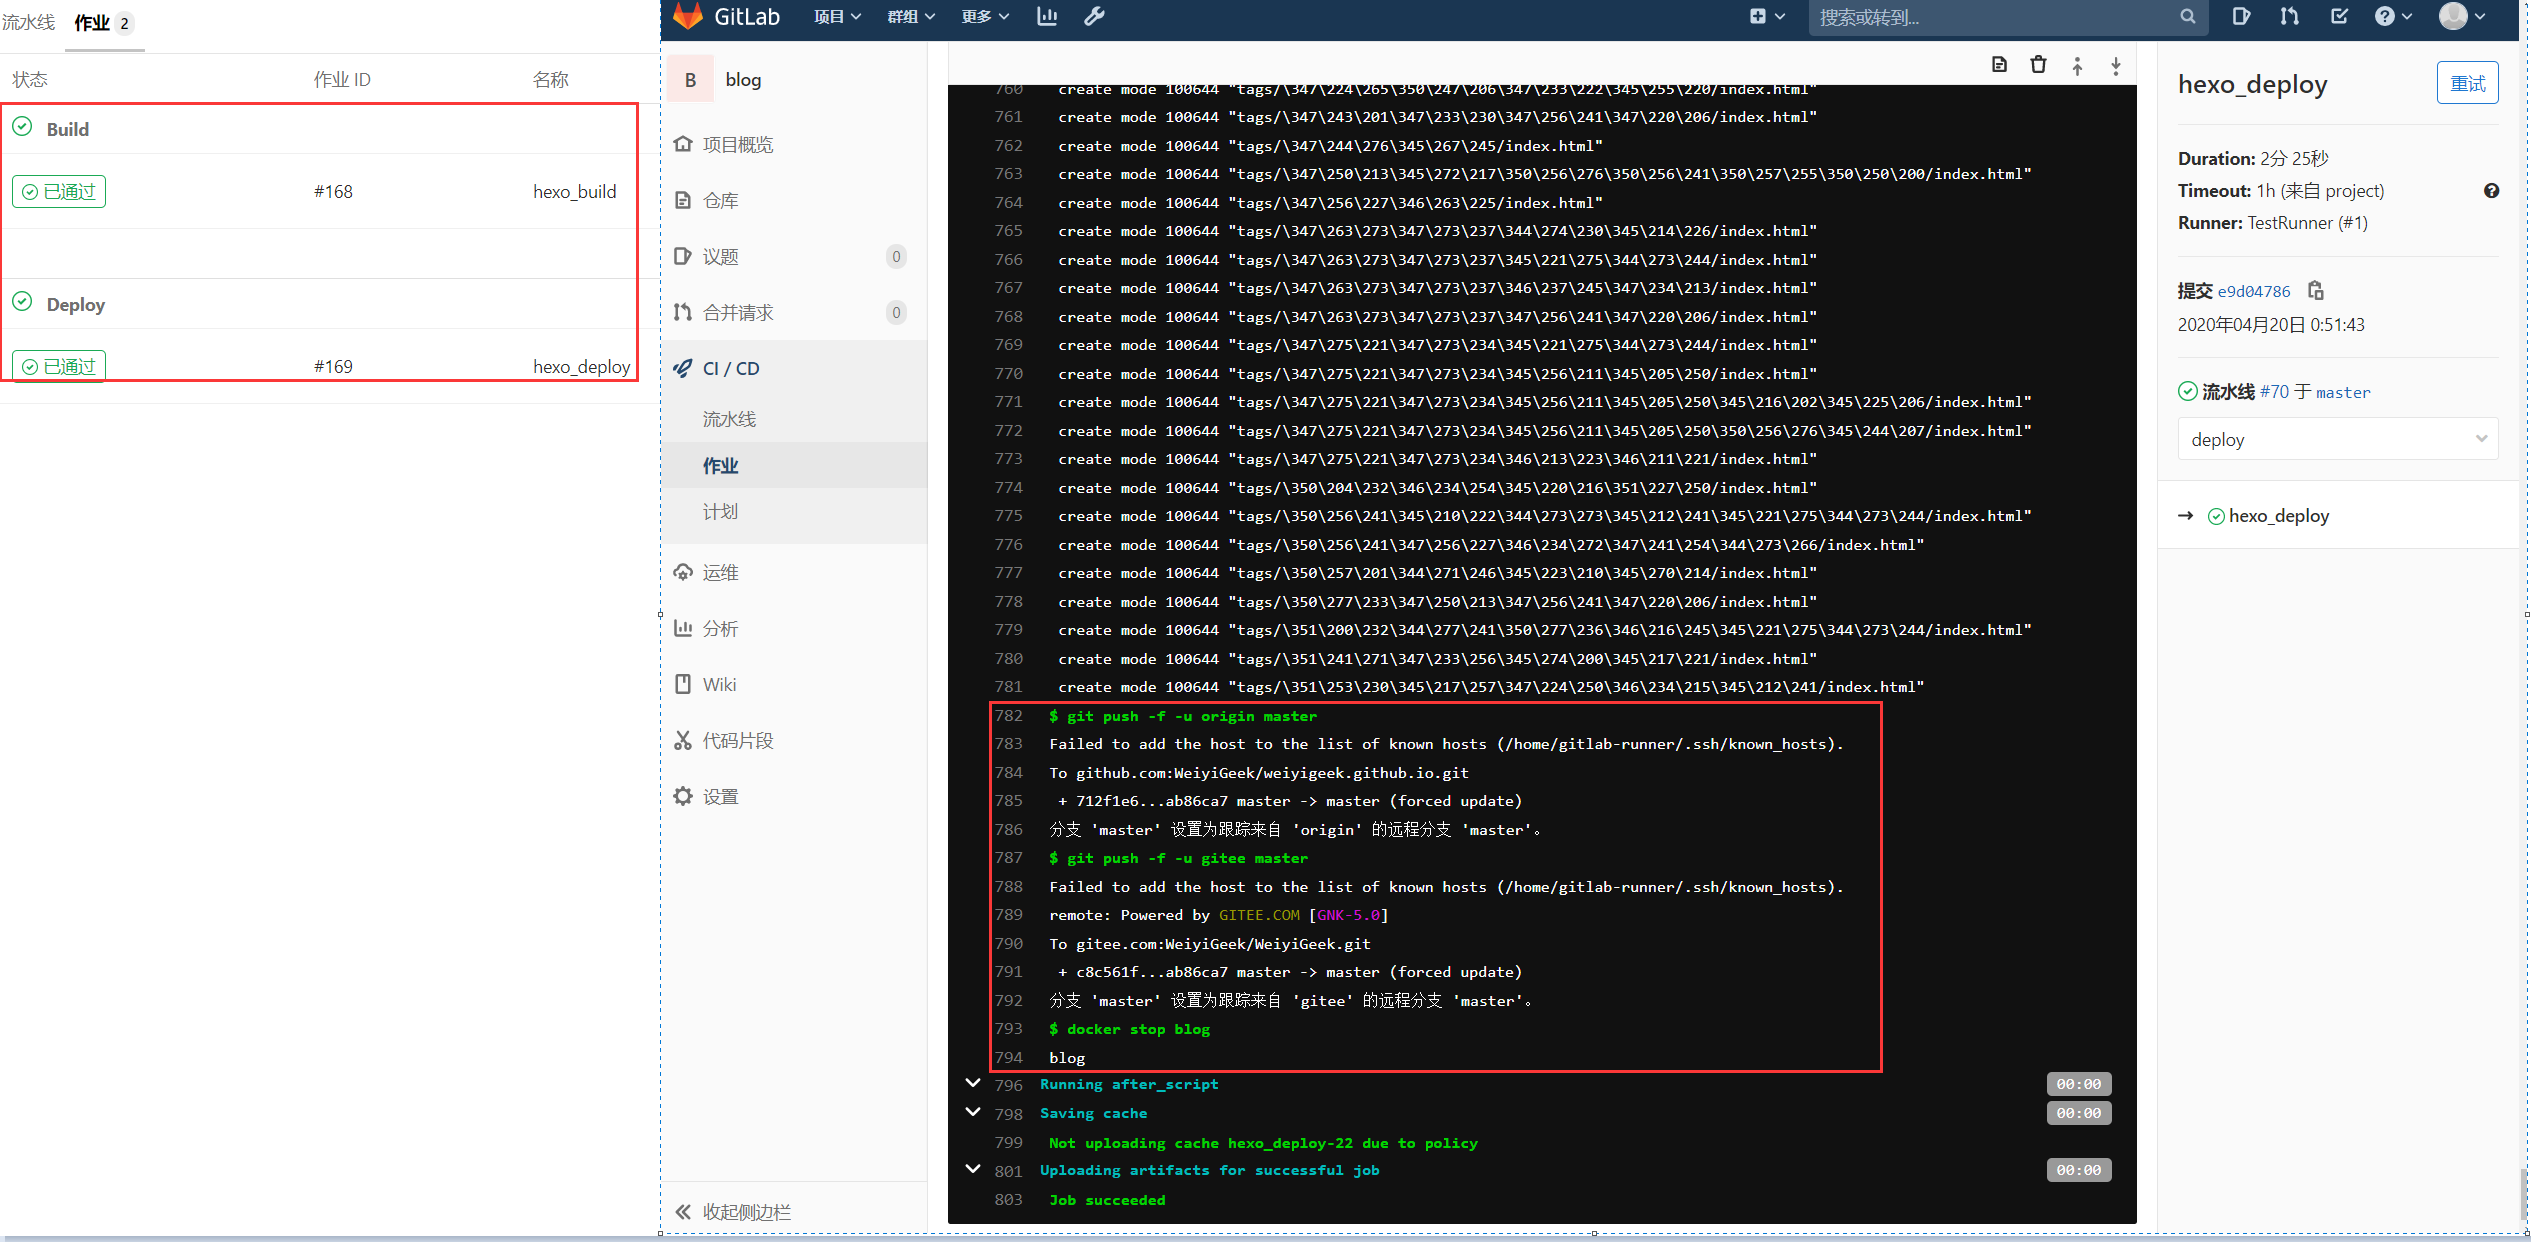
Step9.在作业中查看gitlab-runner执行的详细情况以及查看docker镜像执行情况;
weiyigeek.top-
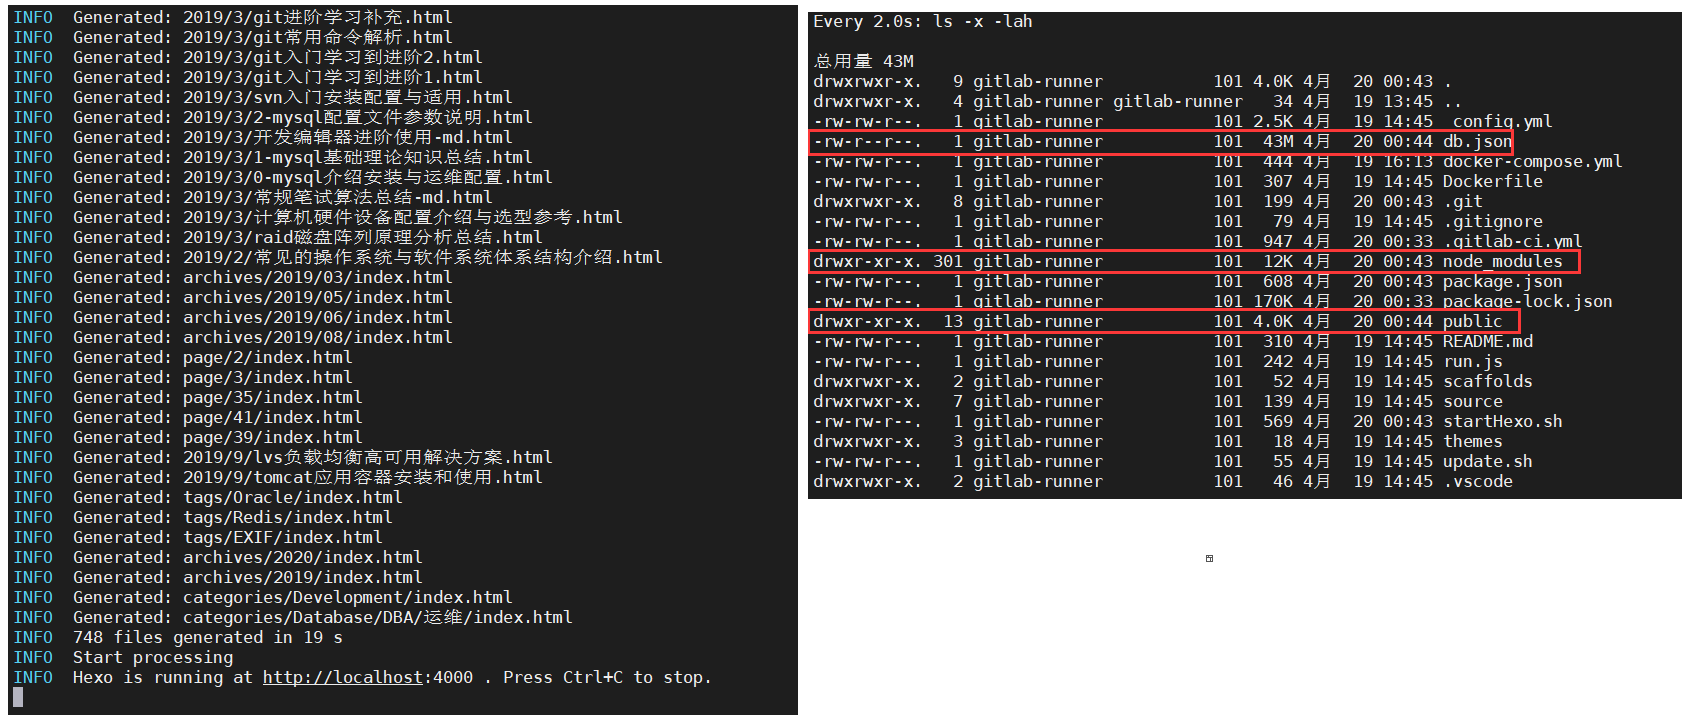
1 2 3 4 5 docker logs --tail 100 -f blog watch -x 'll'
weiyigeek.top-blog
Step10.至此Hexo基于Gitlab的自动化集成和部署就完成了,当然您也可以将deploy中的docker stop blog去掉即可直接访问我们hexo blog;
0x04 入坑问题 问题1:gitlab-runner拉取git仓库失败 1 2 3 4 5 6 7 8 9 Running with gitlab-runner 12.0.1 (0e5417a3) on autobuild-02 qyhAY53y Using Shell executor... Running on xxxxx.novalocal... Fetching changes with git depth set to 50... Reinitialized existing Git repository in /home/gitlab-runner/builds/qyhAY53y/0/tangaoxiong/ci-hotupdate-demo/.git/ fatal: git fetch-pack: expected shallow list fatal: The remote end hung up unexpectedly ERROR: Job failed: exit status 1
解决办法:安装较新版本的git即可,此处以CentOS7为例;1 2 3 yum install http://opensource.wandisco.com/centos/7/git/x86_64/wandisco-git-release-7-2.noarch.rpm sudo yum install –y git git --version
