[TOC]
Security - 集群安全 描述: Kubernetes 作为一个分布式的集群管理工具,保证集群的安全性是非常至关重要的。同时由于API Server是集群内部各个组件通信的中介,也是外部控制的入口,所以Kubernetes的安全机制基本是就是围绕保护API Server 来进行设计的;
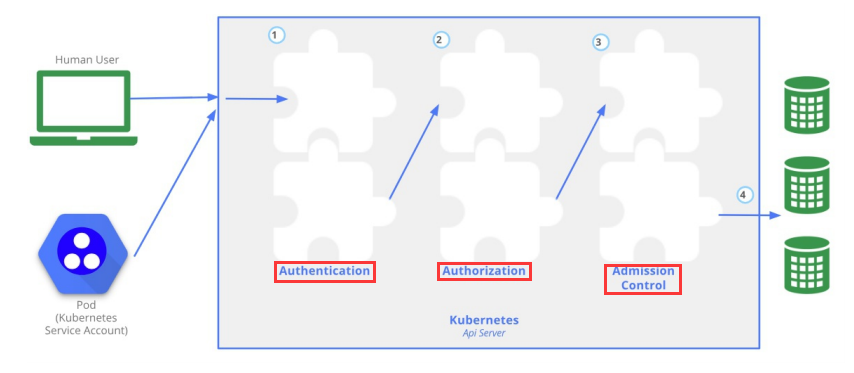
Kubernetes 使用了认证(Authentication)、鉴权(Authorization)、准入控制(Admission Control)三步来保证 每个 请求 API Server 都是安全;
weiyigeek.top-Kubernetes机制说明
1) Authentication(认证) 描述: 开启TLS时所有的请求都需要首先认证,k8s支持多种认证机制并支持同时开启多个认证插件(只需要一个认证通过即可),如果认证成功则用户的username会传入授权模块做进一步的授权验证,而对于认证失败的请求则返回 HTTP 401;
认证分类:
Tips: k8s 不管理用户虽然k8s认证授权采用了username但是k8s并不直接管理用户,不能创建user对象也不存储username。
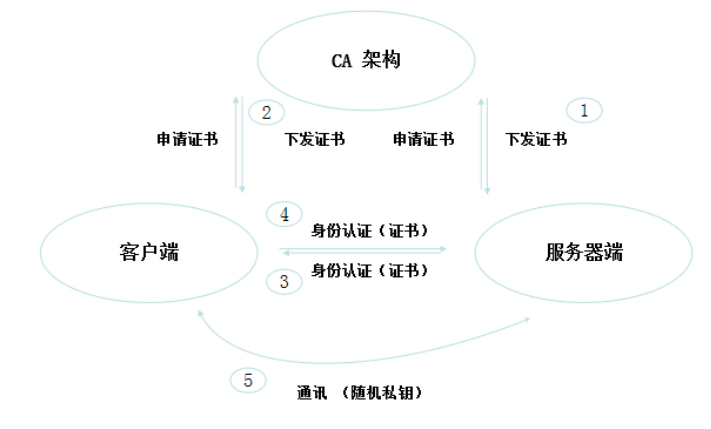
认证流程:
weiyigeek.top-HTTPS双向认证
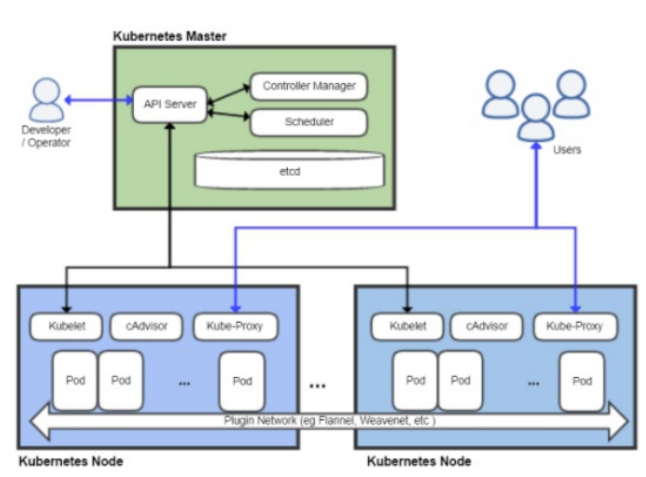
weiyigeek.top-节点认证
证书颁发说明:
1.手动签发: 通过 k8s 集群的跟 ca 进行签发HTTPS 证书;
2.自动签发: kubelet 首次访问 API Server 时,使用 token 做认证,通过后 Contrller Manager 会为 kubelet 生成一个证书,以后的访问都是用证书做认证了;
访问类型:
1.Kubenetes 组件 对API Server 的访问: kubectl、Controller Manager、Scheduler、kubelet、kube-proxy
2.Kubernetes 管理的Pod容器 对API Server 的访问: Pod (dashborad 也是以Pod 形式运行)
安全性说明:
1.Controller Manager、Scheduler 与 API Server 在同一台机器,所以直接使用API Server 的非安全端口访问,可以在Node节点时添加 --insecure-bind-address=127.0.0.1 防止不必要的性能消耗;
2.kubectl、 kubelet、 kube-proxy 访问 API Server 就都需要证书进行 HTTPS 双向认证;
认证文件 描述: 上面我们说过k8s两种访问方式一是对API Server的访问通过(kubeconfig),二是对管理的Pod对容器的访问通过 SA(ServiceAccount);
kubeconfig 描述: kubeconfig 文件包含集群参数 (CA证书、API Serve访问证书),客户端参数(上面生成的证书和私钥),集群context信息(集群名称、用户名);
Tips: Kubenetes 组件通过启动时指定不同的 kubeconfig 文件可以切换到不同的集群;
ServiceAccount 描述: Pod中的容器访问API Server。因为Pod的创建、销毁是动态的,所以要为它手动生成证书就不可行了。
Tips: Kubenetes 通过使用了Service Account 解决 Pod 访问API Server的认证问题; (后面会详细讲解)
Q: Secret 与 SA 的关系
另一种是用于 ServiceAccount 的 service-account token,
另一种是用于保存用户自定义保密信息的 Opaque, Service Account 中用到包含三个部分: Token、ca.crt、namespace
token 是使用API Server 私钥签名的JWT格式, 用于访问API Server时Server端认证;
ca.crt 根证书用于 Client端验证 API Server 发送的证书;
namespace 标识这个 service-account-token 的作用域名空间;
PS : 默认情况下每个 namespace 都会有一个ServiceAccount,如果 Pod 在创建时没有指定ServiceAccount, 就会使用Pod 所属的 namespace 的 ServiceAccount/run/secrets/kubernetes.io/serviceaccount/1 2 3 4 5 6 7 8 9 10 11 12 13 14 15 16 17 18 19 20 21 22 23 24 25 26 27 28 29 30 31 32 33 34 35 36 37 38 39 40 41 42 43 44 45 46 47 48 49 50 51 52 53 54 55 56 57 58 59 60 61 62 63 64 ~$ kubectl get secret --all-namespaces ~$ kubectl describe secret default-token-zglkd --namespace=default ~$ kubectl get secret -n devops ~$ kubectl get secret -n devops -o yaml
2) Authorization(鉴权) 描述: 上面认证过程只是确认通信的双方都确认了对方是可信的可以相互通信,此时认证成功之后的到了授权模块,与认证Auth类似k8s也支持多种授权机制,并支持同时开启多个授权插件(一个验证成功即可),如果授权成功则用户的请求会发送到准入控制模块做进一步的请求验证,而对于授权失败的请求则返回HTTP 403,即鉴权是确定请求方有哪些资源的权限。
API Server 目前支持以下几种授权策略(可通过APIServer 的启动参数“--authorization-mode”设置)
1.AlwaysDeny: 表示拒绝所有的请求,一般用于测试
2.AlwaysAllow: 允许接收所有请求,如果集群不需要授权流程,则可以采用该策略
3.ABAC (Attribute-Based Access Control): 基于属性的访问控制,表示使用用户配置的授权规则对用户请求进行匹配和控制
4.Webbook: 通过调用外部REST服务对用户进行授权
5.RBAC (Role-Based Access Control): 基于角色的访问控制(默认规则) 后续详细讲解
使用 - RBAC - 鉴权 描述: 实际生产环境中往往需要对不同运维人员赋预不同的权限,而根据实际情况也可能会赋予开发人员只读的权限此时我们可以使用RBAC进行鉴权;
RBAC(Role-Based Access Control) 基于角色的访问控制鉴权机制,使用 rbac.authorization.k8s.io API 组 来驱动鉴权决定,允许你通过 Kubernetes API 动态配置策略。
比较于其它访问控制方式拥有以下优势:
1.对集群中的资源和非资源均拥有完整的覆盖
2.整个RBAC完全由几个API对象完成,同其它API对象一样,可以用kubectl 或API进行操作
3.可以在运行时进行调整,无需重启 API Server
Tips : 在Kubernetes 1.5 中引入现行版本成为默认标准。1 kube-apiserver --authorization-mode=Example,RBAC
1
2
3
4
5
6
7
8
~$ kubectl api-resources | grep "Role" ~$ kubectl api-versions | grep "rbac.authorization.k8s.io"
基本概念 1.RBAC K8s对象说明 Role、ClusterRole、RoleBinding、ClusterRoleBinding, 4种对象类型均可以通过 kubectl 与 API 操作;
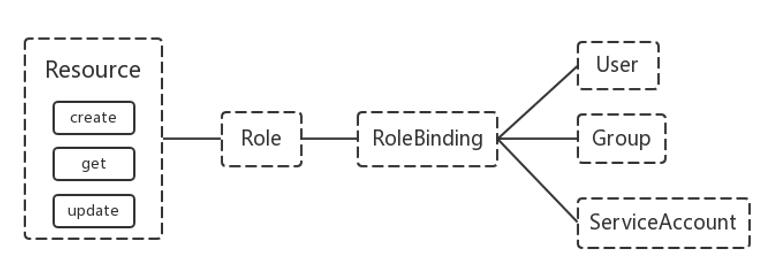
RBAC的 API K8s对象图示:
weiyigeek.top-RBAC的APIK8s 对象
Q: 值得注意的是 Kubenetes 并不会提供用户管理, 那么 User、Group、ServiceAccount 指定的用户又是从哪里来的呢? kubectl、kube-proxy) 或是 其他自定义的用户在向CA申请证书时需要提供一个证书请求文件;
1 2 3 4 5 6 7 8 9 10 11 12 13 14 15 16 17 18 19 20 cat > appuser-csr.yaml <<'END' { "CN": "appuser", # 用户名称(User) "hosts": [], "key":{ "algo": "rsa", "size": 2048 }, "names":[ { "C": "CN", "ST":"TianJin", "L": "TJ", "O": "kubernetes", "OU": "System" # 用户组(Group) } ] } END
Tips : kubelet 使用 TLS Bootstaping 认证时 API Server 可以使用 Bootstrap Tokens 或者 Token authenticationfile 验证 token。
Tips : 无论哪一种 Kubenetes 都会为token 绑定一个默认的 User 和 Group; Pod 使用 ServiceAccount 认证时 service-account-token 中的JWT会保存User信息, 有了用户信息再创建一对角色/集群角色(角色绑定/集群角色绑定)K8s 对象即Role、RoleBinding、ClusterRole、ClusterRoleBinding,就可以完成权限绑定了;
角色 - Role and ClusterRole 描述: 在 RBAC API中Role表示一组规则权限只会增加(累加权限), 不存在一个资源一开始就有很多权限而通过RBAC对其进行减少的操作Role可以定义在一个namespace 中,如果想要跨namespace则可以创建ClusterRole
Role 资源清单示例:1 2 3 4 5 6 7 8 9 kind: Role apiVersion: rbac.authorization.k8s.io/v1beta1 metadata: namespace: default name: pod-reader rules: - apiGroups: [""] resources: ["pods"] verbs: ["get", "watch" , "list" ]
描述: ClusterRole具有与Role相同的权限角色控制能力,不同的是ClusterRole是集群级别的其可以用于以下环境之中:
集群范围资源(比如 节点(Node))
非资源端点(比如 /healthz)
跨名字空间访问的名字空间作用域的资源(如 Pods),比如你可以使用 ClusterRole 来允许某特定用户执行kubectl get pods --all-namespaces
ClusterRole 有若干用法:
定义对某名字空间域对象的访问权限,并将在各个名字空间内完成授权;
为名字空间作用域的对象设置访问权限,并跨所有名字空间执行授权;
为集群作用域的资源定义访问权限。
ClusterRole 资源清单示例:1 2 3 4 5 6 7 8 9 10 kind: ClusterRole apiVersion: rbac.authorization.k8s.io/v1beta1 metadata: name: secret-reader rules: - apiGroups: [""] resources: ["secrets"] verbs: ["get","watch","list"]
Tips : RBAC 的 Role 或 ClusterRole 中包含一组代表相关权限的规则权限是纯粹累加的(不存在拒绝某操作的规则)。
Tips : 如果你希望在名字空间内定义角色应该使用 Role; 如果你希望定义集群范围的角色应该使用 ClusterRole。
Tips : Role 或 ClusterRole 对象的名称必须是合法的 路径区段名称。
角色绑定 - RoleBinding and ClusterRoleBinding 描述: 角色绑定(Role Binding)是将角色中定义的权限赋予一个或者一组用户, 它包含若干主体用户、组或服务账户(users,groups,or service accounts)的列表和对这些主体所获得的角色的引用;
RoleBinding 可以引用同一的名字空间中的任何 Role, 或者一个 RoleBinding 可以引用某 ClusterRole 并将该 ClusterRole 绑定到 RoleBinding 所在的名字空间;
RoleBinding 可以将角色中定义的权限授予用户或用户组其包含一组权限列表 (subjects),权限列表中包含有不同形式的待授予权限资源类型;
RoleBinding 同样包含对被 Bind 的 Role 引用 RoleBinding 适用于某个命名空间内授权而 ClusterRoleBinding 适用于集群范围内的授权;
RoleBinding 同样可以引用 ClusterRole 来对当前 namespace 内用户、用户组或 ServiceAccount 进行授权;
例如: 将 default 命名空间中的 pod-reader Role 角色授予jane用户,此后 jane用户 在 default 命名空间中将具有 pod-reader 角色的权限;
1 2 3 4 5 6 7 8 9 10 11 12 13 14 15 16 apiVersion: rbac.authorization.k8s.io/v1 kind: RoleBinding metadata: name: read-pods namespace: default subjects: - kind: User name: jane apiGroup: rbac.authorization.k8s.io roleRef: kind: Role name: pod-reader apiGroup: rbac.authorization.k8s.io
Tips : RoleBinding 可以引用 ClusterRole, 其将对应 ClusterRole 中定义的访问权限授予 RoleBinding 所在名字空间的资源; 好处是这种引用使得你可以跨整个集群定义一组通用的角色, 之后在多个名字空间中复用。
例如,尽管下面的 RoleBinding 引用的是一个 ClusterRole,”dave”(这里的主体, 不区分大小写)只能访问 “development” 名字空间中的 Secrets 对象,因为 RoleBinding 所在的名字空间(由其 metadata 决定)是 “development”。1 2 3 4 5 6 7 8 9 10 11 12 13 14 15 16 17 apiVersion: rbac.authorization.k8s.io/v1 kind: RoleBinding metadata: name: read-secrets namespace: development subjects: - kind: User name: dave apiGroup: rbac.authorization.k8s.io roleRef: kind: ClusterRole name: secret-reader apiGroup: rbac.authorization.k8s.io
描述: 使用ClusterRoleBinding可以对整个集群中的所有命名空间资源权限进行访问权限的授予。
例如,ClusterRoleBinding 样例展示了授权 manager 组内所有用户在全部命名空间中对 secrets 进行访问;1 2 3 4 5 6 7 8 9 10 11 12 13 14 15 16 17 18 apiVersion: rbac.authorization.k8s.io/v1 kind: ClusterRoleBinding metadata: name: read-secrets-global subjects: - kind: Group name: manager apiGroup: rbac.authorization.k8s.io roleRef: kind: ClusterRole name: secret-reader apiGroup: rbac.authorization.k8s.io
扩充: 创建了绑定之后你不能再修改绑定对象所引用的 Role 或 ClusterRole。
如果试图改变绑定对象的 roleRef 将导致合法性检查错误。
如果你想要改变现有绑定对象中 roleRef 字段的内容,必须删除重新创建绑定对象。
Tips : RoleBinding 在指定的名字空间中执行授权,而 ClusterRoleBinding 在集群范围执行授权。
Tips : RoleBinding 或 ClusterRoleBinding 对象的名称必须是合法的 路径区段名称。
Tips : 如果你希望将某 ClusterRole 绑定到集群中所有名字空间,你要使用 ClusterRoleBinding。
聚合 - ClusterRole Aggregate 描述: 将若干 ClusterRole 聚合(Aggregate) 起来形成一个复合的 ClusterRole。某个控制器作为集群控制面的一部分会监视带有 aggregationRule 的 ClusterRole 对象集合。
Tips : aggregationRule 为控制器定义一个标签 选择算符供后者匹配 应该组合到当前 ClusterRole 的 roles 字段中的 ClusterRole 对象。
聚合 ClusterRole 的示例1: 1 2 3 4 5 6 7 8 9 apiVersion: rbac.authorization.k8s.io/v1 kind: ClusterRole metadata: name: monitoring aggregationRule: clusterRoleSelectors: - matchLabels: rbac.example.com/aggregate-to-monitoring: "true" rules: []
Tips : 如果你创建一个与某现有聚合 ClusterRole 的标签选择算符匹配的 ClusterRole, 这一变化会触发新的规则被添加到聚合 ClusterRole 的操作。
聚合 ClusterRole 的示例2 :通过创建一个标签同样为 rbac.example.com/aggregate-to-monitoring: true 的 ClusterRole新的规则可被添加到 “monitoring” ClusterRole 中。1 2 3 4 5 6 7 8 9 10 11 12 apiVersion: rbac.authorization.k8s.io/v1 kind: ClusterRole metadata: name: monitoring-endpoints labels: rbac.example.com/aggregate-to-monitoring: "true" rules: - apiGroups: [""] resources: ["services", "endpoints" , "pods" ] verbs: ["get", "list" , "watch" ]
默认的面向用户的角色使用 ClusterRole 聚合, 这使得作为集群管理员的你可以为扩展默认规则,包括为定制资源设置规则;
例如,下面的 ClusterRoles 让默认角色 “admin” 和 “edit” 拥有管理自定义资源 “CronTabs” 的权限, “view” 角色对 CronTab 资源拥有读操作权限。
你可以假定 CronTab 对象在 API 服务器所看到的 URL 中被命名为 “crontabs”。1 2 3 4 5 6 7 8 9 10 11 12 13 14 15 16 17 18 19 20 21 22 23 24 apiVersion: rbac.authorization.k8s.io/v1 kind: ClusterRole metadata: name: aggregate-cron-tabs-edit labels: rbac.authorization.k8s.io/aggregate-to-admin: "true" rbac.authorization.k8s.io/aggregate-to-edit: "true" rules: - apiGroups: ["stable.example.com" ] resources: ["crontabs" ] verbs: ["get" , "list" , "watch" , "create" , "update" , "patch" , "delete" ] --- kind: ClusterRole apiVersion: rbac.authorization.k8s.io/v1 metadata: name: aggregate-cron-tabs-view labels: rbac.authorization.k8s.io/aggregate-to-view: "true" rules: - apiGroups: ["stable.example.com" ] resources: ["crontabs" ] verbs: ["get" , "list" , "watch" ]
资源引用 描述: 在 Kubernetes API 中,大多数资源都是使用对象名称的字符串表示来呈现与访问的。 例如,对于 Pod 应使用 “pods”。 RBAC 使用对应 API 端点的 URL 中呈现的名字来引用资源。
例如:有一些 Kubernetes API 涉及 子资源(subresource),logs 资源就属于 pods 的子资源,API 中 URL 样例如下1 GET /api/v1/namespaces/{namespace}/pods/{name}/log
Tips : 在这里,pods 对应名字空间作用域的 Pod 资源,而 log 是 pods 的子资源。
例如: 在 RBAC 角色表达子资源时,使用斜线(/)来分隔资源和子资源。 要允许某主体读取 pods 同时访问这些 Pod 的 log 子资源,你可以这么写:1 2 3 4 5 6 7 8 9 kind: Role apiVersion: rbac.authorization.k8s.io/v1beta1 metadata: namespace: default name: pod-and-pod-logs-reader rules: - apiGroups: [""] resources: ["pods/log"] verbs: ["get", "list" ]
Tips : 对于某些请求也可以通过 resourceNames 列表按名称引用资源。 在指定时可以将请求限定为资源的单个实例。
例子中限制可以 “get” 和 “update” 一个名为 my-configmap 的 ConfigMap:1 2 3 4 5 6 7 8 9 10 11 apiVersion: rbac.authorization.k8s.io/v1 kind: Role metadata: namespace: default name: configmap-updater rules: - apiGroups: [""] resources: ["configmaps"] resourceNames: ["my-configmap"] verbs: ["update", "get" ]
主体引用 描述: RoleBinding 或者 ClusterRoleBinding 可绑定角色到某 *主体(Subject)*上。
Tips : 主体可以是组Group,用户User 或者 服务账户ServiceAccount。
在 Kubernetes 中鉴权模块提供用户组信息与用户名一样,用户组名也用字符串来表示,而且对该字符串没有格式要求, 只是不能使用保留的前缀 system:。1 2 3 - kind: User name: "weiyigeek" name: "weiyigeek@weiyigeek.top"
Tips : 前缀 system: 是 Kubernetes 系统保留的,所以你要确保 所配置的用户名或者组名不能出现上述 system: 前缀, 除了对前缀的限制之外RBAC 鉴权系统不对用户名格式作任何要求。
Tips : 服务账户的用户名前缀为 system:serviceaccount , 属于前缀为 system:serviceaccounts 的用户组。1 2 system:serviceaccount: (单数)是用于 服务账户用户名 的前缀; system:serviceaccounts: (复数)是用于 服务账户组名 的前缀。
角色分类 描述: 我们可以通过 API 发现角色, 无论是经过身份验证的还是未经过身份验证的用户,默认的角色绑定都授权他们读取被认为 是可安全地公开访问的 API( 包括 CustomResourceDefinitions)
Tips : 如果要禁用匿名的未经过身份验证的用户访问,请在 API 服务器配置中中添加 --anonymous-auth=false的配置选项。
通过运行命令 kubectl 可以查看这些角色的配置信息:1 2 3 4 5 6 7 8 9 10 11 12 13 14 15 16 17 18 19 20 21 22 23 24 25 26 27 28 29 30 31 32 33 34 35 36 37 38 39 40 41 42 43 44 45 46 47 48 49 50 51 52 53 54 55 56 57 58 59 60 61 ~$ kubectl get clusterroles.rbac.authorization.k8s.io ~$ kubectl get clusterrolebindings.rbac.authorization.k8s.io ~$ kubectl get clusterroles system:discovery -o yaml
Kubernetes RBAC API 发现角色 自动协商机制完成的。要避免这类覆盖操作要么不要手动编辑这些角色,要么禁止自动协商机制。
默认 ClusterRole | 默认 ClusterRoleBinding | 描述
system:basic-user system:authenticated 组 ## 允许用户以只读的方式去访问他们自己的基本信息。在 1.14 版本之前,这个角色在默认情况下也绑定在 system:unauthenticated 上。
system:discovery system:authenticated 组 ## 允许以只读方式访问 API 发现端点,这些端点用来发现和协商 API 级别。 在 1.14 版本之前,这个角色在默认情况下绑定在 system:unauthenticated 上。
system:public-info-viewer system:authenticated 和 system:unauthenticated 组 ## 允许对集群的非敏感信息进行只读访问,它是在 1.14 版本中引入的。
例如:获取 system:basic-user 角色信息:1 kubectl get clusterroles system:authenticated -o yaml
面向用户的角色
cluster-admin | system:masters 组 | 允许超级用户在平台上的任何资源上执行所有操作。
admin | 无 | 允许管理员访问权限,旨在使用 RoleBinding 在名字空间内执行授权。
edit | 无 | 允许对名字空间的大多数对象进行读/写操作。
view | 无 | 允许对名字空间的大多数对象有只读权限。
Tips : 面向用户的 ClusterRole 使用 ClusterRole 聚合以允许管理员在这些 ClusterRole 上添加用于定制资源的规则1 2 3 4 5 metadata: labels: rbac.authorization.k8s.io/aggregate-to-admin: "true" rbac.authorization.k8s.io/aggregate-to-edit: "true" rbac.authorization.k8s.io/aggregate-to-view: "true"
核心组件角色
system:kube-scheduler | system:kube-scheduler 用户 | 允许访问 scheduler 组件所需要的资源。
system:volume-scheduler | system:kube-scheduler 用户 | 允许访问 kube-scheduler 组件所需要的卷资源。
system:kube-controller-manager | system:kube-controller-manager 用户 | 允许访问控制器管理器 组件所需要的资源。 各个控制回路所需要的权限在控制器角色 详述。
system:node 无 | 允许访问 kubelet 所需要的资源,包括对所有 Secret 的读操作和对所有 Pod 状态对象的写操作。你应该使用 Node 鉴权组件 和 NodeRestriction 准入插件 而不是 system:node 角色。同时基于 kubelet 上调度执行的 Pod 来授权 kubelet 对 API 的访问。
system:node 角色的意义仅是为了与从 v1.8 之前版本升级而来的集群兼容。
system:node-proxier | system:kube-proxy 用户 | 允许访问 kube-proxy 组件所需要的资源。
其他组件角色
默认 ClusterRole
默认 ClusterRoleBinding
描述
system:auth-delegator 无
允许将身份认证和鉴权检查操作外包出去。 这种角色通常用在插件式 API 服务器上,以实现统一的身份认证和鉴权。
system:heapster 无
为 Heapster 组件(已弃用)定义的角色。
system:kube-aggregator 无
为 kube-aggregator 组件定义的角色。
system:kube-dns 在 kube-system 名字空间中的 kube-dns 服务账户
为 kube-dns 组件定义的角色。
system:kubelet-api-admin 无
允许 kubelet API 的完全访问权限。
system:node-bootstrapper 无
允许访问执行 kubelet TLS 启动引导 所需要的资源。
system:node-problem-detector 无
为 node-problem-detector 组件定义的角色。
system:persistent-volume-provisioner 无
允许访问大部分 动态卷驱动 所需要的资源。
system:monitoring system:monitoring 组允许对控制平面监控端点的读取访问(例如:kube-apiserver 存活和就绪端点(/healthz、/livez、/readyz), 各个健康检查端点(/healthz/*、/livez/*、/readyz/*)和 /metrics)。 请注意,各个运行状况检查端点和度量标准端点可能会公开敏感信息。
内置控制器的角色
当使用 --use-service-account-credentials 参数启动时, kube-controller-manager 使用单独的服务账户来启动每个控制器, 每个内置控制器都有相应的、前缀为 system:controller: 的角色。
如果控制管理器启动时未设置 --use-service-account-credentials,它使用自己的身份凭据来运行所有的控制器,该身份必须被授予所有相关的角色;
角色包括:
system:controller:attachdetach-controller
system:controller:certificate-controller
system:controller:clusterrole-aggregation-controller
system:controller:cronjob-controller
system:controller:daemon-set-controller
system:controller:deployment-controller
system:controller:disruption-controller
system:controller:endpoint-controller
system:controller:expand-controller
system:controller:generic-garbage-collector
system:controller:horizontal-pod-autoscaler
system:controller:job-controller
system:controller:namespace-controller
system:controller:node-controller
system:controller:persistent-volume-binder
system:controller:pod-garbage-collector
system:controller:pv-protection-controller
system:controller:pvc-protection-controller
system:controller:replicaset-controller
system:controller:replication-controller
system:controller:resourcequota-controller
system:controller:root-ca-cert-publisher
system:controller:route-controller
system:controller:service-account-controller
system:controller:service-controller
system:controller:statefulset-controller
system:controller:ttl-controller
实际案例 Role | ClusterRole 示例 描述: 以下示例均为从 Role 或 CLusterRole 对象中截取出来,我们仅展示其 rules 部分。
1 2 3 4 5 rules: - apiGroups: [""] resources: ["configmaps"] resourceNames: ["my-config"] verbs: ["get"]
RoleBinding | ClusterRoleBingding 示例 描述: 下面示例是 RoleBinding 中的片段,仅展示其 subjects 与 roleRef 的部分。
1) 对于名称为 alice@example.com 的用户:
1 2 3 4 5 6 7 8 subjects: - kind: User name: "alice@example.com" apiGroup: rbac.authorization.k8s.io roleRef: kind: ClusterRole name: secret-reader apiGroup: rbac.authorization.k8s.io
2) 对于名称为 frontend-admins 的用户组:
1 2 3 4 subjects: - kind: Group name: "frontend-admins" apiGroup: rbac.authorization.k8s.io
3) 对于 kube-system 名字空间中的默认服务账户:
1 2 3 4 subjects: - kind: ServiceAccount name: default namespace: kube-system
4) 对于任何名称空间中的 “qa” 组中所有的服务账户:
1 2 3 4 5 subjects: - kind: Group name: system:serviceaccounts:dev apiGroup: rbac.authorization.k8s.io namespace: development
5) 对于在任何名字空间中的服务账户:
1 2 3 4 subjects: - kind: Group name: system:serviceaccounts apiGroup: rbac.authorization.k8s.io
6) 对于所有已经过认证的用户:
1 2 3 4 subjects: - kind: Group name: system:authenticated apiGroup: rbac.authorization.k8s.io
7) 对于所有未通过认证的用户:
1 2 3 4 subjects: - kind: Group name: system:unauthenticated apiGroup: rbac.authorization.k8s.io
8) 对于所有用户:
1 2 3 4 5 6 7 subjects: - kind: Group name: system:authenticated apiGroup: rbac.authorization.k8s.io - kind: Group name: system:unauthenticated apiGroup: rbac.authorization.k8s.io
Tips : API 服务器创建一组默认的 ClusterRole 和 ClusterRoleBinding 对象。 这其中许多是以 system: 为前缀的,用以标识对应资源是直接由集群控制面管理的。所有的默认 ClusterRole 和 ClusterRoleBinding 都有kubernetes.io/bootstrapping=rbac-defaults 标签。
Tips : 自动协商通过该机制, 在每次启动时 API 服务器都会更新默认 ClusterRole 以添加缺失的各种权限,并更新默认的 ClusterRoleBinding 以增加缺失的的各类主体。 即修复一些不小心发生的修改,并且有助于保证角色和角色绑定在新的发行版本中有权限或主体变更时仍然保持最新。
注意 :如果基于 RBAC 的鉴权机制被启用,则自动协商功能默认是被启用的。
注意 :在修改名称包含 system: 前缀的 ClusterRole 和 ClusterRoleBinding 时要格外小心, 对这些资源的更改可能导致集群无法继续工作。
ClusterRole | RoleBinding 示例 例如,下面的 ClusterRole 和 RoleBinding 将允许用户 user-1 把名字空间 user-1-namespace 中的 admin、edit 和 view 角色赋予其他用户:1 2 3 4 5 6 7 8 9 10 11 12 13 14 15 16 17 18 19 20 21 22 23 24 25 26 27 apiVersion: rbac.authorization.k8s.io/v1 kind: ClusterRole metadata: name: role-grantor rules: - apiGroups: ["rbac.authorization.k8s.io" ] resources: ["rolebindings" ] verbs: ["create" ] - apiGroups: ["rbac.authorization.k8s.io" ] resources: ["clusterroles" ] verbs: ["bind" ] resourceNames: ["admin" ,"edit" ,"view" ] --- apiVersion: rbac.authorization.k8s.io/v1 kind: RoleBinding metadata: name: role-grantor-binding namespace: user-1-namespace roleRef: apiGroup: rbac.authorization.k8s.io kind: ClusterRole name: role-grantor subjects: - apiGroup: rbac.authorization.k8s.io kind: User name: user-1
命令行角色|绑定创建示例 Role 1 2 3 4 5 6 7 8 9 10 11 12 13 14 kubectl create role pod-reader --verb=get --verb=list --verb=watch --resource=pods kubectl create role pod-reader --verb=get --resource=pods --resource-name=readablepod --resource-name=anotherpod kubectl create role foo --verb=get,list,watch --resource=replicasets.apps kubectl create role foo --verb=get,list,watch --resource=pods,pods/status kubectl create role my-component-lease-holder --verb=get,list,watch,update --resource=lease --resource-name=my-compone
clusterrole 1 2 3 4 5 6 7 8 9 10 11 12 13 14 15 16 17 kubectl create clusterrole pod-reader --verb=get,list,watch --resource=pods kubectl create clusterrole pod-reader --verb=get --resource=pods --resource-name=readablepod --resource-name=anotherpod kubectl create clusterrole foo --verb=get,list,watch --resource=replicasets.apps kubectl create clusterrole foo --verb=get,list,watch --resource=pods,pods/status kubectl create clusterrole "foo" --verb=get --non-resource-url=/logs/* kubectl create clusterrole monitoring --aggregation-rule="rbac.example.com/aggregate-to-monitoring=true"
rolebinding 1 2 3 4 5 6 7 8 kubectl create rolebinding bob-admin-binding --clusterrole=admin --user=bob --namespace=acme kubectl create rolebinding myapp-view-binding --clusterrole=view --serviceaccount=acme:myapp --namespace=acme kubectl create rolebinding myappnamespace-myapp-view-binding --clusterrole=view --serviceaccount=myappnamespace:myapp
clusterrolebinding
1 2 3 4 5 6 7 8 kubectl create clusterrolebinding root-cluster-admin-binding --clusterrole=cluster-admin --user=root kubectl create clusterrolebinding kube-proxy-binding --clusterrole=system:node-proxier --user=system:kube-proxy kubectl create clusterrolebinding myapp-view-binding --clusterrole=view --serviceaccount=acme:myapp
auth reconcile rbac.authorization.k8s.io/v1 API 对象; 尚不存在的对象会被创建,如果对应的名字空间也不存在,必要的话也会被创建。
已经存在的角色会被更新,使之包含输入对象中所给的权限。如果指定了 –remove-extra-permissions,可以删除额外的权限。
已经存在的绑定也会被更新,使之包含输入对象中所给的主体。如果指定了 –remove-extra-permissions,则可以删除多余的主体。
1 2 3 4 5 6 7 8 kubectl auth reconcile -f my-rbac-rules.yaml --dry-run kubectl auth reconcile -f my-rbac-rules.yaml kubectl auth reconcile -f my-rbac-rules.yaml --remove-extra-subjects --remove-extra-permissions
3) Admission Control (准入控制) 描述: 准入控制(Admission Control)是API Server的插件集合通过添加不同的插件,实现额外的准入控制规则(即要求做进一步的验证或添加默认参数)。不同于授权和认证只关心用户的操作请求,准入控制还处理请求的内容,并且仅仅对创建、更新、删除或者连接(如代理)等有效而对读操作无效;
Tips: 甚至于Api-Server的一些主要的功能都需要通过 Admission Controllers 实现。
Tips: 准入控制也支持同时开启多个插件,他们依次调用只有全部插件都通过请求之后才可以放入系统;
比如 Service-Account 官方文档上有一份针对不同版本的准入控制器推荐列表,其中最新的 1.14 的推荐列表是:
1 NamespaceLifecycle, LimitRanger, ServiceAccount, DefaultStorageClass, DefaultTolerationSeconds,MutatingAdmissionWebhook, ValidatingAdmissionWebhook, ResourceQuota
列举几个插件的功能:
1.NamespaceLifecycle: 防止在不存在的namespace上创建对象,防止删除系统预置namespace,删除namespace时,连带删除它的所有K8s 对象。
2.LimitRanger: 确保请求的资源不会超过资源所在Namespace 的 LimitRange的限制。
3.ServiceAccount: 实现了自动化添加 ServiceAccount。
4.ResourceQuota: 确保请求的资源不会超过资源的ResourceQuota限制。
5.AlwaysAdmit: 接收所有请求
6.AlwaysPullImages: 总是拉取最新的镜像在多租户场景下非常有用。
7.initalResources: 根据镜像的使用记录为容器设置默认资源请求和限制;
8.initializers: 用来给资源执行策略或者配置默认选项,包括Initializers控制器与用户自定义的Initalizer任务,控制器负责执行用户提交的任务,完成后将从metadata.initalizers列表中删除;
initializers --runtime-config=admissionregistration.k8s.io/v1)部署 Initializers控制器;
Tips : 我们可以备注那些自定义资源可以开启Initializer功能;
资源清单示例:1 2 3 4 5 6 7 8 9 10 apiVersion: admissionregistration.k8s.io/v1 kind: InitializerConfiguration metadata: name: example-config initializers: name: podimage.example rules: apiGroups: ["" ] apiVersion: ["v1" ] resources: ["pods" ]
Initialzers 应用场景: 修改资源的配置,比如自动给Pod添加一个Sidecar容器或存储卷;
Initializers 开发: 其必须有个全局唯一名称,比如initializer.vaultproject.io,其有可能收到信息不全的资源(比如:有可能收到信息不全的资源), 对于Initializer自身部署可采用Deployment但是需要手动设置Initializers列表为空以避免无法启动的问题;1 2 3 4 5 6 apiVersion: apps/v1 kind: Deployment metadata: initializers: pengding: [] GenericAdmissionWebhook
GenericAdmissionWebhook
GenericAdmissionWebhook 启动方式: –admission-control=…,GenericAdmissionWebhook, 然后kube-apiserver开启admissionregistration.k8s.io/v1即(--runtime-config=admissionregistration.k8s.io/v1)部署 Webhook控制器;
Tips : 注意此处的准入控制器必须使用TLS并通过ExternalAdmisshookConfigurations.client.caBundle 想 Kube-apiserver 进行注册;
4) 上下文环境 描述: 我们可以通过Context为上面不同的NameSpace下定义运行环境或者是连接其它k8s集群进行相应的操作管理。
采用Context上下文方式极大的提高了运维K8s的效率和操作性。https://www.cnblogs.com/fengrg/p/14931265.html
操作流程: 1 2 3 4 5 6 7 8 9 10 11 12 13 14 15 16 17 18 19 20 21 22 23 24 25 26 27 28 29 30 31 32 33 34 35 36 37 38 39 40 41 42 43 44 45 46 47 48 49 50 51 52 53 54 55 56 57 58 59 60 61 62 63 64 ~$ kubectl cluster-info $ kubectl config view apiVersion: v1 clusters: - cluster: certificate-authority-data: DATA+OMITTED server: https://weiyigeek-lb-vip.k8s:16443 name: kubernetes contexts: - context: cluster: kubernetes user: kubernetes-admin name: kubernetes-admin@kubernetes current-context: kubernetes-admin@kubernetes kind: Config preferences: {} users: - name: kubernetes-admin user: client-certificate-data: REDACTED client-key-data: REDACTED $ kubectl config set -cluster kubernetes-cluster --server=https://weiyigeek-lb-vip.k8s:16443 $ kubectl config set -context ctx-dev --namespace=dev --cluster=kubernetes-cluster --user dev Context "ctx-dev" created. $ kubectl config view apiVersion: v1 clusters: - cluster: server: https://weiyigeek-lb-vip.k8s:16443 name: kubernetes-cluster ..... contexts: - context: cluster: kubernetes-cluster namespace: dev user: dev name: ctx-dev $ kubectl config use-context ctx-dev $ kubectl config use-context ctx-dev | grep "current-context" kubectl config use-context kubernetes-admin@kubernetes kubectl config delete-context ctx-dev kubectl config delete-cluster kubernetes-cluster
5) 基础实践 实验1.配置证书 与 Api-Server 认证访问
Step 1.创建.kube文件夹并把admin.conf复制到此文件夹
1 2 3 mkdir -p $HOME /.kubeTest sudo cp -i /etc/kubernetes/admin.conf $HOME /.kubeTest/config
Step 2.根据配置文件生成p12格式的证书
1 2 3 4 5 6 7 8 9 10 11 12 13 14 15 16 17 18 19 20 21 22 23 24 25 26 27 28 29 30 ~$ grep 'client-certificate-data' ~/.kube/config | head -n 1 | awk '{print $2}' | base64 -d > client.crt -----BEGIN CERTIFICATE----- MIIDEzCCAfugAwIBAgIIWBe7BoJxSXAwDQYJKoZIhvcNAQELBQAwFTETMBEGA1UE AxMKa3ViZXJuZXRlczAeFw0yMTAxMTEwNDU0NTNaFw0yMjAxMTEwNDU0NTZaMDQx ....... 2ERQAmHha6j9d8x0nolby5HavjKuZuUaac+USV4SZ0l4B2Vx/i76UHdaJh1/iYzp trDCsYy8SchEdPqzgoKy+Sd1KzMjFtg= -----END CERTIFICATE----- ~$ grep 'client-key-data' ~/.kube/config | head -n 1 | awk '{print $2}' | base64 -d > client.key -----BEGIN RSA PRIVATE KEY----- MIIEogIBAAKCAQEA5q/YNa8t+bPfMkPlfu54eBTkBHueqDJY1ogJCTS2XSrvEk50 xd5OUVBYyh6Z8dWOexQVeMGtXg9Nmc3okTde38vyTU4A9UsCjJbl9UzsAGsB4dTa Svk2OPBV7JYaCX2vPAKotB6iYyZrfAnEV6RV3a9JKTZHL7lSTsumgp6XkSTpZJv+ ...... 1SP558GlSXMyMn5sQZ6EGioURuaBW+ErbSZXLzS/kbulMShFT1PafrVInzXkQ92N BHH5AoGAIgkTX5Rp6nMtPquk+N3/IASWKiTFLpCGzUslhchz0P3nh041Gwl2Soxf 6DebdQ+j/m2Opolj/lBm85PtXlyY7TMHv1QJH+8LAToCIA4nhwN29zWXkExrI5Sd QSShmOwGngmhYTHDYiSx7OXQa815tjRsXPEkMU/C9k6QwV+ToEM= -----END RSA PRIVATE KEY----- openssl pkcs12 -export -clcerts -inkey client.key -in client.crt -out kubecfg.p12 -name "kubernetes-client" ~$ ls -lah client.* kubecfg.p12 -rw-r--r-- 1 weiyigeek weiyigeek 1.2K Feb 25 06:44 client.crt -rw-r--r-- 1 weiyigeek weiyigeek 1.7K Feb 25 06:44 client.key -rw------- 1 weiyigeek weiyigeek 2.5K Feb 25 06:44 kubecfg.p12
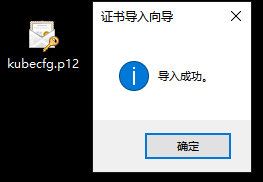
Step 3.完成以后我们把kubecfg.p12复制到要访问dashboard的机器上, 如果是windows机则双击这个文件会弹出一个安装向导,需要输入我们刚才设置的密码输入完以后一直下一步就行了.
weiyigeek.top-证书导入
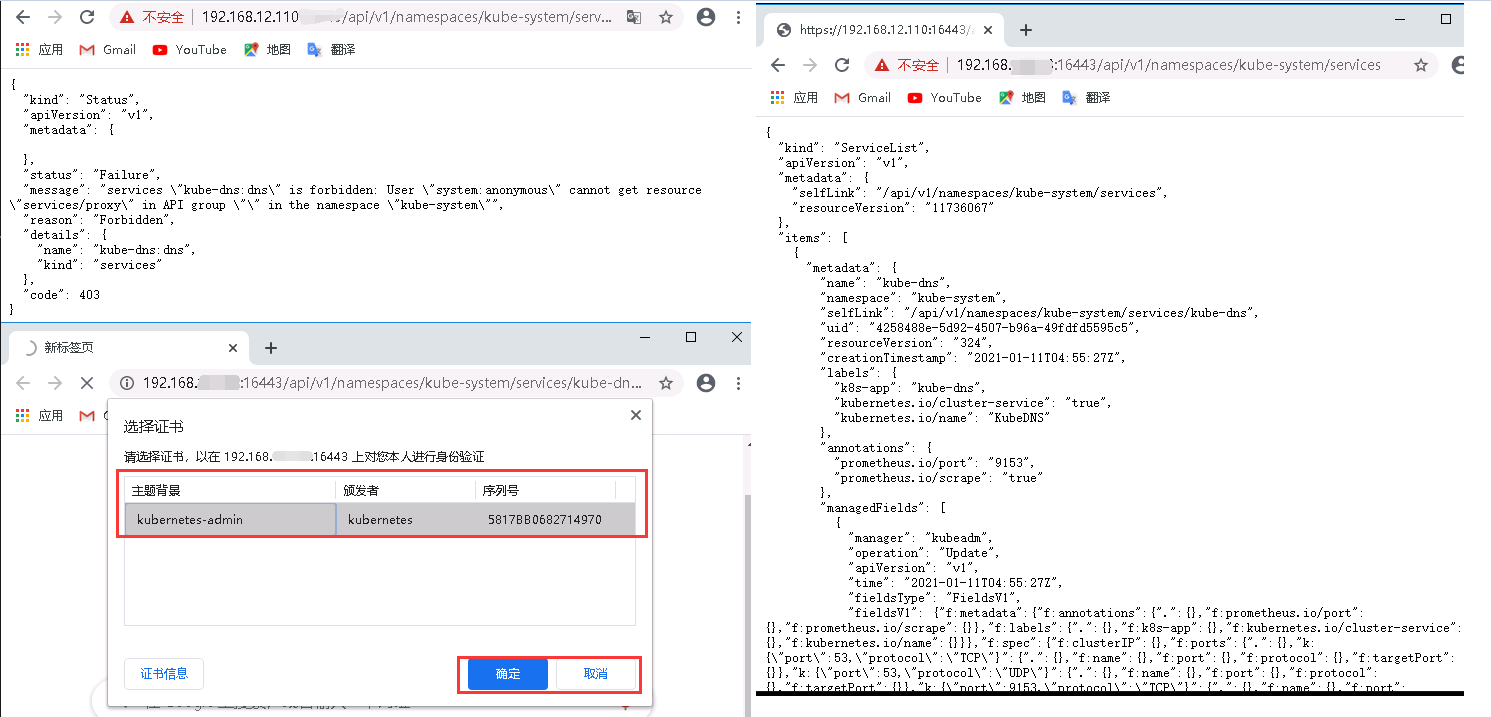
Step 4.导入前后访问集群地址https://192.168.12.110:16443/api/v1/namespaces/kube-system/services/进行比对;
Tips : 注意目前使用火狐会出现403 forbidden现象切换到谷歌就行了
1 2 3 4 ~$ kubectl cluster-info
Step 5.访问结果可以看到没有导入证书前是没有权限连接api-server的导入证书后才能与集群正常通信;
weiyigeek.top-证书访问集群
实验2.创建普通用户进行对Kubernetes集群的管理 Tips: 普通用户并不是通过k8s来创建和维护,是通过创建证书和切换上下文环境的方式来创建和切换用户。
实操步骤:
(1) 下载证书生成相关工具 1 2 3 4 5 6 7 8 9 mkdir cert && cd $_ wget https://pkg.cfssl.org/R1.2/cfssl_linux-amd64 wget https://pkg.cfssl.org/R1.2/cfssljson_linux-amd64 wget https://pkg.cfssl.org/R1.2/cfssl-certinfo_linux-amd64 chmod +x * sudo mv cfssl_linux-amd64 /usr/local /bin/cfssl sudo mv cfssljson_linux-amd64 /usr/local /bin/cfssljson sudo mv cfssl-certinfo_linux-amd64 /usr/local /bin/cfssl-certinfo
(2) 证书申请文件 appuser-csr.json (前面说过 CN 与 O 两个字段)1 2 3 4 5 6 7 8 9 10 11 12 13 14 15 16 17 18 19 cat > appuser-csr.json <<'END' { "CN" : "appuser" , "hosts" : [], "key" :{ "algo" : "rsa" , "size" : 2048 }, "names" :[ { "C" : "CN" , "ST" :"ChongQing" , "L" : "ChongQing" , "O" : "kubernetes" , "OU" : "System" } ] } END
(3) 生成appuser用户的证书与密钥1 2 3 4 5 6 7 8 9 10 11 12 13 14 15 16 17 18 19 20 21 22 23 24 25 26 27 28 29 30 31 32 33 34 35 36 37 38 39 40 cfssl gencert -ca=/etc/kubernetes/pki/ca.crt -ca-key=/etc/kubernetes/pki/ca.key -profile=kubernetes appuser-csr.json | cfssljson -bare appuser ~/k8s/certificate$ ls ~/k8s/certificate$ cfssl-certinfo -cert appuser.pem { "subject" : { "common_name" : "appuser" , "country" : "CN" , "organization" : "kubernetes" , "organizational_unit" : "System" , "locality" : "ChongQing" , "province" : "ChongQing" , "names" : [ "CN" , "ChongQing" , "ChongQing" , "kubernetes" , "System" , "appuser" ] }, "issuer" : { "common_name" : "kubernetes" , "names" : [ "kubernetes" ] }, "serial_number" : "239757714011015189695612917089053624450762739049" , "not_before" : "2021-02-25T08:31:00Z" , "not_after" : "2022-02-25T08:31:00Z" , "sigalg" : "SHA256WithRSA" , "authority_key_id" : "77:73:2:88:85:EF:E1:B2:64:5E:D6:9:E0:F:9F:3:5:E8:FE:8D" , "subject_key_id" : "A0:45:35:5D:64:59:F9:0:6D:38:49:AF:3F:BD:96:63:F7:CD:6A:FD" , "pem" : "-----BEGIN CERTIFICATE-----\AA..............CCC\n-----END CERTIFICATE-----\n" }
weiyigeek.top-CERTIFICATE和PRIVATE
(4) 设置集群参数并生成配置文件 (即可以管理其它K8S集群)1 2 3 4 5 6 7 8 9 10 11 12 13 14 15 16 17 cd /etc/kubernetes/pkisudo cat ca.crt ca.key > ~/k8s/certificate/ca.pem export KUBE_APISERVER="https://192.168.12.110:16443" kubectl config set -cluster kubernetes --certificate-authority=./ca.pem --embed-certs=true --server=${KUBE_APISERVER} --kubeconfig=./appuser.kubeconfig kubectl config set -credentials appuser \ --client-certificate=./appuser.pem \ --client-key=./appuser-key.pem \ --embed-certs=true \ --kubeconfig=appuser.kubeconfig
(5) 创建app-manager角色并且指定其权限然后绑定到appuser用户之中;1 2 3 4 5 6 7 8 9 10 11 12 13 14 15 16 17 18 19 20 21 22 23 24 25 26 27 28 29 30 31 32 33 34 35 36 37 38 39 40 41 42 43 44 45 46 47 48 49 50 51 52 53 54 55 56 57 58 59 60 61 62 63 64 kubectl create namespace app tee app-manager-role.yaml <<'END' kind: Role apiVersion: rbac.authorization.k8s.io/v1 metadata: namespace: app name: app-manager rules: - apiGroups: ["" ] resources: ["pods" ,"pods/exec" ,"persistentvolumes" ,"persistentvolumeclaims" ,"services" ] verbs: ["create" , "delete" , "get" , "list" , "watch" , "patch" , "update" ] - apiGroups: ["extensions" , "apps" ] resources: ["deployments" , "statefulsets" ] verbs: ["create" , "delete" , "get" , "list" , "watch" , "patch" , "update" ] - apiGroups: ["" ] resources: ["pods/log" ,"events" ,"nodes" ,"endpoint" ] verbs: ["get" ,"list" ,"watch" ] - apiGroups: ["" ,"extensions" ] resources: ["configmaps" ,"secrets" ,"serviceaccounts" ] verbs: ["create" , "delete" , "get" , "list" , "watch" , "patch" , "update" ] END kubectl create rolebinding app-pods --role=app-manager --user=appuser --namespace=app tee appuser-rolebingding.yaml <<'END' kind: RoleBinding apiVersion: rbac.authorization.k8s.io/v1 metadata: name: app-pods namespace: app subjects: - kind: User name: appuser apiGroup: rbac.authorization.k8s.io roleRef: kind: Role name: app-manager apiGroup: rbac.authorization.k8s.io END ~/k8s/certificate$ kubectl apply -f app-manager-role.yaml ~/k8s/certificate$ kubectl apply -f appuser-rolebingding.yaml ~/k8s/certificate$ kubectl get role -n app app-manager ~/k8s/certificate$ kubectl get rolebindings.rbac.authorization.k8s.io -n app ~/k8s/certificate$ kubectl delete rolebindings.rbac.authorization.k8s.io -n app read -pods rolebinding.rbac.authorization.k8s.io "read-pods" deleted
1 2 3 4 5 6 7 8 9 10 11 12 13 14 15 16 17 18 19 20 21 22 23 24 25 26 27 28 29 30 31 32 33 34 35 36 37 38 39 40 41 42 43 44 45 46 /k8s/certificate$ kubectl config view apiVersion: v1 clusters: - cluster: certificate-authority-data: DATA+OMITTED server: https://weiyigeek-lb-vip.k8s:16443 name: kubernetes contexts: - context: cluster: kubernetes user: kubernetes-admin name: kubernetes-admin@kubernetes current-context: kubernetes-admin@kubernetes kind: Config preferences: {} users: - name: kubernetes-admin user: client-certificate-data: REDACTED client-key-data: REDACTED ~/k8s/certificate$ kubectl config view apiVersion: v1 clusters: - cluster: certificate-authority-data: DATA+OMITTED server: https://192.168.12.110:16443 name: kubernetes contexts: - context: cluster: kubernetes namespace: app user: appuser name: kubernetes current-context: kubernetes kind: Config preferences: {} users: - name: appuser user: client-certificate-data: REDACTED client-key-data: REDACTED
(9) 采用appuser用户进行Pod的创建默认在app名称空间之中;
1 2 ~/.kube$ kubectl run nginx --image nginx:latest --port=80
1 2 3 4 5 6 7 8 9 10 11 12 13 14 15 16 17 ~/.kube$ kubectl get pod -o wide --show-labels ~/.kube$ kubectl describe pods nginx ~/.kube$ kubectl delete pod nginx pod "nginx" deleted
实验3.集群管理员用户权限一览 描述: 可通过kubectl命令行获取k8s集群admin用户的权限信息;
cluster-admin 用户权限信息:1 2 3 4 5 6 7 8 9 10 11 12 13 14 15 16 17 18 19 20 21 22 23 24 25 26 27 28 29 30 31 32 33 34 35 36 37 38 39 ~/.kube$ kubectl get clusterrole -n kube-system cluster-admin -o yaml
admin 用户权限一览(后续可以备用查表): 1 2 3 4 5 6 7 8 9 10 11 12 13 14 15 16 17 18 19 20 21 22 23 24 25 26 27 28 29 30 31 32 33 34 35 36 37 38 39 40 41 42 43 44 45 46 47 48 49 50 51 52 53 54 55 56 57 58 59 60 61 62 63 64 65 66 67 68 69 70 71 72 73 74 75 76 77 78 79 80 81 82 83 84 85 86 87 88 89 90 91 92 93 94 95 96 97 98 99 100 101 102 103 104 105 106 107 108 109 110 111 112 113 114 115 116 117 118 119 120 121 122 123 124 125 126 127 128 129 130 131 132 133 134 135 136 137 138 139 140 141 142 143 144 145 146 147 148 149 150 151 152 153 154 155 156 157 158 159 160 161 162 163 164 165 166 167 168 169 170 171 172 173 174 175 176 177 178 179 180 181 182 183 184 185 186 187 188 189 190 191 192 193 194 195 196 197 198 199 200 201 202 203 204 205 206 207 208 209 210 211 212 213 214 215 216 217 218 219 220 221 222 223 224 225 226 227 228 229 230 231 232 233 234 235 236 237 238 239 240 241 242 243 244 245 246 247 248 249 250 251 252 253 254 255 256 257 258 259 260 261 262 263 264 265 266 267 268 269 270 271 272 273 274 275 276 277 278 279 280 281 282 283 284 285 286 287 288 289 290 291 292 293 294 295 296 297 298 299 300 301 302 303 304 305 306 307 308 ~/.kube$ kubectl get clusterrole -n kube-system admin -o yaml aggregationRule: clusterRoleSelectors: - matchLabels: rbac.authorization.k8s.io/aggregate-to-admin: "true" apiVersion: rbac.authorization.k8s.io/v1 kind: ClusterRole metadata: annotations: rbac.authorization.kubernetes.io/autoupdate: "true" creationTimestamp: "2021-01-11T04:55:10Z" labels: kubernetes.io/bootstrapping: rbac-defaults managedFields: - apiVersion: rbac.authorization.k8s.io/v1 fieldsType: FieldsV1 fieldsV1: f:aggregationRule: .: {} f:clusterRoleSelectors: {} f:metadata: f:annotations: .: {} f:rbac.authorization.kubernetes.io/autoupdate: {} f:labels: .: {} f:kubernetes.io/bootstrapping: {} manager: kube-apiserver operation: Update time: "2021-01-11T04:55:10Z" - apiVersion: rbac.authorization.k8s.io/v1 fieldsType: FieldsV1 fieldsV1: f:rules: {} manager: kube-controller-manager operation: Update time: "2021-01-11T04:55:29Z" name: admin resourceVersion: "366" selfLink: /apis/rbac.authorization.k8s.io/v1/clusterroles/admin uid: 3ea3152e-8e95-4bbc-93b7-8e7aa793270e rules: - apiGroups: - "" resources: - pods/attach - pods/exec - pods/portforward - pods/proxy - secrets - services/proxy verbs: - get - list - watch - apiGroups: - "" resources: - serviceaccounts verbs: - impersonate - apiGroups: - "" resources: - pods - pods/attach - pods/exec - pods/portforward - pods/proxy verbs: - create - delete - deletecollection - patch - update - apiGroups: - "" resources: - configmaps - endpoints - persistentvolumeclaims - replicationcontrollers - replicationcontrollers/scale - secrets - serviceaccounts - services - services/proxy verbs: - create - delete - deletecollection - patch - update - apiGroups: - apps resources: - daemonsets - deployments - deployments/rollback - deployments/scale - replicasets - replicasets/scale - statefulsets - statefulsets/scale verbs: - create - delete - deletecollection - patch - update - apiGroups: - autoscaling resources: - horizontalpodautoscalers verbs: - create - delete - deletecollection - patch - update - apiGroups: - batch resources: - cronjobs - jobs verbs: - create - delete - deletecollection - patch - update - apiGroups: - extensions resources: - daemonsets - deployments - deployments/rollback - deployments/scale - ingresses - networkpolicies - replicasets - replicasets/scale - replicationcontrollers/scale verbs: - create - delete - deletecollection - patch - update - apiGroups: - policy resources: - poddisruptionbudgets verbs: - create - delete - deletecollection - patch - update - apiGroups: - networking.k8s.io resources: - ingresses - networkpolicies verbs: - create - delete - deletecollection - patch - update - apiGroups: - "" resources: - configmaps - endpoints - persistentvolumeclaims - persistentvolumeclaims/status - pods - replicationcontrollers - replicationcontrollers/scale - serviceaccounts - services - services/status verbs: - get - list - watch - apiGroups: - "" resources: - bindings - events - limitranges - namespaces/status - pods/log - pods/status - replicationcontrollers/status - resourcequotas - resourcequotas/status verbs: - get - list - watch - apiGroups: - "" resources: - namespaces verbs: - get - list - watch - apiGroups: - apps resources: - controllerrevisions - daemonsets - daemonsets/status - deployments - deployments/scale - deployments/status - replicasets - replicasets/scale - replicasets/status - statefulsets - statefulsets/scale - statefulsets/status verbs: - get - list - watch - apiGroups: - autoscaling resources: - horizontalpodautoscalers - horizontalpodautoscalers/status verbs: - get - list - watch - apiGroups: - batch resources: - cronjobs - cronjobs/status - jobs - jobs /status verbs: - get - list - watch - apiGroups: - extensions resources: - daemonsets - daemonsets/status - deployments - deployments/scale - deployments/status - ingresses - ingresses/status - networkpolicies - replicasets - replicasets/scale - replicasets/status - replicationcontrollers/scale verbs: - get - list - watch - apiGroups: - policy resources: - poddisruptionbudgets - poddisruptionbudgets/status verbs: - get - list - watch - apiGroups: - networking.k8s.io resources: - ingresses - ingresses/status - networkpolicies verbs: - get - list - watch - apiGroups: - authorization.k8s.io resources: - localsubjectaccessreviews verbs: - create - apiGroups: - rbac.authorization.k8s.io resources: - rolebindings - roles verbs: - create - delete - deletecollection - get - list - patch - update - watch
