[TOC]
0x01 Jenkins 常用插件
Jenkins 持续集成常用插件一览表:

[TOC]
Jenkins 持续集成常用插件一览表:1
2
3
4
5
6
7
8
9
10
11
12
13
14
15
16
17
18
19
20
21
22
23
24
25
26
27
28
29
30
31
32
33
34
35
36
37
38
39
40
41
42
43
44
45
46
47
48
49
50
51
52
53
54
55
56
57
58
59
60# 权限管理
Role-based Authorization Strategy - 3.1 : http://wiki.jenkins-ci.org/display/JENKINS/Role+Strategy+Plugin
Authorize Project Plugin - 项目权限管控
# 构建参数 - Parameters
Extended Choice Parameter
git Parameter - 获取代码分支
# ssh
SSH Credentials
SSH Slaves
# Gitlab
Git (4.5.2) - This plugin integrates Git with Jenkins.
Git client (3.6.0) - Utility plugin for Git support in Jenkins
Gitlab Authentication (1.10) - This is the an authentication plugin using gitlab OAuth.
GitLab (1.5.13) - This plugin allows GitLab to trigger Jenkins builds and display their results in the GitLab UI.
Credentials (2.3.14) - This plugin allows you to store credentials in Jenkins.
GitLab Branch Source - 提供分支源代码和文件夹组织功能的GitLab仓库在詹金斯
# Svn
Subversion Plug-in - svn 仓库专用
# pipeline 编写
Pipeline
Pipeline: Groovy - 2.87 : 基于Groovy脚本的连续传递样式转换的管道执行引擎。
Groovy - 2.3
Groovy Postbuild - 2.5
# 质量检测
SonarQube Scanner - 2.13
# 上下游构建
Parameterized Trigger
build-pipeline-plugin - 可视化 build pipeline 插件
# 构建工具
Maven Integration - 3.8
Config File Provider
Node and Label parameter
# 消息通知
Qy Wechat Notification Plugin - 1.0.2
Email Extension Plugin # 自带通知功能相对单一
# 容器管理
Kubernetes plugin - Jenkins插件可在Kubernetes集群中运行动态代理。
Kubectl - Kubectl Cli 插件帮助我们在容器中执行相关命令
# 节点添加
SSH Agent - This plugin allows you to provide SSH credentials to builds via a ssh-agent in Jenkins
# 文件目录管理
File Operations - 1.11
# 健康检查
HttpRequest
# 数据备份
thinBackup Version - 1.11
项目描述: Jenkins流水线步骤,提供SSH工具,如命令执行或文件传输,以实现持续交付。
项目地址: https://github.com/jenkinsci/ssh-steps-plugin
1 | Version: 2.0.0 |
1) 在Jenkins中设置一个安全文本(Secret text)票据, 不建议使用明文票据;
1 | # Secret text a2bc53c0-0b68-4fce-9f1f-d04815ae52c1 k8s-192.168.12.215 Secret text k8s-192.168.12.215 |
Delactive Pipeline Script:1
2
3
4
5
6
7
8
9
10
11
12
13
14
15
16
17
18
19
20
21
22
23
24
25
26
27
28
29
30pipeline {
stages {
stage ('ssh-steps-plugin') {
steps {
script {
try {
def remote = [:]
remote.name = 'K8s-Master'
remote.user = 'root'
remote.host = '192.168.12.215'
//remote.password = 'password' // 明文不安全
remote.allowAnyHosts = true // 必须要运行所有主机
withCredentials([string(credentialsId: 'a2bc53c0-0b68-4fce-9f1f-d04815ae52c1', variable: 'sshpassword')]) {
remote.password = sshpassword
writeFile file: 'abc.sh', text: 'ls', encoding: 'utf-8'
sshPut remote: remote, from: 'abc.sh', into: '.' // 非常注意 不能为其它目录只能在当前路径之中
sshGet remote: remote, from: 'abc.sh', into: 'bac.sh', override: true
sshScript remote: remote, script: 'abc.sh'
sshRemove remote: remote, path: 'abc.sh'
sshCommand remote: remote, command: ' whoami && for i in {1..5}; do echo -n \"Loop \$i \"; date ; sleep 1; done'
}
} catch(Exception err) {
echo err.toString()
error "[-Error] : ssh-steps-plugin测试失败\n [-Msg] : ${err.getMessage()} "
}
}
}
}
}
}
输出结果1
2
3
4
5
6
7
8# SSH Steps: sshCommand - Execute command on remote node.7s
# Host key checking is off. It may be vulnerable to man-in-the-middle attacks.
[jsch] Permanently added '192.168.12.215' (RSA) to the list of known hosts.
Connected to 192.168.12.215[192.168.12.215:22] (SSH-2.0-OpenSSH_7.4)
Started command 192.168.12.215#0: whoami
root
Success command 192.168.12.215#0: whoami
Disconnected from 192.168.12.215[192.168.12.215:22]
weiyigeek.top-SSH-STEPS
2) 官网示例中采用密钥进行验证操作
描述: 利用Jenkins凭据存储区读取私钥之后再进行ssh主机验证操作,但是需要注意高版本的Openssh的影响。1
2
3
4
5
6
7
8
9
10
11
12
13
14
15
16
17def remote = [:]
remote.name = "node-1"
remote.host = "10.000.000.153"
remote.allowAnyHosts = true
withCredentials([sshUserPrivateKey(credentialsId: 'sshUser', keyFileVariable: 'identity', passphraseVariable: '', usernameVariable: 'userName')]) {
remote.user = userName
remote.identityFile = identity
stage("SSH Steps Rocks!") {
writeFile file: 'abc.sh', text: 'ls'
sshCommand remote: remote, command: 'for i in {1..5}; do echo -n \"Loop \$i \"; date ; sleep 1; done'
sshPut remote: remote, from: 'abc.sh', into: '.'
sshGet remote: remote, from: 'abc.sh', into: 'bac.sh', override: true
sshScript remote: remote, script: 'abc.sh'
sshRemove remote: remote, path: 'abc.sh'
}
}
3) 远程主机文件上传与删除
执行脚本:1
2
3
4
5
6
7
8
9
10
11
12
13
14
15
16
17
18
19
20
21
22
23
24try {
def projectProduct = sh returnStdout: true, script: "find ${APP_FILE}" // returnStatus: true
def productName = sh returnStdout: true, script: "echo ${JOB_NAME}-${RELEASE_VERSION}${APP_SUFFIX}"
def remote = [:]
remote.name = "K8s-Master#${DEPLOY_HOST}"
remote.user = "weiyigeek" // "${DEPLOY_USER}"
remote.host = "192.168.12.107" //"${DEPLOY_HOST}"
remote.port = 20211
remote.allowAnyHosts = true // 必须要运行所有主机
withCredentials([string(credentialsId: "${DEPLOY_CREDENTIALSID}", variable: 'sshpassword')]) {
remote.password = sshpassword
}
if (productName != '' && projectProduct != ''){
println(projectProduct + "-" + productName)
writeFile file: 'projectProduct.sh', text: "${productName}"
} else {
error "[-Error] : projectProduct 不能为空!"
}
sshPut remote: remote, from: "/home/jenkins/agent/workspace/HelloWorld/target/hello-world.war" , into: "${APP_DIR}"
sshCommand remote: remote, command: "ls -alh ${APP_DIR}"
}
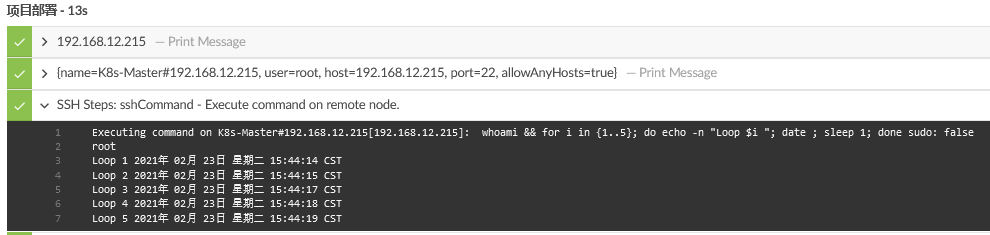
输出结果:1
2
3
4
5
6
7
8
9
10
11
12
13
14target/hello-world.war - hello-world-v1.31.war
projectProduct.sh — Write file to workspace < 1s
+ pwd
/home/jenkins/agent/workspace/HelloWorld
SSH Steps: sshPut - Put a file/directory on remote node.6s
Sending a file/directory to `K8s-Master#192.168.12.215[192.168.12.107]`: from: `/home/jenkins/agent/workspace/HelloWorld/target/hello-world.war` into: /tmp/
SSH Steps: sshCommand - Execute command on remote node.1s
Executing command on K8s-Master#192.168.12.215[192.168.12.107]: ls -alh /tmp/ sudo: false
total 5.9M
-rw-rw-r-- 1 weiyigeek weiyigeek 2.0M Feb 23 09:02 hello-world-v1.31.war
4) 采用函数调用的方式1
2
3
4
5
6
7
8
9
10
11
12
13
14
15
16
17
18
19
20
21
22
23
24
25
26
27
28
29
30
31
32
33
34
35!groovy
def getHost(){
def remote = [:]
remote.name = 'mysql'
remote.host = '192.168.8.108'
remote.user = 'root'
remote.port = 22
remote.password = 'qweasd'
remote.allowAnyHosts = true
return remote
}
pipeline {
agent {label 'master'}
environment{
def server = ''
}
stages {
stage('init-server'){
steps {
script {
server = getHost()
}
}
}
stage('use'){
steps {
script {
sshCommand remote: server, command: """
if test ! -d aaa/ccc ;then mkdir -p aaa/ccc;fi;cd aaa/ccc;rm -rf ./*;echo 'aa' > aa.log
"""
}
}
}
}
}
入坑出坑
问题1.使用ssh-steps-plugin插件并且使用Jenkins shh Private 凭据时jsch密钥连接远程Linux报错 com.jcraft.jsch.JSchException: invalid privatekey: [B@277050dc
报错信息:1
2
3
4
5
6
7
8exception in thread "main" com.jcraft.jsch.JSchException: invalid privatekey: [B@277050dc
at com.jcraft.jsch.KeyPair.load(KeyPair.java:664)
at com.jcraft.jsch.KeyPair.load(KeyPair.java:561)
at com.jcraft.jsch.IdentityFile.newInstance(IdentityFile.java:40)
at com.jcraft.jsch.JSch.addIdentity(JSch.java:407)
at com.jcraft.jsch.JSch.addIdentity(JSch.java:388)
at com.scc.nanny.ssh.SSH.<init>(SSH.java:59)
at com.scc.nanny.ssh.SSH.main(SSH.java:124)
问题原因: 主要原因是生成密钥的时候使用的openssh版本过高导致1
2
3
4
5
6
7
8
9
10
11
12
13
14
15# 高版本生成的密钥
-----BEGIN OPENSSH PRIVATE KEY-----
b3BlbnNzaC1rZXktdjEAAAAACmFlczI1Ni1jdHIAAAAGYmNyeXB0AAAAGAAAABDRomEs9d
........
Av8l4J6WvCkc3NAAAAEAAAAAEAAAEXAAAAB3NzaC1yc2EAAAADAQABAAABAQDD1C48/OJ3
-----END OPENSSH PRIVATE KEY-----
# ssh-steps-plugin 插件支持的密钥样式
-----BEGIN RSA PRIVATE KEY-----
Proc-Type: 4,ENCRYPTED
DEK-Info: AES-128-CBC,749E5AFD6F06C22EF6FD3AECCB6E540B
FwOlFOtCM+JH3EG7gzDOffkwLysiDCucdUeDZaK08rFSWzKpMwfPD/AZKNi0dqZR
....
-----END RSA PRIVATE KEY-----
解决办法: 不能在ssh-steps-plugin插件的版本使用Private验证只能使用密码验证,参考上述1步骤;
官方地址:
帮助文档: https://github.com/jenkinsci/gitlab-plugin#pipeline-jobs
Gitlab Triggers Setting
如果您想在声明式构建中配置插件支持的任何可选作业触发器请使用触发器块,完整的可配置触发选项列表如下:1
2
3
4
5
6
7
8
9
10
11
12
13
14
15
16
17
18
19
20
21
22// 触发器
triggers {
// gitlab 相关触发
gitlab(
triggerOnPush: false,
triggerOnMergeRequest: true, triggerOpenMergeRequestOnPush: "never",
triggerOnNoteRequest: true,
noteRegex: "Jenkins please retry a build",
skipWorkInProgressMergeRequest: true,
ciSkip: false,
setBuildDescription: true,
addNoteOnMergeRequest: true,
addCiMessage: true,
addVoteOnMergeRequest: true,
acceptMergeRequestOnSuccess: false,
branchFilterType: "NameBasedFilter",
includeBranchesSpec: "release/qat",
excludeBranchesSpec: "",
pendingBuildName: "Jenkins",
cancelPendingBuildsOnUpdate: false,
secretToken: "abcdefghijklmnopqrstuvwxyz0123456789ABCDEF")
}
Tips : 注意:您将需要手动运行此作业一次,以便Jenkins读取和设置触发器配置。否则 webhook 将无法触发作业。
Gitlab PipeLine Status Sync
描述: Jenkins 创建的 Pipeline 同步到 Gitlab-CI 流水线之中;
1 | pipeline { |
描述: 通过该插件我们可以实现 Jenkins 管理 Kubernetes 集群以及实现自动化部署;
Jenkins 服务有关 Kubernetes 的插件介绍:
PodTemplate 、slaveTemplates、kubernetes 等指令;而不是通过 Kubectl 客户端进行管理Tips : 如果不想使用Kubernetes插件进行管理K8s集群, 我们可以设置一台服务器为 Kubernetes 服务的客户端,配置好 Kubectl 客户端;让 Jenkins 服务通过 SSH 方式连接到客户端执行管理命令。
Kubernetes 插件支持关键字
参考地址: https://github.com/jenkinsci/kubernetes-plugin#pod-template1
2
3
4
5
6
7
8
9
10
11
12
13
14
15
16
17
18
19
20
21
22
23activeDeadlineSeconds,
cloud,
containerTemplate,
containerTemplates,
customWorkspace,
defaultContainer,
idleMinutes,
inheritFrom,
instanceCap,
label,
namespace,
nodeSelector,
podRetention,
schedulerName,
serviceAccount,
showRawYaml,
slaveConnectTimeout,
supplementalGroups,
workingDir,
workspaceVolume,
yaml,
yamlFile,
yamlMergeStrategy
Help - 帮助声明:
基础示例:1
2
3
4
5
6
7
8
9
10
11
12
13
14
15
16
17
18
19
20
21
22
23
24
25
26
27
28
29
30
31
32
33
34
35
36
37
38
39
40
41
42
43
44
45
46
47
48
49
50
51
52
53
54
55
56
57
58pipeline {
// 确认使用主机/节点机
agent any /*{ node { label 'master'} }*/
// 声明使用的工具(便于不同环境构建)
tools {
maven 'maven_env'
jdk 'jdk_k1.8.0_211'
}
// 流水线步骤声明
stages {
stage ("代码拉取") {
steps {
// (1) 代码拉取
git credentialsId: 'b4c8b4e9-2777-44a1-a1ed-e9dc21d37f4f', url: 'git@gitlab.weiyigeek.top:ci-cd/java-maven.git'
// (2) 超时时间两分钟
timeout(time: 2, unit: 'MINUTES') {
script {
env.git_version=input message: '选择版本', ok: '通过',parameters: [string (description: '应用版本', name: 'git_version', trim: true)];
env.deploy_option = input message: '选择操作', ok: 'deploy', parameters: [description: '选择部署环境',choice(name: 'deploy_option', choices: ['deploy', 'rollback', 'redeploy'])];
}
}
// (3) 切换版本
sh label: 'build', script: '[ -n "${git_version}" ] && git checkout ${git_version} || { echo -e "切换的tag的版本${git_version} 不存在或为空请检查输入的tag!" && exit 1; }'
}
}
stage ("代码质检") {
steps {
sh label: 'sonar', returnStatus: true, script: '''/usr/local/bin/sonar-scanner -Dsonar.projectName=${JOB_NAME} -Dsonar.projectKey=Hello-World -Dsonar.sources=.'''
}
}
stage ("项目构建") {
steps {
sh label: 'build', script: 'cd /var/lib/jenkins/workspace/maven-pipeline-helloword/ && /usr/local/maven/bin/mvn clean package -Dmaven.test.skip=true '
}
}
stage ("项目部署") {
steps {
sh label: 'deploy', script: '/tmp/script/maven-jenkins-ci-script-pipeline-webhook.sh'
}
}
}
//消息通知: POST阶段当所有任务执行后触发
post {
always {
echo "clear workspace......"
deleteDir()
echo "Wechat notification......"
// 企业微信
qyWechatNotification aboutSend: true, failNotify: true, failSend: true, mentionedId: 'ALL', mentionedMobile: '', startBuild: true, successSend: true, unstableSend: true, webhookUrl: 'https://qyapi.weixin.qq.com/cgi-bin/webhook/send?key=c222f3fc-f645-440a-ad24-0ce8d9626fa0'
}
}
}
PS : 钉钉机器人在Pipeline使用示例 https://jenkinsci.github.io/dingtalk-plugin/examples/link.html
PS : 企业微信插件开源代码(在Pipeline无法获取Job_Name) https://github.com/jenkinsci/qy-wechat-notification-plugin
描述: 在 Jenkins Pipeline 中,我们经常需要对文件、目录或者tar、zip等压缩包进行操作,比如移动、复制、重命名等等, 而采用sh复制正对于一些安全票据的操作时,会报出以下警告对于强迫症的我是接受不了的并且确实有安全隐患。1
2
3
4
5
6
7
8
9# 提示1.
The following steps that have been detected may have insecure interpolation of sensitive variables (click here for an explanation):
sh: [keyfile, user]
# 提示2.
Warning: A secret was passed to "sh" using Groovy String interpolation, which is insecure.
Affected argument(s) used the following variable(s): [keyfile, user]
See https://****.io/redirect/groovy-string-interpolation for details.
+ cp **** ./id.private
解决办法: 我们可以通过安装 File Operations Plugin 插件来解决上述问题。
插件地址: https://plugins.jenkins.io/file-operations
支持操作:1
2
3
4
5
6
7
8
9
10
11
12
13
14
15
16# Array / List of Nested Choice of Objects
fileCopyOperation
fileCreateOperation
fileDeleteOperation
fileDownloadOperation
fileJoinOperation
filePropertiesToJsonOperation
fileRenameOperation
fileTransformOperation
fileUnTarOperation
fileUnZipOperation
fileZipOperation
folderCopyOperation
folderCreateOperation
folderDeleteOperation
folderRenameOperation
基础示例:1
2
3
4
5
6
7
8
9
10
11
12
13
14
15
16
17
18
19
20
21
22# 1.创建目录
script {
fileOperations([folderCreateOperation('directoryname')])
}
# 2.文件创建
script {
fileOperations([fileCreateOperation(fileContent: 'devops', fileName: 'test.json')])
}
# 3.文件复制
# flattenFiles: 如果选中,文件将直接复制到目标位置,而不保留源文件子目录结构。
fileOperations ([
folderCopyOperation(includes: "*", targetLocation: ".", flattenFiles: true)
])
# 4.目录复制
fileOperations ([
folderCopyOperation(sourceFolderPath: "/path/to/src", destinationFolderPath: "/path/to/dest"),
folderCopyOperation(sourceFolderPath: "/path/to/foo", destinationFolderPath: "/path/to/bar")
])
thinBackup Version 1.11
杂项
Backups the most important global and job specific configuration files.
此插件仅备份全局和特定于作业的配置(而不是存档或工作区)。
为什么是另一个备份插件
备份插件仅执行手动备份并存储JENKINS_HOME中找到的所有数据。由于时间和磁盘空间要求以及只能手动触发的事实,这有时是不切实际的。可以安排 ThinBackup,并且只备份最重要的配置信息。
在一次更换密码的过程中,意外的丢失了大多数Jenkins项目,导致一个个配置很麻烦,虽然已经使用的SCM Pipeline的方式简化了配置模式, 但手动的配置还是让我花费1个小时才完成所有项目的恢复,所以备份真的很重要
这里的的备份内容主要有
Jenkins自身 - 包括Manager Jenkins里面的内容
项目 - 项目的配置,输出的结果等
这里推荐使用插件 ThinBackup
安装后在 Manage Jenkins -> ThinBackup找到它
首先配置ThinBackup, 最重要的是配置以下选项
Backup directory - 备份的路径, 注意一定是主节点机器上本地的路径,不能是Network路径,否则恢复会失败
Backup schedule for full backups - 自动备份时间
Max number of backup sets - 备份文件最大个数
其他的选项看个人情况备份, 比如我想保留我自己的主题和插件,所以选择保留Backup ‘userContent’ folder和
Backup plugins archives
————————————————
版权声明:本文为CSDN博主「gis2all」的原创文章,遵循CC 4.0 BY-SA版权协议,转载请附上原文出处链接及本声明。
管理Jenkins
chown -R 1000:1000 jenkins/
/storage/dev/backup/jenkins
https://plugins.jenkins.io/cloudbees-disk-usage-simple/
简单的磁盘使用情况插件,用于计算磁盘使用情况,同时限制对 Jenkins 控制器的性能影响。
你好看友,欢迎关注博主微信公众号哟! ❤
这将是我持续更新文章的动力源泉,谢谢支持!(๑′ᴗ‵๑)
温馨提示: 未解锁的用户不能粘贴复制文章内容哟!
方式1.请访问本博主的B站【WeiyiGeek】首页关注UP主,
将自动随机获取解锁验证码。
Method 2.Please visit 【My Twitter】. There is an article verification code in the homepage.
方式3.扫一扫下方二维码,关注本站官方公众号
回复:验证码
将获取解锁(有效期7天)本站所有技术文章哟!

@WeiyiGeek - 为了能到远方,脚下的每一步都不能少
欢迎各位志同道合的朋友一起学习交流,如文章有误请在下方留下您宝贵的经验知识,个人邮箱地址【master#weiyigeek.top】或者个人公众号【WeiyiGeek】联系我。
更多文章来源于【WeiyiGeek Blog - 为了能到远方,脚下的每一步都不能少】, 个人首页地址( https://weiyigeek.top )

专栏书写不易,如果您觉得这个专栏还不错的,请给这篇专栏 【点个赞、投个币、收个藏、关个注、转个发、赞个助】,这将对我的肯定,我将持续整理发布更多优质原创文章!。
最后更新时间:
文章原始路径:_posts/系统运维/自动化运维/CI-CD/Jenkins/7.Jenkins插件安装使用帮助说明.md
转载注明出处,原文地址:https://blog.weiyigeek.top/2020/12-31-537.html
本站文章内容遵循 知识共享 署名 - 非商业性 - 相同方式共享 4.0 国际协议