
[TOC]
Maven 基础入门使用
|[TOC]
0x00 基础介绍
Maven 拉取 Jar 的几种途径1
2
3 -> 国外 Maven Jar 服务器
Gitlab -> Maven -> 国内 Maven Jar 镜像服务器
-> 企业 内部 Maven Jar 私服服务器 (可以双向同步)
Maven版本:
version(SNAPSHOT):快照版本随时更新不稳定的,每个版本都只是特定时间点的快照。同时,SNAPSHOT的不稳定性会带来风险 ,本地仓库中快照版本的依赖的目录下会看到带有时间戳的jar包。
例如:A–>B-1.3.8-SNAPSHOT(理解为A依赖了B的1.3.8-SNAPSHOT版本),那么B-1.3.8-SNAPSHOT更新且重新deploy到仓库之后,A只需要重新构建就可以拿到最新的代码,不用修改依赖B的版本。这样达到了变更传达的透明性。
version(RELEASE):发布(正式)版本,是稳定的版本号,应该一旦发布永远不变。
version(LATEST):不稳定版本,不管是快照还是发布版,就是去拉最新的。
注意: 不推荐直接使用<version>RELEASE<version>和 <version>LATEST<version>,因为它们都会在打包时去远程仓库拉取最新的,从而可能导致同一项目在打包时依赖不同的jar包。
1 | #依赖是具体的发布版本x.RELEASE: |
maven的三种仓库:1
- 1.本地仓库: 安装maven环境后会在本地生成一个`{%username%}/.m2/respository/`仓库位置,可在maven的配置文件`setting.xml`中更改此位置
0x01 环境安装
1.Maven 安装配置
安装包准备:
Maven 官网下载地址: https://maven.apache.org/download.cgi

weiyigeek.top-核验下载
安装环境测试:
Java 的 hello-world 项目 Pom.xml
1 | <project xmlns="http://maven.apache.org/POM/4.0.0" xmlns:xsi="http://www.w3.org/2001/XMLSchema-instance" |
运行打包的 maven-0.0.1-SNAPSHOT.jar1
2PS E:\githubProject\Study-Promgram\JAVAWeb\Maven\maven\target> java -jar .\maven-0.0.1-SNAPSHOT.jar
Hello World! , Hello Maven!
0x02 Maven 私服
1.环境搭建
安装 - Install
私服(nexus)搭建几种方式:
- 1.Windows 、Linux、 Mac 运行即可
- 2.Docker 部署安装
Docker 部署
描述: 前提是您的计算机或者远程服务器已经安装并配置好Docker;
Github docker-nexus3 镜像帮助: https://github.com/sonatype/docker-nexus3#getting-help
案例演示:1
2
3
4
5
6
7
8
9
10
11
12
13
14
15
16
17
18
19
20
21
22
23
24
25
26
27
28
29# 1.创建持久化目录与指定用户ID授权
mkdir -pv /app/nexus3/data && chown -R 200 /app/nexus3/data
# 2.拉取镜像
$ docker search nexus3
# NAME DESCRIPTION STARS
# sonatype/nexus3 Sonatype Nexus Repository Manager 3 896
$ docker pull sonatype/nexus3
# 3.容器构建即运行nexus3
$ docker run -id --privileged=true --name=maven-nexus3 --restart=always -p 8081:8081 -v /app/nexus3/data:/nexus-data sonatype/nexus3
# 参数解释:
# -id 创建守护式容器
# --privileged=true 授予root权限(挂载多级目录必须为true,否则容器访问宿主机权限不足)
# --name=名字 给你的容器起个名字
# -p 宿主机端口:容器端口映射
# -v 宿主机目录:容器目录 目录挂载
# 4.日志查看
docker logs -f --tail 50 maven-nexus3
# 2020-11-16 02:38:16,366+0000 INFO [jetty-main-1] *SYSTEM org.eclipse.jetty.server.AbstractConnector - Started ServerConnector@48c1eded{HTTP/1.1, (http/1.1)}{0.0.0.0:8081} # 表示初始化完成
# 2020-11-16 02:38:16,367+0000 INFO [jetty-main-1] *SYSTEM org.eclipse.jetty.server.Server - Started @30452ms
# 2020-11-16 02:38:16,368+0000 INFO [jetty-main-1] *SYSTEM org.sonatype.nexus.bootstrap.jetty.JettyServer -
# -------------------------------------------------
# Started Sonatype Nexus OSS 3.28.1-01
# -------------------------------------------------
# 5.查看初始化密码
cat /app/nexus3/data/admin.password
配置 - Configure
1) Aliyun - Maven Mirror Proxy Setting
描述: 配置私服得远程Maven的镜像仓库为阿里云加快下载速度;
Step 0.访问 maven.weiyigeek.top:8081 的 Nexus3 平台
Step 1.Setting -> Repository -> Create Repository
Step 2.Create Repository: maven2 (proxy)
Step 3.填入仓库名称以及remote存储仓库地址:https://maven.aliyun.com/repository/public
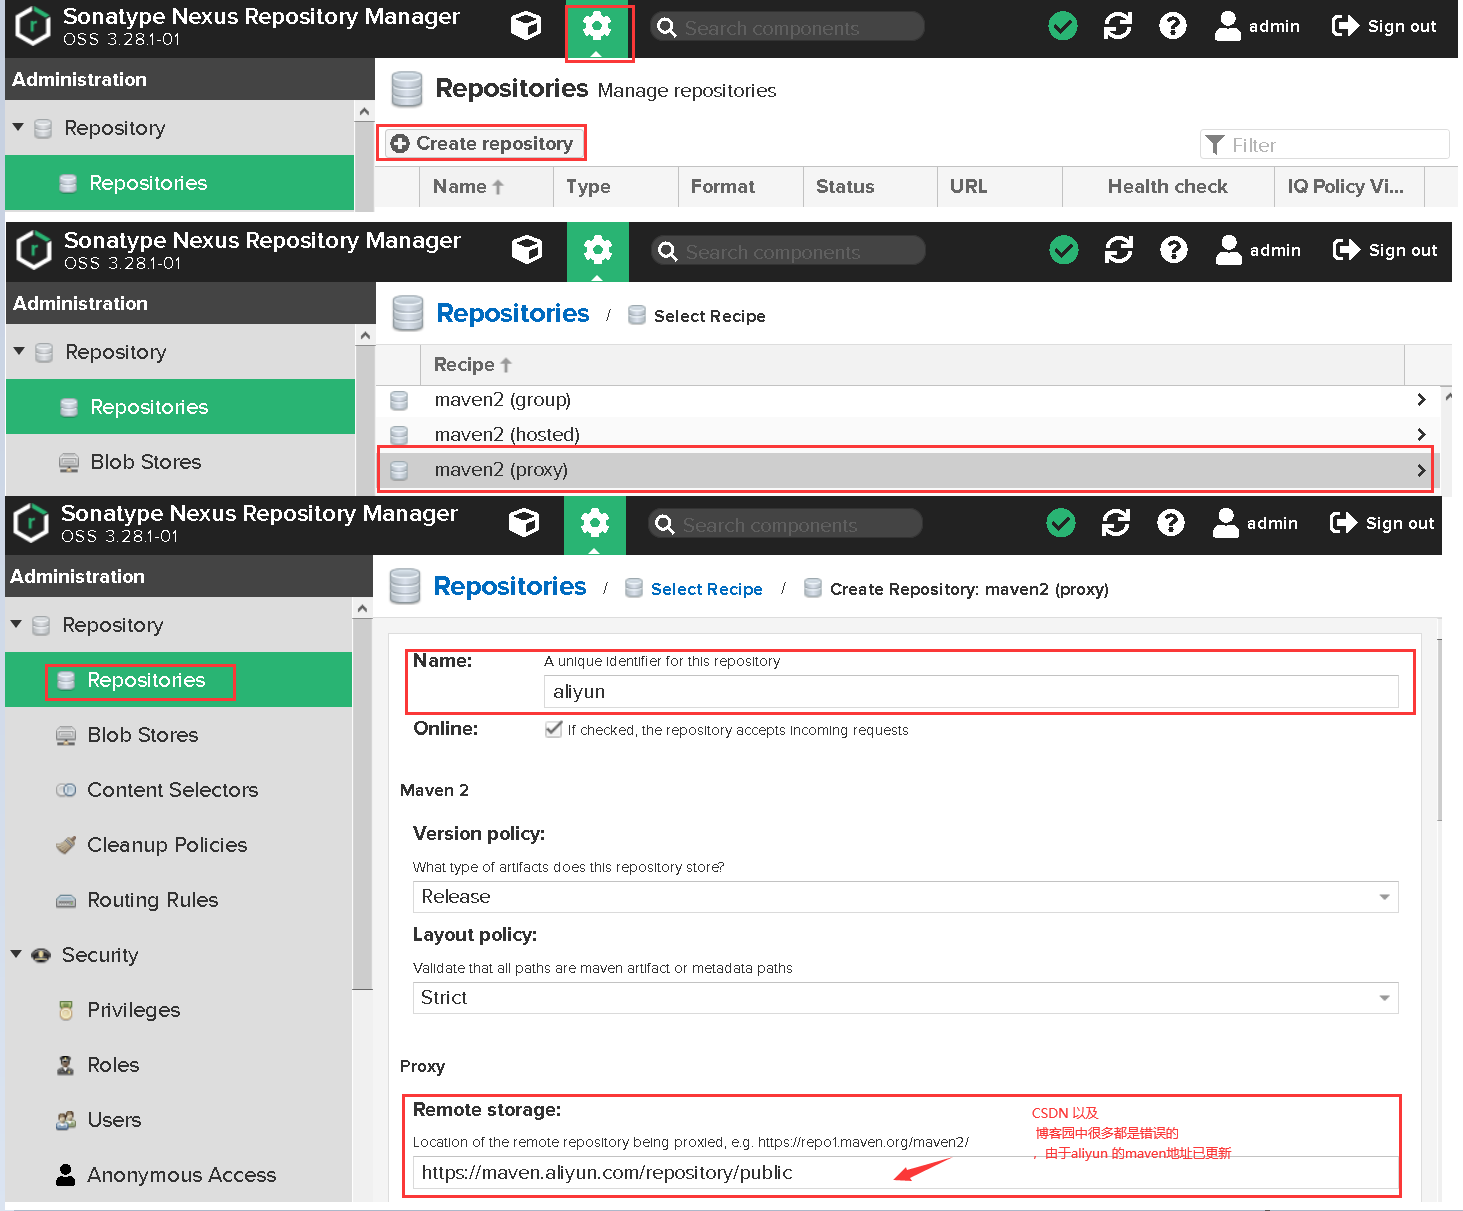
weiyigeek.top-Maven Mirror Proxy Setting
PS : 上述地址如有更新请参照:阿里云Maven中央仓库为阿里云云效提供的公共代理仓库
使用 - Usage
1) 本地 Maven 使用远程私有仓库配置
文件路径(环境有所不同请根据实际情况修改): E:\Development\apache-maven-3.6.3-bin\conf\settings.xml1
2
3
4
5
6
7
8
9<mirrors>
<!-- Maven 私服地址配置 -->
<mirror>
<id>private-maven</id>
<mirrorOf>central</mirrorOf>
<name>WeiyiGeek Private Maven</name>
<url>http://maven.weiyigeek.top:8081/repository/maven-public/</url>
</mirror>
</mirrors>
2) 上传本地jar到内部 Maven 私有仓库
描述: 大致可以通过三种方式进行上传Jar到内部 Maven 私有仓库中,第一种就是通过Web端上传,第二种通过mvn命令上传,第三种则是通过各开发工具上传例如IntelliJ IDEA.
通过 Sonatype Nexus Repository Manager 的 Web 页面进行上传Jar,操作流程Browse -> Upload-> Maven-release -> 选择要上传的jar包并设置该log4j-core.jar的组件相关信息。 weiyigeek.top-通过Nexus Web上传jar包1
2
3
4
5
6
7<dependencies>
<dependency>
<groupId>org.apache.logging.log4j</groupId>
<artifactId>log4j-core</artifactId>
<version>2.16.0</version>
</dependency>
</dependencies>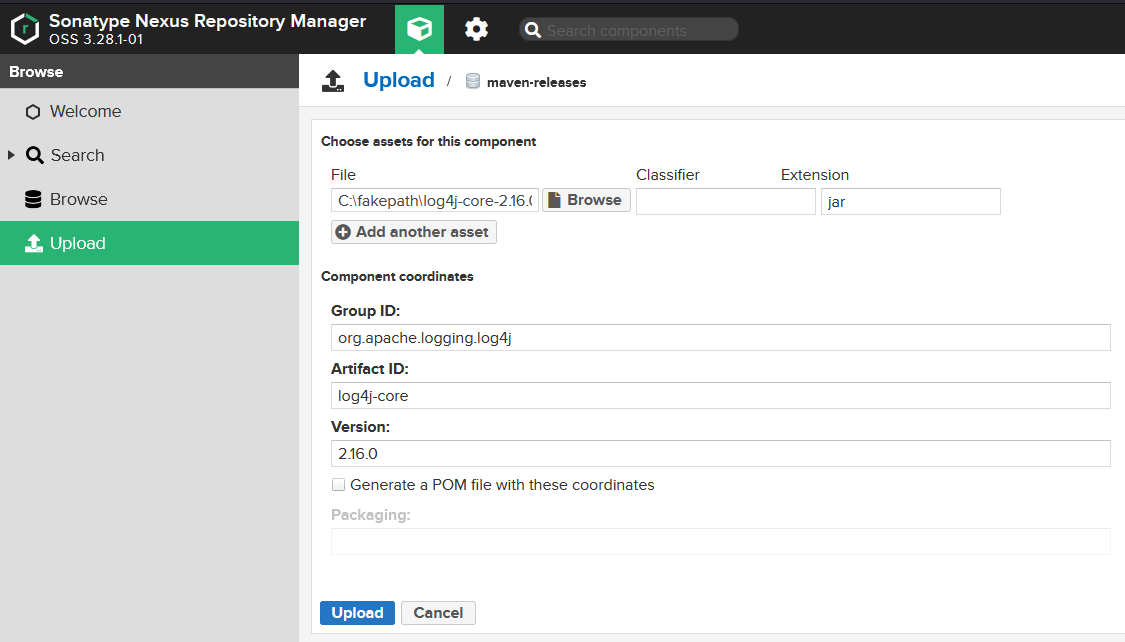
通过 Maven 的 cmd 来上传自定义jar包, 首先需要先复制一份settings.xml为settings-private.xml,在settings-private.xml文件中加入节点server:1
2
3
4
5<server>
<id>deployment</id>
<username>dev</username>
<password>dev123</password>
</server>
在命令行中输入1
2
3
4
5
6
7
8
9mvn deploy:deploy-file
-DgroupId=com.sjing.yjyuan
-DartifactId=fastjson-sj
-Dversion=1.0.1
-Dpackaging=jar
-Dfile=E:\installed\mavenRepository\fastjson-1.2.40.jar
-Durl=http://maven.weiyigeek.top/repository/maven-releases/
-DrepositoryId=deployment
--settings E:\installed\mavenRepository\settings-private.xml
通过IDE集成环境上传自定义jar包,首先还是在IDE集成环境中1
2
3
4
5
6
7
8
9
10<server>
<id>nexus-release</id>
<username>dev</username>
<password>dev123</password>
</server>
<server>
<id>nexus-snapshots</id>
<username>dev</username>
<password>dev123</password>
</server>
在maven工程项目nexus-upload中的pom文件中加入1
2
3
4
5
6
7
8
9
10
11
12
13
14
15
16<!--上传到nexus仓库中,配合mvn deploy:deploy-->
<distributionManagement>
<repository>
<!--这里的id需要和settings.xml中的server的id一致-->
<id>nexus-release</id>
<name>Nexus release Repository</name>
<!--releases仓库-->
<url>http://maven.weiyigeek.top/repository/maven-releases/</url>
</repository>
<snapshotRepository>
<id>nexus-snapshots</id>
<name>Nexus snapshots Repository</name>
<!--snapshots仓库-->
<url>http://maven.weiyigeek.top/repository/maven-snapshots/</url>
</snapshotRepository>
</distributionManagement>
参考地址: https://www.cnblogs.com/tiancai/p/10063572.html
https://www.cnblogs.com/endv/p/11204704.html
https://blog.csdn.net/u013887008/article/details/79429973
问题 - Trouble Shooting
1) Nexus3.X 忘记密码之如何重置admin密码
解决办法:1
2
3
4
5
6
7
8
9
10
11
12
13
14
15
16
17
18
19
20
21
22
23
24
25# 1.进入容器
docker exec -it maven-nexus3 bash
bash-4.4$ cd /opt/sonatype/nexus/bin/
bash-4.4$ ls
contrib nexus nexus.rc nexus.vmoptions nexus.vmoptions.old
bash-4.4$ ls -alh ../lib/support/nexus-orient-console.jar
-rw-r--r-- 1 root root 6.6K Oct 14 18:24 ../lib/support/nexus-orient-console.jar
# 2.进入OrientDB控制台
# Linux、Windows、Mac有不同的进入方法,方法如下:
linux:
java -jar ./lib/support/nexus-orient-console.jar
win:
java -jar lib\support\nexus-orient-console.jar
mac:
.install4j/jre.bundle/Contents/Home/jre/bin/java -jar ./lib/support/nexus-orient-console.jar
# 3.登陆数据库
connect plocal:../sonatype-work/nexus3/db/security admin admin
# 4.重置密码,此处我们将admin用户密码重置为admin123
update user SET password="$shiro1$SHA-512$1024$NE+wqQq/TmjZMvfI7ENh/g==$V4yPw8T64UQ6GfJfxYq2hLsVrBY8D1v+bktfOxGdt4b/9BthpWPNUy/CBk6V9iA0nHpzYzJFWO8v/tZFtES8CA==" UPSERT WHERE id="admin"
# 5.退出shell重新运行nexus3容器
docker restart maven-nexus3
https://www.sonatype.com/nexus/repository-oss/download
配置到你本地maven的settings文件
注意:是public group仓库地址而不是releases或snapshots仓库,public默认包含了这两个仓库1
2
3
4
5
6
7
8
9
10
11
12
13
14
15
16
17
18
19
20
21<profiles>
<profile>
<id>dev</id>
<repositories>
<repository>
<id>local-nexus</id>
<url>http://ip:8081/repository/maven-public/</url>
<releases>
<enabled>true</enabled>
</releases>
<snapshots>
<enabled>true</enabled>
</snapshots>
</repository>
</repositories>
</profile>
</profiles>
<activeProfiles>
<activeProfile>dev</activeProfile>
</activeProfiles>
配置maven settings文件的服务器用户名密码
注意:id为私服中releases和snapshots仓库名,必须一致
在项目父pom文件中配置部署环境,注意id及URL必须与nexus仓库对应
<!--私服仓库-->
<distributionManagement>
<repository>
<id>maven-releases</id>
<name>Nexus Release Repository</name>
<url>http://ip:8081/repository/maven-releases/</url>
</repository>
<snapshotRepository>
<id>maven-snapshots</id>
<name>Nexus Snapshot Repository</name>
<url>http://ip:8081/repository/maven-snapshots/</url>
</snapshotRepository>
</distributionManagement>
重新打开项目,对需要的模块进行deploy1
2
3
4
5
6
7
8
9
10
11
12
13
14
15
16
17
18
19
```xml
在项目父pom文件中配置部署环境,注意id及URL必须与nexus仓库对应
<!--私服仓库-->
<distributionManagement>
<repository>
<id>maven-releases</id>
<name>Nexus Release Repository</name>
<url>http://192.168.3.128:8081/repository/maven-releases/</url>
</repository>
<snapshotRepository>
<id>maven-snapshots</id>
<name>Nexus Snapshot Repository</name>
<url>http://192.168.3.128:8081/repository/maven-snapshots/</url>
</snapshotRepository>
</distributionManagement>
0x03 mvn 命令浅析
参数解析1
2
3
4
5
6-pl,--projects : 选项后可跟随{groupId}:{artifactId}或者所选模块的相对路径(多个模块以逗号分隔)
-am,--also-make : 表示同时处理选定模块所依赖的模块
-amd,--also-make-dependents : 表示同时处理依赖选定模块的模块
-N,--Non-recursive : 表示不递归子模块
-rf,--resume-from : 表示从指定模块开始继续处理
-X : 表示显示构建时的详细信息(Debug)
简单示例1
2
3
4
5
6
7
8# Maven 构建时显示详细信息
mvn install -X
# maven 下载单个源码包
mvn org.apache.maven.plugins:maven-dependency-plugin:2.8:get -Dartifact=javax.mail:mail:1.1:jar:sources
# Maven 导出依赖的jar包 (默认导出到targed/dependency 下面)
mvn dependency:copy-dependencies -DoutputDirectory=lib -DincludeScope=compile
实践示例
- Maven之SpringBoot多模块编译以及单独构建多模块项目中的单个模块温馨提示:
1
2
3
4
5
6
7
8
9
10
11
12
13
14
15
16
17
18
19
20
21
22
23
24# 首先切换到工程的根目录
# 可以通过pom.xml文件查看该POM项目包含的子模块
<modules>
<module>weiyigeek-admin</module>
<module>weiyigeek-front-login</module> # weiyigeek-admin 模块依赖于该模块
<module>weiyigeek-front-search</module>
<module>weiyigeek-front-pdf</module>
<module>weiyigeek-front-history</module>
</modules>
# 方式1.构建该项目的所有模块项目,即 weiyigeek-* 所有项目
mvn clean package
# 方式2.只编译构建 weiyigeek-admin 项目
mvn clean install -pl org.top:weiyigeek-admin -am --settings settings.xml
# 方式3.编译构建 weiyigeek-admin 与 weiyigeek-front-login 项目
mvn clean install -pl weiyigeek-front-login -amd --settings settings.xml
# 方式4.从 weiyigeek-front-history 模块项目进行处理
mvn clean install -rf weiyigeek-front-history
# 方式5.只构建当前项目不构建子模块。
mvn clean install -N如果多模块项目没有互相引用,那么此时可以单独构建单个项目,指定到子模块的pom.xml文件即可完成编译。
如果多模块项目各自都引用了,那么单独编译子模块的pom.xml文件会直接报错,解决方法就是编译父项目pom.xml。
如果编译父项目,那么可能会造成编译时间很慢,其中有些项目也不需要编译,我们就可以采用上述 -pl 参数指定单模块。
X

你好看友,欢迎关注博主微信公众号哟! ❤
这将是我持续更新文章的动力源泉,谢谢支持!(๑′ᴗ‵๑)
温馨提示: 未解锁的用户不能粘贴复制文章内容哟!
方式1.请访问本博主的B站【WeiyiGeek】首页关注UP主,
将自动随机获取解锁验证码。
Method 2.Please visit 【My Twitter】. There is an article verification code in the homepage.
方式3.扫一扫下方二维码,关注本站官方公众号
回复:验证码
将获取解锁(有效期7天)本站所有技术文章哟!
@WeiyiGeek - 为了能到远方,脚下的每一步都不能少
欢迎各位志同道合的朋友一起学习交流,如文章有误请在下方留下您宝贵的经验知识,个人邮箱地址【master#weiyigeek.top】或者个人公众号【WeiyiGeek】联系我。
更多文章来源于【WeiyiGeek Blog - 为了能到远方,脚下的每一步都不能少】, 个人首页地址( https://weiyigeek.top )

专栏书写不易,如果您觉得这个专栏还不错的,请给这篇专栏 【点个赞、投个币、收个藏、关个注、转个发、赞个助】,这将对我的肯定,我将持续整理发布更多优质原创文章!。
最后更新时间:
文章原始路径:_posts/编程世界/JavaWeb/6.Maven/Maven基础入门使用.md
转载注明出处,原文地址:https://blog.weiyigeek.top/2020/2-8-312.html
本站文章内容遵循 知识共享 署名 - 非商业性 - 相同方式共享 4.0 国际协议