[TOC]
0x00 前言简述 CI/CD介绍 Q:我们常说的CI/CD是什么?
CI 为 Continuous Integration 的缩写持续集成,可以理解为代码变动提交后,自动执行代码编译、代码打包、代码测试的这么一个流程。
CD 对应多个英文名称:Continuous Deployment(持续部署) 和 Continuous Delivery(持续交付)。可以理解为通过上一步的操作将生成部署包按照配置文件流程进行部署启动;
Q: 什么是持续部署、交付?他有何作用?
PS:持续集成可以通过自动运行测试来帮助检测代码缺陷,而持续部署可以帮助您向生产环境交付代码, 对于前面提到的「持续」,可以理解为每完成一个完整的部分,就向下一个环节交付。
参考来源 https://docs.gitlab.com/
0x01 GitLab-CI 持续集成 1.1 基础介绍 Q:什么是GitLab-CI?
A: GitLab-CI是Gitlab官方提供的持续集成服务(GitLab8.0以后的版本是默认集成了GitLab-CI并默认启用的),它需要gitlab中配置注册runner,然后在仓库的根目录下新建.gitlab-ci.yml文件编写命令,并且在仓库的每次提交合并中将会触发构建;PS:当然还有其它的持续集成系统同样可以配合GitLab使用比如Jenkins主要针对于Java环境的项目,这里就不多说了;
Q:什么是GitLab-Runner?
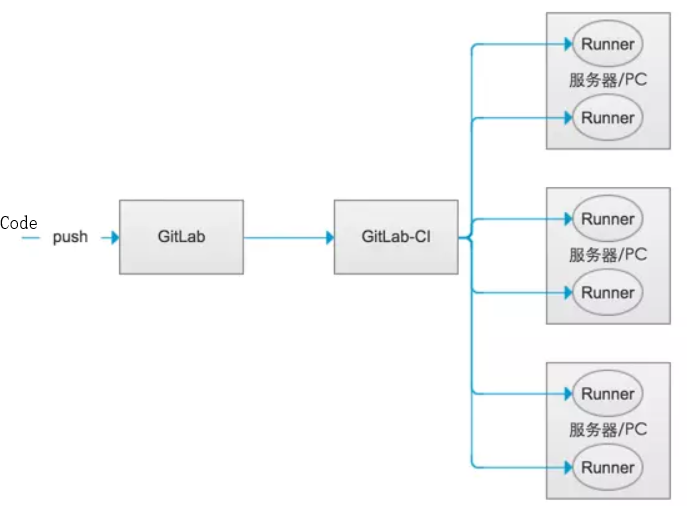
A: Runner是一个执行任务的进程。您可以根据需要配置任意数量的Runner, 它可以放在不同的用户、服务器,甚至本地机器上。当这个工程的仓库代码发生变动时,比如有人push了代码GitLab就会将这个变动通知GitLab-CI,此时GitLab-CI会找出与这个工程相关联的Runner,并通知这些Runner把代码更新到本地并执行预定义好的执行脚本。
示例: Runner就像一个个的工人,而GitLab-CI就是这些工人的一个管理中心,所有工人都要在GitLab-CI里面登记注册,并且表明自己是为哪个工程服务的。所以当相应的工程发生变化时 GitLab-CI就会通知相应的工人执行软件集成脚本的动作,如下图所示:
weiyigeek.top-GitLab-CI与Runner关系图
Q:GitLab-Runner分类两种类型说明?
两种类型指的是Shared Runner(共享型)和Specific Runner(指定型)。
Shared Runner:是所有工程都能够用的并且只有系统管理员能够创建Shared Runner。
Specific Runner:这只能为指定的工程服务。拥有该工程访问权限的人都能够为该工程创建Shared Runner。
Q:GitLab-Runner的几种状态说明?
shared - Runner 将运行所有未指定的项目的作业
group - Runner 将运行群组中所有未指定项目的作业
specific - Runner 将运行指定项目的作业 (常用)
locked - 无法将 Runner 分配给其他项目
paused - Runner 不会接受新的作业
1.2 安装配置 描述: GitLab-Runner安装配置此处有两种下载安装方式(宿主机或者容器中安装),这是由于考虑到国内的网络访问国外地址确实太慢而且容易下载失败,所以通常我们都是在国内的一些镜像源厂商处进行下载以及设置操作系统的更新源;
安装参考: https://docs.gitlab.com/runner/install/
环境说明:
[TOC]
0x00 前言简述 CI/CD介绍 Q:我们常说的CI/CD是什么?
CI 为 Continuous Integration 的缩写持续集成,可以理解为代码变动提交后,自动执行代码编译、代码打包、代码测试的这么一个流程。
CD 对应多个英文名称:Continuous Deployment(持续部署) 和 Continuous Delivery(持续交付)。可以理解为通过上一步的操作将生成部署包按照配置文件流程进行部署启动;
Q: 什么是持续部署、交付?他有何作用?
PS:持续集成可以通过自动运行测试来帮助检测代码缺陷,而持续部署可以帮助您向生产环境交付代码, 对于前面提到的「持续」,可以理解为每完成一个完整的部分,就向下一个环节交付。
参考来源 https://docs.gitlab.com/
0x01 GitLab-CI 持续集成 1.1 基础介绍 Q:什么是GitLab-CI?
A: GitLab-CI是Gitlab官方提供的持续集成服务(GitLab8.0以后的版本是默认集成了GitLab-CI并默认启用的),它需要gitlab中配置注册runner,然后在仓库的根目录下新建.gitlab-ci.yml文件编写命令,并且在仓库的每次提交合并中将会触发构建;PS:当然还有其它的持续集成系统同样可以配合GitLab使用比如Jenkins主要针对于Java环境的项目,这里就不多说了;
Q:什么是GitLab-Runner?
A: Runner是一个执行任务的进程。您可以根据需要配置任意数量的Runner, 它可以放在不同的用户、服务器,甚至本地机器上。当这个工程的仓库代码发生变动时,比如有人push了代码GitLab就会将这个变动通知GitLab-CI,此时GitLab-CI会找出与这个工程相关联的Runner,并通知这些Runner把代码更新到本地并执行预定义好的执行脚本。
示例: Runner就像一个个的工人,而GitLab-CI就是这些工人的一个管理中心,所有工人都要在GitLab-CI里面登记注册,并且表明自己是为哪个工程服务的。所以当相应的工程发生变化时 GitLab-CI就会通知相应的工人执行软件集成脚本的动作,如下图所示:
weiyigeek.top-GitLab-CI与Runner关系图
Q:GitLab-Runner分类两种类型说明?
两种类型指的是Shared Runner(共享型)和Specific Runner(指定型)。
Shared Runner:是所有工程都能够用的并且只有系统管理员能够创建Shared Runner。
Specific Runner:这只能为指定的工程服务。拥有该工程访问权限的人都能够为该工程创建Shared Runner。
Q:GitLab-Runner的几种状态说明?
shared - Runner 将运行所有未指定的项目的作业
group - Runner 将运行群组中所有未指定项目的作业
specific - Runner 将运行指定项目的作业 (常用)
locked - 无法将 Runner 分配给其他项目
paused - Runner 不会接受新的作业
1.2 安装配置 描述: GitLab-Runner安装配置此处有两种下载安装方式(宿主机或者容器中安装),这是由于考虑到国内的网络访问国外地址确实太慢而且容易下载失败,所以通常我们都是在国内的一些镜像源厂商处进行下载以及设置操作系统的更新源;
安装参考: https://docs.gitlab.com/runner/install/
环境说明: 1 2 GitLab 服务器: 192.168.1.250 = gitlab.weiyigeek.top Gitlab-Runner 服务器: 192.168.1.3
Runner 安装配置流程: 1 2 3 4 5 6 7 8 9 10 11 12 13 14 15 16 17 18 19 20 21 22 curl -L https://packages.gitlab.com/install/repositories/runner/gitlab-ci-multi-runner/script.rpm.sh | sudo bash yum install -y gitlab-ci-multi-runner gitlab-ci-multi-runner register cat > /etc/yum.repos.d/gitlab-runner.repo <<END [gitlab-runner] name=gitlab-runner baseurl=https://mirrors.tuna.tsinghua.edu.cn/gitlab-runner/yum/el7 repo_gpgcheck=0 gpgcheck=0 enabled=1 gpgkey=https://packages.gitlab.com/gpg.key END sudo yum makecache sudo yum list gitlab-runner --showduplicates sudo yum install gitlab-runner -y
向GitLab-CI注册Runner流程如下:
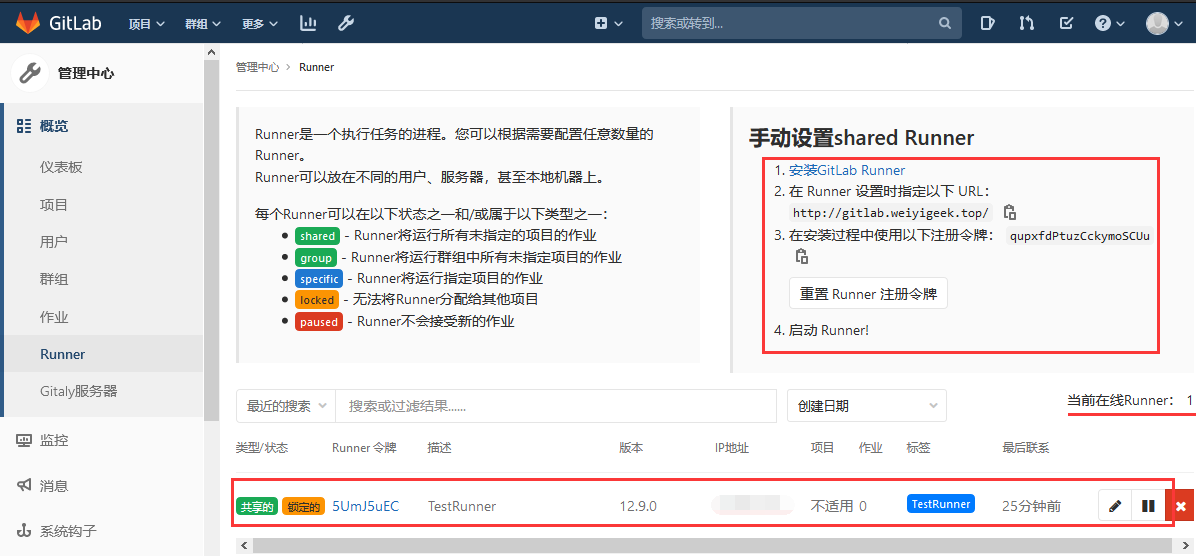
Step1.由于向GitLab-CI注册一个Runner需要两样东西GitLab-CI的url和注册token所以我们首先需要在GitLab平台上得到该属性(管理中心->概览->Runner->手动设置SharedRunner);
1 2 3 4 1.安装GitLab Runner 2.在 Runner 设置时指定以下 URL: http://gitlab.weiyigeek.top/ 3.在安装过程中使用以下注册令牌: qupxfdPtuzCckymoSCUu 4.启动 Runner!
Step2.在Gitlab-Runner 服务器中进行执行;
1 2 3 4 5 6 7 8 9 10 11 12 13 14 15 [root@Gitlab-Runner ~]$gitlab -runner register Runtime platform arch=amd64 os=linux pid=20709 revision=4c96e5ad version=12.9.0 Running in system-mode. Please enter the gitlab-ci coordinator URL (e.g. https://gitlab.com/): http://gitlab.weiyigeek.top/ Please enter the gitlab-ci token for this runner: qupxfdPtuzCckymoSCUu Please enter the gitlab-ci description for this runner: [initiator]: TestRunner Please enter the gitlab-ci tags for this runner (comma separated): TestRunner Registering runner... succeeded runner=qupxfdPt Please enter the executor: parallels, custom, docker, docker-ssh, docker+machine, docker-ssh+machine, kubernetes, shell, ssh, virtualbox: shell Runner registered successfully. Feel free to start it, but if it's running already the config should be automatically reloaded!
Step3.注册完成之后GitLab-CI就会多出一条Runner记录,注意Type值有两种:shared 所有仓库都可以使用 / specific 只有指定的仓库可以使用 , 而type的类型由执行gitlab-runner register命令填入的token决定;
weiyigeek.top-
补充:不错当然您也可以在 /etc/gitlab-runner/config.toml 来注册相应类型的 Runner1 2 3 4 5 6 7 8 9 10 11 12 13 14 15 16 17 18 19 20 21 22 23 24 25 26 27 28 29 30 31 32 33 34 35 36 37 38 39 40 $nano /etc/gitlab-runner/config.tomlconcurrent = 1 check_interval = 0 [session_server] session_timeout = 1800 [[runners]] name = "TestRunner" url = "http://gitlab.weiyigeek.top/" token = "5UmJ5uECw5k6H_phzeiW" executor = "shell" [runners.custom_build_dir] [runners.cache] [runners.cache.s3] [runners.cache.gcs] [[runners]] name = "DockerRunner" url = "http://gitlab.weiyigeek.top/" token = "HrpstQA6eezWv5-9m5-d" executor = "docker" [runners.custom_build_dir] [runners.cache] [runners.cache.s3] [runners.cache.gcs] [runners.docker] allowed_images = ["192.168.1.1/*:*" ] tls_verify = false image = "alpine-node:latest" privileged = false disable_entrypoint_overwrite = false oom_kill_disable = false disable_cache = false volumes = ["/cache" ] shm_size = 0
注意事项:
特别注意concurrent与worker 数量无任何关系,所有worker 的工作是受GitLab Runner控制的,如果concurrent值为1并且有一个worker已经在工作了,那么即使其他worker达到了可以工作的条件也只能“pending”。
1.3 命令参数 描述: 安装 Gitlab Runner 后有两个命令gitlab-ci-multi-runner和gitlab-runner,前者用于注册多个Runner而后者构建一个单实例runner;
gitlab-runner 命令参数:1 2 3 4 5 6 7 8 9 10 11 12 13 14 15 16 17 18 19 20 21 22 $ gitlab-runner register $ gitlab-runner list Runtime platform arch=amd64 os=linux pid=81864 revision=4c96e5ad version=12.9.0 Listing configured runners ConfigFile=/home/gitlab-runner/.gitlab-runner/config.toml sudo gitlab-runner uninstall sudo gitlab-runner install --working-directory /home/gitlab-runner --user root sudo gitlab-runner run sudo gitlab-runner install -n "<service-name>" -u <user-name> sudo gitlab-runner start -n "<service-name>"
GitLab Runner Commands 命令使用参考:https://docs.gitlab.com/runner/commands/README.html
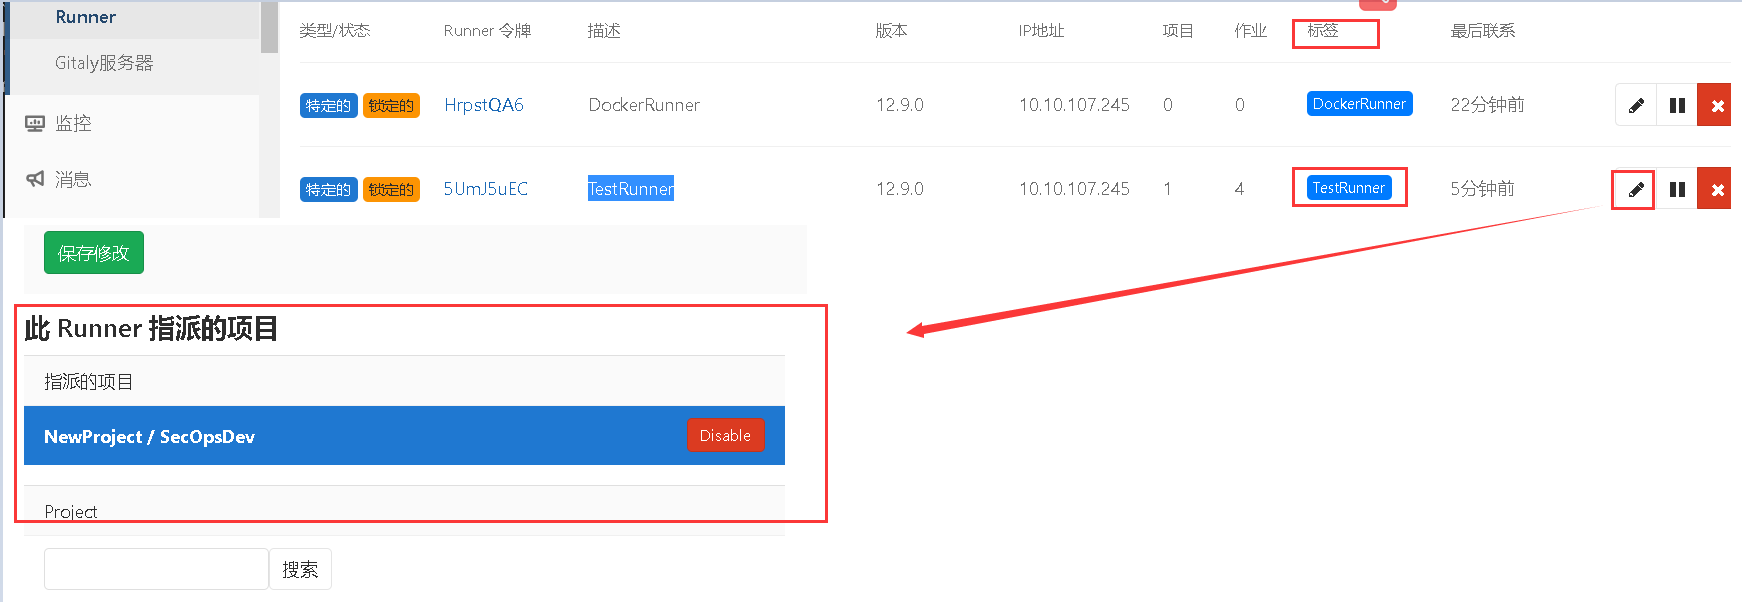
1.4 基础使用 描述:假设我们在SecOpsDev项目中进行使用Gitlab-CI/CD,并且已经注册了Runner,管理中心->Runner->查看Runner标签:此处为TestRunner,然后点击编辑进行指派SecOpsDev项目;
weiyigeek.top-runnertags
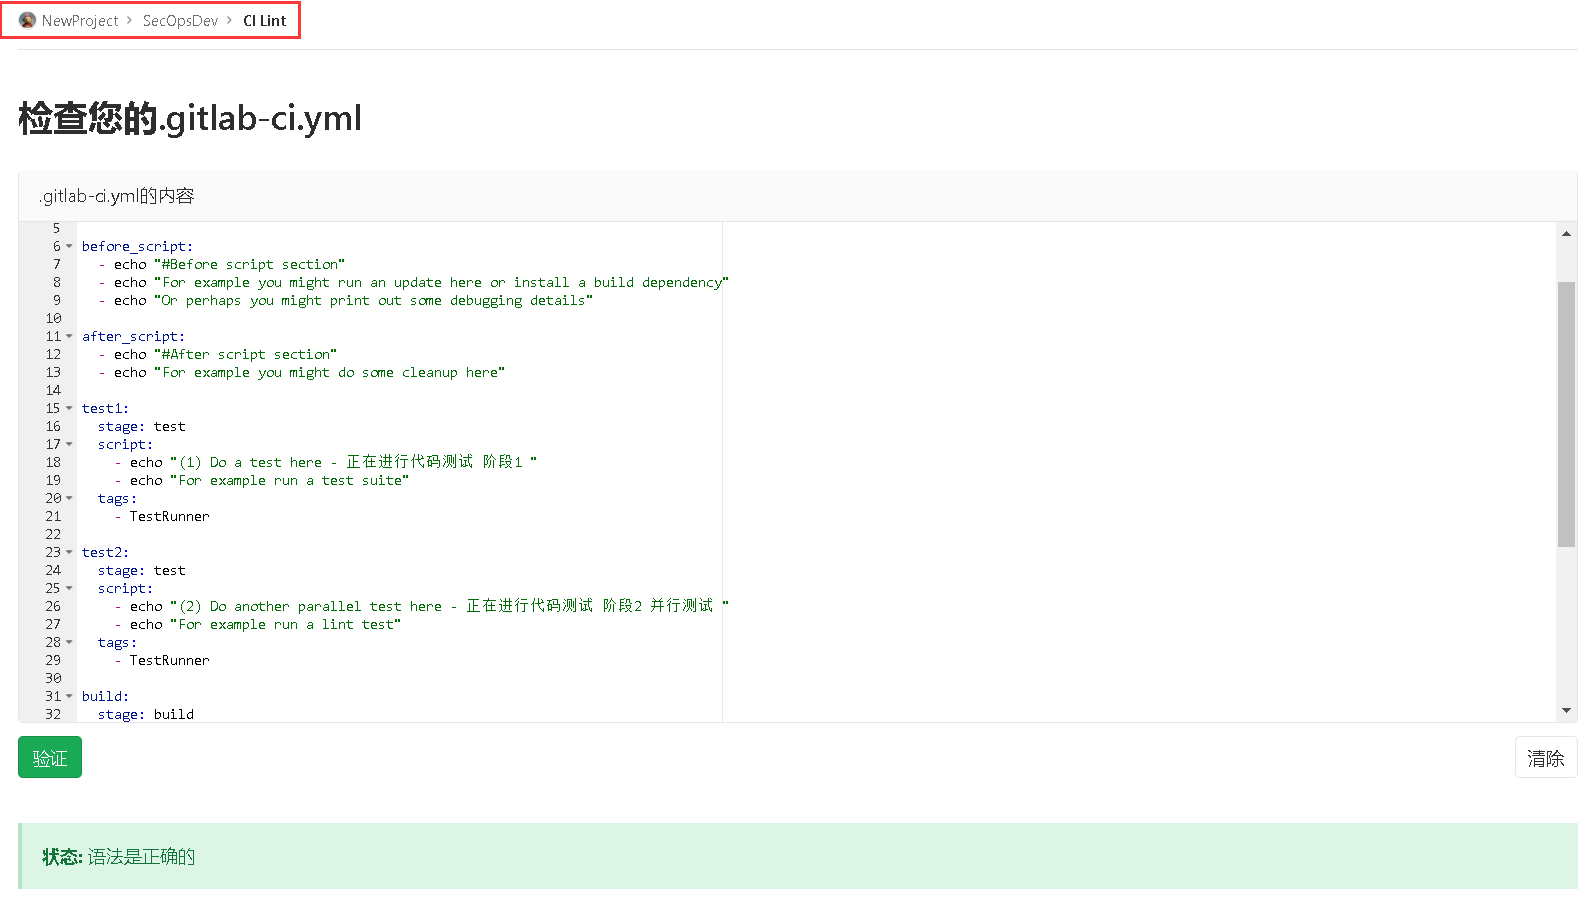
(1)此时我们再在我们的SecOpsDev项目中建立一个.gitlab-ci.yaml文件,并且编写好后建议对其进行检测测试NewProject -> SecOpsDev -> CI Lint,示例如下:1 2 3 4 5 6 7 8 9 10 11 12 13 14 15 16 17 18 19 20 21 22 23 24 25 26 27 28 29 30 31 32 33 34 35 36 37 38 39 40 41 42 43 44 45 46 47 48 49 50 51 stages: - test - build - deploy before_script: - echo "#Before script section" >> WeiyiGeek.txt - echo "For example you might run an update here or install a build dependency" - echo "Or perhaps you might print out some debugging details" after_script: - echo "#After script section" >> WeiyiGeek.txt - echo "For example you might do some cleanup here" test1: stage: test script: - echo "(1) Do a test here - 正在进行代码测试 阶段1 " - echo "For example run a test suite" tags: - TestRunner test2: stage: test script: - echo "(2) Do another parallel test here - 正在进行代码测试 阶段2 并行测试 " - echo "For example run a lint test" tags: - TestRunner build: stage: build script: - echo "(3) Building the app - 正在对项目进行编译 " tags: - TestRunner deploy: stage: deploy script: - echo "(4) Deploy to staging server :" $url - echo "(4) Deploy to staging server :" $(env) environment: name: staging url: https://staging.weiyigeek.top only: - master tags: - TestRunner
weiyigeek.top-gitlab-ci.yaml
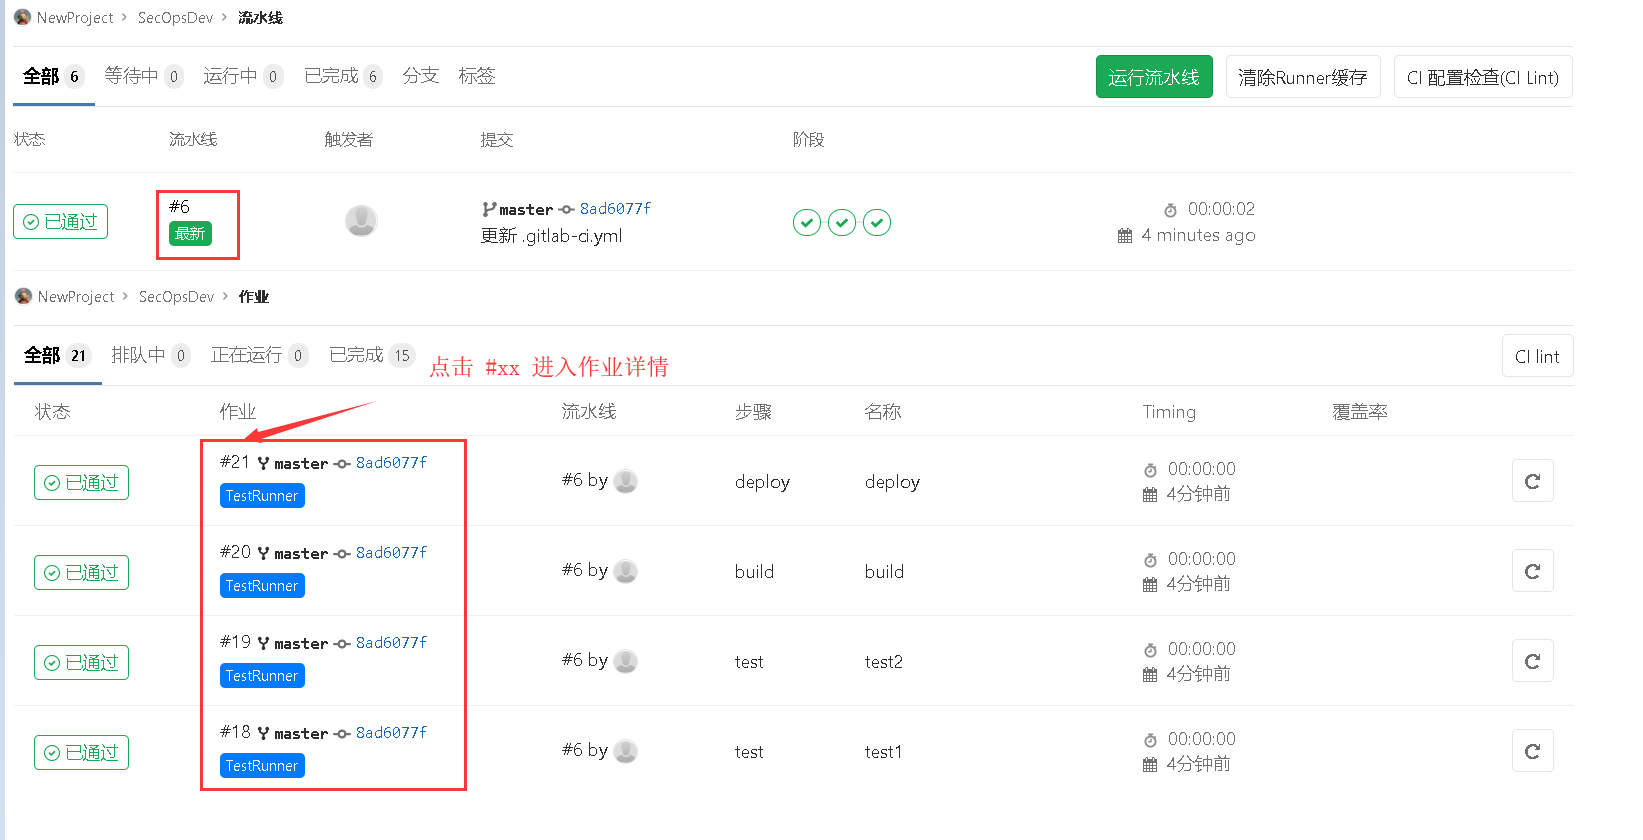
(2)之后我们会在项目中的 CI-CD -> 流水线 | 作业 进行查看执行结果;
weiyigeek.top-流水线
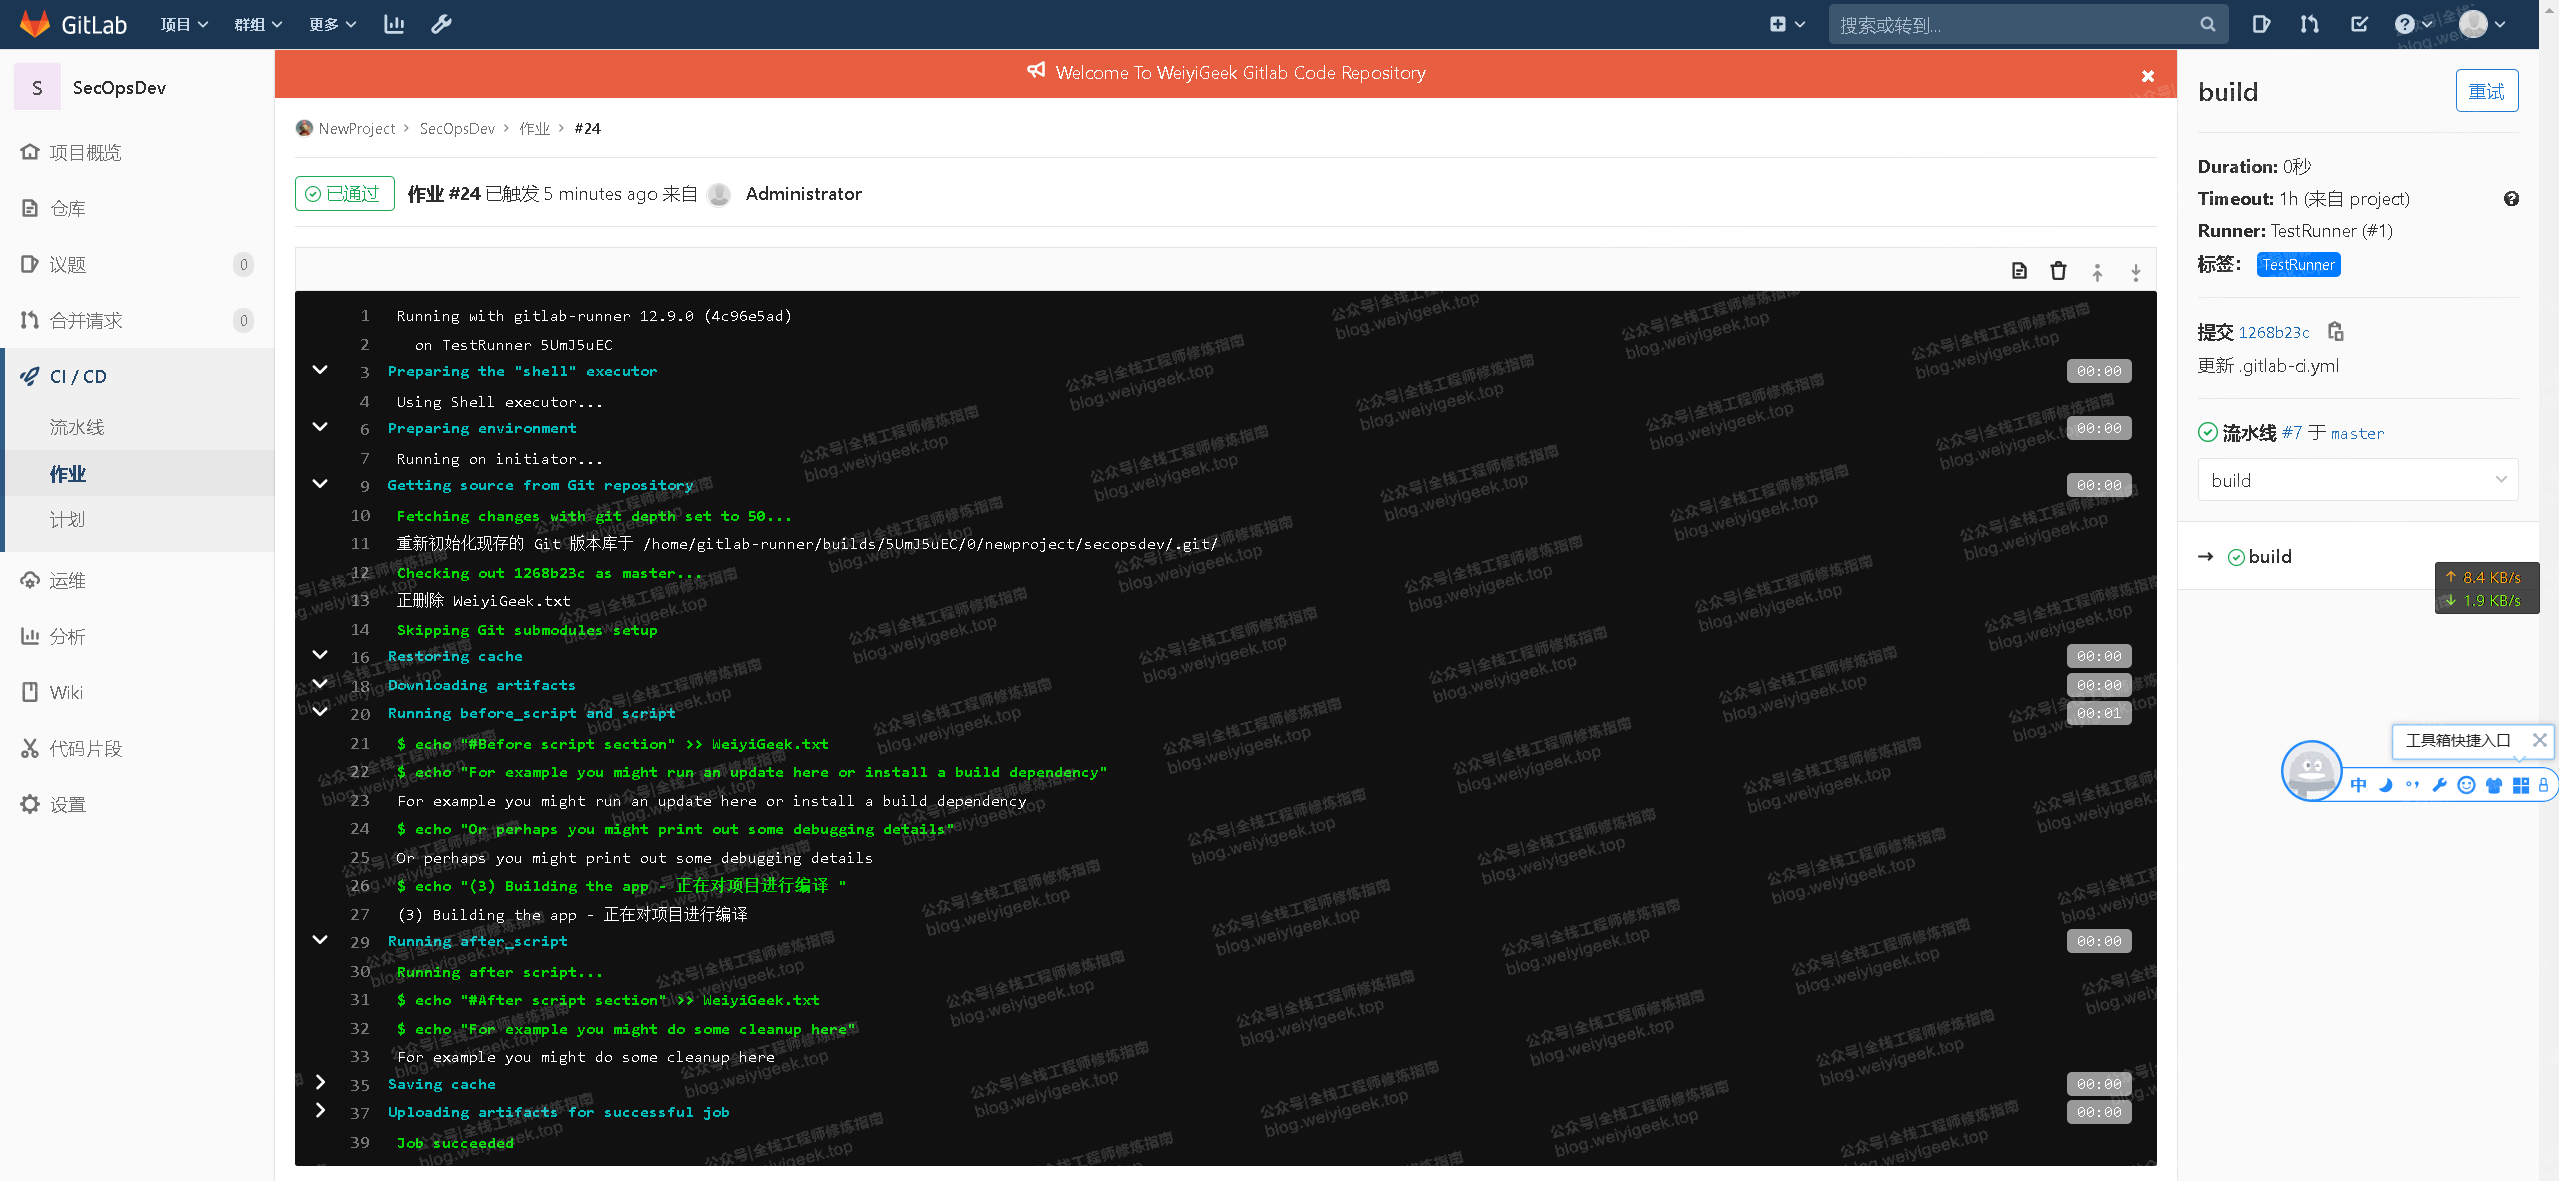
(3)Gitlab-CI执行详情结果:
weiyigeek.top-作业详情
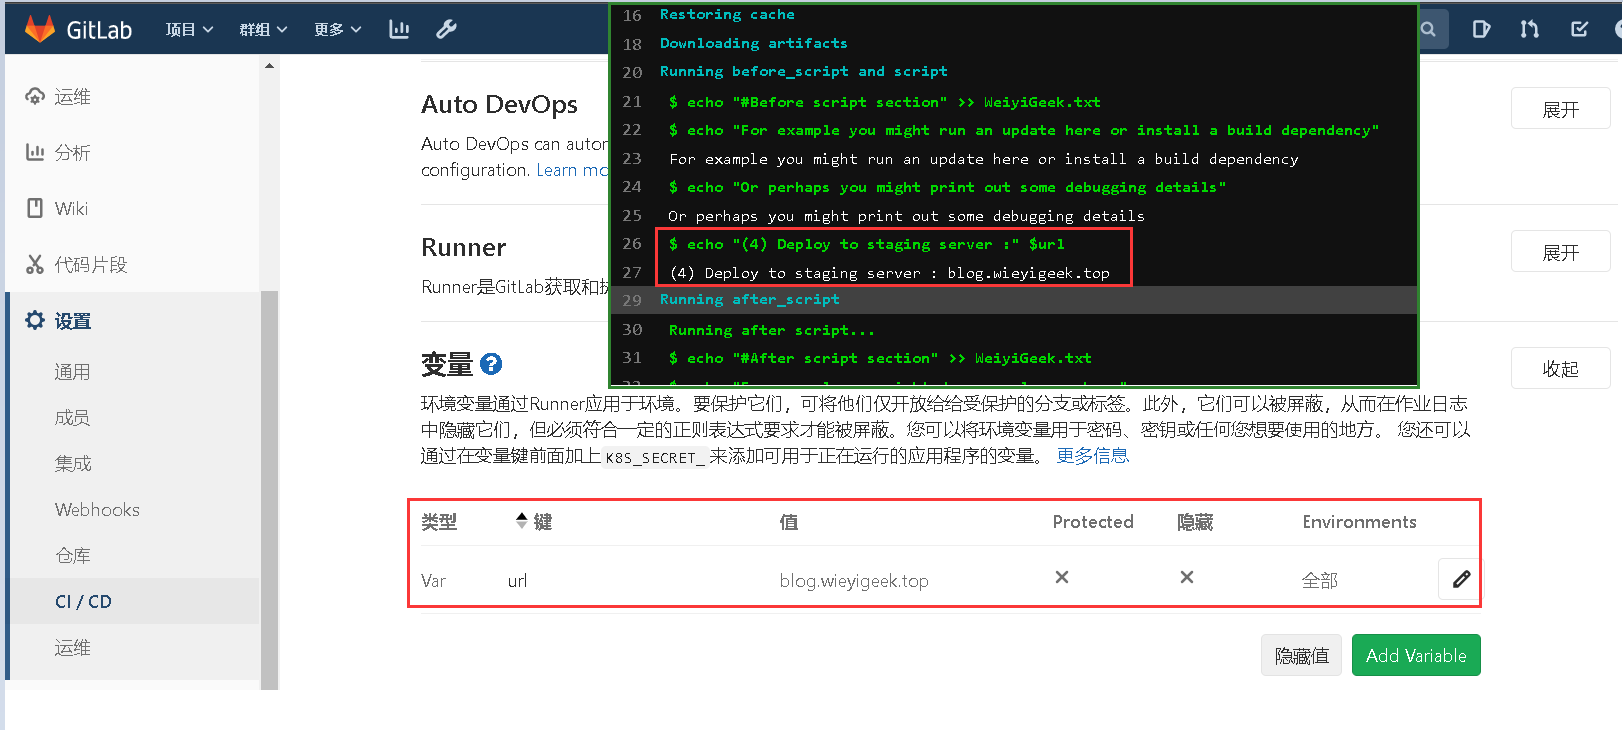
(4)除此之外我们还可对CI/CD环境变量进行设置,并且运行到Runner环境中,设置路径如下: NewProject -> SecOpsDev -> CI/CD 设置 -> Expand (展开),然后重新执行deploy阶段在作业进行查看显示如下图所示;
weiyigeek.top-环境变量
(5)拉取的code会在Gitlab-Runner主机中,安装以下路径进行存放/home/gitlab-runner/builds/5UmJ5uEC/0/newproject/secopsdev/.git/
补充说明:
GitLab CI有三个默认阶段:1构建(build)、2测试(test)、3部署(deploy),我们将有一篇文章进行详细讲解。
Runner可以分布在不同的主机上,同一个主机上也可以有多个Runner。
1.5 Executor 下面我们来谈谈一个非常重要的话题Executor,上面我们在向gitlab-ci注册runner需要我们输入Executor;1 Please enter the executor: parallels, custom, docker, docker-ssh, docker+machine, docker-ssh+machine, kubernetes, shell, ssh, virtualbox:
Shell Executor <working-directory>/builds/<short-token>/<concurrent-id>/<namespace>/<project-name>,如果你使用了cache,那么cache将会存在<working-directory>/cache/<namespace>/<project-name>。1 2 3 4 5 /home/gitlab-runner/builds/5UmJ5uEC/0/WeiyiGeek/blog /home/gitlab-runner/cache/WeiyiGeek/blog
参考:https://docs.gitlab.com/runner/executors/shell.html
Docker Executor
- build和cache的存储
Docker executor默认将所有的builds存储在/builds//(这里的路径是container里的路径,Runner配置文件config.toml里的build_dir字段可以重新指明build的目录,默认对应于宿主机的目录是在宿主机的docker volume下:/var/lib/docker/volumes//_data/),默认将所有的caches存储在container里的/cache目录(config.toml里的cache_dir字段可以重新指明cache的目录),注意build_dir和cache_dir指向的均是container里的目录,要想将container里的数据持久化,需要用到volumes字段,这个字段的使用和docker volume的使用是类似的,只需在config.toml的[runner.docker]部分添加volumes = ["/cache", ":rw"]即可实现container里/cache目录数据的永久保存以及将host目录挂载到相应的container目录并具有读写的功能。
1 2 3 4 5 6 7 8 9 10 11 12 13 14 15 [runners.custom_build_dir] [runners.cache] [runners.cache.s3] [runners.cache.gcs] [runners.docker] allowed_images = ["192.168.1.1/*:*"] tls_verify = false image = "alpine-node:latest" privileged = false disable_entrypoint_overwrite = false oom_kill_disable = false disable_cache = false volumes = ["/cache"] shm_size = 0
Helper image
当你使用docker, docker+machine 或 kubernetes作为executor时,GitLab Runner将会使用特定的container来处理Git、artifacts 和cache 操作。通过在宿主机中键入以下命令:
1 2 3 4 $ sudo docker images REPOSITORY TAG gitlab/gitlab-runner-helper x86_64-3afdaba6 gitlab/gitlab-runner-helper x86_64-cf91d5e1
当然,你也可以通过配置config.toml里的helper_image字段来让Runner使用你自己定制化的helper image。
Q:如何在job所对应的container里使用git clone命令?
答: 如果你想在job运行期间clone某些代码(如shell或python的脚本),首先要确保你的宿主机有权限clone代码,然后你就可以将你的secret挂载到container里
例如,你是通过ssh的方式克隆代码,并且你的ssh目录为home//.ssh,你就可以在config.toml文件里添加如下配置:
1 volumes = ["/home/x1twbm/.ssh:/root/.ssh:ro"]
1.6 缓存使用 该章节主要针对于Gitlab CI/CD 中的 Cache 两种机制进行学习和说明;
Q:为何要使用 Cache?它有什么目的? Cache 机制的引入就是为了加快 job 执行的时间。Cache 在使用时制定一系列的文件或者文件目录,使得其在不同的 job 之间被缓存下来。这样当某一个 job 需要依赖于之前步骤产生的一些文件结果,Cache 就帮助我们在上一个 job 将产生的结果缓存下来并且在当前的 job 进行使用。
(1)Cache 所有的 job 都会采用这个全局定义的 cache 设置, 当然每个 job 内也可以定义自己特有的 cache 来覆盖全局的配置。
paths: 指定需要被缓存的文件路径(项目相对路径)
key: 在cache中不同 job 定义了不同的 key 时, 每个 job 都会有一个独立的 cache,不同的 key 下的缓存也不会相互影响,当 cache:key 结合 GitLab CI/CD 中预定义的参数可以有不同的效果,当 key 没有被特别定义的时候,默认为 default,所有没定义 key 的 cache 使用的是同一份 cache,会随着 job 的执行一直被覆盖;
policy: 如果有 cache 的配置此时每个 job 会在开始执行前将对应路径的文件下载下来,并在任务结束前重新上传,不管文件是否有变化都会如此操作(默认的配置 cache:policy为 pull-push 策略);但是如果我们已经知道某个 job 只是使用的其他 job 改变的文件,自身并无改变对应路径的文件,那么就不需要进行文件上传操作采用pull 策略即可,这样做的好处减少了不必要的操作,在一定程度上节约了时间。
Q:如何进行 cache 继承? &global_cache,然后再job中进行调用击即可<<: *global_cache;
Q:如何禁用某个Job的Cache操作?cache: {}即不会收到全局缓存的影响:
Cache在runner中缓存的物理路径:1 2 /home/gitlab-runner/cache/gitlab用户/项目名称/cache.zip /home/gitlab-runner/cache/WeiyiGeek/blog/cache.zip
参数说明: 1 2 3 4 5 6 7 8 9 10 11 12 13 14 15 16 17 18 19 20 21 22 23 24 25 26 27 28 29 30 cache: &global_cache key: ${CI_JOB_NAME} paths: - node_modules/ policy: pull-push local_cache: stage: build cache: key: ${CI_JOB_NAME} policy: pull paths: - node_modules/ - binaries/*.apk inherit_cache: cache: <<: *global_cache policy: pull disable_cache cache: {}
分布式 Cache 在 GitLab CI/CD 中,我们所使用的 runner 是以 docker 的形式运行不同的任务。普通的 cache 机制,其 cache 均存储在本地,所有如果两个 job 实际运行的位置是在不用宿主机上,其相互之间的缓存是无法共享的。
为了实现分布式 Cache,需要在配置 GitLab Runner 的 config.toml 的 [runners.cache]进行如下配置:1 2 3 4 5 6 7 8 9 10 11 12 13 [[runners]] limit = 10 executor = "docker" [runners.cache] Type = "s3" Path = "path/to/prefix" Shared = true [runners.cache.s3] ServerAddress = "s3.example.com" AccessKey = "access-key" SecretKey = "secret-key" BucketName = "runner" Insecure = false
http(s)://<ServerAddress>/<BucketName>/<Path>/project/<id>/<cache-key>,在配置,对应的存储 cache 服务器需要满足 s3 协议,当然也可以自建 cache 服务器
Cache 小实践:job1 和 job3 使用了全局的 cache 配置,job2 独立定义了 cache 配置使用了 pull 策略。1 2 3 4 5 6 7 8 9 10 11 12 13 14 15 16 17 18 19 20 21 22 23 24 25 26 27 28 29 30 31 32 33 34 35 36 37 38 39 40 41 42 stages: - test1 - test2 - test3 cache: key: "$CI_COMMIT_REF_SLUG" paths: - Test.txt job1: stage: test1 script: - cat Test.txt - echo "aaaaaaaaaa" > Test.txt - cat Test.txt tags: - base-runner job2: stage: test2 cache: key: "$CI_COMMIT_REF_SLUG" paths: - Test.txt policy: pull script: - cat Test.txt - echo "bbbbbbbbbbb" >> Test.txt - cat Test.txt tags: - base-runner job3: stage: test3 script: - ls - cat Test.txt - echo "cccccccc" >> Test.txt - cat Test.txt tags: - base-runner
(2) 执行结果1 2 3 4 5 6 7 8 9 10 11 12 13 14 15 16 17 18 19 20 21 22 23 24 25 26 27 28 29 30 31 32 33 34 35 36 37 38 39 40 41 42 43 Checking cache for test -wer-1... $ echo "aaaaaaaaaa" > Test.txt $ cat Test.txt aaaaaaaaaa Creating cache test -wer-1... Test.txt: found 1 matching files Uploading cache.zip to http://192.168.12.139:9000/runner/cache-path/project/1242/test -wer-1 Created cache Job succeeded Checking cache for test -wer-1... cache.zip is up to date Successfully extracted cache $ cat Test.txt aaaaaaaaaa $ echo "bbbbbbbbbb" >> Test.txt $ cat Test.txt aaaaaaaaaa bbb Not uploading cache test -wer-1 due to policy Job succeeded Checking cache for test -wer-1... cache.zip is up to date Successfully extracted cache $ cat Test.txt aaaaaaaaaa $ echo "ccccccccc" >> Test.txt $ cat Test.txt aaaaaaaaaa ccccccccc Creating cache test -wer-1... Test.txt: found 1 matching files 22.txt: found 1 matching files Uploading cache.zip to http://192.168.12.139:9000/runner/cache-path/project/1242/test -wer-1 Created cache Job succeeded
job2 获取到缓存文件 Test.txt 的文件内容是 job1 执行后的结果,说明 job1 和 job2 之间实现了缓存共享
job3 获取到缓存文件 Test.txt 的文件与 job1 执行后内容一致而非 job2,这是因为 job2 执行后的结果没有进行上传
特别注意的是 job1 在执行任务前获取到的 Test.txt 的文件与 job3 执行完的结果一致,这是因为这个 pipeline 我运行了多次,job1 获取的缓存是上一次 pipeline 中 job3 的执行后的缓存结果。说明 cache 在不同次 pipeline 之间也实现了共享
0x02 GitLab Runner 补充 1.Kubernetes 环境中安装 Runner 描述: 除开在宿主机以及Docker中运行Runner我们还可以将其运行在Kubernetes集群之中,下面将使用 Helm 图表方式将GitLab Runner 实例部署到 Kubernetes 集群。
环境要求
Kubernetes 环境 (V1.23.x)
kubectl 客户端工具
Helm 客户端工具 (此处为Helm 3.x版本)
使用 Helm Chart 快速安装 GitLab Runner 1 2 3 4 5 6 7 8 9 10 11 12 13 14 15 16 17 18 19 20 21 22 23 24 25 26 27 28 29 30 31 32 33 34 35 36 37 38 39 40 41 42 43 44 45 46 47 48 49 50 51 52 53 54 55 56 57 58 59 60 61 62 63 64 65 66 67 68 69 70 71 72 73 74 75 76 77 78 79 80 81 82 83 84 85 86 87 88 89 90 91 92 93 94 95 96 97 98 99 100 101 102 helm repo add gitlab https://charts.gitlab.io helm repo update helm search repo gitlab-runner helm search repo -l gitlab/gitlab-runner helm show values gitlab/gitlab-runner --version 0.41.0 > gitlab-runner.yaml $ egrep -v "^$|^#|^[[:space:]]+#" gitlab-runner.yaml imagePullPolicy: IfNotPresent imagePullSecrets: - name: "harbor-cloud-secret" gitlabUrl: http://gitlab.weiyigeek.top runnerRegistrationToken: "gu8nqhPNZXJ8xZxotTPr" terminationGracePeriodSeconds: 3600 concurrent: 10 checkInterval: 30 logLevel: error sessionServer: enabled: false rbac: create: true rules: [] clusterWideAccess: false podSecurityPolicy: enabled: false resourceNames: - gitlab-runner metrics: enabled: false portName: metrics port: 9252 serviceMonitor: enabled: false service: enabled: false type : ClusterIP runners: config: | [[runners]] [runners.kubernetes] namespace = "{{.Release.Namespace}}" image = "ubuntu:20.04" cache: {} builds: {} services: {} helpers: {} nodeSelector: {} securityContext: runAsUser: 100 fsGroup: 65533 resources: {} affinity: {} nodeSelector: kubernetes.io/hostname: weiyigeek-226 tolerations: [] hostAliases: [] podAnnotations: {} podLabels: {} secrets: [] configMaps: {} kubectl create secret docker-registry harbor-cloud-secret \ --docker-server=harbor-cloud \ --docker-username=weiyigeek \ --docker-password=WWW.weiyigeek.top \ --namespace=devops $ helm install --namespace devops gitlab-runner --version 0.41.0 -f ./gitlab-runner.yaml gitlab/gitlab-runner $ helm upgrade --namespace devops gitlab-runner --version 0.41.0 -f ./gitlab-runner.yaml gitlab/gitlab-runner kubectl get pod -n devops -l app=gitlab-runner
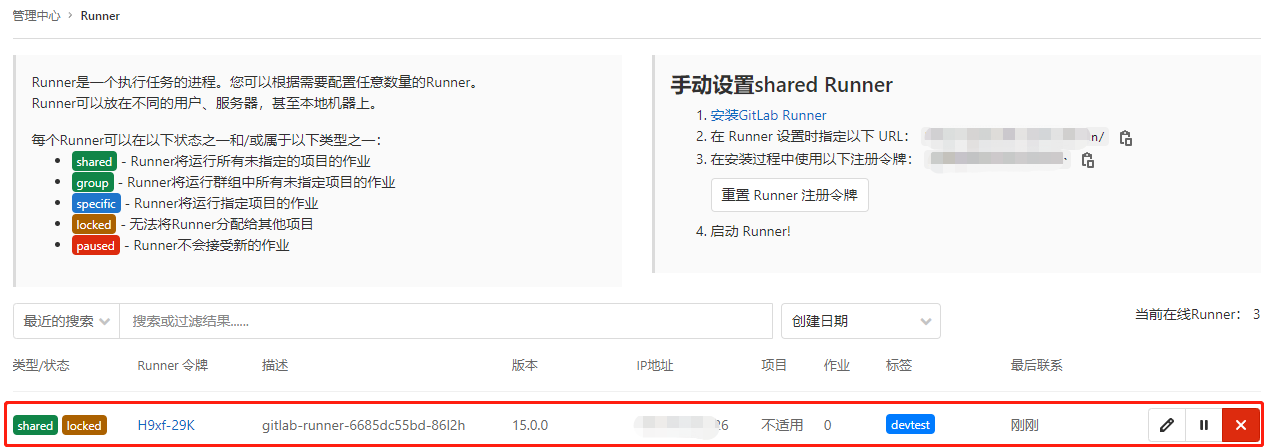
在完成上述操作之后我们便可在管理中心->Runner中查看到注册的gitlab-runner-6685dc55bd-86l2h了, 如下图所示。
weiyigeek.top-gitlab-runner注册成功
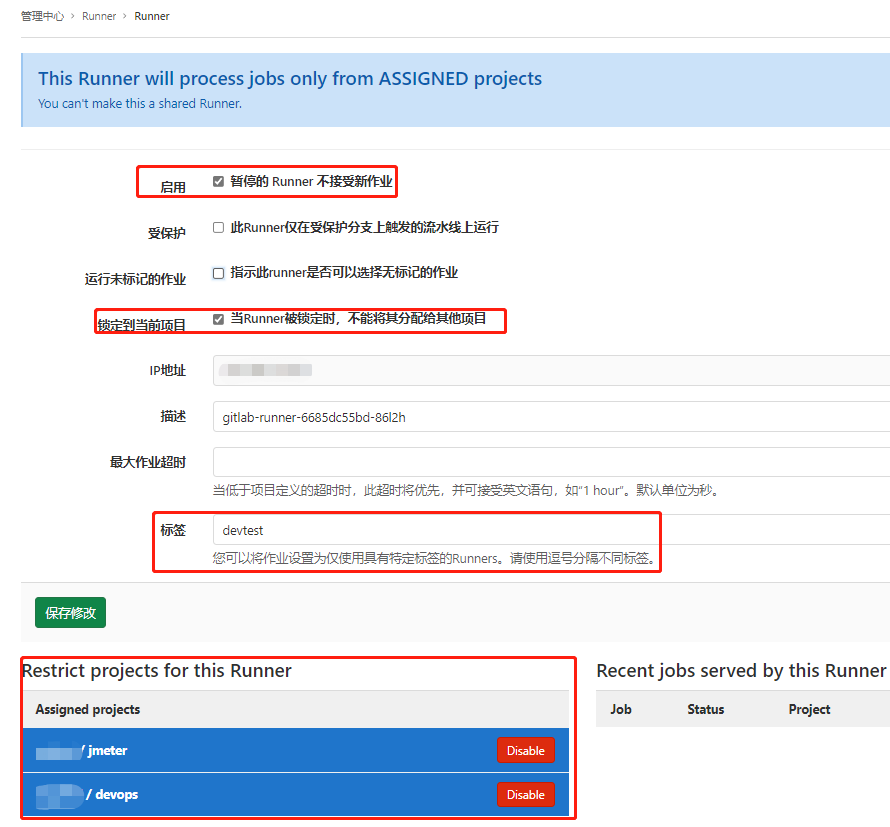
此时你会发现其处于不适用状态,即Git项目中的流水线无法使用该注册Runner,我们需要手动进行指定Git项目进行调用该Runner(即Runner将运行指定项目的作业),并且为其设置devtest标签。
weiyigeek.top-Runner运行指定项目的作业
最后验证该runner是否能运行指定流水线的作业, 温馨提示为了能在runner流水线中拉取该项目代码, 你需要将提交用户加入到项目成员中(此处演示项目为root用户其权限为Guest),否则会报没有权限拉取项目的错误。
步骤01.首先在项目根目录中创建.gitlab-ci.yml文件,假设其内容如下:1 2 3 4 5 6 7 8 9 10 11 12 13 14 15 16 17 18 stages: - test default: image: alpine:3.16 before_script: - uname -a && id - echo "WeiyiGeek" > user.logs && date -R >> user.logs Test: stage: test script: - echo -e "# Test Stage" - echo "https://www.weiyigeek.top" - cat user.logs tags: - devtest
温馨提示: 注意流水线脚本中的tags值需要与runner标签值进行对应, 这样做的好处是可以在不同的runner环境中执行指定阶段的流水线脚本。
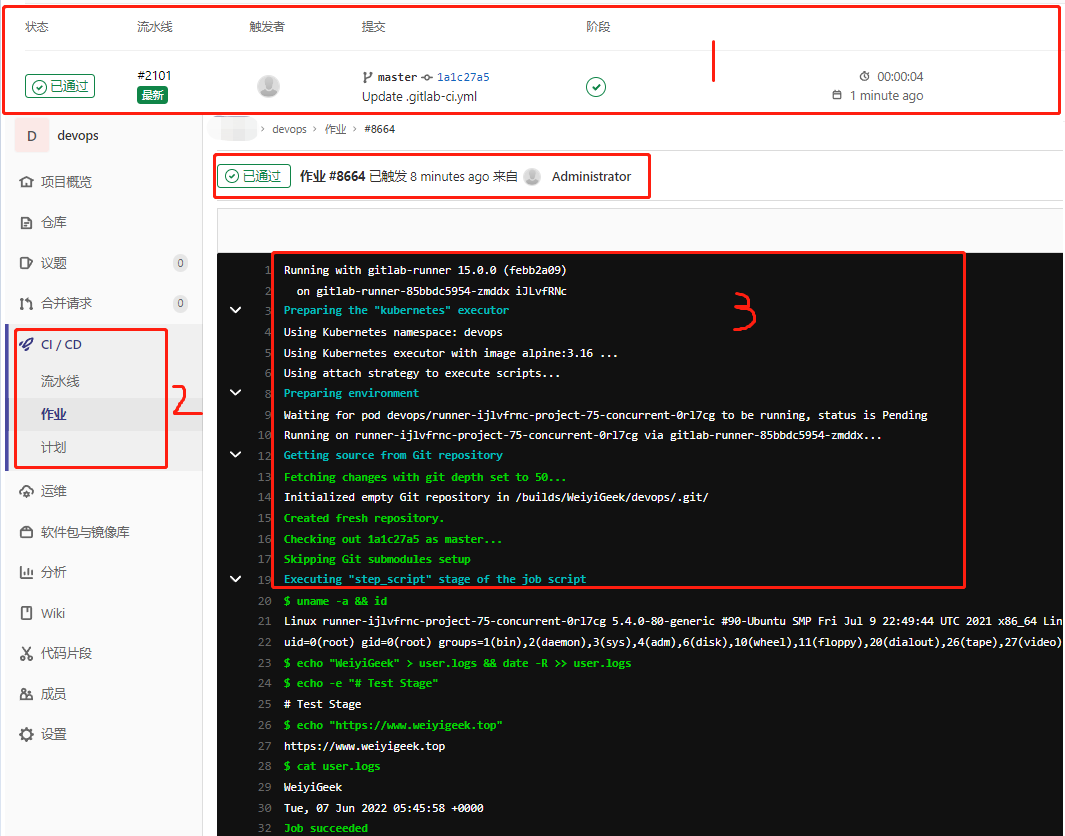
步骤 02.默认提交后将会触发CICD, 此时我们可返回K8S Master的shell终端进行查看流水线是否正常运行, 当然也可以通过项目流水线进行查看。1 2 3 4 5 ~$ kubectl get pod -n devops -o wide NAME READY STATUS RESTARTS AGE IP NODE NOMINATED NODE READINESS GATES gitlab-runner-85bbdc5954-zmddx 1/1 Running 0 20h 10.66.182.214 runner-ijlvfrnc-project-75-concurrent-0rl7cg 0/2 PodInitializing 0 3s 10.66.182.235
weiyigeek.top-测试Runner进行流水线工作结果
温馨提示: 如果未在上述gitlab-runner.yaml图表配置文件中设置image: gitlab/gitlab-runner将默认采用指定版本对应的gitlab-runner镜像,所以此处镜像为image: gitlab/gitlab-runner:alpine-v15.0.0。
0x0n 入坑出坑 问题1.向Gitlab-CI进行注册Runner时候提示Failed to register this runner. Perhaps you are having network problems 1 2 ERROR: Registering runner... failed runner=qRGh2M86 status=500 Internal Server Error PANIC: Failed to register this runner. Perhaps you are having network problems
线上环境推荐)。1 2 3 4 5 使用 root 用户从 web 端登录到 gitlab 管理中心 http://${ip} /admin 。管理中心 --> 设置 --> 网络 –> 外发请求 * 勾选 允许Webhook和服务对本地网络的请求 * 勾选 允许系统钩子向本地网络发送的请求
补充 [2020年4月17日 22:53:44] 时间:
如果点击 保存修改 之后就跳转到 Gitlab 500 错误的页面。
1 2 3 4 5 6 7 8 9 10 11 12 13 14 15 16 17 18 19 20 21 22 ==> /var/log /gitlab/gitlab-rails/production.log <== Started PATCH "/admin/application_settings/network" for 10.0.30.2 at 2020-03-10 11:08:20 +0000 Processing by Admin::ApplicationSettingsController Parameters: {"utf8" =>"✓" , "authenticity_token" =>"[FILTERED]" , "application_setting" => {"allow_local_requests_from_web_hooks_and_services" =>"[FILTERED]" , "allow_local_requests_from_system_hooks" =>"[FILTERED]" , "outbound_local_requests_whitelist_raw" =>"" ,"dns_rebinding_protection_enabled" =>"1" }}Completed 500 Internal Server Error in 40ms (ActiveRecord: 14.5ms | Elasticsearch: 0.0ms) OpenSSL::Cipher::CipherError (): lib/gitlab/crypto_helper.rb:27:in `aes256_gcm_decrypt' ==> /var/log/gitlab/gitlab-rails/production_json.log <== {"method":"PATCH","path":"/admin/application_settings/network","format":"html","controller":"Admin:: ApplicationSettingsController","action":"network","status":500,"error":"OpenSSL::Cipher::CipherError : ","duration":40.08,"view":0.0,"db":14.47,"time":"2020-03-10T11:08:20.061Z","params": [{"key":"utf8","value":"✓"},{"key":"_method","value":"patch"},{"key":"authenticity_token","value":" [FILTERED]"},{"key":"application_setting","value": {"allow_local_requests_from_web_hooks_and_services":" [FILTERED]","allow_local_requests_from_system_hooks":" [FILTERED]","outbound_local_requests_whitelist_raw":"","dns_rebinding_protection_enabled":"1"}}],"re mote_ip":"10.0.30.2","user_id":1,"username":"root","ua":"Mozilla/5.0 (Windows NT 10.0; Win64; x64) AppleWebKit/537.36 (KHTML, like Gecko) Chrome/80.0.3987.87 Safari/537.36","queue_duration":2.55,"correlation_id":"9rvflpksdj2"}
错误关键信息: OpenSSL::Cipher::CipherError ():1 2 3 4 5 6 7 8 9 10 11 12 ╭─root@gitlab ~ ╰─ -------------------------------------------------------------------------------- GitLab: 12.3.5 (2417d5becc7) GitLab Shell: 10.0.0 PostgreSQL: 10.9 -------------------------------------------------------------------------------- Loading production environment (Rails 5.2.3) irb(main):001:0> ApplicationSetting.current.reset_runners_registration_token! => true irb(main):002:0> exit
补充 [2020年3月14日 21:31:04] 时间:1 ERROR: Registering runner... failed runner=xxxxxxx status=couldn't execute POST against https://x.x.x.x/api/v4/runners: Post https://x.x.x.x/api/v4/runners: x509: cannot validate certificate for x.x.x.x because it doesn' t contain any IP SANs
"--tls-ca-file"参数,指定自签名的ca根证书。
问题2.项目进行运行Gitlab-CI流水线上的时候报错:此作业被卡住,因为没有任何该项目指定标签的 runner 在线` 1 2 3 4 5 6 build: stage: build script: echo "Building the app" tags: - TestRunner
勾选指示此runner是否可以选择无标记的作业,此时gitlab-ci.yaml将可以不用设置tags标签;
补充 [2020年3月14日 21:31:04] 时间:Post https://x.x.x.x/api/v4/runners: x509: certificate signed by unknown authority" Indicates whether this runner can pick jobs without tags"或者.gitlab-ci.yml中的job指定tag。
问题3.Runner采用docker作为executor时,无法build docker image 提示dial unix /var/run/docker.sock: connect: permission denied 1 2 3 4 5 6 $usermod -aG docker gitlab-runner$groups gitlab-runnergitlab-runner : gitlab-runner docker
问题4.Peer’s Certificate issuer is not recognized. fatal: unable to access 'https://gitlab-ci-token:xxxxxxxxxxxxxxxxxxxx@gitlab.x.com/root/cmop.git/': Peer's Certificate issuer is not recognized.1 2 3 4 5 6 7 [root@gitlab-runner ~] [gitlab-runner@gitlab-runner ~]$ git config --global http."sslVerify" false [gitlab-runner@gitlab-runner ~]$ cat /home/gitlab-runner/.gitconfig [http] sslVerify = false
问题5. Couldn’t resolve host ‘gitlab.x.com’, 出现Runner无法连接网络的问题 fatal: unable to access 'https://gitlab-ci-token:xxxxxxxxxxxxxxxxxxxx@gitlab.cmop.chinamcloud.com/root/cmop.git/': Couldn't resolve host 'gitlab.x.com'
问题6.当我的Runner采用docker作为executor时,无法build docker image
1 2 Cannot connect to the Docker daemon at unix:///var/run/docker.sock. Is the docker daemon running? time="2020-04-17T11:12:33Z" level=error msg="failed to dial gRPC: cannot connect to the Docker daemon. Is 'docker daemon' running on this host?: dial unix
解决办法: 这是个dind(docker in docker)问题你可以将本地的docker socket绑定到container里来解决这个问题,具体方法是将volumes = ["/var/run/docker.sock:/var/run/docker.sock"]配置到config.toml文件里。
问题7.Gitlab-Runner 运行流水线时报ERROR: Job failed (system failure): prepare environment: setting up scripts configMap: generating scripts config map: configmaps is forbidden: User错误
1 2 3 4 5 6 7 8 9 10 11 Running with gitlab-runner 15.0.0 (febb2a09) on gitlab-runner-6685dc55bd-86l2h H9xf-29K Preparing the "kubernetes" executor 00:00 Using Kubernetes namespace: devops Using Kubernetes executor with image alpine:3.16 ... Using attach strategy to execute scripts... Preparing environment 00:00 ERROR: Error cleaning up configmap: resource name may not be empty ERROR: Job failed (system failure): prepare environment: setting up scripts configMap: generating scripts config map: configmaps is forbidden: User "system:serviceaccount:devops:default" cannot create resource "configmaps" in API group "" in the namespace "devops" . Check https://docs.gitlab.com/runner/shells/index.html
解决办法: 指定拥有相应权限的serviceaccount用户, 或者在helm搭建gitlab-runner时指定启动rbac.create为ture。
1 2 3 4 5 6 7 8 9 10 11 12 13 14 15 16 17 18 19 rbac: create: true kubectl create serviceaccount gitlab-runner --namespace devops kubectl create clusterrolebinding gitlab-runner --clusterrole=admin --serviceaccount=devops:gitlab-runner rbac: create: false serviceAccountName: gitlab-runner helm upgrade --namespace devops gitlab-runner --version 0.41.0 -f ./gitlab-runner.yaml gitlab/gitlab-runner
问题8.使用Gitlab-runner执行devops项目的CICD流水线作业时报fatal: unable to access '[Gitlab项目的git地址]': The requested URL returned error: 403错误解决
1 2 3 4 5 6 7 8 Getting source from Git repository 00:01 Fetching changes with git depth set to 50... Initialized empty Git repository in /builds/WeiyiGeek/devops/.git/ Created fresh repository. remote: You are not allowed to download code from this project. fatal: unable to access 'http://gitlab.weiyigeek.top/WeiyiGeek/devops.git/' : The requested URL returned error: 403 ERROR: Job failed: command terminated with exit code 1
问题原因: 由于项目是私有权限而非public权限, 而有加之执行更改的项目的用户为root并为加入到devops项目成员中。
解决办法: 一是将该项目改为public公共项目(针对一些非私密的项目), 二是在私有项目添加指定触发成员(此种方式常用),例如此处我们将devops用户加入到devops项目中并赋予最小的Guest权限即可,然后在运行流水线作业即可。
