[TOC]
0x00 前言简述 描述:Flask 官方介绍Web Develoment one drop at a time,实际上它是一个基于Python开发的Web轻量级框架; 通过Flask和各种插件的配合使用,以新的框架实现Web前后端联合开发。
Flask 核心特性就是”微”,而微框架中的“微”字表示 Flask 的目标是保持核心简单而又可扩展(从零开始由你做主),所有并不是说它不适用于大型项目;
Flask 官方网站: http://flask.pocoo.org 内置的 Jinja 模板引擎和 Werkzeug WSGI 套件(WSGI 工具集)以及itsdangerous基于Django签名模块下面列出其帮助文档:
Flask 特点:
1.当前最流行的Python-Web框架,已经超越Django排名第一了;
2.官方文档齐全,方便入手;
3.非常好的扩展机制和第三方的扩展环境;
4.社区活跃度非常高;
5.微型框架提供给开发者更大的选择空间;
Flask VS Django 对比区别:
(1) 相同点:
(2) 区别点:
前者轻量级开发框架用户自定义多轻捷便利(6行代码实现一个Web服务器),而Django较于前者比较重但是功能完善;
软件架构设设计风格:层次清晰/便于维护
它是一种软件设计规范使得业务逻辑、后台数据、前台界面进行分离,其核心思想是解耦合,优点是降低了模块之间的耦合性,方便变更以及更容易重构代码并且最大程度实现代码重用;
Q: MVT(Model、View、Template)设计模式与MVC本质无什么差别,各组件之间为了保持松耦合关系,只是定义上有些许不同;
1.负责业务对象与数据库(ORM)的对象;
学习关键点:
0x01 环境安装 描述: 在进行Flask开发建议使用最新版本的Python3版本以及采用Pycharm进行快速Python Flask项目开发,并且建议在开发环境和生产环境下都使用虚拟环境来管理项目的依赖。
(1) venv 虚拟环境 Q:为什么要使用虚拟环境?
随着你的 Python 项目越来越多,你会发现不同的项目会需要不同的版本的 Python 库,同一个 Python 库的不同版本可能不兼容。安装独立的 Python 库,这样就可以隔离不同项目之间的 Python 库,也可以隔离项目与操作系统之间的 Python 库。
Python 3 内置了用于创建虚拟环境的 venv 模块,我们可以采用其创建一个虚拟环境流程如下:1 2 3 4 5 6 7 8 mkdir project && cd ./project && python3 -m venv venv $ . venv/bin/activate > venv\Scripts\activate
补充Python2.x下虚拟环境安装:1 2 3 4 5 6 7 8 9 10 11 12 13 14 15 16 17 apt install python-pip && pip install virtualenv apt install virtualenvwrapper export WORKON_HOME=~/.virtualenvssource /usr/local /bin/virtualenvwrapper.shmkvirtualenv rmvirtualenv workon deactivate
项目变量定义:1 2 3 4 5 6 7 8 pip install python-dotenv .env .flaskenv .flaskenv
(2) Flask与扩展安装 1 2 3 4 5 6 7 8 cat requirement.txt flask flask-script Flask-RESTful pip install -r requirement.txt
Flask(__name__).run() 参数配选项1 2 3 4 5 6 7 debug threaded port host app.run(debug=Ture,host='0.0.0.0' ,port=8000 )
Flask 命令行界面支持的环境变量:1 2 3 4 5 6 7 8 9 10 11 12 FLASK_APP=hello FLASK_ENV=development FLASK_RUN_EXTRA_FILES=file1:dirA/file2:dirB/ FLASK_DEBUG=1 FLASK_RUN_PORT=8000 FLASK_SKIP_DOTENV=1
Flask 命令:1 2 3 4 5 flask run --port 8000 --extra-files file1:dirA/file2:dirB/ flask shell
0x02 基础尝试 描述:一个简单Flask项目创建流程如下:
1.导入flask包中的Flask模块
2.创建Flask对象
3.使用对象实例进行路由注册
4.在路由下编写路由函数并返回响应字符串
5.通过对象实例的run()方法启动Flask项目
(1) 小试牛刀 示例1.初始化Flask项目之hello_world.py1 2 3 4 5 6 7 8 9 10 11 12 13 14 15 from flask import Flaskfrom datetime import datetimeapp = Flask(__name__) @app.route('/') def hello_world () : a = "Flask" b = " - Hello world" time = datetime.now() return "<h4 style='text-algin:center'>Project %s %s %s</h4>" % (a,b,time) if __name__ == '__main__' : app.run(debug=True ,host='0.0.0.0' ,port=8000 )
启动配置指定启动环境模式:1 2 3 4 5 6 7 8 9 10 11 12 set FLASK_ENV=development$env :FLASK_ENV="development" FLASK_ENV=production python Flask-hello_world.py env FLASK_APP=.\Flask-hello_world.py flask run $env :FLASK_APP=.\Flask-hello_world.py flask run
执行结果:1 2 3 4 5 6 7 8 * Serving Flask app "Flask-hello_world" (lazy loading) * Environment: production WARNING: This is a development server. Do not use it in a production deployment.Use a production WSGI server instead. * Debug mode: on * Restarting with stat * Debugger is active! * Debugger PIN: 113-873-865 * Running on http://0.0.0.0:8000/ (Press CTRL+C to quit)
总结:
Dubugger 相关功能在Flask中调速器拥有保护的功能,采用PIN作为当前调试的身份认证,常常在开发环境中使用生产环境中不建议开启;
示例2:环境变量与启动参数 https://flask.palletsprojects.com/en/1.1.x/cli/?highlight=flask%20script
方式1.Flask-Script方式(在1.0版本前使用现在已丢弃),使用其前安装它pip install flask-script1 2 3 4 5 6 7 8 9 10 11 12 13 from flask import Flaskfrom flask_script import Managerapp = Flask(__name__) manager = Manager(app) @app.route('/') def param () : return f'Flask - script,host port param' if __name__ == '__main__' : manager.run()
flask-script 帮助命令:1 2 3 4 5 6 7 8 9 10 11 $python .\Day1\flask-scritp.py usage: flask-scritp.py [-?] {shell,runserver} ... positional arguments: {shell,runserver} shell Runs a Python shell inside Flask application context. runserver Runs the Flask development server i.e. app.run() usage: flask-scritp.py runserver [-?] [-h HOST] [-p PORT] [--threaded] [--processes PROCESSES] [--passthrough-errors] [-d] [-D] [-r] [-R] [--ssl-crt SSL_CRT] [--ssl-key SSL_KEY]
执行命令1 2 3 4 5 6 7 8 9 10 11 12 13 14 python3 http.py runserver -p 8000 - h 0.0.0.0 -d -r --threaded python .\Day1\flask-scritp.py runserver -h 0.0.0.0 -p 8000 -r -d --threaded * Serving Flask app "flask-scritp" (lazy loading) * Environment: production WARNING: This is a development server. Do not use it in a production deployment. Use a production WSGI server instead. * Debug mode: on * Restarting with stat * Debugger is active! * Debugger PIN: 113-873-865 * Running on http://0.0.0.0:8000/ (Press CTRL+C to quit)
方式2:采用命令行或者环境变量指定端口1 2 3 4 5 6 7 8 9 10 11 12 13 14 15 16 17 18 19 $env :FLASK_ENV="development" $env :FLASK_APP="./Flask-param.py" $env :FLASK_RUN_PORT="8080" ;flask run $env :FLASK_APP="./Flask-param.py" flask run --port 8000 --host 0.0.0.0 * Debugger is active! * Debugger PIN: 292-194-254 * Running on http://0.0.0.0:8000/ (Press CTRL+C to quit)
路由管理 在看路由前我们先大致了解一下用户请求流程:1 2 3 浏览器 -> Route -> Views -> Views -> Templates -> 浏览器 -> modesl /
Route(路由): 将从可客端发送过来的请求分发到指定函数上;1 2 3 4 5 6 7 8 9 10 11 12 13 14 15 16 17 18 19 20 21 22 <converter:variable_name> * String: 接收任何没有斜杠('/' )的文件(默认); * Int: 接收整型; * Float: 接收浮点型; * Path: 接收路径可接收斜线('/' )不以其作为分割阶段,即其从`aa/bb/cc`; * Uuid: 只接受uuid字符串,唯一码一种生成规则; * Any: 可以同时指定多种路径进行限定; @app.route('/default/<string:id/' ) @app.route('/<int:id>/' ) @app.route('/<uuid:id>/' ) methods=[GET,POST,HEAD,PUT,DELETE,OPTION] @app.route('/api-Rsetful/' ,methods=['GET' ,'POST' ]) url_for('函数名称' ,参数名=value)
实际案例:1 2 3 4 5 6 7 8 9 10 11 12 13 14 15 16 17 18 19 20 21 22 23 24 25 26 27 28 29 30 31 32 33 34 35 36 37 38 39 40 41 42 @app.route('/') def index () : return '<b> Hello World! This is Flask Index </b>' @app.route('/getstring/<id>/') def get_str (id) : print(id,":" ,type(id)) return '字符串: Hello {} Username!' .format(id) @app.route('/getint/<int:id>/') def get_int (id) : print(id,":" ,type(id)) return '数值: {} ' .format(id) @app.route('/getpath/<path:id>/') def get_path (id) : print(id,":" ,type(id)) return '路径: {} ' .format(id) @app.route('/getuuid/<uuid:uuid>/') def get_uuid (uuid) : print(uuid,":" ,type(uuid)) return 'uuid: {} ' .format(uuid) @app.route('/getany/<any(a,b):id>/') def get_any (id) : print(id,":" ,type(id)) return 'id: {} ' .format(id) @app.route('/method/',methods=['GET','POST','DELETE']) def get_method () : return '该请求类型成功!' @app.route('/redirect/') def get_redirect () : return redirect(url_for('app.get_any' ,id='a' ))
测试结果:1 2 3 4 5 6 7 8 9 10 11 12 13 14 weiyigeek/api : <class 'str' > 路径: weiyigeek/api a : <class 'str' > id: a 277cd8ed-041d-42f7-980c-a0f305288255 : <class 'uuid.UUID' > uuid: 277cd8ed-041d-42f7-980c-a0f305288255 、 127.0.0.1:8000/redirect/ ==> http://127.0.0.1:8000/getany/a/
注意事项:
1.可以多个路由指向一个函数,在实际开发中利用数据类型进行处理分类;
2.Flask视图函数默认支持GET、HEAD、OPTION等请求,如需支持其他请求方式请手动注册即可;
3.使用重定向与反向解析时候需要导入flask包中的redirect模块即from flask import redirect,url_for;
Q:使用时候容器出现循环引用的问题?
懒加载: 使用函数调用的形式进行加载
蓝图: 对路由进行规划(采用flask-buleprint扩展实现)
懒加载 插件以及数据库迁移都是需要使用懒加载方法;
项目概况:1 2 3 4 5 6 7 8 9 10 11 $tree ././App/ ├── __init__.py ├── __pycache__ │ ├── __init__.cpython-37.pyc │ └── views.cpython-37.pyc ├── moudels.py ├── static ├── templates └── views.py setup.py
执行结果:1 2 3 4 5 Request / <br> Hello World Request /hello <br> Hello Flask, WeiyiGeek
Blueprint 描述:动态路由依赖于 Blueprint 蓝图在使用前必须进行安装该模块pip install flask-buleprint,并且在使用的时候进行初始化即创建蓝图对象;
使用和Flash对象差不多,可直接作为装饰器来注册路由
项目结构:1 2 3 4 5 6 7 8 9 10 $tree Buleroute/Buleroute/ ├── __init__.py ├── templates │ └── index.html └── view ├── __init__.py ├── index.py └── user.py setup.py
Buleroute包的初始化模块:Buleroute/__init__.py1 2 3 4 5 6 from flask import Flaskfrom Buleroute.view import init_view def create_app () : app = Flask(__name__) init_view(app=app) return app
view包中初始化模块:Buleroute/view/__init__.py1 2 3 4 5 6 7 from .index import index from .user import userdef init_view (app) : app.register_blueprint(index) app.register_blueprint(user)
蓝图(Blueprint):1 2 3 4 5 6 7 8 9 10 from flask import Blueprint,render_templateindex = Blueprint('index' ,__name__) @index.route('/') @index.route('/index') def index_bule () : return render_template('index.html' ,msg="基础入门(模板参数传递)" )
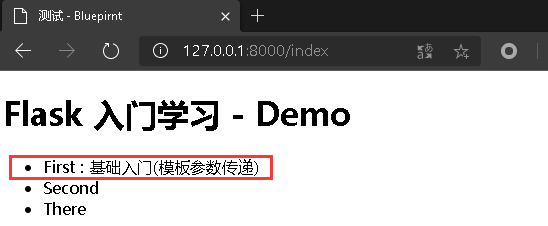
Flask模板:Buleroute/templates/index.html1 2 3 4 5 6 7 <h1 > Flask 入门学习 - Demo </h1 > <ul > <li > First : {{msg}}</li > <li > Second</li > <li > There</li > </ul >
执行结果:
weiyigeek.top-结果
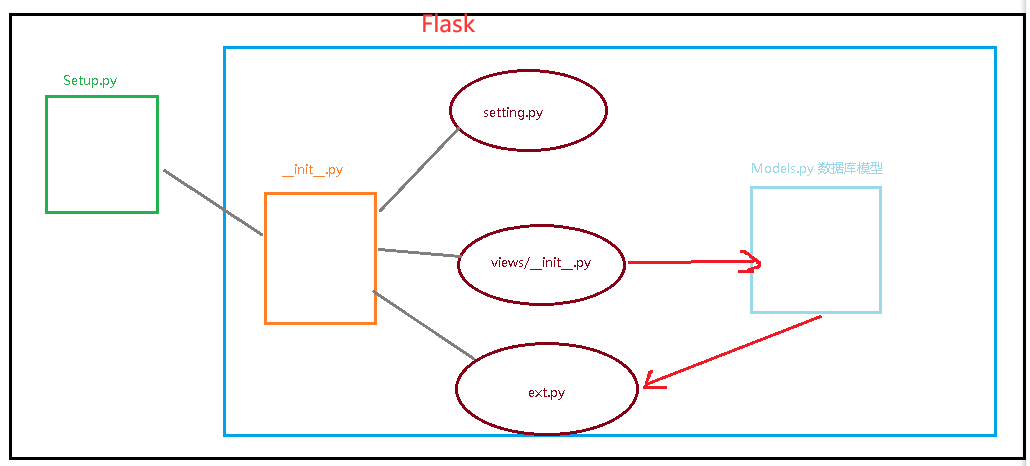
MVC 架构实践 描述:三阶改装项目结构1 2 3 4 5 6 7 8 9 - Setup.py 项目管理及入口文件 - App 应用项目目录(MVC) - __init__ 初始化文件 - ext extension扩展库除了和路由相关 - setting config以及全局项目配置 - view apis和路由视图函数 - models 定制模型与数据库相关 - static 静态资源文件 - template 网页模板文件
setup.py1 2 3 4 5 6 7 8 9 10 11 12 13 14 15 16 17 18 import osfrom SQLAlchemy import create_appfrom flask_script import Managerfrom flask_migrate import MigrateCommandenv = os.environ.get("FLASK_ENV" ,"develop" ) app = create_app(env) manager = Manager(app=app) manager.add_command('db' ,MigrateCommand) if __name__ == "__main__" : manager.run()
App/__init__.py1 2 3 4 5 6 7 8 9 10 11 12 13 14 15 16 17 18 19 from flask import Flaskfrom SQLAlchemy.view import init_viewfrom .ext import init_extfrom .setting import envsfrom .models import Userdef create_app (env) : app = Flask(__name__) app.config.from_object(envs.get(env)) init_ext(app) init_view(app=app) return app
ext.py1 2 3 4 5 6 7 8 9 10 11 from flask_sqlalchemy import SQLAlchemyfrom flask_migrate import Migratedb = SQLAlchemy() migrate = Migrate() def init_ext (app) : db.init_app(app) migrate.init_app(app, db)
Day2\SQLAlchemy\setting.py1 2 3 4 5 6 7 8 9 10 11 12 13 14 15 16 17 18 19 20 21 22 23 24 25 26 27 28 29 30 31 32 33 34 35 36 37 38 39 40 41 42 43 44 45 46 47 48 49 50 51 52 def get_db_uri (dbinfo) : engine = dbinfo.get("ENGINE" ) or "sqlite" driver = dbinfo.get("DRIVER" ) or "sqlite" user = dbinfo.get("USER" ) or "" password = dbinfo.get("PASSWORD" ) or "" host = dbinfo.get("HOST" ) or "" port = dbinfo.get("PORT" ) or "" name = dbinfo.get("NAME" ) or "" if engine == "sqlite" : return "{}:///{}" .format(engine,name) else : return "{}+{}://{}:{}@{}:{}/{}" .format(engine,driver,user,password,host,port,name) class DevelopConfig : DEBUG = Ture SQLALCHEMY_TRACK_MODIFICATIONS = False DBINFO = { "ENGINE" : "sqlite" , "NAME" : "sqlite.db" } SQLALCHEMY_DATABASE_URI = get_db_uri(DBINFO) class ProductConfig : DEBUG = False SQLALCHEMY_TRACK_MODIFICATIONS = False DBINFO = { "ENGINE" : "mysql" , "DRIVER" : "pymysql" , "USER" : "root" , "PASSWORD" : "Pass123456." , "HOST" : "127.0.0.1" , "PORT" : "3306" , "NAME" : "FlaskTest" } SQLALCHEMY_DATABASE_URI = get_db_uri(DBINFO) envs = { "develop" : DevelopConfig, "product" : ProductConfig }
Day2\SQLAlchemy\models.py1 2 3 4 5 6 7 8 9 10 11 12 13 14 15 16 17 18 19 20 21 22 from SQLAlchemy.ext import dbdef save (obj) : db.session.add(obj) db.session.commit() class User (db.Model) : __tablename__ = 'user' id = db.Column(db.Integer, primary_key=Ture) username = db.Column(db.String(16 )) def commit (self) : save(self) class Member (db.Model) : id = db.Column(db.Integer, primary_key=Ture) subname = db.Column(db.String(16 )) def commit (self,db) : save(delf,db)
Day2\SQLAlchemy\view\db.py: 数据库模型交互与蓝图此处体现了MVT思想,此处的View表示了控制器接受请求处理逻辑1 2 3 4 5 6 7 8 9 10 11 12 13 14 15 16 17 18 19 20 21 22 23 24 25 26 from flask import Blueprintfrom SQLAlchemy.models import db,Userdatabase = Blueprint('database' ,__name__) @database.route('/createdb/') def create_db () : db.create_all(); return '创建成功' @database.route('/adduser/') def user_add () : user = User() user.username = "WeiyiGeek" user.commit() return "username %s Insert Successful!" %(user.username) @database.route('/dropdb/') def drop_db () : db.drop_all() return '删除成功'
补充说明:1 2 3 |-----------------------> Ext Control Manager ---> __init__ / |----> Views ---> Models
weiyigeek.top-基础结构(三阶拆分)
内置对象 Flask四大内置对象如下所示:
Request: request
Session: session
G: g
Config: 在模板中采用config而在Python代码中是app.config;
Request 描述:request是服务器在接收到客户端请求后会自动创建Request对象(注意由Flask框架创建并且Request对象不可修改);from flask import request
对象属性:1 2 3 4 5 6 7 8 9 10 11 12 13 14 15 16 17 18 19 20 21 22 23 24 25 26 27 28 29 30 - url: 完整请求地址 - url_root: 主机与端口号的URL - path: 路由中的路径 - host_url: 主机与端口号的URL - base_url: 去掉GET参数的URL - method: 请求方法 - remote_addr: 请求的客户端地址 - args: GET请求参数 - form: POST请求参数 - values:返回请求中的参数和form - date: 请求的数据 - files: 请求上传的文件 - headers: 请求头 - cookies: 请求中的cookie - session: 请求中的session return request.method return json.dumps(request.form) return json.dumps(request.args) return str(request.values) return json.dumps(request.cookies) return str(request.headers) return request.headers.get('User-Agent' ) return 'url: %s , script_root: %s , path: %s , base_url: %s , url_root : %s' % (request.url,request.script_root, request.path,request.base_url,request.url_root)
ImmutableMutiltiDict 类似于字典的数据类型与字典的区别就是可以存在相同的键以列表的方式存放比如[(key,value)];1 2 3 4 5 6 dict = ImmutableMutiltiDict dict.get('key' ) dict.getlist('key' )
实际案例1:1 2 3 4 5 6 7 8 9 10 11 12 13 14 15 16 17 18 19 20 21 22 23 24 25 26 27 28 29 @demo2.route('/request/<path:url>',methods=['GET','POST']) def req (url) : req_method = '' if request.method.upper() == 'GET' : req_method = 'GET Successful!' elif request.method.upper() == 'POST' : req_method = 'POST Successful!' else : req_method = request.method.upper()+'Not Support!' return " Current Time: {}<br>Header:<pre>{}</pre><br> HOST: {} <br>URL: {} <br>Method: {} <br>Client IP: {} <br>" .format(datetime.datetime.now().strftime("%Y-%m-%d %H:%M:%S" ),request.headers, request.host_url, request.base_url, req_method, request.remote_addr)
基础示例2:1 2 3 4 5 6 7 8 9 10 11 12 13 14 15 16 17 18 19 20 21 22 23 24 25 26 27 28 29 @demo2.route('/login/' ,methods=['GET' ,'POST' ]) def send_rep(): print (request.args,"\n" ,type (request.args)); print (request.args.getlist('a' )) print (request.form,"\n" ,type (request.form)) if request.method.upper() == 'POST' : if request.form['username' ] == 'weiyigeek' and request.form['password' ] == 'pass' : return 'Ture' else : return str(request.headers) else : return render_template('login.html' ) return 'successful!' ImmutableMultiDict([]) <class 'werkzeug.datastructures.ImmutableMultiDict' > [] ImmutableMultiDict([('username' , 'weiyigeek' ), ('password' , 'pass' )]) <class 'werkzeug.datastructures.ImmutableMultiDict'
基础示例3:1 2 3 4 5 6 7 8 9 10 11 12 13 14 15 16 17 18 19 20 21 22 23 24 25 26 27 28 29 30 31 32 33 34 35 36 37 from werkzeug.utils import secure_filenamefrom flask import Blueprint,request,render_template@demo2.route('/upload',methods=['GET','POST']) def upload () : if request.method == 'POST' : print(request.date," : " , type(request.date)) print(request.files," : " , type(request.files)) f = request.files['file' ] filename = secure_filename(f.filename) f.save('App/static/' +str(filename)) return 'ok' else : return render_template('upload.html' ) <!DOCTYPE html> <html> <body> <form action="upload" method="post" enctype="multipart/form-data" > <input type="text" name="flag" value="weiyigeek" > <input type="file" name="file" /><br /> <input type="submit" value="Upload" /> </form> </body> </html> None : <class 'NoneType '>ImmutableMultiDict ([('file' , <FileStorage: 'QQ截图20200907112813.jpg' ('image/jpeg' ) >) ]) :class 'werkzeug .datastructures .ImmutableMultiDict '>127.0.0.1 - - [07/Sep /2020 18: 23 :23 ] "POST /upload HTTP/1.1" 200 -
Response 描述: 服务器返回给客户端的数据,有程序开发者创建返回Reponse对象;1 2 3 4 5 6 7 8 1.通过直接返回字符串与状态、也可采用Reponse对象或者通过make_response(data,code)函数使传递进来的资源创建一个response,前者返回的数据内容后者返回的状态码; 2.返回的文本内容和状态码 3.利用render_template将模板渲染成为HTML 4.返回模板(实质与2一样) 5.重定向 redirect() 或者 url_for('函数名' ,参数=value) 6.终止信号 abort 7.钩子函数: 异常捕获或者errorhandler(app作用于全局、蓝图只能捕获本身蓝图) 8.
语法:1 2 3 4 5 6 7 8 9 10 11 12 13 @app.route('/reponse/') def get_reponse () : return Response('我是直接返回的Reponse对象!' ) @app.route('/reponse/') def get_reponse () : response = make_response(render_template('error.html' ), 404 ) return response
异常处理: 1 2 3 4 5 6 7 8 9 abort(异常码) abort(404 ) abort(Response('404 Not Found!' )) @app.errorhandler(404): def not_found () : return '404 , Not Found!' , 404
基础实例 :1 2 3 4 5 6 7 8 9 10 11 12 13 14 15 16 17 18 19 20 21 22 from flask import render_template .... @app.errorhandler(404) def not_found (error) : print(error) print(type(error)) return render_template('404.html' ,title="404 Not Found" ,msg=error) <body> <h1>{{title}}</h1> <br> <pre>{{msg}}</pre> </body> @app.route('/robots.txt") def robots () : response = make_response(render_template('robots.txt' ),200 ) response.headers={'context-type' :'text/plain' } return reponse
执行结果:
weiyigeek.top-error-404
注意实现:
(1) 在FLASK中获取请求参数可以通过args属性并且支持所有请求,而form属性支持非GET请求的其他方法比如(put/patch),其获取的数据类型ImmutableMultiDict实际上是字典(Dict)的再次封装;
会话保持 描述: 我们知道学习WEB后端语言时它是我们都绕不开的话题 , 网页中采用会话保持技术进行跨请求共享数据,实际上它就是存储访问者的访问票据;
其出现原因:
1) Web 开发中HTTP都是短连接(请求响应后即关闭再次请求就是全新请求)
2) HTTP 请求是无状态的
实现会话保持的三种方式:
(1) Cookie
(2) Session
(3) Token
Cookie 描述:它是客户端会话技术,其数据以key-vakye的形式存储在客户端(重要业务不建议使用会导致一定的风险),并且Flask中的Cookues默认对中文进行了处理所以可以直接使用中文;
特点:
支持会话过期
支持中文处理
不能跨网站域名访问
默认携带本站所有Cookie
基础语法:1 2 3 4 5 6 7 8 9 response = make_response("响应的字符串此处是参数 %s" % username) response = Response("响应的字符串此处是参数{}" .format(username)) response.set_cookie(key, value="" , max_age=None, expires=None, path="/" , domain=None, secure=False, httponly=False, samesite=None) response.delete_cookie(key) request.cookies.get('key' )
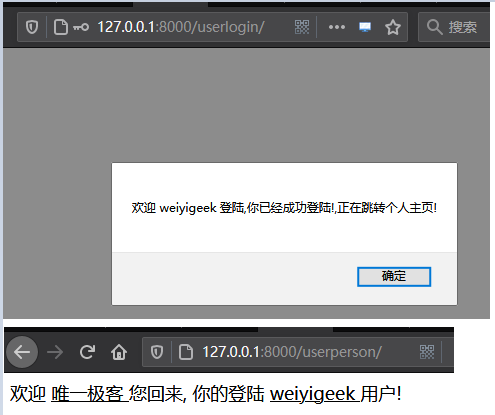
简单示例:1 2 3 4 5 6 7 8 9 10 11 12 13 14 15 16 17 18 19 20 21 22 23 24 25 26 27 28 29 30 31 32 33 34 35 36 37 38 from flask import Blueprint,request,render_template,url_for,redirect,make_response,Response@demo2.route('/userlogin/',methods=['GET','POST']) def login () : if request.method.upper() == 'GET' : return render_template('login.html' ) elif request.method.upper() == 'POST' : username = request.form.get('username' ) password = request.form.get('password' ) if username == password : response = Response("<script>alert('欢迎 %s 登陆,你已经成功登陆!,正在跳转个人主页!');window.location.href='/userperson/'</script>" % (username)) response.set_cookie('username' , username) response.set_cookie('name' , '唯一极客' ) return response else : return '账号或者密码错误!' else : return 'ERROR! Request Method Not Allow!' @demo2.route('/userperson/',methods=['GET','POST']) def person () : print(request.cookies) if request.cookies.get('username' ) != None : name = request.cookies.get('name' ) username = request.cookies.get('username' ) return '欢迎 <u> %s </u> 您回来, 你的登陆 <u> %s </u>用户!' % (name,username) else : return "<script>alert('用户未登录请登陆');window.location.href='/userlogin';</script>"
weiyigeek.top-Cookie
Session 描述: 它是一个服务端会话技术, 数据存储在服务器中(保证安全以及不可篡改)以Key-Value的形式;
特征:
1.默认将session序列化后存储在cookie中(KEY->Hash->base64编码),会将机器hmac以及salt加入到其中保证session的安全性;
2.可采用flask-session实现session数据持久化存储在redis中, 嵌入级的不需要修改源代码只需要配置redis即可
3.默认的生命周期在31天;
注意: 必须进行FLASK的APP配置SESSION的密钥否则将会报以下错误:"The session is unavailable because no secret " RuntimeError: The session is unavailable because no secret key was set. Set the secret_key on the application to something unique and secret.1 2 app.config['SECRET_KEY' ] = 'WeiyiGeek'
在FLASK中session实现流程:
1.将session存储在cookie之中;
2.对数据进行序列化
3.在对其进行base64编码
4.之后再进行zlib压缩
5.最后传递hash(验证是否被篡改)
语法参数:1 2 3 4 5 session['key' ] = value; session.get('key' )
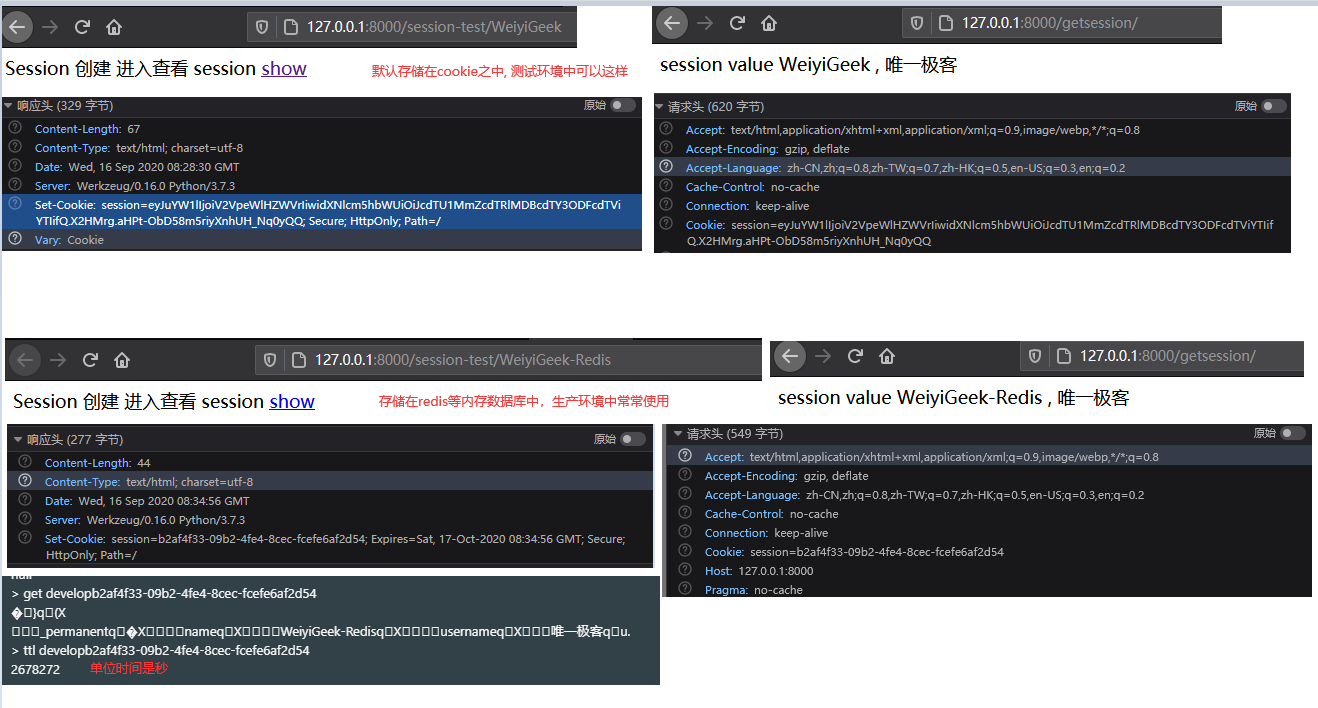
基础示例1.简单的FLASK内的session模块演示1 2 3 4 5 6 7 8 9 10 11 12 13 14 15 16 17 18 19 20 from flask import Blueprint,request,render_template,url_for,redirect,make_response,Response,session@demo2.route('/session-test/<string:name>',methods=['GET','POST']) def sessiontest (name) : if name != None : session['name' ] = name; session['username' ] = "唯一极客" ; return 'Session 创建 进入查看 session <a href="/getsession/">show</a>' else : return '<p style="color:red">Parameter Error!</p>' @demo2.route('/getsession/',methods=['GET']) def getsession () : if session.get('name' ) != None : print(session) print(type(session)) return 'session value %s , %s' % (session.get('name' ),session.get('username' )) else : return '<b>session 未设置请在 /session-test/\<string:name\> 页面上复制 </b><script language="javascript">setTimeout("location=\'/\'",3000);</script>'
1 2 3 4 <SecureCookieSession {'name' : 'weiyigeek' , 'username' : '唯一极客' }> <class 'werkzeug.local.LocalProxy' > session=eyJuYW1lIjoid2VpeWlnZWVrIiwidXNlcm5hbWUiOiJcdTU1MmZcdTRlMDBcdTY3ODFcdTViYTIifQ.X2GdGA.MgBLw9iCDlFBMaSXmtruHjdzkGs
基础示例2.通过FLASK-Session插件将session存储到内存数据库之中即非关系型数据库(redis);1 2 3 4 5 6 7 8 9 10 11 12 13 14 15 16 17 18 19 20 21 22 23 24 25 26 pip install flask-session pip install redis app.config['SECRET_KEY' ] = "WeiyiGeek" app.config['SESSION_COOKIE_SECURE' ] = Ture app.config['SESSION_USER_SIGNER' ] = Ture app.config['SESSION_TYPE' ] = 'redis' app.config['SESSION_REDIS' ] = Redis(host='192.168.100.10' , password='weyigeek' ,db=3) app.config['SESSION_KEY_PREFIX' ] = "product:" SECRET_KEY = "WeiyiGeek" SESSION_COOKIE_SECURE = Ture SESSION_KEY_PREFIX = "product:" SESSION_TYPE = 'redis' SESSION_REDIS = Redis(host='192.168.100.10' , password='weyigeek' ,db=3) SESSION_USER_SIGNER = Ture from flask_session import Session def init_ext(app): Session(app)
执行结果:1 2 3 <RedisSession {'_permanent' : True, 'name' : 'WeiyiGeek-Redis' , 'username' : '唯一极客' }> <class 'werkzeug.local.LocalProxy' > Set-Cookie:session=4a461782-840d-4a2d-8352-3622ea9102fe; Expires=Sat, 17-Oct-2020 08:11:32 GMT; Secure; HttpOnly; Path=/
weiyigeek.top-session
模板引擎 描述:在学习FLASK的开发模我们首先应该了解一下模板、以及模板引擎;
Q: 什么是模板? 视图与模板;模板处理分为两个过程一是加载二是渲染;
1.静态HTML
2.模板语法(动态插入代码片段)
Q: 开发中VT之间的关系
Jinja2 模板引擎 描述: 它是由FLASK作者模仿Django的模板开发并运用在FLASK中的模板引擎,一个现代化设计和友好的Python模板语言;
特点:
1.速度快广泛应用
2.HTML开发和后端Python分离
3.减少Python复杂度
4.非常灵活快速和安全
5.提供了控制继承等高级功能
模板语法:
变量:
标签: {\% name \%}与JAVAweb开发中jsp相似
模板中的变量
视图传递给模板的数据
前面定义数据的调用
变量不存在(默认忽略)
模板中的标签{\% tag \%}作用:
1.逻辑控制
2.表达式使用
3.创建变量
4.宏定义(较Djiago新增功能): 即利用标签实现函数功能;
常用标签一览
结构标签 注释符: 在模板引擎中的注释1 2 3 {# ``base.html`` 这是注释的行 #}
block: 块操作即子模板调用或者继承(父模板挖坑,子模板填坑)1 2 3 {% block xxx %} <p>我是等待被填充或者继承的元素</p> {% endblock xxx %} <!-- 推荐结束时候也加上块名称 -->
extends: 继承父模板的块操作里的内容,即引用或者填充、扩充父模板中块里的元素, 其继承体系是化整为零的操作;1 2 3 4 5 {% extends 'xxx.html' %} {% block xxx %} {{ super () }} <span>我是添加的子元素</span> / / 扩充 {% endblock xxx %}
include: 包含其它html文件内容到本html中体现的是由零到一的概念;
marco : 宏定义(其实C语言那个宏定义类型),它可以在模板中定义函数然后在其它地方进行使用;1 2 3 4 5 6 7 8 9 {% marco hello (name) %} {{ name }}{% endmarco %} # 宏调用 {{ hello("weiyigeek" ) }} # 重其它模板中导入宏定义 {% from 'xxxx' import hello,func1,func2 %}
变量声明 1 2 3 4 5 6 {% set index = 0 %} {% set index = 5 * loop.index %} {{ index }}
条件结构 for: 该标签可以向Pyton一样的使用for…else..也可以获取循环信息loop对象相关方法(first/last/index/index0/revindex/reindex0)即循环器1 2 3 4 5 {% for item in cols %} {% else %} {% endfor %}
过滤器 描述:Jinja2中全套模板引擎中大概有400多个过滤器;
基础语法:1 2 3 4 5 6 7 8 9 10 11 12 13 14 15 16 17 18 19 {{ 变量|过滤器|过滤器 }} capitalize default last first length sum sort lower upper title trim reverse format safe striptags
基础示例:
Day3\App\templates\Tag\default.html1 2 3 4 5 6 7 8 9 10 11 12 13 14 15 16 17 18 19 20 21 22 <!DOCTYPE html> <html lang ="en" > {% block header%} <head > <meta charset ="UTF-8" > <meta name ="viewport" content ="width=device-width, initial-scale=1.0" > <title > {% block title%} {{ title }} {% endblock %}</title > </head > {% endblock header%} <body > {% block content %} <p style ="color: red;" > Python Flask Deveploment Study!</p > <h5 > Name: {{ student }}</h5 > {% endblock content %} <br /> {% block footer %} <p > © WeiyiGeek ℗ Python-Flask <br > <a href ="https://weiyigeek.top" > 个人主页</a > </p > {% endblock footer %} <br /> </body > </html >
Day3\App\templates\Tag\friends.html1 2 3 4 5 6 <div id ="firends" > <ul > <li > https://weiyigeek.top</li > <li > https://weiyigeek.top</li > </ul > </div >
Day3\App\templates\Tag\function.html1 2 3 4 5 6 7 8 9 10 {% macro Start(name) %} <span > 你好, {{ name }} </span > {% endmacro %} {% macro Product(a,b,c) %} <p > 产品列表:</p > <span > {{ a }} </span > <span > {{ b }} </span > <span > {{ c }} </span > {% endmacro %}
Day3\App\templates\Tag\demo3_1.html #演示文件1 2 3 4 5 6 7 8 9 10 11 12 13 14 15 16 17 18 19 20 21 22 23 24 25 26 27 28 29 30 31 32 33 34 35 36 37 38 39 40 41 42 43 44 45 46 47 48 49 50 51 52 53 54 55 56 57 58 59 60 61 62 63 64 65 {% extends 'Tag/default.html' %} <!DOCTYPE html> <html lang ="en" > {% block header %} {{ super() }} {% endblock header %} <body > {% block content %} <b > 块引用嵌入</b > {{ super() }} {% block firends %} <p > 友情连接: </p > {% include 'Tag/friends.html' %} {% endblock firends %} <hr > <b > 标签中自定义函数: </b > <br > {% macro hello_tag() %} <u > 我是标签模板生成的函数 </u > <br > {% endmacro %} {{ hello_tag() }} {{ hello_tag() }} {% from 'Tag/function.html' import Start,Product %} <br > {{ Start("WeiyiGeek") }} {{ Product("Python3 入门到精通","Python 可视化编程","Python - Flask Web Development") }} {% endblock content %} {% block footer %} <hr > <b > 条件循环</b > {% for user in users %} {% if loop.first %} <li style ="color:red" > {{ loop.index }} : {{ loop.index0 }} : {{ user }}</li > {% elif loop.last %} <li style ="color:green" > {{ loop.index }} : {{ loop.index0 }} : {{ user }}</li > {% else %} <li style ="color:blue" > {{ loop.index }} : {{ loop.index0 }} : {{ user }}</li > {% endif %} {% else %} <p > 循环结束</p > {% endfor %} <hr > <b > 过滤器</b > <p > 原始字符:{{ student }}</p > <p > 字符|capitalize:{{ student|capitalize }}</p > <p > 字符|upper:{{ student|upper }}</p > <p > 字符|reverse:{{ student|reverse }}</p > <hr > {{ super() }} {% endblock footer %} </body > </html >
Day3\App\views\demo\demo3.py1 2 3 4 5 6 7 8 9 from flask import Blueprint,render_templated3 = Blueprint("demo3" ,__name__) @d3.route("/demo3_1/") def demo3_1 () : users = ["C++" ,"C" ,"Python" ,"Go" ,"R" ,"JAVA" ,"JavaScript" ,"PHP" ] return render_template("Tag/demo3_1.html" ,title="结构标签测试" ,student="weiyigeek" ,users=users)
补充知识: ODOO 框架是一套企业资源规划(ERP)及客户关系管理(CRM)系统。以Python语言开发,数据库采用开源的PostgreSQL,系统以GNU GPL开源协议发布。
入坑解决 问题1.使用 Visual Studio Code 开发 Flask 程序的时候,一直提示 Instance of 'SQLAlchemy' has no 'Column' member 错误,同样的代码在其它的 IDE 就没有问题; 1 2 3 4 5 6 7 "python.linting.flake8Enabled" : Ture,"python.linting.pylintEnabled" : false ,"python.linting.flake8Args" : [ "--disable=E1101" , "--max-line-length=120" ]
问题2.异常排查_Python.[alembic.env] No changes in schema detected?
RESTful 作用于数据序列化方便于前后端分离;
缓存Jinja2片段1 2 3 4 5 6 7 8 9 10 11 12 13 14 15 16 17 18 19 {% cache [timeout [,[key1, [key2, ...]]]] %} ... {% endcache %} {% cache None "key" %}... 基础实例: {% cache 60*5 %} <div> <form> {% render_form_field form.username %} {% render_submit %} </form> </div> {% endcache %}


