[TOC]
0x00 前言简述 本章将主要给各位看友介绍表单form中常用的标签元素属性,本节标签一览如下所示:
<form> : 定义供用户输入的 HTML 表单。<label> : 定义 input 元素的标注。<input> : 定义输入控件。<textarea> : 定义多行的文本输入控件。<button> : 定义按钮。<select> : 定义选择列表(下拉列表)。<optgroup> : 定义选择列表中相关选项的组合。<option> : 定义选择列表中的选项。<legend> : 定义 fieldset 元素的标题。<fieldset> : 定义围绕表单中元素的边框。<datalist> HTML5 : 定义下拉列表。<output> HTML5 : 定义输出的一些类型。<keygen> HTML5 : 定义生成密钥。<isindex> : 定义与文档相关的可搜索索引。HTML5 中不支持
0x00 表单标签元素 描述 : 表单是一个包含表单元素的区域,表单元素是允许用户在表单中输入内容,其包含 文本框、文本域(textarea)、按钮、下拉列表、单选框(radio-buttons)、复选框(checkboxes)等元素都要放在form标签里面或者进行form的id值的调用,否则提交的数据到不了后端。
属性 :
name 属性: 规定表单的名称.
action 属性: 规定当提交表单时向后端URL发送表单数据。
method 属性: 规定提交发送表单时 HTTP 方法,通常为GET或者POST,当然也有可能为其他方法。
accept-charset 属性: 规定服务器可处理的表单数据字符集。
enctype 属性: 规定在向服务器发送表单数据之前如何对其进行编码, 在 POST 请求使用其值为(text/plain、multipart/form-data、application/x-www-form-urlencoded)。
target 属性: 规定在窗口何处打开 action URL。
autocomplete 属性(NEW): 规定 form 或 input (name: text, search, url, telephone, email, password, date pickers)域应该拥有自动填充功能,在某些浏览中需要开启自动填充才能使其生效, 设置 on 或 off。
novalidate 属性(NEW): 规定在提交表单时不应该验证 form 或 input 域(name: text, search, url, telephone, email, password, date pickers)域应该拥有自动填充功能,在某些浏览中需要开启自动填充才能使其生效。
示例 :
[TOC]
0x00 前言简述 本章将主要给各位看友介绍表单form中常用的标签元素属性,本节标签一览如下所示:
<form> : 定义供用户输入的 HTML 表单。<label> : 定义 input 元素的标注。<input> : 定义输入控件。<textarea> : 定义多行的文本输入控件。<button> : 定义按钮。<select> : 定义选择列表(下拉列表)。<optgroup> : 定义选择列表中相关选项的组合。<option> : 定义选择列表中的选项。<legend> : 定义 fieldset 元素的标题。<fieldset> : 定义围绕表单中元素的边框。<datalist> HTML5 : 定义下拉列表。<output> HTML5 : 定义输出的一些类型。<keygen> HTML5 : 定义生成密钥。<isindex> : 定义与文档相关的可搜索索引。HTML5 中不支持
0x00 表单标签元素 描述 : 表单是一个包含表单元素的区域,表单元素是允许用户在表单中输入内容,其包含 文本框、文本域(textarea)、按钮、下拉列表、单选框(radio-buttons)、复选框(checkboxes)等元素都要放在form标签里面或者进行form的id值的调用,否则提交的数据到不了后端。
属性 :
name 属性: 规定表单的名称.
action 属性: 规定当提交表单时向后端URL发送表单数据。
method 属性: 规定提交发送表单时 HTTP 方法,通常为GET或者POST,当然也有可能为其他方法。
accept-charset 属性: 规定服务器可处理的表单数据字符集。
enctype 属性: 规定在向服务器发送表单数据之前如何对其进行编码, 在 POST 请求使用其值为(text/plain、multipart/form-data、application/x-www-form-urlencoded)。
target 属性: 规定在窗口何处打开 action URL。
autocomplete 属性(NEW): 规定 form 或 input (name: text, search, url, telephone, email, password, date pickers)域应该拥有自动填充功能,在某些浏览中需要开启自动填充才能使其生效, 设置 on 或 off。
novalidate 属性(NEW): 规定在提交表单时不应该验证 form 或 input 域(name: text, search, url, telephone, email, password, date pickers)域应该拥有自动填充功能,在某些浏览中需要开启自动填充才能使其生效。
示例 :1 2 3 4 5 <form action ="https://api.weiygeeek.top/v2/version.jsp" method ="get" autocomplete ="on" > <label for ="username" > First name: </label > <input type ="text" name ="username" /> <br /> <label for ="email" > E-mail: </label > <input type ="email" name ="email" autocomplete ="off" /> </form >
补充扩展
何时使用 Get ? 何时使用 Post ?
Get 请求:用于没有敏感信息,且少量数据的提交,其表单数据在页面地址栏中是可见的,例如 action page.php?firstname=Mickey&lastname=Mouse
label 标签 描述: 该元素(标签)表示用户界面中某个元素的说明, 其通常与input连用,它可以标签文本不仅与其相应的文本输入元素在视觉上相关联,也可以点击关联的标签来聚焦或者激活这个输入元素,就像直接点击输入元素一样。
属性:
for : 即和 label 元素在同一文档中的 可关联标签的元素 的 id。
form : 表示与 label 元素关联的 form 元素(即它的表单拥有者)。
示例: 1 2 3 4 5 6 7 <label for ="url" > URL: </label > <input type ="text" name ="url" value ="https://blog.weiyigeek.top" /> <label > URL: <input type ="text" name ="url" value ="https://blog.weiyigeek.top" /> </label >
描述: 该元素用于为基于 Web 的表单创建交互式控件,以便接受来自用户的数据。取决于设备和用户代理不同,表单可以使用各种类型的输入数据和控件。<input> 元素是目前是 HTML 中最强大、最复杂的元素之一,因为它有大量的输入类型和属性组合。
属性:
属性
类型
描述
acceptfile文件上传控件中预期文件类型的提示
altimage图片类型的 alt 属性。对无障碍是必需的
autocomplete除了 checkbox、radio 和按钮以外
表单自动填充特性提示
capturefile文件上传控件中媒体捕获方法的提示
checkedcheckbox、radio控件是否选中
dirnamesearch、text表单字段的名称,用于在提交表单时发送元素的方向性
disabled所有类型
表单控件是否禁用
form所有类型
将控件联系到表单元素中
formactionimage、submit要提交表单的 URL 地址
formenctypeimage、submit提交表单时使用的表单数据编码类型
formmethodimage、submit提交表单时所使用的 HTTP 方法
formnovalidateimage、submit绕过表单提交时的表单控件验证
formtargetimage、submit提交表单时的浏览上下文
heightimage与 ![img]()
list除了 hidden、password、checkbox、radio 和按钮以外
自动完成选项的
maxdate、month、week、time、datetime-local、number、range最大值
maxlengthtext、search、url、tel、email、passwordvalue 的最大长度(字符数)
mindate、month、week、time、datetime-local、number、range最小值
minlengthtext、search、url、tel、email、passwordvalue 的最小长度(字符数)
multipleemail、file布尔值。是否允许多个值
name所有类型
表单的控件名称,作为键值对的一部分与表单一同提交
patterntext、search、url、tel、email、password为了使得 value 有效,必须符合的模式(正在)
placeholdertext、search、url、tel、email、password、number当没有值设定时,出现在表单控件上的文字
readonly除了 hidden、range、color、checkbox、radio 和按钮以外
布尔值。如果存在,其中的值将不可编辑。
required除了 hidden、range、color 和按钮以外
布尔值。如果存在,一个值是必需的,或者必须勾选该值才能提交表格。
sizetext、search、url、tel、email、password控件的尺寸
srcimage与 ![img]()src 属性含义相同,图片资源的地址
stepdate、month、week、time、datetime-local、number、range有效的增量值
type所有类型
表单控件的类型
value所有类型
表单控件的初始值
widthimage与 ![img]()width 属性含义相同
type 属性: 指定该标签值的类型,其类型如下所示:
| type类型 | 说明 |
示例
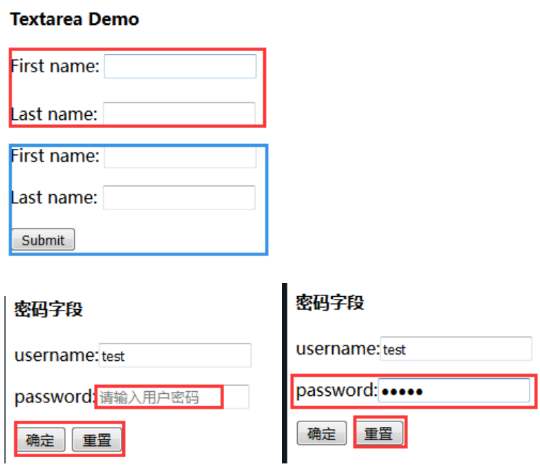
1.文本框(Text Fields)、提交按钮(Submit Button)类型, 文本域通过<input type="text"> 标签来设定,当用户要在表单中键入字母、数字等内容时,就会用到文本域, 并且当用户单击确认按钮时,表单的内容会被传送到服务端。
1 2 3 4 5 6 7 8 9 <form method ="get" action ="service.php" > <label for ="first-name" > First name:</label > <input type ="text" name ="first-name" > <br > <label > Last name: <input type ="text" name ="last-name" > </label > <input type ="submit" value ="确定" name ="submit" /> <input type ="reset" value ="重置" name ="reset" /> </form >
2.密码类型,通过标签 <input type="password"> 来定义, 通常在输入敏感信息时需要使用该标签。
1 2 3 4 5 <form action ="info.php" method ="get" > <label > username:<input type ="text" name ="username" placeholder ="请输入用户名" /> </label > <label > password:<input type ="password" name ="password" placeholder ="请输入用户密码" /> </label > </form >
weiyigeek.top-上述示例1、2图
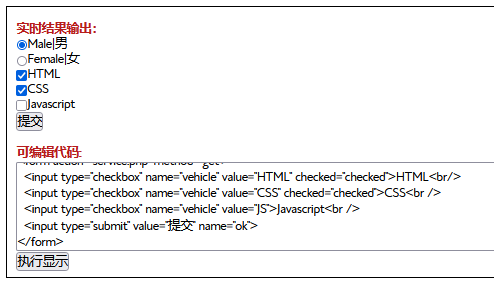
3.单选按钮(Radio Buttons)、多选按钮(Checkboxes)类型,通过 <input type="radio|checkbox"> 标签定义了表单单选框选项以及多选按钮。
1 2 3 4 5 6 7 8 9 10 11 12 13 <form action ="info.php" method ="post" > <input type ="radio" name ="sex" value ="male" > Male|男<br /> <input type ="radio" name ="sex" value ="female" > Female|女<br /> </form > <form action ="service.php" method ="get" > <input type ="checkbox" name ="vehicle" value ="HTML" checked ="checked" > HTML<br /> <input type ="checkbox" name ="vehicle" value ="CSS" checked ="checked" > CSS<br /> <input type ="checkbox" name ="vehicle" value ="JS" > Javascript<br /> <input type ="submit" value ="提交" name ="ok" > </form >
weiyigeek.top-单选框与多选框结果图
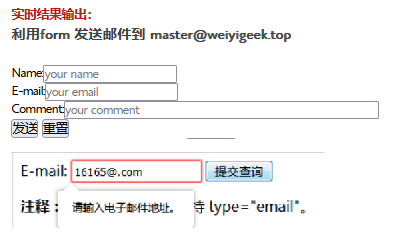
4.email邮箱地址类型,用于应该包含电子邮件地址的输入字段。根据浏览器支持,能够在被提交时自动对电子邮件地址进行验证。
1 2 3 4 5 6 7 8 9 10 11 12 13 14 15 16 <h4 > 利用form 发送邮件到 master@weiyigeek.top</h4 > <form action ="MAILTO:master@weiyigeek.top" method ="post" enctype ="text/plain" > Name:<input type ="text" name ="name" placeholder ="your name" > <br > E-mail:<input type ="email" name ="mail" placeholder ="your email" > <br > Comment:<input type ="text" name ="comment" placeholder ="your comment" size ="50" > <br > <input type ="submit" value ="发送" > <input type ="reset" value ="重置" > </form > <form action ="/demo/demo_form.asp" > E-mail: <input type ="email" name ="email" > <input type ="submit" > </form >
weiyigeek.top-邮箱地址输入类型结果图
5.search类型,用于搜索域,比如站点搜索或 Google 搜索,search 域显示为常规的文本域。
1 2 3 4 <form action ="search.asp" > 搜索谷歌:<input type ="search" name ="blog-search" > <input type ="submit" > </form >
6.tel类型,用于应该包含电话号码的输入字段,目前只有 Safari 8 支持 tel 类型。
1 <form > Telephone:<input type ="tel" name ="usrtel" > </form >
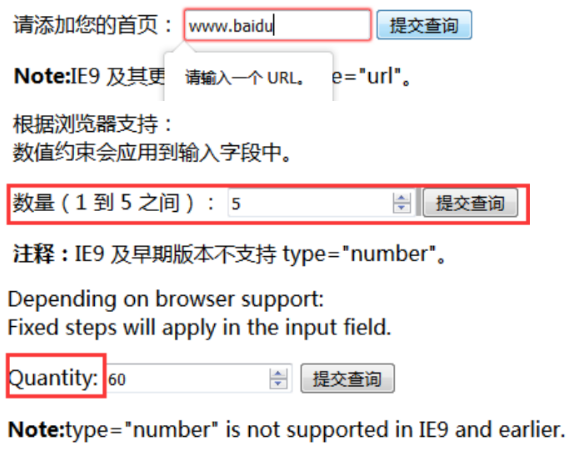
7.number类型,用于应该包含数字值的输入字段,您能够对数字做出限制,根据浏览器支持,限制可应用到输入字段。
1 2 3 4 5 6 <form > Quantity (between 1 and 5): <input type ="number" name ="quantity" min ="1" max ="5" > <input type ="number" name ="points" min ="0" max ="100" step ="10" value ="30" > </form >
weiyigeek.top-URL与Number类型示意图
8.url 类型用于应该包含 URL 地址的输入字段。根据浏览器支持,在提交时能够自动验证 url 字段。
1 2 3 <form > Blog:<input type ="url" name ="homepage" > </form >
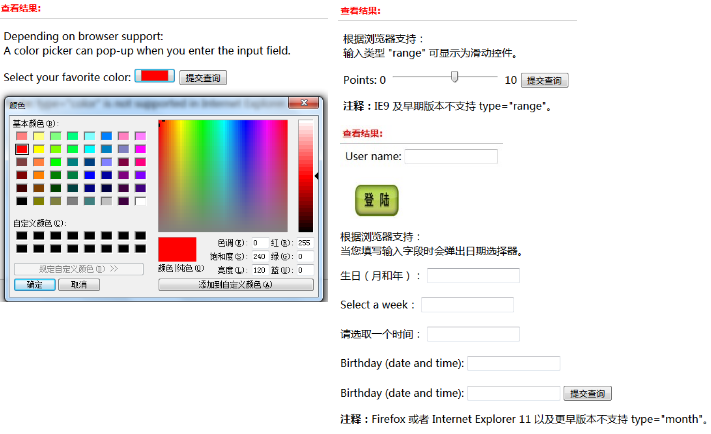
9.color 类型,用于应该包含颜色的输入字段,根据浏览器支持,颜色选择器会出现输入字段中。
1 2 Select your favorite color: <input type ="color" name ="favcolor" value ="#ff0000" >
10.range 类型, 用于应该包含一定范围内的值的输入字段,根据浏览器支持,输入字段能够显示为滑块控件。
1 Points: 0<input type ="range" name ="points" min ="0" max ="10" > 10
11.image 类型, 用于自定义图片来表示,功能与Bottun差不多。
1 2 User name: <input type ="text" name ="user_name" /> <br /> <input type ="image" src ="http://weiyigeek.top/img/login.jpg" width ="99" height ="99" />
12.日期时间类型,用于包含日期时间的的输入字段,根据浏览器(给手机端的)支持,日期(时间)选择器会出现输入字段中。
1 2 3 4 5 6 7 8 9 10 11 12 13 14 15 <input type ="date" > 日期的输入字段<input type ="month" > 选择月份和年份<input type ="week" > 选择周和年<input type ="time" > 选择时间(无时区)<input type ="datetime" > 选择日期和时间(有时区)<input type ="datetime-local" > 选择日期和时间(无时区)生日:<input type ="date" name ="bday" > 生日(月和年):<input type ="month" name ="bday_month" > <br /> <br /> Select a week:<input type ="week" name ="year_week" > <br /> <br /> 请选取一个时间:<input type ="time" name ="usr_time" > <br /> <br /> Birthday (date and time): <input type ="datetime" name ="bday_time" > <br /> <br /> Birthday (date and time): <input type ="datetime-local" name ="bday_time" >
weiyigeek.top-示例结果图
13.file 类型,允许用户可以从他们的设备中选择一个或多个文件,选择后这些文件可以使用提交表单的方式上传到服务器上,或者通过 Javascript 代码和文件 API 对文件进行操作,注意该提交必须为POST请求。
1 2 3 4 5 6 7 8 9 10 11 12 13 14 15 16 17 18 19 20 21 22 23 24 25 26 27 28 29 30 31 32 33 <label for ="avatar" > Choose a profile picture:</label > <input type ="file" id ="avatar" name ="avatar" accept ="image/png, image/jpeg" > accept=".png, .jpg, .jpeg" capture (en-US) 属性是一个字符串(在移动设备上使用才能体现),如果 accept (en-US) 属性指出了 input 是图片或者视频类型,则它指定了使用哪个摄像头去获取这些数据。 值 user 表示应该使用前置摄像头和(或)麦克风,值 environment 表示应该使用后置摄像头和(或)麦克风 <label for ="picture" > 拍张照片你的脸:</label > <input type ="file" name ="picture" accept ="image/*" capture ="user" > <label for ="voice" > 记录你的声音:</label > <input type ="file" name ="voice" accept ="audio/*" capture > multiple (en-US) 文件 input 允许用户选择多个文件。 <form method ="post" enctype ="multipart/form-data" > <label for ="file" > 选择要上传的文件</label > <input type ="file" id ="file" name ="file" multiple /> <button > 提交</button > </form >
1 2 3 4 5 6 7 8 9 10 11 12 13 14 15 16 17 18 19 20 21 22 23 24 25 26 27 28 29 30 31 32 33 34 35 36 <form action ="weiyigeek.asp" method ="get" autocomplete ="on" novalidate ="true" autofocus ="autofocus" > <input type ="submit" formaction ="demo_admin.asp" value ="Submit as admin" /> <input type ="submit" formnovalidate ="true" value ="Submit without validation" /> <input type ="image" src ="img_submit.gif" width ="99" height ="99" /> Webpage: <input type ="url" list ="url_list" name ="link" /> <datalist id ="url_list" > <option label ="Index" value ="https://www.weiygeek.top" > <option label ="Blog" value ="https://blog.weiygeek.top" > <option label ="Tools" value ="https://tools.weiygeek.top" > </datalist > Points: <input type ="number" name ="points" min ="0" max ="10" step ="3" /> Select images: <input type ="file" name ="img" multiple ="multiple" /> Country code: <input type ="text" name ="country_code" pattern ="[A-z]{3}" title ="Three letter country code" /> <input type ="submit" /> <input type ="search" name ="user_search" placeholder ="Search W3School" /> Name: <input type ="text" name ="usr_name" required ="required" /> </form >
textarea 标签 描述: 该元素表示一个多行纯文本编辑控件,当你希望用户输入一段相当长的(可容纳无限数量)、不限格式的文本,例如评论或反馈表单中的一段意见时,这很有用。其默认字体是等宽字体(通常是 Courier)
属性:
autocomplete: 是否使用浏览器的记忆功能自动填充文本(off、on)。
autofocus: 页面加载完毕之后是否自动给本元素添加焦点。
rows: 元素的输入文本的行数(显示的高度)。
cols: 文本域的可视宽度, 必须为正数,默认为 20 (HTML5)。
disabled: 禁用文本域
form: 指定跟自身相关联的表单
maxlength: 允许用户输入的最大字符长度 (Unicode)
minlength: 允许用户输入的最小字符长度 (Unicode)
name: 元素的名称。
placeholder: 向用户提示可以在控件中输入的内容
readonly: 不允许用户修改元素内文本。
required: 提示用户这个元素的内容必填
spellcheck: 该属性设为 true 时,表明该元素会做拼写和语法检查。
wrap: 指定文本换行的方式
默认为 soft 在到达元素最大宽度的时候,不会自动插入换行符.
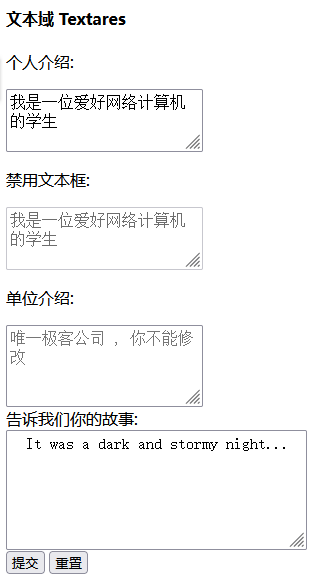
示例: 1 2 3 4 5 6 7 8 9 10 11 12 13 14 15 16 17 <label for ="story" > 告诉我们你的故事:</label > <textarea id ="story" name ="story" rows ="5" cols ="33" > It was a dark and stormy night... </textarea > <form action ="service.php" method ="get" > <p > 个人介绍:</p > <textarea placeholder ="请输入你的个人简介,而且是必须填写得" cols ="20" rows ="2" required > </textarea > <br /> <p > 禁用文本框:</p > <textarea placeholder ="请输入你的个人简介,而且是必须填写得" cols ="20" rows ="2" disabled > 我是一位爱好网络计算机的学生</textarea > <br /> <p > 单位介绍:</p > <textarea placeholder ="唯一极客公司 , 你不能修改" cols ="20" rows ="3" readonly autofocus > </textarea > <br /> <input type ="submit" value ="提交" name ="submit" /> <input type ="reset" value ="重置" name ="reset" /> </form >
weiyigeek.top-文本域展示结果图
温馨提示:在文本输入区内的文本行间,用 “%OD%OA” (回车/换行)进行分隔。
描述: 该元素可以如其意定义一个按钮,在其元素内部您可以放置内容,比如文本或图像,这是该元素与使用 <input> 元素创建的按钮之间的不同之处。
属性:
type 属性: 其值可为 button、reset、submit 。
name 属性: button 的名称,与表单数据一起提交。
value 属性: button 的初始值。
formaction 属性: 配合submit类型,将表单里面的数据分别提交到后端文件进行处理。
formenctype 属性: 覆盖 form 元素的 enctype 属性,其值为application/x-www-form-urlencoded、multipart/form-data、text/plain。
formnovalidate 属性: 带有两个提交按钮的表单(进行验证或不进行验证),第一个提交按钮提交数据时带有默认的表单验证,第二个提交按钮提交数据时不进行表单验证。
formmethod 属性: 覆盖原生表单的 HTTP 方法。
formtarget 属性: 表示接收提交的表单后在哪里显示响应(_self,_top,_blank,_parent)
温馨提示: 请始终为 <button> 元素规定 type 属性 (三种类型),不同的浏览器对 <button> 元素的 type 属性使用不同的默认值,提交的话建议使用input, 但是前者更容易使用css样式。
示例 1 2 3 4 5 6 7 8 9 10 <button type ="button" onclick ="alert('你好,世界,HTML!')" > 点我!点我!</button > <form action ="info.php" method ="get" > First name: <input type ="text" name ="fname" /> <br > <button type ="submit" > 提交</button > <br > <button type ="submit" formaction ="demo-info.php" formenctype ="text/plain" > 提交</button > <button type ="submit" formnovalidate > 不验证提交</button > </form >
综合实践: https://github.com/WeiyiGeek/DevelopLearnig/blob/main/fore-end/HTML/example/study/03.DivisionSection.html
select 标签 描述: select 元素可创建单选或多选菜单, 其元素中的 <option> 标签用于定义列表中的可用选项。
属性:
autofocus: 规定在页面加载后交本区域自动获得焦点
disabled: 规定禁用该下拉列表
form: 规定文本区域所属的一个或多个表单,指定表单的name名称。
multiple : 规定可选择多个选项
name : 规定下拉列表的名称
required : 规定文本区域是必填的
number : 规定下拉列表中可见选项的数目
size : 若控件显示为滚动列表框(如声明了 multiple),此属性表示为控件中同时可见的行数。
示例: 1 2 3 4 5 6 7 8 9 10 11 12 下拉列表的两种实现方式: <select name ="username" value ="" > <option value ="1" > Dimond</option > <option value ="2" > vertical</option > </select > <input name ="type" type ="number" list ="recordtype" placeholder ="类型选择" required class ="form-control" > <datalist id ="recordtype" > <option value ="1" > vertical</option > </datalist >
option 标签 描述: option 元素定义下拉列表中的一个选项(一个条目),浏览器将该标签中的内容作为 <select> 标签的菜单或是滚动列表中的一个元素显示, 所以该元素位于 select 元素内部。
属性:
disabled : 规定此选项应在首次加载时被禁用。
selected : 规定选项( 在首次显示在列表中时)表现为选中状态
value : 定义送往服务器的选项值。
label : 定义当使用 <optgroup> 时所使用的标注
注释 :
<option> 标签可以在不带有任何属性的情况下使用,但是您通常需要使用 value 属性,此属性会指示出被送往服务器的内容。如果列表选项很多,可以使用 <optgroup> 标签对相关选项进行组合。multiple 属性的 <select> 元素中选中多个选项,用户可以按住 Ctrl, Command, 或 Shift 键(取决于你的操作系统)然后鼠标点击不同选项以选择或取消选择。
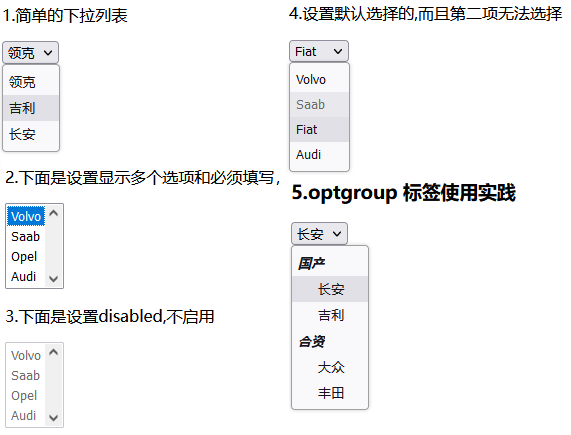
示例: 1 2 3 4 5 6 7 8 9 10 11 12 13 14 15 16 17 18 19 20 21 22 23 24 25 26 27 <form action ="https://weiyigeek.top/cars.php" method ="get" > <select name ="cars" > <option value ="" > --Please choose an option--</option > <option value ="领克" > 领克</option > <option value ="吉利" > 吉利</option > <option value ="长安" > 长安</option > </select > </form > <select name ="carlist" form ="weiyigeek" size ="4" required multiple > <option value ="volvo" > Volvo</option > <option value ="saab" > Saab</option > <option value ="opel" > Opel</option > <option value ="audi" > Audi</option > </select > <form > <select name ="cars" > <option value ="volvo" > Volvo</option > <option value ="saab" disabled > Saab</option > <option value ="fiat" selected ="selected" > Fiat</option > <option value ="audi" > Audi</option > </select > </form >
optgroup 标签 描述: 该元素经常用于把相关的选项组合在一起,如果你有很多的选项组合, 你可以使用<optgroup> 标签能够很简单的将相关选项组合在一起。
属性:
disbaled: 规定禁用该选项组。
label: 为该选项组规定描述。
示例: 1 2 3 4 5 6 7 8 9 10 11 12 <form class ="cars" action ="index.html" method ="post" > <select form ="weiyigeek" name ="cars" > <optgroup label ="国产" > <option value ="长安" > 长安</option > <option value ="吉利" > 吉利</option > </optgroup > <optgroup label ="合资" > <option value ="大众" > 大众</option > <option value ="丰田" > 丰田</option > </optgroup > </select > </form >
weiyigeek.top-select-optgroup-option实践图
fieldset 标签 描述: 该元素用于对表单中的控制元素进行分组(也包括 label 元素).
属性:
disabled: 如果设置了这个 bool 值属性,<fieldset> 的所有子代表单控件也会继承这个属性。
form: 将该值设为一个 <form> 元素的 id 属性值以将 <fieldset> 设置成这个 <form> 的一部分。
name: 元素分组的名称。
legend 标签 描述: 该元素用于表示其父元素 <fieldset> 的内容标题。
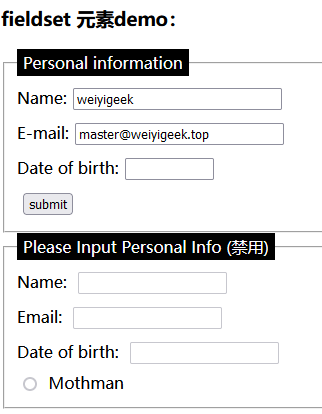
示例: 1 2 3 4 5 6 7 8 9 10 11 12 13 14 15 16 17 18 19 20 21 <style > legend { background-color : #000 ; color : #fff ; padding: 3px 6px; } input { margin : 0.4rem ; } </style > <form class ="info" action ="index.html" method ="post" > <fieldset disabled > <legend > Please Input Personal Info</legend > Name: <input type ="text" > <br > Email: <input type ="text" > <br > Date of birth: <input type ="text" > <br > <input type ="radio" id ="mothman" name ="monster" value ="M" /> <label for ="mothman" > Mothman</label > </fieldset > </form >
weiyigeek.top-fieldset与legend元素示例图
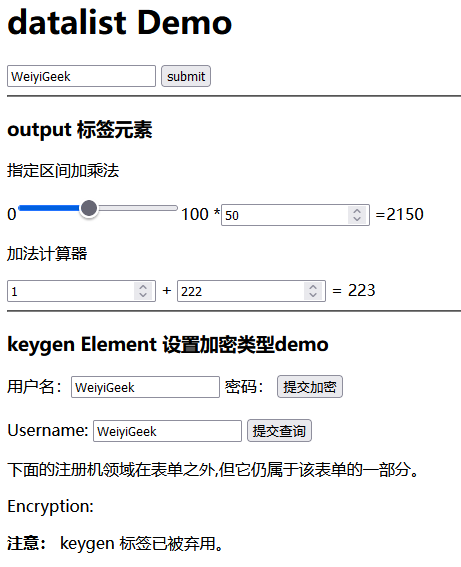
datalist 标签 描述: 标签规定了 <input> 元素可能的选项列表,”自动完成”的特性, 用户能看到一个下拉列表,里边的选项是预先定义好的,将作为用户的输入数据。(PS: 输入的时候可以提示补全你输入的值,其元素并不会像select元素一样显示)
属性:
id 属性: 请使用 <input> 元素的 list 属性来绑定 <datalist> 元素(id引用list属性值)。
示例:
1 2 3 4 5 6 7 8 9 10 11 12 <form action ="server.php" method ="get" > <input list ="browsers" name ="weiyigeek" > <datalist id ="browsers" > <option value ="Internet Explorer" > <option value ="Firefox" > <option value ="Chrome" > <option value ="Opera" > <option value ="Safari" > </datalist > <input type ="submit" > </form >
output 标签 描述: 该标签是html5新增标签,是使用来定义不同类型的输出(比如:脚本的输出),output标签通常和form表单一起使用,用来输出显示计算结果。
属性:
for: 定义输出域相关的一个或多个元素。
form: 定义输入字段所属的一个或多个表单。
name: 定义对象的唯一名称。(表单提交时使用)
示例: 1 2 3 4 5 6 7 8 9 10 11 12 13 <form oninput ="x.value=parseInt(a.value)+parseInt(b.value)" > 0<input type ="range" id ="a" value ="50" > 100 + <input type ="number" id ="b" value ="50" > = <output name ="x" for ="a b" > </output > </form > <form oninput ="x.value=parseInt(a.value)+parseInt(b.value)" > <input type ="number" id ="a" value ="0" > + <input type ="number" id ="b" value ="0" > = <output name ="x" for ="a b" > 0</output > </form >
keygen 标签 (已弃用) 描述: 该元素是为了方便生成密钥材料和提交作为 HTML form 的一部分的公钥。这种机制被用于设计基于 Web 的证书管理系统。按照预想,<keygen> 元素将用于 HTML 表单与其他的所需信息一起构造一个证书请求,该处理的结果将是一个带有签名的证书。
属性:
autofocus: 获取焦点
disabled: 设置不可用
challenge: 挑战就是提交公共的keys
form: 关联表单
keytype: Key 类型支持RSA、DSA、EC(椭圆曲线)。
name: 名称的控制
示例:1 2 3 4 5 6 7 8 9 10 <keygen name ="name" challenge ="challenge string" keytype ="type" keyparams ="pqg-params" > <form action ="demo_keygen.php" method ="get" id ="secureformid" > Username: <input type ="text" name ="usr_name" > <input type ="submit" > </form > <p > 下面的注册机领域在表单之外,但它仍属于该表单的一部分。</p > Encryption: <keygen name ="security" form ="secureformid" >
weiyigeek.top-keygen执行结果示例图
综合示例: https://github.com/WeiyiGeek/DevelopLearnig/blob/main/fore-end/HTML/example/study/08.Input.html
weiyigeek.top-执行结果图
本文至此完毕,谢谢支持!

