[TOC]
0x00 前言简述 描述: 随着国家要求各政府部门及事企业单位服务器系统国产化,越来越多的的企业单位逐步引进国产化Linux操作系统(大趋势),在众多国产操作系统中银河麒麟(KylinOS)、中科方德、统信UOS,此三家持续版本迭代超15年的其生态市场及占有率最高, 除此之外红旗Linux、共创Linux、凝思磐石、新支点、深度Linux、Start OS、思普操作系统、云针OS、鸿蒙OS、YunOS、OpenCloudOS等国产操作系统。
此处由于我们企业中是试用的银河麒麟(KylinOS)V10 SP3 版本的国产系统,为了试用该系统是否可以承载现有业务,以及满足网络安全等保2.0主机安全配置要求,遂针对该系统进行安全加固及常规初始化操作,设置安全基线镜像,以保证基础业务运行环境安全。
这里作者就不在针对银河麒麟(KylinOS)的国产系统进行详细介绍与下载安装讲解,有兴趣的朋友可以参照【1.国产银河麒麟V10服务器操作系统基础知识与安装实践 】( https://blog.weiyigeek.top/2023/3-21-725.html ) 此文。
好的废话不多说,此处我将其分为三个章节,第一个章节是初始化运维常规配置,第二个章节是系统内核优化,第三个章节安全加固,此处我已经将其写成shell脚本可以直接运行加固大大的节省了我们运维人的时间,最后我会将安全加固shell脚本(部分适用于CentOS7操作系统 )放在文章末尾, 以供各位看友使用实践参考,若有错误欢迎在【全栈工程师修炼指南 】公众号留言。
若需观看视频实践演示,请在【全栈工程师修炼指南】公众号中回复【kylinos安全加固】或【10002】关键字获得脚本下载链接。
温馨提示: 在进行操作时请注意备份操作文件,以便于异常时及时回退。
温馨提示: 此处为了防止伸手党,以及尊重作者编写脚本及实践成果,象征性的设置为收费文章,希望大家理解支持!
首发地址: https://mp.weixin.qq.com/s/eBF_Q-WkiZHKGdEG1MODNQ
0x01 常规配置 1.主机IP地址与网关设置 描述: 一台新安装的主机必须配置IP地址才能方便我们通过远程连接,所以第一步肯定是把网络打通,主要根据配置的IP地址与网络地址环境变量进行对应设置,例如下述部分脚本片段。
[TOC]
0x00 前言简述 描述: 随着国家要求各政府部门及事企业单位服务器系统国产化,越来越多的的企业单位逐步引进国产化Linux操作系统(大趋势),在众多国产操作系统中银河麒麟(KylinOS)、中科方德、统信UOS,此三家持续版本迭代超15年的其生态市场及占有率最高, 除此之外红旗Linux、共创Linux、凝思磐石、新支点、深度Linux、Start OS、思普操作系统、云针OS、鸿蒙OS、YunOS、OpenCloudOS等国产操作系统。
此处由于我们企业中是试用的银河麒麟(KylinOS)V10 SP3 版本的国产系统,为了试用该系统是否可以承载现有业务,以及满足网络安全等保2.0主机安全配置要求,遂针对该系统进行安全加固及常规初始化操作,设置安全基线镜像,以保证基础业务运行环境安全。
这里作者就不在针对银河麒麟(KylinOS)的国产系统进行详细介绍与下载安装讲解,有兴趣的朋友可以参照【1.国产银河麒麟V10服务器操作系统基础知识与安装实践 】( https://blog.weiyigeek.top/2023/3-21-725.html ) 此文。
好的废话不多说,此处我将其分为三个章节,第一个章节是初始化运维常规配置,第二个章节是系统内核优化,第三个章节安全加固,此处我已经将其写成shell脚本可以直接运行加固大大的节省了我们运维人的时间,最后我会将安全加固shell脚本(部分适用于CentOS7操作系统 )放在文章末尾, 以供各位看友使用实践参考,若有错误欢迎在【全栈工程师修炼指南 】公众号留言。
若需观看视频实践演示,请在【全栈工程师修炼指南】公众号中回复【kylinos安全加固】或【10002】关键字获得脚本下载链接。
温馨提示: 在进行操作时请注意备份操作文件,以便于异常时及时回退。
温馨提示: 此处为了防止伸手党,以及尊重作者编写脚本及实践成果,象征性的设置为收费文章,希望大家理解支持!
首发地址: https://mp.weixin.qq.com/s/eBF_Q-WkiZHKGdEG1MODNQ
0x01 常规配置 1.主机IP地址与网关设置 描述: 一台新安装的主机必须配置IP地址才能方便我们通过远程连接,所以第一步肯定是把网络打通,主要根据配置的IP地址与网络地址环境变量进行对应设置,例如下述部分脚本片段。1 2 3 4 5 6 7 8 9 10 11 12 13 14 15 16 17 18 19 20 21 22 23 24 25 26 27 28 29 30 31 32 33 34 35 36 37 38 39 40 41 42 43 44 45 46 47 48 49 50 51 52 53 54 55 56 57 VAR_NETINTERFACE=ens192 VAR_IP=192.168.4.201/24 VAR_GATEWAY=192.168.4.1 if [ ! -f /opt/init/ ];then mkdir -vp /opt/init/ sudo tee /opt/init/network.sh <<'EOF' #!/bin/bash if [[ $# -lt 4 ]];then echo "Usage: $0 NetInterface IP/NETMASK GATEWAY DNS" echo "Example: $0 ens192 192.168.12.12/24 192.168.12.1 223.6.6.6" echo "@Author: WeiyiGeek" echo "@Blog: https://blog.weiyigeek.top" exit fi echo "Setting Network interface card: ${1} , IP: ${2} , GATEWAY: ${3} " CURRENT_IP=$(hostname -I | cut -f 1 -d " " ) CURRENT_GATEWAY=$(hostname -I | cut -f 1,2,3,4 -d "." ) CURRENT_FILE=/etc/sysconfig/network-scripts/ifcfg-${1} CONFIG_IP=${2%%/*} CONFIG_PREFIX=${2##*/} echo "Original Network info: IP: ${CURRENT_IP} , GATEWAY: ${CURRENT_GATEWAY} " echo "Setting Network interface card: ${1} , IP/NETMASK: ${2} , GATEWAY: ${3} , DNS: ${4} " if [[ -f ${CURRENT_FILE} ]];then egrep -q "^\s*ONBOOT=.*$" ${CURRENT_FILE} && sed -ri "s/^\s*ONBOOT=.*$/ONBOOT=yes/" ${CURRENT_FILE} || echo "ONBOOT=yes" >> ${CURRENT_FILE} egrep -q "^\s*BOOTPROTO=.*$" ${CURRENT_FILE} && sed -ri "s/^\s*BOOTPROTO=.*$/BOOTPROTO=static/" ${CURRENT_FILE} || echo "BOOTPROTO=static" >> ${CURRENT_FILE} egrep -q "^\s*IPADDR=.*$" ${CURRENT_FILE} && sed -ri "s/^\s*IPADDR=.*$/IPADDR=${CONFIG_IP} /" ${CURRENT_FILE} || echo "IPADDR=${CONFIG_IP} " >> ${CURRENT_FILE} egrep -q "^\s*PREFIX=.*$" ${CURRENT_FILE} && sed -ri "s/^\s*PREFIX=.*$/PREFIX=${CONFIG_PREFIX} /" ${CURRENT_FILE} || echo "PREFIX=${CONFIG_PREFIX} " >> ${CURRENT_FILE} egrep -q "^\s*GATEWAY=.*$" ${CURRENT_FILE} && sed -ri "s/^\s*GATEWAY=.*$/GATEWAY=${3} /" ${CURRENT_FILE} || echo "GATEWAY=${3} " >> ${CURRENT_FILE} egrep -q "^\s*DNS1=.*$" ${CURRENT_FILE} && sed -ri "s/^\s*DNS1=.*$/DNS1=${4} /" ${CURRENT_FILE} || echo "DNS1=${4} " >> ${CURRENT_FILE} else nmcli dev show ${1} nmcli conn add connection.id ${1} -staic connection.interface-name ${1} connection.autoconnect yes type Ethernet ifname ${1} ipv4.method manual ipv4.address ${2} ipv4.gateway ${3} ipv4.dns ${4} ipv4.ignore-auto-dns true fi sudo nmcli c reload read -t 5 -p "Heavy load network card, It is recommended to enter N during initialization (Y/N): " VERTIFYif [[ ${VERIFY:="N"} == "Y" || ${VERIFY:="N"} == "y" ]]; then sudo nmcli c up ${1} sudo nmcli d reapply ${1} else echo "Please reload the network card manually, run sudo nmcli d reapply ${1} ." fi EOF sudo chmod +x /opt/init/network.sh /opt/init/network.sh ${VAR_NETINTERFACE} ${VAR_IP} ${VAR_GATEWAY} ${VAR_DNS_SERVER}
2.主机DNS配置 描述: 完成IP地址的配置后,我便需要为主机配置私有DNS或者公共的DNS,以便可以解析外部域名。1 2 3 4 5 6 7 8 9 10 11 12 13 14 15 16 17 18 19 20 21 22 23 24 25 26 27 28 29 30 31 VAR_VERIFY_RESULT=Y VAR_DNS_SERVER=( "223.5.5.5" "114.114.114.114" "192.168.4.254" ) local flagsed -i -e "s/^#FallbackDNS=.*/FallbackDNS=114.114.114.114 2400:3200::1 2400:3200:baba::1/" -e "s/^#DNSSEC=.*/DNSSEC=allow-downgrade/" -e "s/^#DNSOverTLS=.*/DNSOverTLS=opportunistic/" /etc/systemd/resolved.conf for dns in ${VAR_DNS_SERVER[@]} ;do grep -q "${dns} " /etc/systemd/resolved.conf if [ $? != 0 ];then echo "nameserver ${dns} " sed -i "/#DNS=/i DNS=${dns} " /etc/systemd/resolved.conf; fi done systemctl restart systemd-resolved && systemctl enable systemd-resolved find /etc/resolv.conf -delete ln -s /run/systemd/resolve/resolv.conf /etc/resolv.conf if [[ ${VERIFY:="N"} == "Y" || ${VERIFY:="N"} == "y" ]]; then grep -Ev '^#|^$' /etc/resolv.conf | uniq echo grep -Ev '^#|^$' /etc/systemd/resolved.conf | uniq fi
3.镜像源配置 描述: 使用国外的操作系统,例如CentOS、Ubuntu、Debian、Alpine等操作系统,通常为了加快Linux系统中下载安装软件的速度,我们是需要配置软件镜像源,此处由于我们是国产操作系统,其软件更新源也肯定是在国内,所以通常无需调整。
但此处为了防止小伙伴们更改过该镜像源,我也将各发行版镜像源配置罗列出来。
1 2 3 4 5 6 7 8 9 10 11 12 13 14 15 16 17 18 19 20 21 22 23 24 25 26 27 28 29 30 31 32 33 34 35 36 37 38 39 40 41 42 43 44 45 46 47 local release cp /etc/yum.repos.d/kylin_x86_64.repo ${BACKUPDIR} release=$(grep -e "^VERSION=" /etc/os-release | cut -f 2 -d "=" | tr -d '[:punct:][:space:]' ) if [ ${release} == "V10Lance" ];then sudo tee /etc/yum.repos.d/kylin_x86_64.repo <<'EOF' [ks10-adv-os] name = Kylin Linux Advanced Server 10 - Os baseurl = https://update.cs2c.com.cn/NS/V10/V10SP3/os/adv/lic/base/$basearch / gpgcheck = 1 gpgkey=file:///etc/pki/rpm-gpg/RPM-GPG-KEY-kylin enabled = 1 [ks10-adv-updates] name = Kylin Linux Advanced Server 10 - Updates baseurl = https://update.cs2c.com.cn/NS/V10/V10SP3/os/adv/lic/updates/$basearch / gpgcheck = 1 gpgkey=file:///etc/pki/rpm-gpg/RPM-GPG-KEY-kylin enabled = 1 [ks10-adv-addons] name = Kylin Linux Advanced Server 10 - Addons baseurl = https://update.cs2c.com.cn/NS/V10/V10SP3/os/adv/lic/addons/$basearch / gpgcheck = 1 gpgkey=file:///etc/pki/rpm-gpg/RPM-GPG-KEY-kylin enabled = 0 EOF elif [ ${release} == "V10Sword" ];then echo "暂未使用麒麟 V10 Sword SP2 版本,请自行百度搜索,镜像源!" elif [ ${release} == "V10Tercel" ];then echo "暂未使用麒麟 V10 Tercel SP1 版本,请自行百度搜索,镜像源!" else echo "暂未使用麒麟除 V10 以外的系统版本,请自行百度搜索,镜像源!" fi sudo yum clean all -y && sudo yum makecache read -t ${VAR_VERIFY_TIMEOUT} -p "Please input, Perform system software update and upgrade. (Y/N) : " VERIFY if [[ ${VERIFY:="N"} == "Y" || ${VERIFY:="N"} == "y" ]]; then sudo yum update -y && sudo yum upgrade -y fi
PS: 虽然银河麒麟(KylinOS)V10 SP3 系统中可以使用CentOS7的镜像源,但是并不建议这样否则在镜像软件更新安装时,将会出现莫名错误。
4.常规运维工具安装及系统升级 描述: 完成软件镜像源配置后我们便可进行系统更新以及,常规的运维工具安装了。
1 2 3 4 5 6 7 8 9 10 11 12 13 echo "[-] 系统软件源更新." sudo yum update && sudo yum upgrade -y && dnf repolist echo "[-] 安装系统所需的常规软件." sudo dnf install -y gcc make sudo dnf install -y nano vim git unzip unrar ftp wget ntpdate dos2unix net-tools tree htop sysstat psmisc bash-completion jq rpcbind dialog nfs-utils
5.系统时间时区同步配置 描述: 更新系统及对应工具后,我们需要针对系统时间时区做同步配置,此步骤非常重要往往会影响应用程序时间,建议在服务器中必须进行配置。
1 2 3 4 5 6 7 8 9 10 11 12 13 14 15 16 17 18 19 20 21 22 23 24 25 26 27 28 29 30 31 32 33 34 35 36 37 38 39 40 41 42 43 44 45 46 47 48 49 50 51 52 VAR_VERIFY_RESULT=Y VAR_NTP_SERVER=( "ntp.aliyun.com" "ntp.tencent.com" "192.168.10.254" ) if [[ $(rpm -qa | grep -c "chrony" ) -eq 0 ]];then dnf install -y chrony fi cp /etc/chrony.conf ${BACKUPDIR} grep -E -q "^server" /etc/chrony.conf | sed -i 's/^server/# server/g' /etc/chrony.conf grep -E -q "^pool" /etc/chrony.conf | sed -i 's/^pool/# pool/g' /etc/chrony.conf for ntp in ${VAR_NTP_SERVER[@]} ;do echo "ntp server => ${ntp} " if [[ ${ntp} =~ "ntp" ]];then echo "pool ${ntp} iburst maxsources 4" >> /etc/chrony.conf; else echo "pool ${ntp} iburst maxsources 1" >> /etc/chrony.conf; fi done systemctl enable chronyd.service && systemctl restart chronyd.service if [[ ${VAR_VERIFY_RESULT} == "Y" ]];then systemctl status chronyd.service -l --no-pager;fi
主机时间同步校准与时区设置1 2 3 4 5 6 7 8 9 10 11 12 13 14 15 16 17 18 19 20 21 22 23 24 25 26 27 VAR_TIMEZONE=Asia/Shanghai sudo timedatectl set -timezone ${VAR_TIMEZONE} sudo timedatectl set -local-rtc 0 sudo timedatectl set -ntp yes sudo chronyc tracking sudo hwclock -w echo "设置时间同步与时区后: $(date) " sudo systemctl restart rsyslog.service crond.service
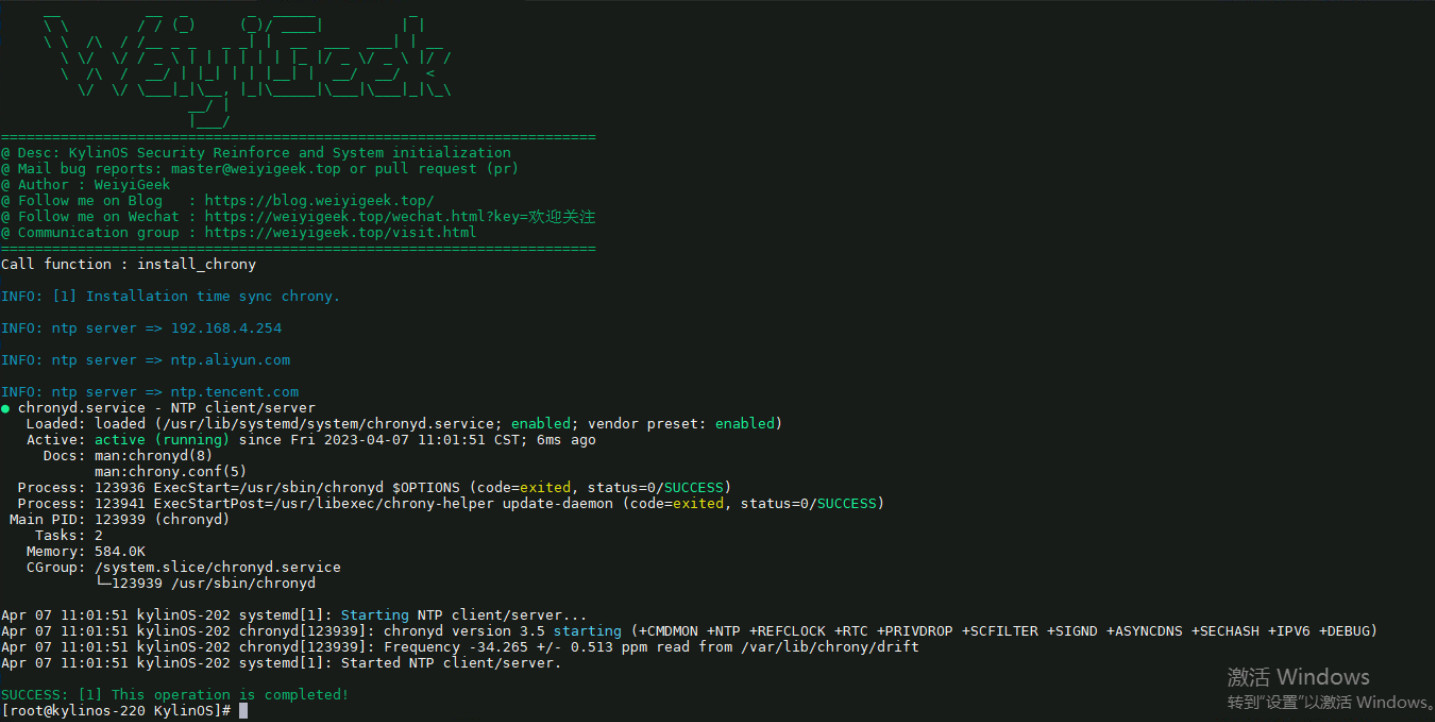
脚本执行效果:
weiyigeek.top-主机时间同步校准与时区设图
0x02 系统优化 1.创建swap系统分区配置 描述: 当服务器系统内存过小时,我们可以划分一块磁盘空间作为swap交换分区以补充内存过小,无法运行某些程序,通常情况下会出现在VPS上,针对于企业中的服务器基本都是在64G以上,请根据业务需求划分,我们由于使用了K8S云原生通常情况下需要禁用SWAP交换分区,不过此处作者还是将方法其罗列出来以供需要的朋友使用。
1 2 3 4 5 6 7 8 9 10 11 12 13 14 15 16 17 18 19 20 21 22 23 24 25 26 27 28 29 30 31 32 33 34 35 36 37 38 39 40 41 42 43 44 45 46 47 48 VAR_VERIFY_RESULT=Y VAR_VERIFY_TIMEOUT=8 echo "[${COUNT} ] Create system swap partition." read -t ${VAR_VERIFY_TIMEOUT} -p "Please input, Create swap partition. (Y/N) : " VERIFYif [[ ${VERIFY:="N"} == "Y" || ${VERIFY:="N"} == "y" ]]; then MEM=$(free -m | awk '/Mem:/{print $2}' ) if [ "$MEM " -le 1280 ]; then MEM_LEVEL=1G elif [ "$MEM " -gt 1280 ] && [ "$MEM " -le 2500 ]; then MEM_LEVEL=2G elif [ "$MEM " -gt 2500 ] && [ "$MEM " -le 3500 ]; then MEM_LEVEL=3G elif [ "$MEM " -gt 3500 ] && [ "$MEM " -le 4500 ]; then MEM_LEVEL=4G elif [ "$MEM " -gt 4500 ] && [ "$MEM " -le 8000 ]; then MEM_LEVEL=6G elif [ "$MEM " -gt 8000 ]; then MEM_LEVEL=8G fi if [ "$(free -m | awk '/Swap:/{print $2}') " == '0' ]; then fallocate -l "${MEM_LEVEL} " /swapfile chmod 600 /swapfile mkswap /swapfile >/dev/null 2>&1 swapon /swapfile sed -i "/swap/d" /etc/fstab echo "/swapfile swap swap defaults 0 0" >> /etc/fstab fi egrep -q "^\s*vm.swappiness.*$" /etc/sysctl.conf && sed -ri "s/^\s*vm.swappiness.*$/vm.swappiness = 10/" /etc/sysctl.conf || echo "vm.swappiness = 10" >> /etc/sysctl.conf egrep -q "^\s*vm.vfs_cache_pressure.*$" /etc/sysctl.conf && sed -ri "s/^\s*vm.vfs_cache_pressure.*$/vm.vfs_cache_pressure = 501/" /etc/sysctl.conf || echo "vm.vfs_cache_pressure = 50" >> /etc/sysctl.conf sysctl -p >/dev/null 2>&1 if [[ $VAR_VERIFY_RESULT == "Y" ]]; then swapon --show echo . free -h echo . grep -Ev '^#|^$' /etc/fstab | uniq fi fi
2.系统资源句柄数优化配置 描述: 为了提高系统的高并发以及防止程序报 Too many open file 错误,通常需要针对系统资源句柄数进行优化配置。
1 2 3 4 5 6 7 8 9 10 11 12 13 14 15 16 17 18 19 echo "[-] Linux 系统的最大进程数和最大文件打开数限制." cp -a /etc/security/limits.conf ${BACKUPDIR} egrep -q "^\s*ulimit -HSn\s+\w+.*$" /etc/profile && sed -ri "s/^\s*ulimit -HSn\s+\w+.*$/ulimit -HSn 655350/" /etc/profile || echo "ulimit -HSn 655350" >> /etc/profile egrep -q "^\s*ulimit -HSu\s+\w+.*$" /etc/profile && sed -ri "s/^\s*ulimit -HSu\s+\w+.*$/ulimit -HSu 655350/" /etc/profile || echo "ulimit -HSu 655350" >> /etc/profile if ! grep -qi "# OS Resources Limits Config" /etc/security/limits.conf; then sed -i 's/^# End of file*//' /etc/security/limits.conf { echo '# OS Resources Limits Config' echo '* soft nofile 655350' echo '* hard nofile 655350' echo '* soft nproc unlimited' echo '* hard nproc unlimited' echo '* soft core unlimited' echo '* hard core unlimited' echo '# End of file' } >> /etc/security/limits.conf fi if [[ $VAR_VERIFY_RESULT == "Y" ]]; then grep -Ev '^#|^$' /etc/security/limits.conf | uniq;fi
3.系统常规内核参数优化配置 描述: 服务器内核参数的优化有助于系统以及应用程序提供更好的性能,但是通常需要针对应用程序特点以及应用场景进行相应配置,下述只是常规配置有侧重点的朋友们,可根据实际情况进行调整。
1 2 3 4 5 6 7 8 9 10 11 12 13 14 15 16 17 18 19 20 21 22 23 24 25 26 27 28 29 30 31 32 33 34 35 36 37 38 39 40 41 42 43 44 45 46 47 48 49 50 51 52 53 54 55 56 57 58 59 60 61 62 63 64 65 66 67 68 69 70 71 72 73 VAR_VERIFY_RESULT=Y VAR_VERIFY_TIMEOUT=8 echo "[-] 系统内核参数的优化配置 /etc/sysctl.conf" egrep -q "^(#)?net.ipv4.ip_forward.*" /etc/sysctl.conf && sed -ri "s|^(#)?net.ipv4.ip_forward.*|net.ipv4.ip_forward = 1|g" /etc/sysctl.conf || echo "net.ipv4.ip_forward = 1" >> /etc/sysctl.conf egrep -q "^(#)?net.ipv6.conf.all.disable_ipv6.*" /etc/sysctl.conf && sed -ri "s|^(#)?net.ipv6.conf.all.disable_ipv6.*|net.ipv6.conf.all.disable_ipv6 = 1|g" /etc/sysctl.conf || echo "net.ipv6.conf.all.disable_ipv6 = 1" >> /etc/sysctl.conf egrep -q "^(#)?net.ipv6.conf.default.disable_ipv6.*" /etc/sysctl.conf && sed -ri "s|^(#)?net.ipv6.conf.default.disable_ipv6.*|net.ipv6.conf.default.disable_ipv6 = 1|g" /etc/sysctl.conf || echo "net.ipv6.conf.default.disable_ipv6 = 1" >> /etc/sysctl.conf egrep -q "^(#)?net.ipv6.conf.lo.disable_ipv6.*" /etc/sysctl.conf && sed -ri "s|^(#)?net.ipv6.conf.lo.disable_ipv6.*|net.ipv6.conf.lo.disable_ipv6 = 1|g" /etc/sysctl.conf || echo "net.ipv6.conf.lo.disable_ipv6 = 1" >> /etc/sysctl.conf egrep -q "^(#)?net.ipv6.conf.all.forwarding.*" /etc/sysctl.conf && sed -ri "s|^(#)?net.ipv6.conf.all.forwarding.*|net.ipv6.conf.all.forwarding = 1|g" /etc/sysctl.conf || echo "net.ipv6.conf.all.forwarding = 1" >> /etc/sysctl.conf if ! grep -qi "# OS Resources Limits Config" /etc/sysctl.conf; then tee -a /etc/sysctl.conf <<'EOF' net.ipv4.conf.all.accept_redirects = 0 net.ipv4.conf.default.accept_redirects = 0 net.ipv4.icmp_echo_ignore_broadcasts = 1 net.ipv4.conf.all.accept_source_route = 0 net.ipv4.conf.default.accept_source_route = 0 net.ipv4.conf.all.send_redirects = 0 net.ipv4.conf.default.send_redirects = 0 net.ipv4.conf.all.rp_filter = 1 net.ipv4.conf.default.rp_filter = 1 vm.max_map_count = 262144 vm.overcommit_memory = 0 net.ipv4.tcp_syncookies = 1 net.ipv4.tcp_tw_reuse = 1 net.ipv4.tcp_fin_timeout = 60 net.ipv4.tcp_synack_retries = 1 net.ipv4.tcp_syn_retries = 1 net.ipv4.tcp_fastopen = 3 net.ipv4.tcp_keepalive_time = 7200 net.ipv4.tcp_max_syn_backlog = 8192 net.ipv4.tcp_max_tw_buckets = 16384 net.ipv4.ip_local_port_range = 1024 65535 net.core.netdev_max_backlog = 8192 net.core.somaxconn = 32768 net.core.rmem_max = 12582912 net.core.rmem_default = 6291456 net.core.wmem_max = 12582912 net.core.wmem_default = 6291456 vm.dirty_background_ratio = 5 vm.dirty_ratio = 10 EOF fi if [[ ${VAR_VERIFY_RESULT} == "Y" ]];then sysctl -p;fi
4.系统服务优化配置 描述: 针对我们新安装的KylinOS服务器中往往存在许多非必须服务,此处我们可以根据需求禁用相关服务。
1 2 3 4 5 6 7 8 9 10 11 12 13 14 15 16 17 18 19 20 21 22 23 24 25 26 27 28 29 30 31 32 33 34 35 36 37 38 39 40 41 42 43 44 45 46 47 48 49 50 51 52 53 54 echo "[-] 用于关闭与禁用某些服务端口。." local VAR_APP_SERVICE VAR_SYSTEM_SERVICEVAR_APP_SERVICE="telnet.socket printer sendmail nfs kshell lpd tftp ident time ntalk bootps klogin ypbind daytime nfslock echo discard chargen debug-shell.service" VAR_SYSTEM_SERVICE="chargen-dgram daytime-stream echo-streamklogin tcpmux-server chargen-stream discard-dgram eklogin krb5-telnet tftp cvs discard-stream ekrb5-telnet kshell time-dgram daytime-dgram echo-dgram gssftp rsync time-stream" for i in ${VAR_APP_SERVICE} ;do echo "Status and Disable APP ${i} Service!" systemctl stop ${i} ;systemctl disable ${i} ; done for i in ${VAR_SYSTEM_SERVICE} ;do echo "Status and Disable System ${i} Service!" systemctl stop ${i} ;systemctl disable ${i} ; done if [ -f /etc/default/apport ]; then cp /etc/default/apport ${BACKUPDIR} sed -i 's/enabled=.*/enabled=0/' /etc/default/apport systemctl stop apport.service systemctl disable apport.service systemctl mask apport.service >/dev/null 2>&1 fi read -t ${VAR_VERIFY_TIMEOUT} -p "Please input, is service verificating (Y/N) : " VERIFYif [[ ${VERIFY:="N"} == "Y" || ${VERIFY:="N"} == "y" ]]; then systemctl status apport.service --no-pager else log ::success "[${COUNT} ] This operation is completed!" fi sudo systemctl stop cloud-init.target cloud-init.service cloud-config.service cloud-init-local.service cloud-final.service sudo systemctl disable cloud-init.target cloud-init.service cloud-config.service cloud-init-local.service cloud-final.service sudo systemctl mask cloud-init.service cloud-config.service cloud-init-local.service cloud-final.service >/dev/null 2>&1 if [ ! -f /etc/cloud/cloud-init.disable ];then sudo touch /etc/cloud/cloud-init.disable;fi read -t ${VAR_VERIFY_TIMEOUT} -p "Please input, is Remove cloud-init related files and their directories (Y/N) : " VERIFYif [[ ${VERIFY:="N"} == "Y" || ${VERIFY:="N"} == "y" ]]; then sudo apt purge cloud-init -y sudo rm -rf /etc/cloud && sudo rm -rf /var/lib/cloud/ fi sudo systemctl daemon-reload systemctl stop debug-shell.service systemctl mask debug-shell.service >/dev/null 2>&1 if [[ $VAR_VERIFY_RESULT == "Y" ]]; then systemctl status debug-shell.service --no-pager fi
0x03 安全加固 1.远程登录主机提示信息 描述: 配置提示信息可以提示运维人员以及恶意人员,在非权限授权时禁止访问。1 2 3 4 5 6 7 8 9 10 11 12 13 14 15 16 17 18 19 20 21 22 23 24 25 26 27 28 29 30 31 32 33 34 35 36 37 38 39 40 41 42 43 44 45 46 47 egrep -q "^\s*(banner|Banner)\s+\W+.*$" /etc/ssh/sshd_config && sed -ri "s/^\s*(banner|Banner)\s+\W+.*$/Banner \/etc\/issue.net/" /etc/ssh/sshd_config || echo "Banner /etc/issue.net" >> /etc/ssh/sshd_config sudo tee /etc/issue <<'EOF' ************************* [ 安全登陆 (Security Login) ] ************************ Authorized users only. All activity will be monitored and reported.By WeiyiGeek Security Center. Author: WeiyiGeek blog: https://blog.weiyigeek.top EOF sudo tee /etc/issue.net <<'EOF' ************************* [ 安全登陆 (Security Login) ] ************************* Authorized users only. All activity will be monitored and reported.By WeiyiGeek Security Center. Author: WeiyiGeek blog: https://blog.weiyigeek.top EOF tee /etc/motd <<'EOF' Welcome to KylinOS Private Cloud Computer Service! If the server is abnormal, please add WX weiyigeeker (WeiyiGeek-Security-Center) _ooOoo_ o8888888o 88" . " 88 (| -_- |) O\ = /O ____/`---'\____ .' \\| |// `. / \\||| : |||// \ / _||||| -:- |||||- \ | | \\\ - /// | | | \_| '' \---/'' | | \ .-\__ `-` ___/-. / ___`. .' /--.--\ `. . __ ."" ' < `.___\_<|>_/___.' >' "" . | | : `- \`.;`\ _ /`;.`/ - ` : | | \ \ `-. \_ __\ /__ _/ .-` / / ======`-.____`-.___\_____/___.-`____.-'====== `=---=' ^^^^^^^^^^^^^^^^^^^^^^^^^^^^^^^^^^^^^^^^^^^^^ 佛祖保佑 永不死机 心外无法 法外无心 EOF
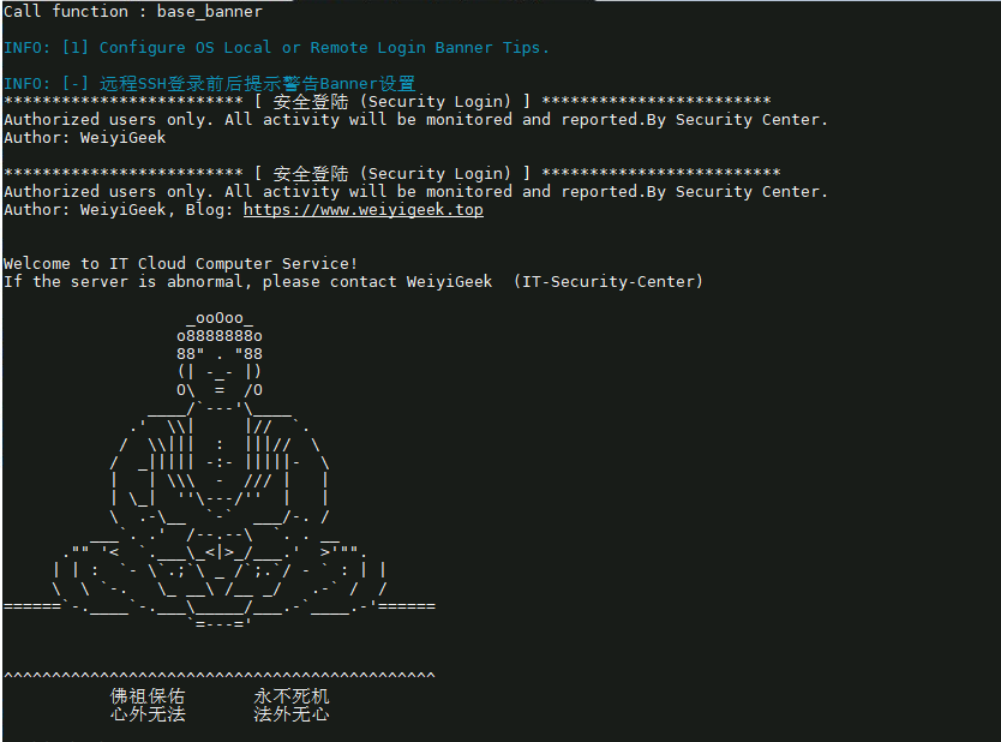
脚本执行效果:
weiyigeek.top-本地控制台与SSH登录后提示自定义提示信息图
2.远程登录主机系统信息 描述: 在登录到系统后及时的显示服务器系统相关信息,包括但不限于系统资源信息、登录时间、失败信息,以及各分区磁盘使用率。
1 2 3 4 5 6 7 8 9 10 11 12 13 14 15 16 17 18 19 20 21 22 23 24 25 26 27 28 29 30 31 32 33 34 35 36 37 38 39 40 41 42 43 44 45 46 47 48 49 50 51 52 53 54 55 56 57 58 59 60 61 62 63 64 65 66 67 68 69 70 71 72 73 74 75 76 77 78 79 80 81 82 83 84 85 86 87 88 89 90 91 92 93 94 95 96 97 98 99 100 101 102 103 104 105 106 107 108 109 110 111 112 113 114 115 116 117 118 119 120 121 122 123 124 125 126 tee /usr/local /bin/00-custom-header <<'EOF' #!/bin/bash LAST_LOGIN=$(last -n 2 --time-format iso | sed -n '2p;' ) LAST_LOGIN_T=$(echo ${LAST_LOGIN} | awk '{print $2}' ) LAST_LOGIN_IP=$(echo ${LAST_LOGIN} | awk '{print $3}' ) LAST_LOGIN_TIME=$(echo ${LAST_LOGIN} | awk '{print $4}' ) LAST_LOGOUT_TIME=$(echo ${LAST_LOGIN} | awk '{print $6}' ) LOAD1=$(grep "" /proc/loadavg | awk '{print $1}' ) LOAD5=$(grep "" /proc/loadavg | awk '{print $2}' ) LOAD15=$(grep "" /proc/loadavg | awk '{print $3}' ) MEMORY_USED=$(free -t -m | grep "Mem" | awk '{print $3}' ) MEMORY_ALL=$(free -t -m | grep "Mem" | awk '{print $2}' ) MEMORY_PERCENTAGE=$(free | awk '/Mem/{printf("%.2f%"), $3/$2*100}' ) UPTIME=$(grep "" /proc/uptime | cut -f1 -d.) UPTIME_DAYS=$(("${UPTIME} " /60/60/24)) UPTIME_HOURS=$(("${UPTIME} " /60/60%24)) UPTIME_MINS=$(("${UPTIME} " /60%60)) UPTIME_SECS=$(("${UPTIME} " %60)) PROCESS=$(ps -eo user=|sort|uniq -c | awk '{print $2 " " $1 }' ) PROCESS_ALL=$(echo "${PROCESS} " | awk '{print $2}' | awk '{SUM += $1} END {print SUM}' ) PROCESS_ROOT=$(echo "${PROCESS} " | grep root | awk '{print $2}' ) PROCESS_USER=$(echo "${PROCESS} " | grep -v root | awk '{print $2}' | awk '{SUM += $1} END {print SUM}' ) PROCESSOR_NAME=$(grep "model name" /proc/cpuinfo | cut -d ' ' -f3- | awk '{print $0}' | head -1) PROCESSOR_COUNT=$(grep -ioP 'processor\t:' /proc/cpuinfo | wc -l) G="\033[01;32m" R="\033[01;31m" D="\033[39m\033[2m" N="\033[0m" echo -e "\e[01;38;44;5m##################### 主机资源信息 (Host resource information ) #######################\e[0m" echo -e "[Login Info]\n" echo -e "USER: ${G} $(whoami) ${N} " echo -e "You last logged in to ${G} ${LAST_LOGIN_T} ${N} of ${G} $(uname -n) ${N} system with IP ${G} ${LAST_LOGIN_IP} ${N} , \nLast Login time is ${G} ${LAST_LOGIN_TIME} ${N} , Logout time is ${R} ${LAST_LOGOUT_TIME} ${N} .\n" echo -e "[System Info]\n" echo -e " SYSTEM : $(awk -F'[="]+' '/PRETTY_NAME/{print $2}' /etc/os-release) " echo -e " KERNEL : $(uname -sr) " echo -e " Architecture : $(uname -m) " echo -e " UPTIME : ${G} ${UPTIME_DAYS} ${N} days ${G} ${UPTIME_HOURS} ${N} hours ${G} ${UPTIME_MINS} ${N} minutes ${G} ${UPTIME_SECS} ${N} seconds" echo -e " CPU : ${PROCESSOR_NAME} (${G} ${PROCESSOR_COUNT} ${N} vCPU)\n" echo -e " MEMORY : ${MEMORY_USED} MB / ${MEMORY_ALL} MB (${G} ${MEMORY_PERCENTAGE} ${N} Used)" echo -e " LOAD AVG : ${G} ${LOAD1} ${N} (1m), ${G} ${LOAD5} ${N} (5m), ${G} ${LOAD15} ${N} (15m)" echo -e " PROCESSES : ${G} ${PROCESS_ROOT} ${N} (root), ${G} ${PROCESS_USER} ${N} (user), ${G} ${PROCESS_ALL} ${N} (total)" echo -e " USERS : ${G} $(users | wc -w) ${N} users logged in" echo -e " BASH : ${G} ${BASH_VERSION} ${N} \n" echo -e "[Disk Usage]\n" mapfile -t DFH < <(df -h -x zfs -x squashfs -x tmpfs -x devtmpfs -x overlay --output=target,pcent,size,used | tail -n+2)for LINE in "${DFH[@]} " ; do DISK_USAGE=$(echo "${LINE} " | awk '{print $2}' | sed 's/%//' ) USAGE_WIDTH=$((("${DISK_USAGE} " *60)/100)) if [ "${DISK_USAGE} " -gt 90 ]; then COLOR="${R} " else COLOR="${G} " fi BAR="[${COLOR} " for ((i=0; i<"${USAGE_WIDTH} " ; i++)); do BAR+="=" done BAR+=${D} for ((i="${USAGE_WIDTH} " ; i<60; i++)); do BAR+="=" done BAR+="${N} ]" echo "${LINE} " | awk '{ printf("Mounted: %-32s %s / %s (%s Used)\n", $1, $4, $3, $2); }' | sed -e 's/^/ /' echo -e "${BAR} " | sed -e 's/^/ /' done echo EOF chmod +x /usr/local /bin/00-custom-header if [ $(grep -c "00-custom-header" /etc/profile) -eq 0 ];then echo "/usr/local/bin/00-custom-header" >> /etc/profile else echo "Custom-header already exists in the /etc/profile file " fi
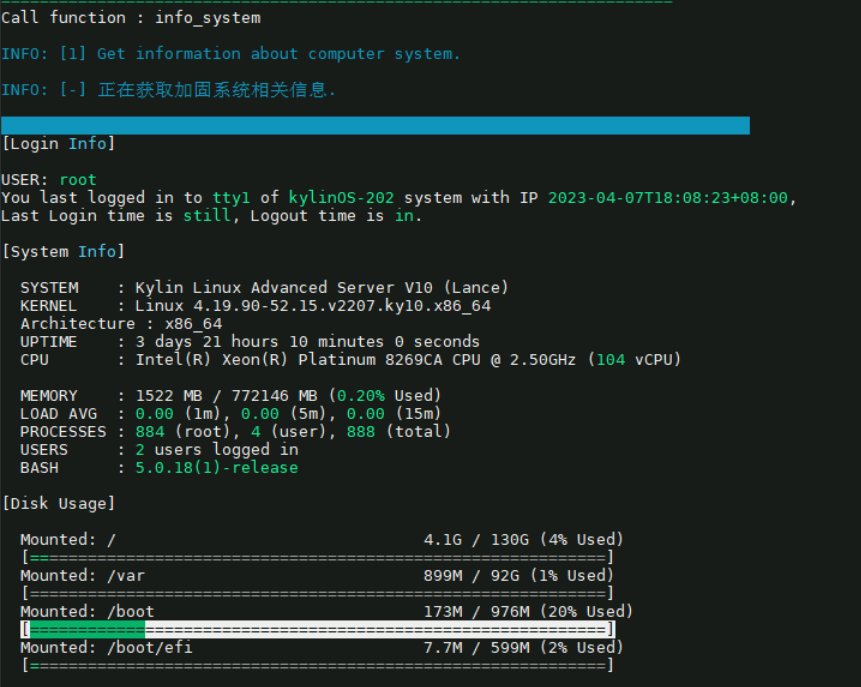
脚本执行效果:
weiyigeek.top-主机资源信息图
3.远程登录sshd服务安全策略配置 描述: 作为运维人员通常会使用 ssh 来连接我们的远程Linux服务器,所以针对于sshd服务加固也是重中之重。
1 2 3 4 5 6 7 8 9 10 11 12 13 14 15 16 17 18 19 20 21 22 23 24 25 26 27 28 29 30 31 32 33 34 35 36 37 38 39 40 41 42 43 44 45 46 47 48 49 50 51 52 53 54 55 56 57 58 59 60 VAR_SSHD_PORT=20211 VAR_LOGIN_TIMEOUT=300 echo "[-] 系统sshd服务安全策略设置." egrep -q "^\s*(banner|Banner)\s+\W+.*$" /etc/ssh/sshd_config && sed -ri "s/^\s*(banner|Banner)\s+\W+.*$/Banner \/etc\/issue.net/" /etc/ssh/sshd_config || \ echo "Banner /etc/issue.net" >> /etc/ssh/sshd_configegrep -q "^\s*PermitRootLogin\s+.+$" /etc/ssh/sshd_config && sed -ri "s/^(#)?\s*PermitRootLogin\s+.+$/PermitRootLogin no/" /etc/ssh/sshd_config || echo "PermitRootLogin no" >> /etc/ssh/sshd_config sudo egrep -q "^(#)?\s*StrictModes\s+.+$" /etc/ssh/sshd_config && sed -ri "s/^(#)?\s*StrictModes\s+.+$/StrictModes yes/" /etc/ssh/sshd_config || echo "StrictModes yes" >> /etc/ssh/sshd_config sudo egrep -q "^(#)?\s*Port\s+.+$" /etc/ssh/sshd_config && sed -ri "s/^(#)?\s*Port\s+.+$/Port ${VAR_SSHD_PORT} /" /etc/ssh/sshd_config || echo "Port ${VAR_SSHD_PORT} " >> /etc/ssh/sshd_config egrep -q "^(#)?\s*IgnoreRhosts\s+.+$" /etc/ssh/sshd_config && sed -ri "s/^(#)?\s*IgnoreRhosts\s+.+$/IgnoreRhosts yes/" /etc/ssh/sshd_config || echo "IgnoreRhosts yes" >> /etc/ssh/sshd_config egrep -q "^(#)?\s*HostbasedAuthentication \s+.+$" /etc/ssh/sshd_config && sed -ri "s/^(#)?\s*HostbasedAuthentication \s+.+$/HostbasedAuthentication no/" /etc/ssh/sshd_config || echo "HostbasedAuthentication no" >> /etc/ssh/sshd_config egrep -q "^(#)?\s*Protocol\s+.+$" /etc/ssh/sshd_config && sed -ri "s/^(#)?\s*Protocol\s+.+$/Protocol 2/" /etc/ssh/sshd_config || echo "Protocol 2" >> /etc/ssh/sshd_config egrep -q "^(#)?\s*LogLevel\s+.+$" /etc/ssh/sshd_config && sed -ri "s/^(#)?\s*LogLevel\s+.+$/LogLevel INFO/" /etc/ssh/sshd_config || echo "LogLevel INFO" >> /etc/ssh/sshd_config egrep -q "^(#)?\s*PermitEmptyPasswords\s+.+$" /etc/ssh/sshd_config && sed -ri "s/^(#)?\s*PermitEmptyPasswords\s+.+$/PermitEmptyPasswords no/" /etc/ssh/sshd_config || echo "PermitEmptyPasswords no" >> /etc/ssh/sshd_config egrep -q "^(#)?\s*MaxAuthTries\s+.+$" /etc/ssh/sshd_config && sed -ri "s/^(#)?\s*MaxAuthTries\s+.+$/MaxAuthTries 5/" /etc/ssh/sshd_config || echo "MaxAuthTries 5" >> /etc/ssh/sshd_config egrep -q "^(#)?\s*ClientAliveInterval\s+.+$" /etc/ssh/sshd_config && sed -ri "s/^(#)?\s*ClientAliveInterval\s+.+$/ClientAliveInterval ${VAR_LOGIN_TIMEOUT} /" /etc/ssh/sshd_config || echo "ClientAliveInterval ${VAR_LOGIN_TIMEOUT} " >> /etc/ssh/sshd_config egrep -q "^(#)?\s*ClientAliveCountMax\s+.+$" /etc/ssh/sshd_config && sed -ri "s/^(#)?\s*ClientAliveCountMax\s+.+$/ClientAliveCountMax 3/" /etc/ssh/sshd_config || echo "ClientAliveCountMax 3" >> /etc/ssh/sshd_config egrep -q "^(#)?\s*PermitUserEnvironment\s+.+$" /etc/ssh/sshd_config && sed -ri "s/^(#)?\s*PermitUserEnvironment\s+.+$/PermitUserEnvironment no/" /etc/ssh/sshd_config || echo "PermitUserEnvironment no" >> /etc/ssh/sshd_config egrep "^\s*Ciphers\s+.+$" /etc/ssh/sshd_config && sed -ri "s/^\s*Ciphers\s+.+$/Ciphers aes256-ctr,aes128-ctr,aes192-ctr,aes128-gcm@openssh.com,aes256-gcm@openssh.com/" /etc/ssh/sshd_config || echo "Ciphers aes256-ctr,aes128-ctr,aes192-ctr,aes128-gcm@openssh.com,aes256-gcm@openssh.com" >> /etc/ssh/sshd_config egrep -q "^(#)?\s*LoginGraceTime\s+.+$" /etc/ssh/sshd_config && sed -ri "s/^(#)?\s*LoginGraceTime\s+.+$/LoginGraceTime 60/" /etc/ssh/sshd_config || echo "LoginGraceTime 60" >> /etc/ssh/sshd_config egrep -q "^(#)?\s*X11Forwarding\s+.+$" /etc/ssh/sshd_config && sed -ri "s/^(#)?\s*X11Forwarding\s+.+$/X11Forwarding no/" /etc/ssh/sshd_config || echo "X11Forwarding no" >> /etc/ssh/sshd_config egrep -q "^(#)?\s*X11UseLocalhost\s+.+$" /etc/ssh/sshd_config && sed -ri "s/^(#)?\s*X11UseLocalhost\s+.+$/X11UseLocalhost yes/" /etc/ssh/sshd_config || echo "X11UseLocalhost yes" >> /etc/ssh/sshd_config egrep -q "^(#)?\s*AllowTcpForwarding\s+.+$" /etc/ssh/sshd_config && sed -ri "s/^(#)?\s*AllowTcpForwarding\s+.+$/AllowTcpForwarding no/" /etc/ssh/sshd_config || echo "AllowTcpForwarding no" >> /etc/ssh/sshd_config egrep -q "^(#)?\s*AllowAgentForwarding\s+.+$" /etc/ssh/sshd_config && sed -ri "s/^(#)?\s*AllowAgentForwarding\s+.+$/AllowAgentForwarding no/" /etc/ssh/sshd_config || echo "AllowAgentForwarding no" >> /etc/ssh/sshd_config chown root:root /etc/ssh/sshd_config chmod og-rwx /etc/ssh/sshd_config chown -R root:ssh_keys /etc/ssh/*key chmod -R 400 /etc/ssh/*key chown -R root:root /etc/ssh/*key.pub chmod -R 444 /etc/ssh/*key.pub
4.系统账户安全策略配置 描述: 下述脚本中将会显示非系统自动创建的用户以及拥有/bin/bash的shell用户,我们需要根据实际情况进行锁定或者删除多余的系统账户。
1 2 3 4 5 6 7 8 9 10 11 12 13 14 15 16 17 18 19 20 21 22 23 24 25 26 27 28 29 30 31 32 33 34 35 36 37 38 39 40 41 42 43 44 VAR_VERIFY_TIMEOUT=8 echo "[-] 用于锁定或者删除多余的系统账户." local defaultuserdefaultuser=(root bin daemon adm lp sync shutdown halt mail operator games ftp nobody systemd-coredump systemd-network systemd-resolve systemd-timesync tss dbus polkitd chrony dhcpd sshd ntp rpc rpcuser) for i in $(cat /etc/passwd | cut -d ":" -f 1,7);do flag=0; name=${i%%:*} ; terminal=${i##*:} if [[ "${terminal} " == "/bin/bash" || "${terminal} " == "/bin/sh" ]];then log ::warning "${name} 用户,shell终端为 /bin/bash 或者 /bin/sh" fi for j in ${defaultuser[@]} ;do if [[ "${name} " == "${j} " ]];then flag=1 break ; fi done if [[ $flag -eq 0 ]];then log ::warning "${name} 为非默认用户, 请排查是否为内部人员创建." fi done for i in $(cat /etc/passwd | cut -d ":" -f 1,3);do name=${i%%:*} ; uid=${i##*:} if [[ ${uid} -eq 0 ]] && [[ "${name} " != "root" ]];then log ::error "${name} 用户 uid 为 0 ,请排查是否为内部人员创建." fi done echo .read -t ${VAR_VERIFY_TIMEOUT} -p "Please input, Lock useless account. (Y/N) : " VERIFYif [[ ${VERIFY:="N"} == "Y" || ${VERIFY:="N"} == "y" ]]; then echo "[-] 正在锁定系统多余的服务账户......" local defaultuser defaultuser=(adm avahi apache bin dbus daemon distcache dbus ftp gdm games gopher haldaemon lxd listen pcap nfs ntp nscd named nobody nobody4 noaccess polkitd mail mailnull sys sshd squid smmsplp sabayon uucp nuucp operator webservd webalizer rpm rpc rpcuser vcsa xfs) for j in ${defaultuser[@]} ;do usermod -L ${j} &>/dev/null 2&>/dev/null; done fi echo "[-] 系统用户删除命令 userdel -r [用户名] && groupdel [用户名] ."
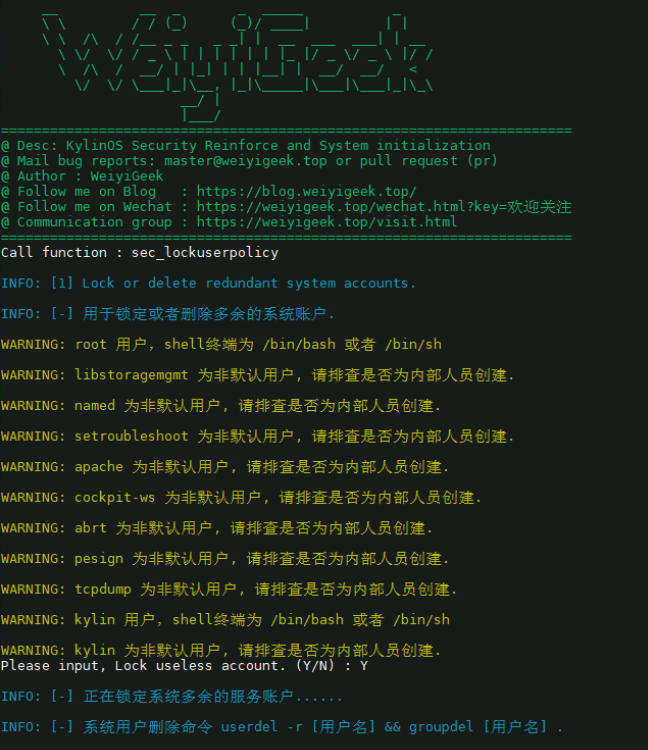
脚本执行效果:
weiyigeek.top-系统账户安全策略配置图
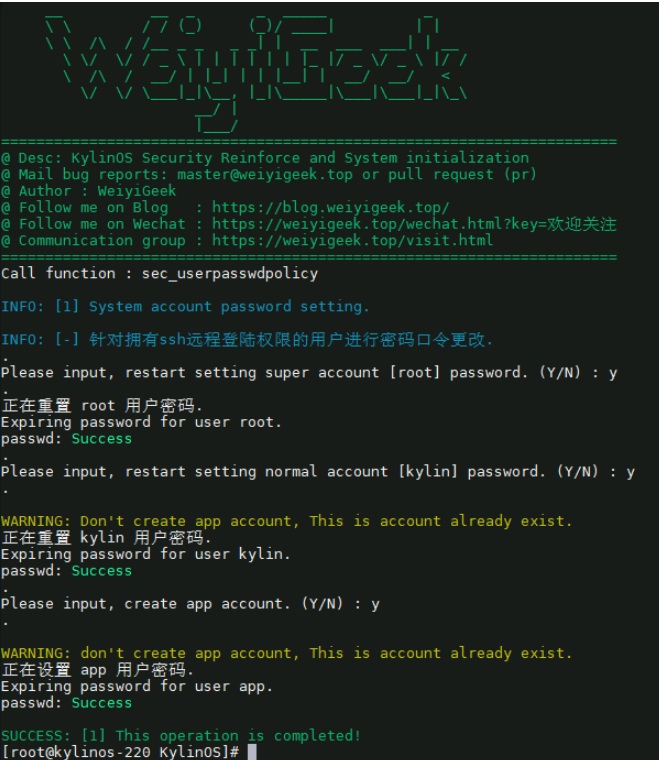
5.系统账户密码更改及过期策略配置 描述: 根据等保要求,我们需要针对拥有ssh远程登陆权限的用户进行密码口令及失效设置(三权分离)。
1 2 3 4 5 6 7 8 9 10 11 12 13 14 15 16 17 18 19 20 21 22 23 24 25 26 27 28 29 30 31 32 33 34 35 36 37 38 39 40 41 42 43 44 45 46 47 48 49 50 51 52 53 54 55 56 57 58 59 60 61 62 63 64 65 66 67 68 69 VAR_VERIFY_RESULT=Y VAR_VERIFY_TIMEOUT=8 VAR_SUPER_USER=root VAR_SUPER_PASS=R2023.weiyigeek.top VAR_USER_NAME=kylin VAR_USER_PASS=K2023.weiyigeek.top VAR_APP_USER=app VAR_APP_PASS=A2023.weiyigeek.top echo "[-] 针对拥有ssh远程登陆权限的用户进行密码口令更改." echo .read -t ${VAR_VERIFY_TIMEOUT} -p "Please input, restart setting super account [${VAR_SUPER_USER} ] password. (Y/N) : " VERIFYecho .if [[ ${VERIFY:="N"} == "Y" || ${VERIFY:="N"} == "y" ]]; then echo "正在重置 ${VAR_SUPER_USER} 用户密码." echo "${VAR_SUPER_USER} :${VAR_SUPER_PASS} " | chpasswd chage -d 0 -m 0 -M 90 -W 15 ${VAR_SUPER_USER} fi echo .read -t ${VAR_VERIFY_TIMEOUT} -p "Please input, setting super account [${VAR_USER_NAME} ] password expire time. (Y/N) : " VERIFYecho .if [[ ${VERIFY:="N"} == "Y" || ${VERIFY:="N"} == "y" ]]; then passwd --expire ${VAR_SUPER_USER} ; fi echo .read -t ${VAR_VERIFY_TIMEOUT} -p "Please input, restart setting normal account [${VAR_USER_NAME} ] password. (Y/N) : " VERIFYecho .if [ $( grep -c "^${VAR_USER_NAME} :" /etc/passwd) -eq 0 ];then echo "正在创建 ${VAR_USER_NAME} 用户与组." groupadd ${VAR_USER_NAME} && useradd -m -s /bin/bash -c "Custom System Operation users" -g ${VAR_USER_NAME} ${VAR_USER_NAME} else log ::warning "Don't create ${VAR_USER_NAME} account, This is account already exist." fi if [[ ${VERIFY:="N"} == "Y" || ${VERIFY:="N"} == "y" ]]; then echo "正在重置 ${VAR_USER_NAME} 用户密码." echo "${VAR_USER_NAME} :${VAR_USER_PASS} " | chpasswd chage -d 0 -m 0 -M 90 -W 15 ${VAR_USER_NAME} fi echo .read -t ${VAR_VERIFY_TIMEOUT} -p "Please input, setting normal account [${VAR_USER_NAME} ] password expire time. (Y/N) : " VERIFYecho .if [[ ${VERIFY:="N"} == "Y" || ${VERIFY:="N"} == "y" ]]; then passwd --expire ${VAR_USER_NAME} ; fi echo .read -t ${VAR_VERIFY_TIMEOUT} -p "Please input, create ${VAR_APP_USER} account. (Y/N) : " VERIFYecho .grep -q "^${VAR_APP_USER} :" /etc/passwd if [ $? == 1 ];then echo "正在创建 ${VAR_APP_USER} 用户与组." groupadd ${VAR_APP_USER} && useradd -m -s /bin/bash -c "Application low privilege users" -g ${VAR_APP_USER} ${VAR_APP_USER} else log ::warning "don't create ${VAR_APP_USER} account, This is account already exist." fi if [[ ${VERIFY:="N"} == "Y" || ${VERIFY:="N"} == "y" ]]; then echo "正在设置 ${VAR_APP_USER} 用户密码." echo "${VAR_APP_USER} :${VAR_APP_PASS} " | chpasswd chage -d 0 -m 0 -M 90 -W 15 ${VAR_APP_USER} && passwd --expire ${VAR_APP_USER} fi
脚本执行效果:
weiyigeek.top-系统账户密码更改及过期策略配置图
6.系统用户密码复杂性策略配置 描述: 根据等保要求建议将密码设置最小长度12(最好设置为12以上,等保要求),数字、大写字母、小写字母、特殊符号,密码包含三种及以上, 且无规律,其次是密码到期时间设置。
1 2 3 4 5 6 7 8 9 10 11 12 13 14 15 16 17 18 19 20 21 22 23 24 25 26 27 28 29 30 31 32 33 34 35 36 37 38 39 40 41 42 43 44 45 46 47 48 49 50 51 52 53 54 55 56 57 58 59 60 61 62 63 64 65 66 67 68 69 70 71 72 73 74 75 76 echo "[-] 用户口令密码复杂性策略设置." PASS_MIN_DAYS=1 PASS_MAX_DAYS=90 PASS_WARN_AGE=15 PASS_MIN_LEN=12 egrep -q "^\s*PASS_MIN_DAYS\s+\S*(\s*#.*)?\s*$" /etc/login.defs && sed -ri "s/^(\s*)PASS_MIN_DAYS\s+\S*(\s*#.*)?\s*$/PASS_MIN_DAYS ${PASS_MIN_DAYS} /" /etc/login.defs || echo "PASS_MIN_DAYS ${PASS_MIN_DAYS} " >> /etc/login.defs egrep -q "^\s*PASS_MAX_DAYS\s+\S*(\s*#.*)?\s*$" /etc/login.defs && sed -ri "s/^(\s*)PASS_MAX_DAYS\s+\S*(\s*#.*)?\s*$/PASS_MAX_DAYS ${PASS_MAX_DAYS} /" /etc/login.defs || echo "PASS_MAX_DAYS ${{PASS_MAX_DAYS} }" >> /etc/login.defs egrep -q "^\s*PASS_WARN_AGE\s+\S*(\s*#.*)?\s*$" /etc/login.defs && sed -ri "s/^(\s*)PASS_WARN_AGE\s+\S*(\s*#.*)?\s*$/PASS_WARN_AGE ${PASS_WARN_AGE} /" /etc/login.defs || echo "PASS_WARN_AGE ${PASS_WARN_AGE} " >> /etc/login.defs egrep -q "^\s*PASS_MIN_LEN\s+\S*(\s*#.*)?\s*$" /etc/login.defs && sed -ri "s/^(\s*)PASS_MIN_LEN\s+\S*(\s*#.*)?\s*$/PASS_MIN_LEN ${PASS_MIN_LEN} /" /etc/login.defs || echo "PASS_MIN_LEN ${PASS_MIN_LEN} " >> /etc/login.defs egrep -q "^\s*ENCRYPT_METHOD\s+\S*(\s*#.*)?\s*$" /etc/login.defs && sed -ri "s/^(\s*)ENCRYPT_METHOD\s+\S*(\s*#.*)?\s*$/ENCRYPT_METHOD ${VAR_PASS_ENCRYPT} /" /etc/login.defs || echo "ENCRYPT_METHOD ${VAR_PASS_ENCRYPT} " >> /etc/login.defs VAR_PASS_ENCRYPT=SHA512 VAR_PASS_RETRY=3 VAR_PASS_DIFOK=6 VAR_PASS_MINCLASS=3 VAR_PASS_UCREDIT=-1 VAR_PASS_LCREDIT=-1 VAR_PASS_DCREDIT=-1 VAR_PASS_OCREDIT=-1 VAR_PASS_REMEMBER=3 egrep -q "^password\s.+pam_pwquality.so\s+\w+.*$" /etc/pam.d/system-auth && sed -ri "/^password\s.+pam_pwquality.so/{s/pam_pwquality.so\s+\w+.*$/pam_pwquality.so try_first_pass local_users_only enforce_for_root/g;}" /etc/pam.d/system-auth egrep -q "^(#)?\s*minlen\s+.+$" /etc/security/pwquality.conf && sed -ri "s/^(#)?\s*minlen\s+.+$/minlen = ${PASS_MIN_LEN} /" /etc/security/pwquality.conf || echo "minlen = ${PASS_MIN_LEN} " >> /etc/security/pwquality.conf egrep -q "^(#)?\s*retry\s+.+$" /etc/security/pwquality.conf && sed -ri "s/^(#)?\s*retry\s+.+$/retry = ${VAR_PASS_RETRY} /" /etc/security/pwquality.conf || echo "retry = ${VAR_PASS_RETRY} " >> /etc/security/pwquality.conf egrep -q "^(#)?\s*difok\s+.+$" /etc/security/pwquality.conf && sed -ri "s/^(#)?\s*difok\s+.+$/difok = ${VAR_PASS_DIFOK} /" /etc/security/pwquality.conf || echo "difok = ${VAR_PASS_DIFOK} " >> /etc/security/pwquality.conf egrep -q "^(#)?\s*minclass\s+.+$" /etc/security/pwquality.conf && sed -ri "s/^(#)?\s*minclass\s+.+$/minclass = ${VAR_PASS_MINCLASS} /" /etc/security/pwquality.conf || echo "minclass = ${VAR_PASS_MINCLASS} " >> /etc/security/pwquality.conf egrep -q "^(#)?\s*ucredit\s+.+$" /etc/security/pwquality.conf && sed -ri "s/^(#)?\s*ucredit\s+.+$/ucredit = ${VAR_PASS_UCREDIT} /" /etc/security/pwquality.conf || echo "ucredit = ${VAR_PASS_UCREDIT} " >> /etc/security/pwquality.conf egrep -q "^(#)?\s*lcredit\s+.+$" /etc/security/pwquality.conf && sed -ri "s/^(#)?\s*lcredit\s+.+$/lcredit = ${VAR_PASS_LCREDIT} /" /etc/security/pwquality.conf || echo "lcredit = ${VAR_PASS_LCREDIT} " >> /etc/security/pwquality.conf egrep -q "^(#)?\s*dcredit\s+.+$" /etc/security/pwquality.conf && sed -ri "s/^(#)?\s*dcredit\s+.+$/dcredit = ${VAR_PASS_DCREDIT} /" /etc/security/pwquality.conf || echo "dcredit = ${VAR_PASS_DCREDIT} " >> /etc/security/pwquality.conf egrep -q "^(#)?\s*ocredit\s+.+$" /etc/security/pwquality.conf && sed -ri "s/^(#)?\s*ocredit\s+.+$/ocredit = ${VAR_PASS_OCREDIT} /" /etc/security/pwquality.conf || echo "ocredit = ${VAR_PASS_OCREDIT} " >> /etc/security/pwquality.conf egrep -q "^(#)?\s*usercheck\s+.+$" /etc/security/pwquality.conf && sed -ri "s/^(#)?\s*usercheck\s+.+$/usercheck = 1/" /etc/security/pwquality.conf || echo "usercheck = 1" >> /etc/security/pwquality.conf egrep -q "^password\s.+pam_pwhistory.so\s+\w+.*$" /etc/pam.d/system-auth && sed -ri "/^password\s.+pam_pwhistory.so/{s/pam_pwhistory.so\s+\w+.*$/pam_pwhistory.so remember=${VAR_PASS_REMEMBER} enforce_for_root/;}" /etc/pam.d/system-auth || sed -ri "/^password\s.+pam_pwquality.so/a\password requisite pam_pwhistory.so remember=${VAR_PASS_REMEMBER} enforce_for_root" /etc/pam.d/system-auth echo "[-] 验证查看用户密码复杂性策略设置." if [[ ${VAR_VERIFY_RESULT} == "Y" ]];then grep "^PASS_" /etc/login.defs egrep "pam_pwquality.so | pam_pwhistory.so" /etc/pam.d/system-auth fi
7.系统用户登录失败策略配置 描述: 根据等保要求当用户登录失败时需要及时在一段时间内禁止用户登录,其次是设置终端登录超时时间,在一段时间内没有操作时将会自动退出。
1 2 3 4 5 6 7 8 9 10 11 12 13 14 15 16 17 18 19 20 21 22 23 24 25 26 27 28 29 30 31 32 33 34 35 36 VAR_DEFAULT_HOME=no VAR_USERGROUPS_ENAB=no VAR_LOG_OK_LOGINS=yes VAR_LOGIN_FAIL_COUNT=6 VAR_LOGIN_FAIL_INTERVAL=300 VAR_LOGIN_LOCK_TIME=600 VAR_LOGIN_TIMEOUT=300 echo "[-] 用户登陆安全策略设置." egrep -q "^\s*LOG_OK_LOGINS\s+\S*(\s*#.*)?\s*$" /etc/login.defs && sed -ri "s/^(\s*)LOG_OK_LOGINS\s+\S*(\s*#.*)?\s*$/LOG_OK_LOGINS ${VAR_LOG_OK_LOGINS} /" /etc/login.defs || echo "LOG_OK_LOGINS ${VAR_LOG_OK_LOGINS} " >> /etc/login.defs egrep -q "^\s*DEFAULT_HOME\s+\S*(\s*#.*)?\s*$" /etc/login.defs && sed -ri "s/^(\s*)DEFAULT_HOME\s+\S*(\s*#.*)?\s*$/DEFAULT_HOME ${VAR_DEFAULT_HOME} /" /etc/login.defs || echo "DEFAULT_HOME ${VAR_DEFAULT_HOME} " >> /etc/login.defs egrep -q "^\s*USERGROUPS_ENAB\s+\S*(\s*#.*)?\s*$" /etc/login.defs && sed -ri "s/^(\s*)USERGROUPS_ENAB\s+\S*(\s*#.*)?\s*$/USERGROUPS_ENAB ${VAR_USERGROUPS_ENAB} /" /etc/login.defs || echo "USERGROUPS_ENAB ${VAR_USERGROUPS_ENAB} " >> /etc/login.defs echo "[-] 用户远程连续登录失败10次锁定帐号5分钟包括root账号" if [ ! -f /var/run/faillock ];then mkdir -vp /var/run/faillock;fi sed -ri "s/deny=.+ even_deny_root unlock_time.*$/deny=${VAR_LOGIN_FAIL_COUNT} even_deny_root unlock_time=${VAR_LOGIN_LOCK_TIME} root_unlock_time=${VAR_LOGIN_LOCK_TIME} /g" /etc/pam.d/system-auth sed -ri "s/deny=.+ even_deny_root unlock_time.*$/deny=${VAR_LOGIN_FAIL_COUNT} even_deny_root unlock_time=${VAR_LOGIN_LOCK_TIME} root_unlock_time=${VAR_LOGIN_LOCK_TIME} /g" /etc/pam.d/password-auth echo "[-] 设置登录超时时间为${VAR_LOGIN_TIMEOUT} 秒 " egrep -q "^\s*(export|)\s*TMOUT\S\w+.*$" /etc/profile && sed -ri "s/^\s*(export|)\s*TMOUT.\S\w+.*$/export TMOUT=${VAR_LOGIN_TIMEOUT} \nreadonly TMOUT/" /etc/profile || echo -e "export TMOUT=${VAR_LOGIN_TIMEOUT} \nreadonly TMOUT" >> /etc/profile
8.系统用户su/sudo权限策略配置 描述: 通常情况下我们需要针对用户su与sudo权限配置及其日志记录配置,以防止普通用户通过sudo passwd更改root密码或者使用sudo进行一些风险性操作。
1 2 3 4 5 6 7 8 9 10 11 12 13 14 15 16 17 18 19 20 21 22 23 24 25 26 27 28 29 30 31 32 33 34 35 36 37 38 SU_LOG_FILE=${HISTORYDIR} /su.log SUDO_LOG_FILE=${HISTORYDIR} /sudo.log VAR_SU_WHEEL_ONLY=yes VAR_SU_NAME=SU echo "[-] 将用户切换命令更改名称为 SU 并记录su使用日志" if [ ! -f ${SU_LOG_FILE} ];then touch ${SU_LOG_FILE} ;fi egrep -q "^(\s*)SULOG_FILE\s+\S*(\s*#.*)?\s*$" /etc/login.defs && sed -ri "s/^(\s*)SULOG_FILE\s+\S*(\s*#.*)?\s*$/\SULOG_FILE ${SU_LOG_FILE} /" /etc/login.defs || echo "SULOG_FILE ${SU_LOG_FILE} " >> /etc/login.defs egrep -q "^\s*SU_NAME\s+\S*(\s*#.*)?\s*$" /etc/login.defs && sed -ri "s/^(\s*)SU_NAME\s+\S*(\s*#.*)?\s*$/\SU_NAME ${VAR_SU_NAME} /" /etc/login.defs || echo "SU_NAME ${VAR_SU_NAME} " >> /etc/login.defs echo "[-] 配置指定wheel用户组(成员)使用su命令切换用户 " gpasswd -a ${VAR_USER_NAME} wheel egrep -q "^(\s*)SU_WHEEL_ONLY\s+\S*(\s*#.*)?\s*$" /etc/login.defs && sed -ri "s/^(\s*)SU_WHEEL_ONLY\s+\S*(\s*#.*)?\s*$/\SULOG_FILE ${VAR_SU_WHEEL_ONLY} /" /etc/login.defs || echo "SU_WHEEL_ONLY ${VAR_SU_WHEEL_ONLY} " >> /etc/login.defs egrep -q "^(#)?auth\s.*required\s.*pam_wheel.so.*use_uid.*$" /etc/pam.d/su && sed -ri "/^(#)?auth\s.*required\s.*pam_wheel.so use_uid.*$/{s/^(#)?auth\s.*required\s.*pam_wheel.so use_uid.*$/auth required pam_wheel.so use_uid/;}" /etc/pam.d/su echo "[-] 配置不允许指定用户使用 sudo 修改 root 密码及切换到root" tee /etc/sudoers.d/user <<EOF ${VAR_USER_NAME} ALL=(root) !/bin/su,!/bin/bash,!/usr/sbin/visudo,!/usr/bin/passwd,!/usr/bin/passwd [A-Za-z]*,!/usr/bin/chattr,!/usr/bin/vi /etc/sudoers*,!/usr/bin/vim /etc/sudoers*,!/usr/bin/nano /etc/sudoers*,!/usr/bin/sudo -iEOF echo "[-] 配置记录用户使用 sudo 权限日志" egrep -q "^(#)?Defaults\s+*logfile.*$" /etc/sudoers && sed -ri "s|^(#)?Defaults\s+*logfile.*$|\Defaults logfile=${SUDO_LOG_FILE} |" /etc/sudoers || echo "Defaults logfile=${SUDO_LOG_FILE} " >> /etc/sudoers egrep -q "^(#)?local2.debug.*sudo.*$" /etc/rsyslog.conf && sed -r "s|^(#)?local2.debug.*sudo.*$|local2.debug -${SUDO_LOG_FILE} |" /etc/rsyslog.conf || echo "local2.debug -${SUDO_LOG_FILE} " >> /etc/rsyslog.conf visudo -c && systemctl restart rsyslog
执行效果:1 2 3 4 5 6 7 8 9 [kylin@kylinOS-Security ~]$ sudo -i [sudo] kylin 的密码: 对不起,用户 kylin 无权以 root 的身份在 kylinOS-Security 上执行 /bin/bash。 [kylin@kylinOS-Security ~]$ sudo -s [sudo] kylin 的密码: 对不起,用户 kylin 无权以 root 的身份在 kylinOS-Security 上执行 /bin/bash。 [kylin@kylinOS-Security ~]$ sudo su - root [sudo] kylin 的密码: 对不起,用户 kylin 无权以 root 的身份在 kylinOS-Security 上执行 /usr/bin/su - root。
8.系统文件权限策略配置 描述: 我们需要针对系统某些重要的文件或者目录进行系统用户权限与文件目录创建权限策略设置。
1 2 3 4 5 6 7 8 9 10 11 12 13 14 15 VAR_UMASK=022 echo "[-] 配置用户 umask 为 022." egrep -q "^\s*umask\s+\w+.*$" /etc/profile && sed -ri "s/^\s*umask\s+\w+.*$/umask ${VAR_UMASK} /" /etc/profile || echo "umask ${VAR_UMASK} " >> /etc/profile egrep -q "^\s*(umask|UMASK)\s+\w+.*$" /etc/login.defs && sed -ri "s/^\s*(umask|UMASK)\s+\w+.*$/UMASK ${VAR_UMASK} /" /etc/login.defs || echo "UMASK ${VAR_UMASK:=0022} " >> /etc/login.defs echo "[-] 设置/恢复重要目录和文件的权限." touch /etc/security/opasswd && chown root:root /etc/security/opasswd && chmod 600 /etc/security/opasswd find /home -name authorized_keys -exec chmod 600 {} \; chmod 600 ~/.ssh/authorized_keys chmod 0600 /etc/ssh/sshd_config chmod 644 /etc/group /etc/services chmod 700 /etc/inetd.conf&>/dev/null 2&>/dev/null; chmod 755 /etc /etc/passwd /etc/shadow /etc/security /etc/rc*.d
9.系统grub引导安全策略配置 描述: 我们可根据需要针对系统进行 GRUB 安全设置,以防止物理接触从grub菜单中修改系统密码。
1 2 3 4 5 6 7 8 9 10 11 12 13 14 15 16 17 18 19 20 21 22 23 24 25 26 27 28 29 30 31 32 33 34 35 36 37 38 VAR_RUNDATE=$(date +%Y%m%d-%s) BACKUPDIR=/var/log /.backup/${VAR_RUNDATE} mkdir -vp ${BACKUPDIR} echo "[-] 系统 GRUB 安全设置 (防止物理接触从grub菜单中修改密码), 缺省密码为 【WeiyiGeek】" cp -a /etc/grub.d/00_header ${BACKUPDIR} cp -a /etc/grub.d/10_linux ${BACKUPDIR} sed -i -e 's|set timeout_style=${style}|#set timeout_style=${style}|g' -e 's|set timeout=${timeout}|set timeout=3|g' /etc/grub.d/00_header tee -a /etc/grub.d/00_header <<'END' cat <<'EOF' set superusers="grub" password_pbkdf2 grub grub.pbkdf2.sha512.10000.21AC9CEF61B96972BF6F918D2037EFBEB8280001045ED32DFDDCC260591CC6BC8957CF25A6755904A7053E97940A9E4CD5C1EF833C1651C1BCF09D899BED4C7C.9691521F5BB34CD8AEFCED85F4B830A86EC93B61A31885BCBE3FEE927D54EFDEE69FA8B51DBC00FCBDB618D4082BC22B2B6BA4161C7E6B990C4E5CFC9E9748D7 EOF END sed -i '/echo "$title" | grub_quote/ { s/menuentry /menuentry --user=grub /;}' /etc/grub.d/10_linux sed -i '/echo "$os" | grub_quote/ { s/menuentry /menuentry --unrestricted /;}' /etc/grub.d/10_linux update-grub
10.系统用户历史命令记录策略配置 描述: 在运维安全中除了通过堡垒机来记录用户执行的命令,同时我们也可以使用主机进行记录用户执行命令的时间以及命令。
1 2 3 4 5 6 7 8 9 10 11 12 13 14 15 16 17 18 19 20 21 22 23 24 VAR_HISTSIZE=128 echo "[-] 用户终端执行的历史命令记录." egrep -q "^HISTSIZE\W\w+.*$" /etc/profile && sed -ri "s/^HISTSIZE\W\w+.*$/HISTSIZE=${VAR_HISTSIZE} /" /etc/profile || echo "HISTSIZE=${VAR_HISTSIZE} " >> /etc/profile echo .tee /etc/profile.d/history -record.sh <<'EOF' LOGTIME=$(date +%Y%m%d-%H-%M-%S) export HISTFILE="/var/log/.history/${USER} .${LOGTIME} .history" if [ ! -f ${HISTFILE} ];then touch ${HISTFILE} fi chmod 600 ${HISTFILE} HISTFILESIZE=128 HISTTIMEFORMAT="%F_%T $(whoami) #$(who -u am i 2>/dev/null| awk '{print $NF}'|sed -e 's/[() ]//g'):" EOF chmod a+x /etc/profile.d/history -record.sh source /etc/profile.d/history -record.sh
执行效果:1 2 3 [kylin@kylinOS-Security ~]$ history 1 2023-04-27_14:31:09 kylin 2 2023-04-27_14:31:25 kylin
11.系统安全日志事件记录策略配置 描述: 根据等保要求,我们需要针对系统进行配置记录检查安全日志事件策略。
1 2 3 4 5 6 7 8 9 10 11 12 13 14 15 16 17 echo "[-] 系统安全事件策略配置." grep -q "kern.debug;daemon.notice" /etc/rsyslog.conf if [ $? -ne 0 ];then tee -a /etc/rsyslog.conf <<EOF *.err;kern.debug;daemon.notice /var/log /adm EOF fi grep -q "authpriv.*" /etc/rsyslog.conf if [ $? -ne 0 ];then tee -a /etc/rsyslog.conf <<EOF authpriv.* /var/log /secure EOF fi
12.系统审计规则安全策略配置 描述: 根据等保要求我们需要开启系统审计规则安全策略,并且设置对指定文件进行审计。
1 2 3 4 5 6 7 8 9 10 11 12 13 14 15 16 17 18 19 20 21 22 23 24 25 26 27 28 echo "[-] 系统审计规则安全策略配置." echo "[-] 在内核中启用 audit 审计服务" if [ -f /etc/grub2.cfg ];then sed -i "s#audit=0#audit=1#" /etc/grub2.cfg fi if [ -f /etc/grub2-efi.cfg ];then sed -i "s#audit=0#audit=1#" /etc/grub2-efi.cfg fi grub2-set-default 0 systemctl status auditd.service | grep "Active: active" if [ $? != 0 ];then systemctl start auditd.service systemctl enable auditd.service systemctl mask fauditd.servicee >/dev/null 2>&1 fi echo "[-] 设置 audit 审计规则" auditctl -w /etc/passwd -k file auditctl -w /etc/shadow -k file auditctl -w /etc/group -k file auditctl -w /etc/sudoers -k file auditctl -a exit ,always -F arch=b64 -S execve -F uid=0
13.配置禁用系统非必须别名策略 描述: 禁用系统非必须别名可减少攻击面。
1 2 3 4 5 6 7 8 9 10 11 12 13 14 15 16 17 18 19 20 21 echo "[-] 禁用系统不必要的别名策略设置." if [ -f /etc/aliases ]; then cp -a /etc/aliases ${BACKUPDIR} sed -ri -e "s/^games/#games/" /etc/aliases sed -ri -e "s/^ingres/#ingres/" /etc/aliases sed -ri -e "s/^system/#system/" /etc/aliases sed -ri -e "s/^toor/#toor/" /etc/aliases sed -ri -e "s/^uucp/#uucp/" /etc/aliases sed -ri -e "s/^manager/#manager/" /etc/aliases sed -ri -e "s/^dumper/#dumper/" /etc/aliases sed -ri -e "s/^operator/#operator/" /etc/aliases sed -ri -e "s/^decode/#decode/" /etc/aliases sed -ri -e "s/^operator/#operator/" /etc/aliases sed -ri -e "s/^root/#operator/" /etc/aliases fi echo "[-] 禁用邮件服务系统不必要的别名策略设置." if [ -f /etc/mail/aliases ]; then cp -a /etc/mail/aliases ${BACKUPDIR} sed -ri -e "s/^games/#games/" -e "s/^ingres/#ingres/" -e "s/^system/#system/" -e "s/^toor/#toor/" -e "s/^uucp/#uucp/" -e "s/^manager/#manager/" -e "s/^dumper/#dumper/" -e "s/^operator/#operator/" -e "s/^decode/#decode/" -e "s/^operator/#operator/" -e "s/^root/#operator/" /etc/mail/aliases fi
14.配置禁用桌面系统策略 描述:如果你的KylinOS安装了服务器界面化请执行如下脚本片段。1 2 3 4 5 6 7 8 9 10 11 gsettings list-schemas if [ $? -eq 0 ];then echo "[-] 禁用 ctrl+alt+del 组合键" gsettings set org.mate.SettingsDaemon.plugins.media-keys logout '' echo "[-] 配置定时自动屏幕锁定(适用于具备图形界面的设备)单位分钟" gsettings set org.mate.session idle-delay 10 echo "[-] 配置定时自动屏幕锁定(适用于具备图形界面的设备)" gsettings set org.ukui.screensaver mode blank-only fi
15.配置禁用Ctrl+Alt+Del重启系统 描述: 为了防止运维人员执行 Ctrl+Alt+Del 误操作对系统进行重启,我们需要禁用该快捷键
1 2 3 4 5 6 7 8 9 10 11 12 VAR_RUNDATE=$(date +%Y%m%d-%s) BACKUPDIR=/var/log /.backup/${VAR_RUNDATE} echo "[-] 禁用控制台 Ctrl+Alt+Del 组合键重启." if [ -f /usr/lib/systemd/system/ctrl-alt-del.target ];then systemctl stop ctrl-alt-del.target systemctl mask ctrl-alt-del.target >/dev/null 2>&1 sed -i 's/^#CtrlAltDelBurstAction=.*/CtrlAltDelBurstAction=none/' /etc/systemd/system.conf mv /usr/lib/systemd/system/ctrl-alt-del.target ${BACKUPDIR} /ctrl-alt-del.target.bak fi
16.配置rm删除回收站策略 描述: 为了防止运维人员从删除到跑路,我们需要针对rm -rf 做一个别名设置,以防止误删除并可以及时恢复误删除的数据。
1 2 3 4 5 6 7 8 9 10 11 12 13 14 15 16 17 18 19 20 21 22 23 24 25 26 27 28 29 30 31 32 33 34 35 36 37 38 39 40 41 echo "[-] 设置文件删除回收站别名(防止误删文件)" tee -a /etc/bashrc <<'EOF' alias rm="sh /usr/local/bin/remove.sh" EOF tee /etc/profile.d/alias.sh <<'EOF' alias rm="sh /usr/local/bin/remove.sh" EOF tee /usr/local /bin/remove.sh <<'EOF' #!/bin/sh trash="/.trash" deltime=$(date +%Y%m%d-%H-%M-%S) TRASH_DIR="${HOME} ${trash} /${deltime} " if [ ! -e ${TRASH_DIR} ];then mkdir -p ${TRASH_DIR} fi for i in $*;do if [ "$i " = "-rf" ];then continue ;fi if [ "$i " = "/" ];then echo '# Danger delete command, Not delete / directory!' ;exit -1;fi STAMP=$(date +%s) fileName=$(basename $i ) mv $i ${TRASH_DIR} /${fileName} .${STAMP} done EOF sudo chmod a+x /usr/local /bin/remove.sh /etc/profile.d/alias.sh source /etc/profile.d/alias.sh
17.配置清除临时文件策略 描述: 在初始化、内核优化与安全配置完成后,我们选择删除安全加固过程临时文件清理为基线镜像做准备。
1 2 3 4 5 6 7 8 9 10 11 12 13 14 15 16 17 18 19 20 21 22 23 24 25 26 27 28 29 30 31 32 33 34 35 36 37 38 39 40 41 42 43 44 45 46 47 48 49 VAR_VERIFY_RESULT=Y VAR_VERIFY_TIMEOUT=8 HISTORYDIR=/var/log /.history if [ ! -e $HISTORYDIR ];then mkdir -vp ${HISTORYDIR} > /dev/null 2>&1; chmod -R 1777 ${HISTORYDIR} ; chattr -R +a ${HISTORYDIR} ;fi chattr -R -a ${HISTORYDIR} echo "[-] 删除潜在威胁文件" find / -maxdepth 3 -name hosts.equiv | xargs rm -rf find / -maxdepth 3 -name equiv | xargs rm -rf find / -maxdepth 3 -name .netrc | xargs rm -rf find / -maxdepth 3 -name .rhosts | xargs rm -rf find / -maxdepth 3 -name rhosts | xargs rm -rf echo "[-] 清理安装软件缓存" dnf autoremove -y yum clean all echo "[-] 清理备份与缓存文件目录" find /var/cache/fontconfig -type f -delete find /var/backups -type f -delete echo "[-] 清理应用日志缓存文件即临时目录" find /var/log / -name "*.log-*" -type f -delete find /var/log / -name "*.log.*" -type f -delete find /var/log / -name "*-*" -type f -delete find /var/log -name "vmware-*.*.log" -name "*.log-*" -name "*.gz" -name "*log.*" -delete find /var/log -type f -name "*log" -exec truncate -s 0 {} \; find /tmp/* -delete echo "[-] 清理系统回收站" find ~/.trash/* -delete find /home/ -type d -name .trash -exec find {} -delete \; find /opt/security/* -delete echo "[-] 清理命令行历史命令" history -cchattr -R +a ${HISTORYDIR}
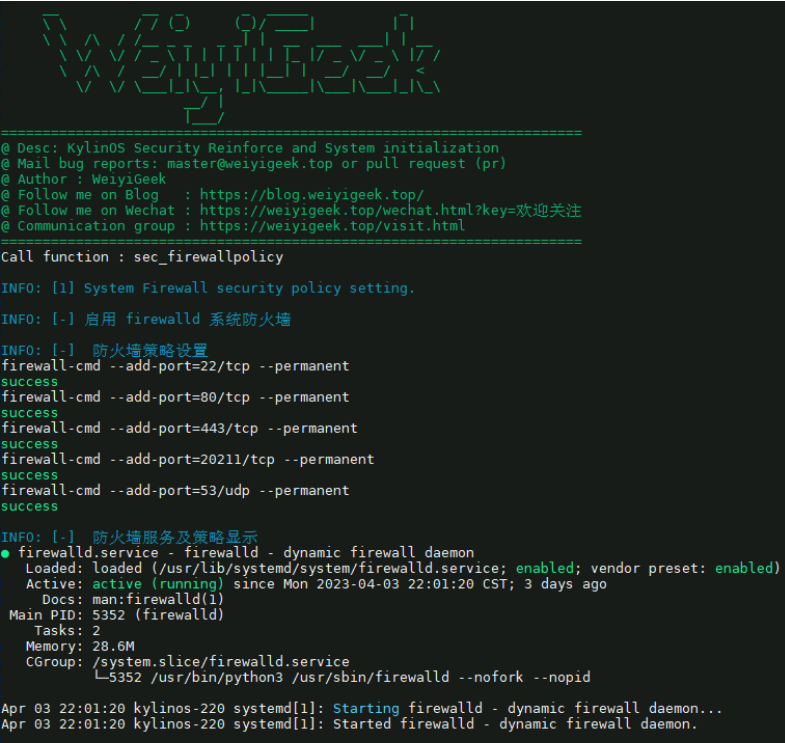
18.配置系统防火墙策略 描述: 根据运维经验以及等保要求来说,我们都需要进行系统防火墙的配置以保证系统及应用安全。
1 2 3 4 5 6 7 8 9 10 11 12 13 14 15 16 17 18 19 20 VAR_ALLOW_PORT=("22/tcp 80/tcp 443/tcp ${VAR_SSHD_PORT} /tcp 53/udp" ) echo "[-] 启用 firewalld 系统防火墙" firewall-cmd --state | grep -q "running" if [ $? != 0 ];then systemctl start firewalld.service systemctl enable firewalld.service systemctl mask firewalld.servicee >/dev/null 2>&1 firewall-cmd --state fi echo "[-] 防火墙策略设置" for port in ${VAR_ALLOW_PORT[@]} ;do echo "firewall-cmd --add-port=${port} --permanent" firewall-cmd --add-port=${port} --permanent done echo "[-] 防火墙服务及策略显示" systemctl status firewalld.service --no-pager
执行效果:
weiyigeek.top-配置系统防火墙策略图
19.配置重启服务器策略 描述: 在初始化、内核优化与安全配置完成后,我们选择是否进行重启或者关闭服务器(建议重启)。
1 2 3 4 5 6 7 echo "[-] 选择重启或者关闭服务器, 注意默认需要等待1分钟." read -t ${VAR_VERIFY_TIMEOUT} -p "Please input,Do you want to restart (Y) or shut down (N) the server. (Y/N) : " VERIFYif [[ ${VERIFY:="Y"} == "N" || ${VERIFY:="y"} == "n" ]];then shutdown --poweroff --no-wall else shutdown --reboot --no-wall fi
0x04 应用安全配置 1.FTP服务安全权限策略设置 1 2 3 4 5 6 7 8 9 10 11 12 13 14 15 16 17 18 echo "[-]系统中ftp相关服务权限策略设置." if [[ -f /etc/ftpaccess ]];then egrep -q "^\s*class all real.*$" /etc/ftpaccess && sed -ri "s/^\s*class all real.*$/#class all real,guest,anonymous */" /etc/ftpaccess || echo "# class all real,guest,anonymous *" >> /etc/ftpaccess if [[ $(grep -wc root /etc/ftpusers) -eq 1 ]];then log ::warning "[-] 请手动禁止 root 登录 WU-FTP." fi fi if [[ -f /etc/vsftpd.conf ]];then egrep -q "^\s*anonymous_enable.*$" /etc/vsftpd.conf && sed -ri "s/^\s*anonymous_enable.*$/anonymous_enable=NO/" /etc/vsftpd.conf || echo "anonymous_enable=NO" >> /etc/vsftpd.conf if [[ $(grep -wc root /etc/vsftpd/ftpusers) -eq 1 ]] || [[ $(grep -wc root /etc/vsftpd/user_list) -eq 1 ]];then log ::warning "[-] 请手动禁止 root 登录 VSFTP." fi fi
至此,安全加固实践完毕!
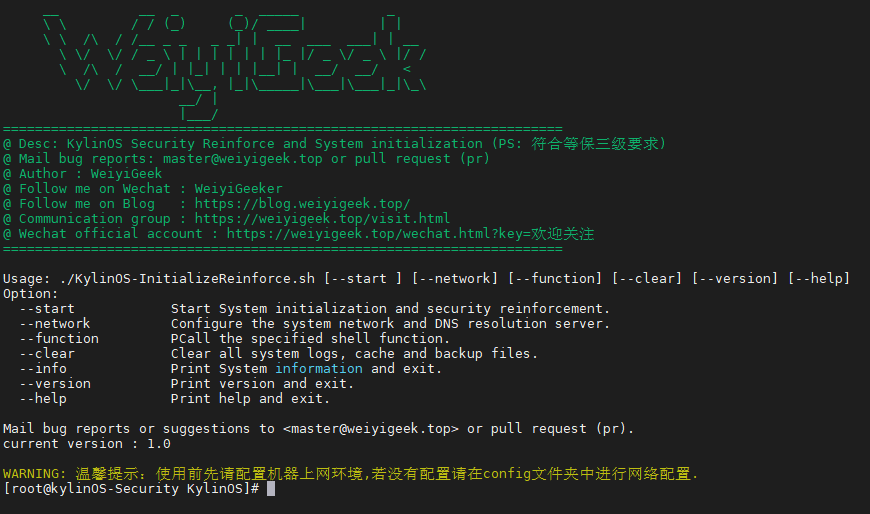
若需要 KylinOS V10 SP3 初始化及安全加固脚本或者复制本章中脚本代码的朋友,请在【全栈工程师修炼指南】公众号中回复【kylinos安全脚本付费】关键字获取对应脚本。
1 2 3 4 5 6 7 8 9 10 11 12 13 14 15 16 17 18 19 20 21 22 23 24 25 26 27 28 29 30 31 32 33 $ ./KylinOS-InitializeReinforce.sh __ __ _ _ _____ _ \ \ / / (_) (_)/ ____| | | \ \ /\ / /__ _ _ _ _| | __ ___ ___| | __ \ \/ \/ / _ \ | | | | | | |_ |/ _ \/ _ \ |/ / \ /\ / __/ | |_| | | |__| | __/ __/ < \/ \/ \___|_|\__, |_|\_____|\___|\___|_|\_\ __/ | |___/ ====================================================================== @ Desc: KylinOS Security Reinforce and System initialization (PS: 符合等保三级要求) @ Mail bug reports: master@weiyigeek.top or pull request (pr) @ Author : WeiyiGeek @ Follow me on Wechat : WeiyiGeeker @ Follow me on Blog : https://blog.weiyigeek.top/ @ Communication group : https://weiyigeek.top/visit.html @ Wechat official account : https://weiyigeek.top/wechat.html?key=欢迎关注 ====================================================================== Usage: ./KylinOS-InitializeReinforce.sh [--start] [--network] [--function ] [--clear] [--version] [--help ] Option: --start Start System initialization and security reinforcement. --network Configure the system network and DNS resolution server. --function PCall the specified shell function . --clear Clear all system logs, cache and backup files. --info Print System information and exit . --version Print version and exit . --help Print help and exit . Mail bug reports or suggestions to <master@weiyigeek.top> or pull request (pr). current version : 1.0 WARNING: 温馨提示:使用前先请配置机器上网环境,若没有配置请在config文件夹中进行网络配置.
weiyigeek.top-安全加固脚本图

