[TOC]
0x00 Cobbler安装原版Windows10需求
需求:采用Cobbler批量分发安装Windows10(官方原版未封装过)并默认进入审核模式;
1. 环境准备
- 1.COBBLER无人值守批量安装系统(参看我前面的文章)
- 2.Windows ADK 下载与安装(两个工具都必须下载)
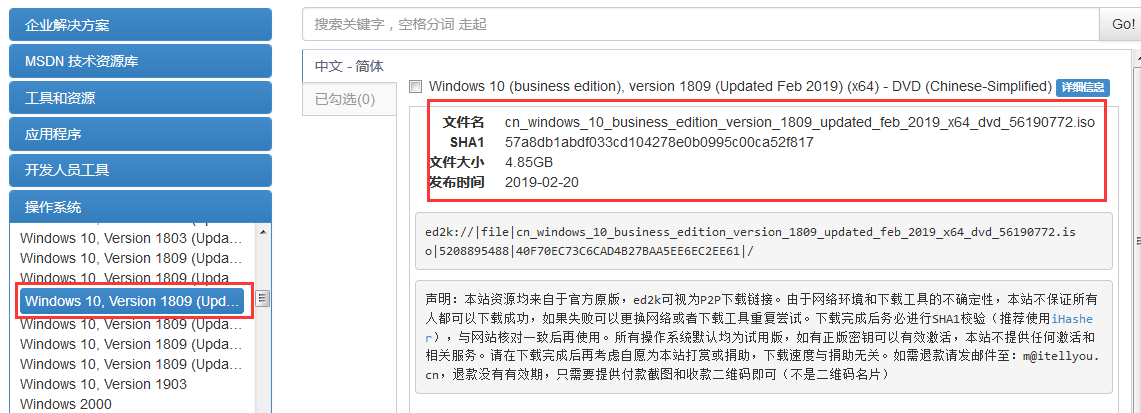
- 3.Windows 10 专业版下载(version 1903 (x64) - DVD (Chinese-Simplified)

[TOC]
需求:采用Cobbler批量分发安装Windows10(官方原版未封装过)并默认进入审核模式;
[TOC]
需求:采用Cobbler批量分发安装Windows10(官方原版未封装过)并默认进入审核模式;
1 | OS 名称: Microsoft Windows 10 专业版 |
weiyigeek.top-Windows10
Liunx配置:
环境:CentOS Linux release 7.6.1810 (Core) 3.10.0-957.12.2.el7.x86_641
2
3
4
5
6
7
8
9
10
11
12
13
14
15
16
17
18
19
20
21
22
23
24
25
26
27
28
29
30
31
32
33
34
35
36
37
38
39
40#!/bin/bash
#Desc:Centos7安装后初始化脚本
# 根据自己的环境自定义 (采用两块网卡 - 一块连接外网下载应用 - 一块用于开启DHCP服务于TFTP)
echo -e "\n############################\n#网卡配置\n####################################\n"
sed -i 's/ONBOOT=no/ONBOOT=yes/g' /etc/sysconfig/network-scripts/ifcfg-ens192
sed -i 's/BOOTPROTO=dhcp/BOOTPROTO=static/g' /etc/sysconfig/network-scripts/ifcfg-ens192
cat >> /etc/sysconfig/network-scripts/ifcfg-ens192 <<EOF
echo IPADDR=192.168.1.99
echo NETMASK=255.255.255.0
EOF
service network restart
echo nameserver 114.114.114.114 >> /etc/resolv.conf
echo "--[网卡配置结束]--"
echo -e "\n############################\n#SSH服务配置\n####################################\n"
sed -i 's/#PermitRootLogin/PermitRootLogin/g' /etc/ssh/sshd_config
systemctl restart sshd
echo "--[SSH服务配置结束]--"
# 自定义完毕
echo -e "\n############################\n#采用阿里YUM源调换系统YUM源\n####################################\n"
curl -o /etc/yum.repos.d/CentOS-Base.repo http://mirrors.aliyun.com/repo/Centos-7.repo
curl -o /etc/yum.repos.d/CentOS-epel.repo http://mirrors.aliyun.com/repo/epel-7.repo
yum clean all
yum makecache
yum update -y && yum upgrade -y && yum -y install epel*
echo "--[YUM替换更新应用软件完成]--"
echo -e "\n############################\n#安装常用的运维软件\n####################################\n"
yum install -y nano vim net-tools tree wget
echo "--[安装安装完成]--"
echo -e "\n############################\n#安装COBBLER及其依赖\n####################################\n"
yum -y install xinetd syslinux dhcp tftp-server httpd rsync samba
install -y python-pip && pip install -U pip
yum -y install cobbler cobbler-web pykickstart
wget https://github.com/WeiyiGeek/Study-Promgram/Linux%E8%BF%90%E7%BB%B4%E8%BF%9B%E9%98%B6/Linux/Cobbler/Cobbler_init.sh -O /tmp/
chmod +x /tmp/Cobbler_init.sh && /tmp/Cobbler_init.sh
echo "--[安装完毕]--"
Windows ADK
描述:Windows 评估和部署工具包 (Windows ADK) 具有自定义大规模部署的 Windows 映像以及测试系统、添加的组件和在该系统上运行的应用程序的质量和性能所需的工具。 weiyigeek.top-other-ADK
下载地址:https://docs.microsoft.com/zh-cn/windows-hardware/get-started/adk-install#winADK (可以下载到其他版本ADK)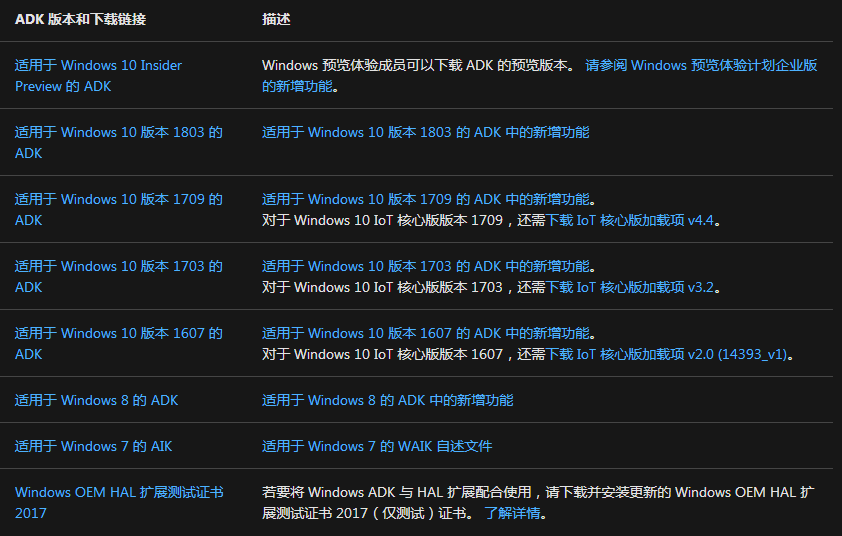
Windows ADK 包括:
_注意_:
根据需求进行选择: weiyigeek.top-adksetup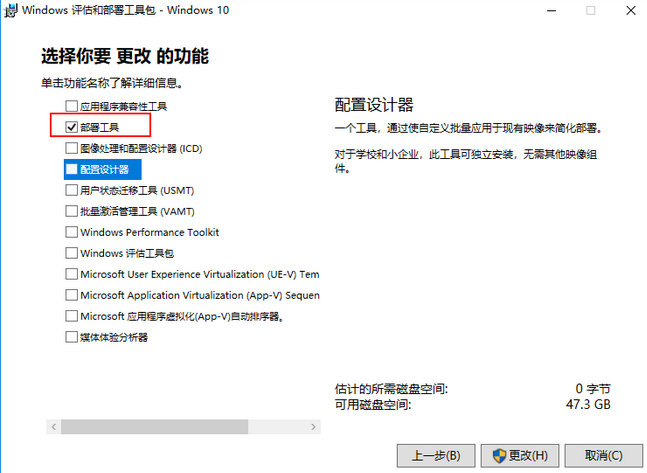
进行预安装环境windows PE: weiyigeek.top-adkwinpe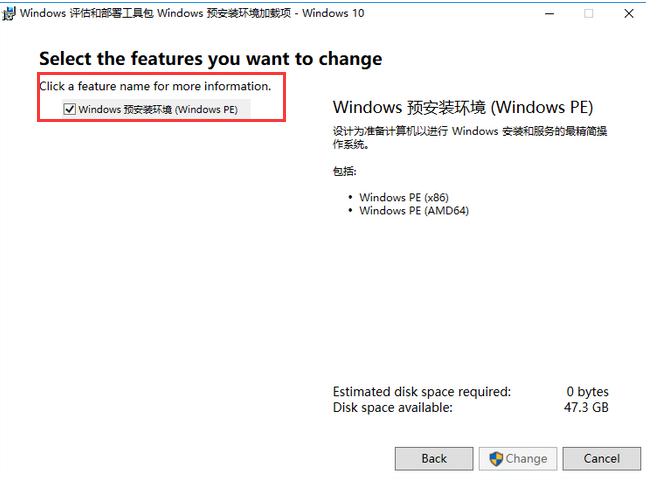
安装完后,以管理员身份打开部署和映像工具环境(执行以下命令): weiyigeek.top-打开部署和映像工具环境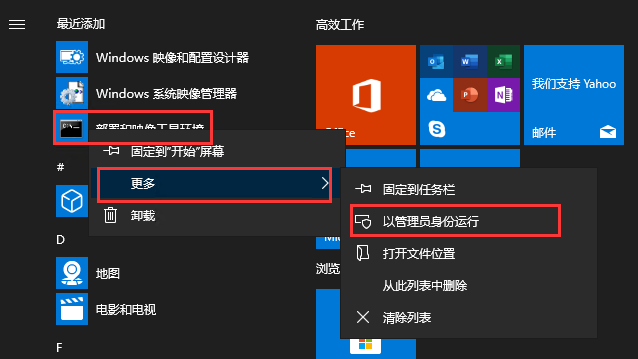
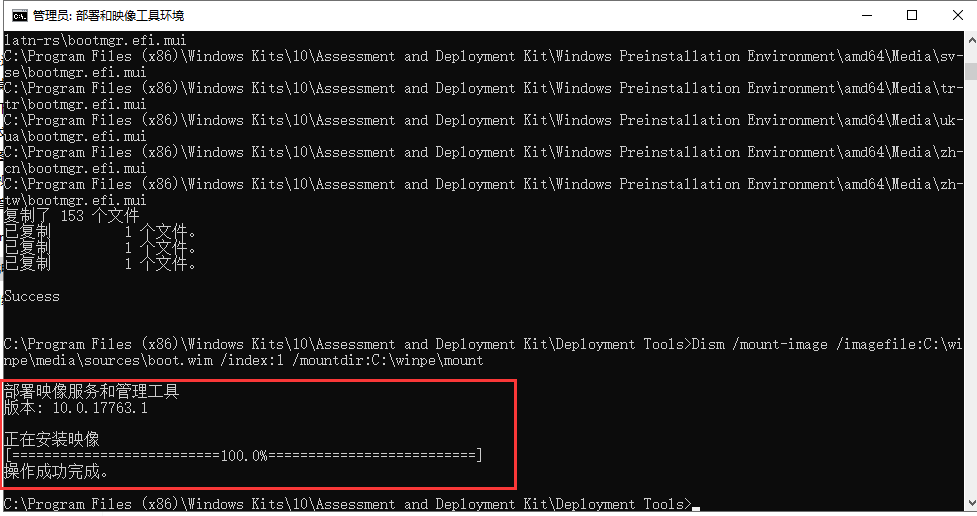
1 | #1.本地生成winpe文件目录 |
提示(TIPS):
2020年7月13日 15:04:08)1 | # startnet.cmd |
使用WinScp 等工具,将 winpe_win10_amd64.iso 上传到 Cobbler 服务器上,同样的三个流程:
1 | #导入ISO镜像 |
安装与修改samba:1
2
3
4
5
6
7
8
9
10
11
12
13
14
15
16
17
18
19
20
21
22
23
24
25
26$yum install -y samba
#修改smb config
$vi /etc/samba/smb.conf
# /etc/samba/smb.conf
[global]
log file = /var/log/samba/log.%m
max log size = 5000
security = user
guest account = nobody
map to guest = Bad User
load printers = yes
cups options = raw
[share]
comment = share directory目录
path = /smb/
directory mask = 0755
create mask = 0755
guest ok=yes
writable=yes
#启动smb服务
service smb start
systemctl enable smb
采用两种方法创建应答文件:
Windows 10 自动化安装应答文件:1
2
3
4
5
6
7
8
9
10
11
12
13
14
15
16
17
18
19
20
21
22
23
24
25
26
27
28
29
30
31
32
33
34
35
36
37
38
39
40
41
42
43
44
45
46
47
48
49
50
51
52
53
54
55
56
57
58
59
60
61
62
63
64
65
66
67
68
69
70
71
72
73
74
75
76
77
78
79
80
81
82
83
84
85
86
87
88
89
90
91
92
93
94
95
96
97
98
99
100
101
102
103
104
105
106
107
108
109
110
111
112
113
114
115
116
117
118
119
120
121
122
123
124
125
126
127
128
129
130
131
132
133
134
135
136
137
138
139
140
141
142
143
144
145
146
147
148
149
150
151
152
153
154
155
156
157
158
159
160
161
162
163
164
165
166
167
168
169
170
171
172
173
174
175
176
177
178
179
180
181
182
183
184
185
186
187
188
189
190
191
192
193
194
195
196
197
198
199
200
201
202
203
204
205
206
207
208
209
210
211
212
213
214
215
216
217
218
219
220
221
222
223
224
225
226
227
228
229
230
231
232
233
234
235
236
237
238
239
240
241
242
243
244
245
246
247
248
249
250
251
252
253
254
255
256
257
258
259
260
261
262
263
264
265
266
267
268
269
270
271
272
273
274
275
276
277
278
279
280
281
282
283
284
285
286
287
288
289
290
291
292
293
294
295
296
297
298
299
300
301
302
303
304
305
306
307
308
309
310
311
312
313
314
315
316
317
318
319
320
321
322
323
324
325
326
327
328
329
330
331
332
333
334
335
336
337
338
339
340
341
342
343
344
345
346<?xml version="1.0" encoding="utf-8"?>
<unattend
xmlns="urn:schemas-microsoft-com:unattend">
<settings pass="windowsPE">
<component name="Microsoft-Windows-International-Core-WinPE" processorArchitecture="x86" publicKeyToken="31bf3856ad364e35" language="neutral" versionScope="nonSxS"
xmlns:wcm="http://schemas.microsoft.com/WMIConfig/2002/State"
xmlns:xsi="http://www.w3.org/2001/XMLSchema-instance">
<SetupUILanguage>
<UILanguage>en-US</UILanguage>
</SetupUILanguage>
<InputLocale>0804:{81D4E9C9-1D3B-41BC-9E6C-4B40BF79E35E}{FA550B04-5AD7-411f-A5AC-CA038EC515D7}</InputLocale>
<SystemLocale>zh-CN</SystemLocale>
<UILanguage>zh-CN</UILanguage>
<UILanguageFallback>zh-CN</UILanguageFallback>
<UserLocale>zh-CN</UserLocale>
</component>
<component name="Microsoft-Windows-International-Core-WinPE" processorArchitecture="amd64" publicKeyToken="31bf3856ad364e35" language="neutral" versionScope="nonSxS"
xmlns:wcm="http://schemas.microsoft.com/WMIConfig/2002/State"
xmlns:xsi="http://www.w3.org/2001/XMLSchema-instance">
<SetupUILanguage>
<UILanguage>en-US</UILanguage>
</SetupUILanguage>
<InputLocale>0804:{81D4E9C9-1D3B-41BC-9E6C-4B40BF79E35E}{FA550B04-5AD7-411f-A5AC-CA038EC515D7}</InputLocale>
<SystemLocale>zh-CN</SystemLocale>
<UILanguage>zh-CN</UILanguage>
<UILanguageFallback>zh-CN</UILanguageFallback>
<UserLocale>zh-CN</UserLocale>
</component>
<component name="Microsoft-Windows-Setup" processorArchitecture="x86" publicKeyToken="31bf3856ad364e35" language="neutral" versionScope="nonSxS"
xmlns:wcm="http://schemas.microsoft.com/WMIConfig/2002/State"
xmlns:xsi="http://www.w3.org/2001/XMLSchema-instance">
<DiskConfiguration>
<Disk wcm:action="add">
<CreatePartitions>
<CreatePartition wcm:action="add">
<Order>1</Order>
<Type>Primary</Type>
<Size>100</Size>
</CreatePartition>
<CreatePartition wcm:action="add">
<Extend>true</Extend>
<Order>2</Order>
<Type>Primary</Type>
</CreatePartition>
</CreatePartitions>
<ModifyPartitions>
<ModifyPartition wcm:action="add">
<Active>true</Active>
<Format>NTFS</Format>
<Label>System Reserved</Label>
<Order>1</Order>
<PartitionID>1</PartitionID>
<TypeID>0x27</TypeID>
</ModifyPartition>
<ModifyPartition wcm:action="add">
<Active>true</Active>
<Format>NTFS</Format>
<Label>OS</Label>
<Letter>C</Letter>
<Order>2</Order>
<PartitionID>2</PartitionID>
</ModifyPartition>
</ModifyPartitions>
<DiskID>0</DiskID>
<WillWipeDisk>true</WillWipeDisk>
</Disk>
</DiskConfiguration>
<ImageInstall>
<OSImage>
<InstallTo>
<DiskID>0</DiskID>
<PartitionID>2</PartitionID>
</InstallTo>
<InstallToAvailablePartition>false</InstallToAvailablePartition>
</OSImage>
</ImageInstall>
<UserData>
<AcceptEula>true</AcceptEula>
<FullName>weiyiegeek</FullName>
<Organization>weiyiegeek</Organization>
<ProductKey>
<Key>VK7JG-NPHTM-C97JM-9MPGT-3V66T</Key>
</ProductKey>
</UserData>
</component>
<component name="Microsoft-Windows-Setup" processorArchitecture="amd64" publicKeyToken="31bf3856ad364e35" language="neutral" versionScope="nonSxS"
xmlns:wcm="http://schemas.microsoft.com/WMIConfig/2002/State"
xmlns:xsi="http://www.w3.org/2001/XMLSchema-instance">
<DiskConfiguration>
<Disk wcm:action="add">
<CreatePartitions>
<CreatePartition wcm:action="add">
<Order>1</Order>
<Type>Primary</Type>
<Size>100</Size>
</CreatePartition>
<CreatePartition wcm:action="add">
<Extend>true</Extend>
<Order>2</Order>
<Type>Primary</Type>
</CreatePartition>
</CreatePartitions>
<ModifyPartitions>
<ModifyPartition wcm:action="add">
<Active>true</Active>
<Format>NTFS</Format>
<Label>System Reserved</Label>
<Order>1</Order>
<PartitionID>1</PartitionID>
<TypeID>0x27</TypeID>
</ModifyPartition>
<ModifyPartition wcm:action="add">
<Active>true</Active>
<Format>NTFS</Format>
<Label>OS</Label>
<Letter>C</Letter>
<Order>2</Order>
<PartitionID>2</PartitionID>
</ModifyPartition>
</ModifyPartitions>
<DiskID>0</DiskID>
<WillWipeDisk>true</WillWipeDisk>
</Disk>
</DiskConfiguration>
<ImageInstall>
<OSImage>
<InstallTo>
<DiskID>0</DiskID>
<PartitionID>2</PartitionID>
</InstallTo>
<InstallToAvailablePartition>false</InstallToAvailablePartition>
</OSImage>
</ImageInstall>
<UserData>
<AcceptEula>true</AcceptEula>
<FullName>weiyiegeek</FullName>
<Organization>weiyiegeek</Organization>
<ProductKey>
<Key>VK7JG-NPHTM-C97JM-9MPGT-3V66T</Key>
</ProductKey>
</UserData>
</component>
</settings>
<settings pass="offlineServicing">
<component name="Microsoft-Windows-LUA-Settings" processorArchitecture="x86" publicKeyToken="31bf3856ad364e35" language="neutral" versionScope="nonSxS"
xmlns:wcm="http://schemas.microsoft.com/WMIConfig/2002/State"
xmlns:xsi="http://www.w3.org/2001/XMLSchema-instance">
<EnableLUA>false</EnableLUA>
</component>
</settings>
<settings pass="offlineServicing">
<component name="Microsoft-Windows-LUA-Settings" processorArchitecture="amd64" publicKeyToken="31bf3856ad364e35" language="neutral" versionScope="nonSxS"
xmlns:wcm="http://schemas.microsoft.com/WMIConfig/2002/State"
xmlns:xsi="http://www.w3.org/2001/XMLSchema-instance">
<EnableLUA>false</EnableLUA>
</component>
</settings>
<settings pass="generalize">
<component name="Microsoft-Windows-Security-SPP" processorArchitecture="x86" publicKeyToken="31bf3856ad364e35" language="neutral" versionScope="nonSxS"
xmlns:wcm="http://schemas.microsoft.com/WMIConfig/2002/State"
xmlns:xsi="http://www.w3.org/2001/XMLSchema-instance">
<SkipRearm>1</SkipRearm>
</component>
</settings>
<settings pass="generalize">
<component name="Microsoft-Windows-Security-SPP" processorArchitecture="amd64" publicKeyToken="31bf3856ad364e35" language="neutral" versionScope="nonSxS"
xmlns:wcm="http://schemas.microsoft.com/WMIConfig/2002/State"
xmlns:xsi="http://www.w3.org/2001/XMLSchema-instance">
<SkipRearm>1</SkipRearm>
</component>
</settings>
<settings pass="specialize">
<component name="Microsoft-Windows-International-Core" processorArchitecture="x86" publicKeyToken="31bf3856ad364e35" language="neutral" versionScope="nonSxS"
xmlns:wcm="http://schemas.microsoft.com/WMIConfig/2002/State"
xmlns:xsi="http://www.w3.org/2001/XMLSchema-instance">
<InputLocale>0804:{81D4E9C9-1D3B-41BC-9E6C-4B40BF79E35E}{FA550B04-5AD7-411f-A5AC-CA038EC515D7}</InputLocale>
<SystemLocale>zh-CN</SystemLocale>
<UILanguage>zh-CN</UILanguage>
<UILanguageFallback>zh-CN</UILanguageFallback>
<UserLocale>zh-CN</UserLocale>
</component>
<component name="Microsoft-Windows-International-Core" processorArchitecture="amd64" publicKeyToken="31bf3856ad364e35" language="neutral" versionScope="nonSxS"
xmlns:wcm="http://schemas.microsoft.com/WMIConfig/2002/State"
xmlns:xsi="http://www.w3.org/2001/XMLSchema-instance">
<InputLocale>0804:{81D4E9C9-1D3B-41BC-9E6C-4B40BF79E35E}{FA550B04-5AD7-411f-A5AC-CA038EC515D7}</InputLocale>
<SystemLocale>zh-CN</SystemLocale>
<UILanguage>zh-CN</UILanguage>
<UILanguageFallback>zh-CN</UILanguageFallback>
<UserLocale>zh-CN</UserLocale>
</component>
<component name="Microsoft-Windows-Security-SPP-UX" processorArchitecture="x86" publicKeyToken="31bf3856ad364e35" language="neutral" versionScope="nonSxS"
xmlns:wcm="http://schemas.microsoft.com/WMIConfig/2002/State"
xmlns:xsi="http://www.w3.org/2001/XMLSchema-instance">
<SkipAutoActivation>true</SkipAutoActivation>
</component>
<component name="Microsoft-Windows-Security-SPP-UX" processorArchitecture="amd64" publicKeyToken="31bf3856ad364e35" language="neutral" versionScope="nonSxS"
xmlns:wcm="http://schemas.microsoft.com/WMIConfig/2002/State"
xmlns:xsi="http://www.w3.org/2001/XMLSchema-instance">
<SkipAutoActivation>true</SkipAutoActivation>
</component>
<component name="Microsoft-Windows-SQMApi" processorArchitecture="x86" publicKeyToken="31bf3856ad364e35" language="neutral" versionScope="nonSxS"
xmlns:wcm="http://schemas.microsoft.com/WMIConfig/2002/State"
xmlns:xsi="http://www.w3.org/2001/XMLSchema-instance">
<CEIPEnabled>0</CEIPEnabled>
</component>
<component name="Microsoft-Windows-SQMApi" processorArchitecture="amd64" publicKeyToken="31bf3856ad364e35" language="neutral" versionScope="nonSxS"
xmlns:wcm="http://schemas.microsoft.com/WMIConfig/2002/State"
xmlns:xsi="http://www.w3.org/2001/XMLSchema-instance">
<CEIPEnabled>0</CEIPEnabled>
</component>
<component name="Microsoft-Windows-Shell-Setup" processorArchitecture="x86" publicKeyToken="31bf3856ad364e35" language="neutral" versionScope="nonSxS"
xmlns:wcm="http://schemas.microsoft.com/WMIConfig/2002/State"
xmlns:xsi="http://www.w3.org/2001/XMLSchema-instance">
<ComputerName>weiyiegeek-PC</ComputerName>
<ProductKey>VK7JG-NPHTM-C97JM-9MPGT-3V66T</ProductKey>
</component>
<component name="Microsoft-Windows-Shell-Setup" processorArchitecture="amd64" publicKeyToken="31bf3856ad364e35" language="neutral" versionScope="nonSxS"
xmlns:wcm="http://schemas.microsoft.com/WMIConfig/2002/State"
xmlns:xsi="http://www.w3.org/2001/XMLSchema-instance">
<ComputerName>weiyiegeek-PC</ComputerName>
<ProductKey>VK7JG-NPHTM-C97JM-9MPGT-3V66T</ProductKey>
</component>
</settings>
<settings pass="oobeSystem">
<component name="Microsoft-Windows-Shell-Setup" processorArchitecture="x86" publicKeyToken="31bf3856ad364e35" language="neutral" versionScope="nonSxS"
xmlns:wcm="http://schemas.microsoft.com/WMIConfig/2002/State"
xmlns:xsi="http://www.w3.org/2001/XMLSchema-instance">
<AutoLogon>
<Password>
<Value></Value>
<PlainText>true</PlainText>
</Password>
<Enabled>true</Enabled>
<Username>weiyiegeek</Username>
</AutoLogon>
<OOBE>
<HideEULAPage>true</HideEULAPage>
<HideOEMRegistrationScreen>true</HideOEMRegistrationScreen>
<HideOnlineAccountScreens>true</HideOnlineAccountScreens>
<HideWirelessSetupInOOBE>true</HideWirelessSetupInOOBE>
<NetworkLocation>Work</NetworkLocation>
<SkipUserOOBE>true</SkipUserOOBE>
<SkipMachineOOBE>true</SkipMachineOOBE>
<ProtectYourPC>1</ProtectYourPC>
</OOBE>
<UserAccounts>
<LocalAccounts>
<LocalAccount wcm:action="add">
<Password>
<Value></Value>
<PlainText>true</PlainText>
</Password>
<Description>PC用户 weiyiegeek</Description>
<DisplayName>weiyiegeek</DisplayName>
<Group>Administrators</Group>
<Name>weiyiegeek</Name>
</LocalAccount>
</LocalAccounts>
</UserAccounts>
<RegisteredOrganization>weiyiegeek</RegisteredOrganization>
<RegisteredOwner>weiyiegeek</RegisteredOwner>
<DisableAutoDaylightTimeSet>false</DisableAutoDaylightTimeSet>
<FirstLogonCommands>
<SynchronousCommand wcm:action="add">
<Description>Control Panel View</Description>
<Order>1</Order>
<CommandLine>reg add "HKEY_CURRENT_USER\Software\Microsoft\Windows\CurrentVersion\Explorer\ControlPanel" /v StartupPage /t REG_DWORD /d 1 /f</CommandLine>
<RequiresUserInput>true</RequiresUserInput>
</SynchronousCommand>
<SynchronousCommand wcm:action="add">
<Order>2</Order>
<Description>Control Panel Icon Size</Description>
<RequiresUserInput>false</RequiresUserInput>
<CommandLine>reg add "HKEY_CURRENT_USER\Software\Microsoft\Windows\CurrentVersion\Explorer\ControlPanel" /v AllItemsIconView /t REG_DWORD /d 0 /f</CommandLine>
</SynchronousCommand>
<SynchronousCommand wcm:action="add">
<Order>3</Order>
<RequiresUserInput>false</RequiresUserInput>
<CommandLine>cmd /C wmic useraccount where name="weiyiegeek" set PasswordExpires=false</CommandLine>
<Description>Password Never Expires</Description>
</SynchronousCommand>
</FirstLogonCommands>
<TimeZone>China Standard Time</TimeZone>
</component>
<component name="Microsoft-Windows-Shell-Setup" processorArchitecture="amd64" publicKeyToken="31bf3856ad364e35" language="neutral" versionScope="nonSxS"
xmlns:wcm="http://schemas.microsoft.com/WMIConfig/2002/State"
xmlns:xsi="http://www.w3.org/2001/XMLSchema-instance">
<AutoLogon>
<Password>
<Value></Value>
<PlainText>true</PlainText>
</Password>
<Enabled>true</Enabled>
<Username>weiyiegeek</Username>
</AutoLogon>
<OOBE>
<HideEULAPage>true</HideEULAPage>
<HideOEMRegistrationScreen>true</HideOEMRegistrationScreen>
<HideOnlineAccountScreens>true</HideOnlineAccountScreens>
<HideWirelessSetupInOOBE>true</HideWirelessSetupInOOBE>
<NetworkLocation>Work</NetworkLocation>
<SkipUserOOBE>true</SkipUserOOBE>
<SkipMachineOOBE>true</SkipMachineOOBE>
<ProtectYourPC>1</ProtectYourPC>
</OOBE>
<UserAccounts>
<LocalAccounts>
<LocalAccount wcm:action="add">
<Password>
<Value></Value>
<PlainText>true</PlainText>
</Password>
<Description>PC用户 weiyiegeek</Description>
<DisplayName>weiyiegeek</DisplayName>
<Group>Administrators</Group>
<Name>weiyiegeek</Name>
</LocalAccount>
</LocalAccounts>
</UserAccounts>
<RegisteredOrganization>weiyiegeek</RegisteredOrganization>
<RegisteredOwner>weiyiegeek</RegisteredOwner>
<DisableAutoDaylightTimeSet>false</DisableAutoDaylightTimeSet>
<FirstLogonCommands>
<SynchronousCommand wcm:action="add">
<Description>Control Panel View</Description>
<Order>1</Order>
<CommandLine>reg add "HKEY_CURRENT_USER\Software\Microsoft\Windows\CurrentVersion\Explorer\ControlPanel" /v StartupPage /t REG_DWORD /d 1 /f</CommandLine>
<RequiresUserInput>true</RequiresUserInput>
</SynchronousCommand>
<SynchronousCommand wcm:action="add">
<Order>2</Order>
<Description>Control Panel Icon Size</Description>
<RequiresUserInput>false</RequiresUserInput>
<CommandLine>reg add "HKEY_CURRENT_USER\Software\Microsoft\Windows\CurrentVersion\Explorer\ControlPanel" /v AllItemsIconView /t REG_DWORD /d 0 /f</CommandLine>
</SynchronousCommand>
<SynchronousCommand wcm:action="add">
<Order>3</Order>
<RequiresUserInput>false</RequiresUserInput>
<CommandLine>cmd /C wmic useraccount where name="weiyiegeek" set PasswordExpires=false</CommandLine>
<Description>Password Never Expires</Description>
</SynchronousCommand>
</FirstLogonCommands>
<TimeZone>China Standard Time</TimeZone>
</component>
</settings>
</unattend>
注意事项:
通过winscp等软件将 cn_windows_10_business_edition_version_1809_updated_sept_2018_x64_dvd_84ac403f.iso 上传到cobbler服务器上,并将创建的应答文件上传到cobbler /smb/win/win10_x64_bios_auto.xml;
1 | $mkdir -p /smb/win |
完成上面的操作后在安装前必须在Cobbler服务器上执行: weiyigeek.top-进入BOIS1
cobbler sync #同步选项
Step1. 新建一台虚拟机进行BIOS设置PXE启动: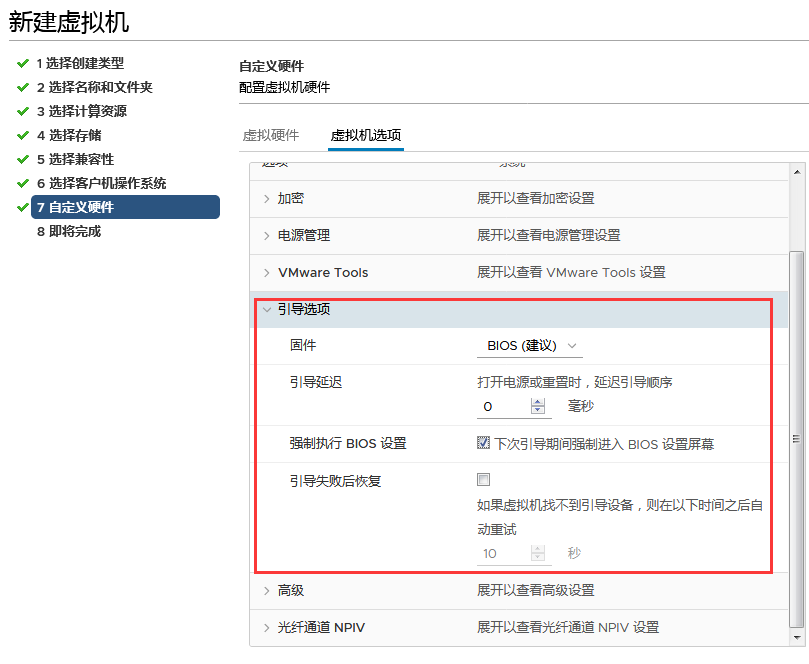
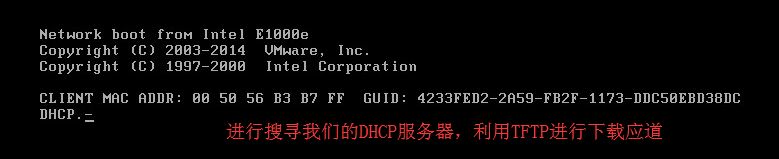
Step2. 进入PXE启动进行我们cobbler服务器传输过来的镜像引导,进行选择我们制作的镜像服务
weiyigeek.top-PXE
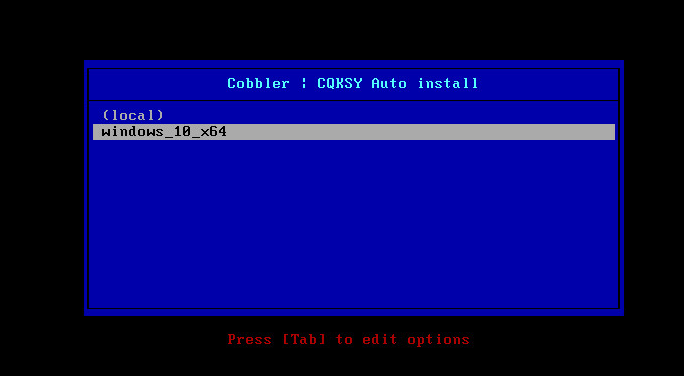
weiyigeek.top-Windows10
Step3. 然后挂载smb共享执行setup.exe来启用安装 weiyigeek.top-smb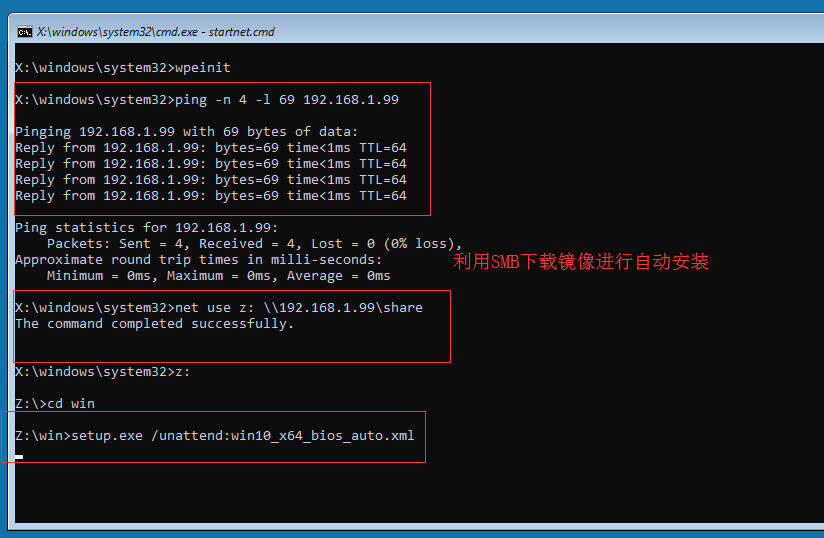
Step4. 运行脚本startnet.cmd脚本 weiyigeek.top-系统安装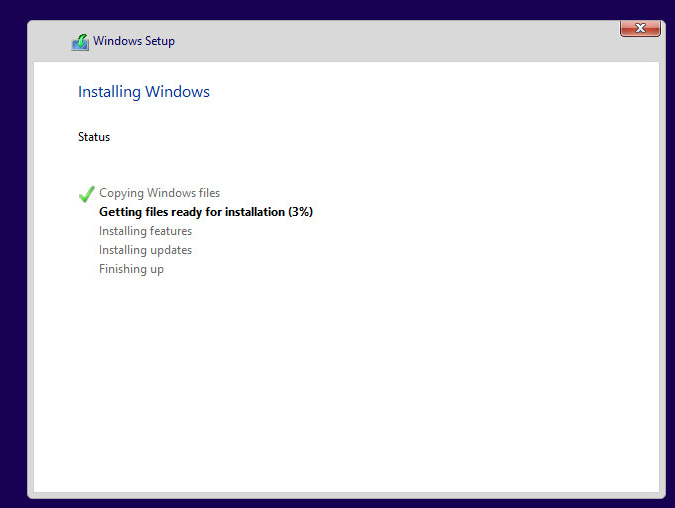
Step4. 等待系统安装完成即可
Win PE的制作微软官方提供有相应的工具,该工具叫做:Windows AIK。
我们需要使用该工具来定制Win PE工具可以从这里下载:
适用于 Windows® 7 的 Windows® 自动安装工具包 (AIK)
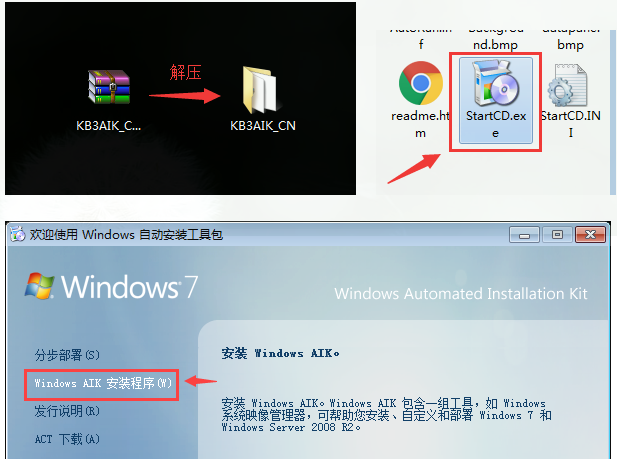
weiyigeek.top-解压安装
安装完毕后,启动该工具来定制Win PE镜像1
2
3
4
5
6
7
8
9
10
11
12
13
14
15
16
17
18#定制Win PE ISO所用命令及相关配置:
copype amd64 C:\winpe
imagex /mountrw c:\winpe\winpe.wim 1 c:\winpe\mount
echo ping -n 7 -l 69 192.168.1.199 >> C:\winpe\mount\Windows\System32\startnet.cmd
echo net use z: \\192.168.1.199\share >> C:\winpe\mount\Windows\System32\startnet.cmd
echo Z: >> C:\winpe\mount\Windows\System32\startnet.cmd
#win是包含windows 7 ISO解压文件的父目录
echo cd win >> C:\winpe\mount\Windows\System32\startnet.cmd
echo setup.exe /unattend:Autounattend.xml >> C:\winpe\mount\Windows\System32\startnet.cmd
imagex /unmount c:\winpe\mount /commit
copy c:\winpe\winpe.wim c:\winpe\ISO\sources\boot.wim
# "-bC"中间没有空格
oscdimg -n -bC:\winpe\etfsboot.com c:\winpe\ISO c:\winpe\winpe_cobbler_amd64.iso
命令解释:1
2
3
4
5
6
7
8
9
10
11
12
13
14
15
16
17#解释一下上面的几行命令:
1:使用copype命令创建C:\winpe目录,并在该目录下生成Win PE预安装所需的文件。
3:使用imagex命令挂载c:\winpe\winpe.wim文件到c:\winpe\mount目录下,以便后续进行修改,因为Windows系统的很多核心文件都被打包压缩在这个文件里面,所以我们需要挂载才能读写修改。除了imagex这个工具可以完成修改之外,另一个工具DIMS也能做到,如果你熟悉该工具,则可以使用DIMS来做。
5-11:修改挂载后的wim文件,向C:\winpe\mount\Windows\System32\startnet.cmd文件中写入一些脚本命令。其中第5行用于测试脚本有无执行可以删去。
剩下的几行是对samba共享文件的加载并执行,具体会在后续第三步samba文件共享那里详细解释。需要注意的是,这里用到的IP地址是我Cobbler Server服务器的地址,具体请根据你自己的服务器地址进行更改。
至于为什么是写入到startnet.cmd文件中,是因为Win PE第一次运行时固定使用 Wpeinit 和 Startnet.cmd 运行启动脚本。
但是对于Wpeinit我多次测试却没有成功过,因此选择将命令脚本写入到startnet.cmd文件中(startnet.cmd是Win PE ISO镜像自带的脚本文件)。
一个问题:写入到脚本中的命令用到了Cobber Server端的IP地址,这个IP地址被硬编码到了Win PE ISO镜像中,一个可行的办法是在这里不直接写入具体命令,而是调用另外一个脚本,这个被掉的脚本可以放在其他地方,以方便后续修改。
13:完成修改后,提交保存修改并去除挂载。
15:拷贝修改后的winpe.wim到指定目录并重命名。
18:生成Win PE ISO镜像工具,路径及名称为C:\winpe\winpe_cobbler_amd64.iso。
1. PXE启动芯片出错代码表、初始化/引导/载入Bootstrap错误代码1
2
3
4
5
6
7
8
9
10
11
12
13
14
15
16
17
18
19
20
21
22
23
24
25
26
27
28
29
30
31
32
33
34
35
36
37
38
39
40
41
42
43
44
45
46
47
48
49
50
51
52
53
54
55
56
57
58
59
60
61
62
63
64
65
66
67
68
69
70
71
72
73
74
75
76
77
78
79
80
81
82
83
84
85
86
87
88
89
90
91
92
93
94
95
96
97
98- PXE-E00:Could not find enough free base memory.PXE主代码和UNDI运行时模块从闪存或上位内存拷贝至基本内存顶部480K(78000h)至640K(A0000h)的剩余空间位置,这段内存必须被系统BIOS填零,如果这些内存没有填零,PXE ROM里的重布置代码将认为这些内存已经被系统BIOS或其它启动ROM占用了。
- PXE-E01:PCI Vendor and Device IDs do not match!
此信息在成品BIOS中不可能出现,当系统BIOS初始化基于PCI的ROM时,它将假设PCI总线/设备/模块(Bus/Device/Function)值已在AX寄存器里通过审核,如果AX寄存器里定义的PCI设备不匹配UNDI设备,将出现此错误代码。
- PXE-E04:Error reading PCI configuration space
如果任何PCI BIOS调用导致PCI设置空间返回错误代码,此信息将出现,此信息将不会在成品BIOS和硬件上出现。
- PXE-E05:EEPROM checksum error
如果网卡EEPROM内容被损坏,将出现此信息。EEPROM内容的损坏通常发生在正在对网卡EEPROM进行编程时系统突然复位(Reset)或掉电的情形下,如果出现此信息,PXE ROM将不执行引导。
- PXE-E06:Option ROM requires DDIM support
此信息将不会在成品BIOS中出现,PCI可选ROM通常必须被设置为DDIM可选ROM(通常必须被安置在读/写上位内存中)
- PXE-E07:PCI BIOS calls not supported
此信息将不会在成品BIOS中出现,PCI BIOS必须有PCI BIOS服务。
- PXE-E08:Unexpected API error.API:xxxxh Status:xxxxh
如果PXE API返回一个运行时加载器(Runtime Loader)预料之外的状态代码,将出现此信息
- PXE-E09:Unexpected UNDI loader error.Status:xxxxh
如果UNDI运行时加载器(Runtime Loader)返回预料之外的状态代码,将出现此信息
_ARP错误代码_
- PXE-E11:ARP timeout PXE ROM 将重试四遍ARP请求,如果无法获取任何有效的ARP答复,将出现此信息,此信息通常源于一些网络和服务设置错误,通常的原因有:
1.在DHCP主服务器上设置了DHCP类标识符(Option 60)却在另一台服务器上安装了ProxyDHCP服务。
2.使用了不响应ARP请求的路由器
_BIOS和BIS错误代码_
* PXE-E20:BIOS extended memory copy error.AH==nn 如果BIOS扩展内存拷贝服务返回一个错误信息,此信息将出现,在成品BIOS中将不会遭遇此信息,代码"nn"为BIOS扩展内存拷贝服务(Int 15h,AH=87h)返回的错误代码。
* PXE-E21:BIS integrity check failed 如果在扩展内存中的BIS映像损坏,则将显示此信息
* PXE-E22:BIS p_w_picpath/credential validation failed 下载的映像和证书不匹配客户端关键字
* PXE-E23:BIS initialization failed BIS无法被初始化,没有更多可用数据
* PXE-E24:BIS shutdown failed BIS无法停止,没有更多可用数据
* PXE-E25:BIS get boot object authorization check flag failed--2 PXE启动芯片出错代码表无法检测BIS已启用/已禁用
* PXE-E26:BIS free memory failed无法释放BIS分配内存
* PXE-E27:BIS get signature information failed请求BIS证书类型信息不能被确定。
* PXE-E28:BIS bad entry structure checksum SM BIOS表中的BIS入口结构无效。
_TFTP/MTFTP错误代码:_
* PXE-E32:TFTP open timeout TFTP"Open"请求没有应答,验证TFTP服务是否正在运行。
* PXE-E35:TFTP read timeout未收到下一个TFTP数据包
* PXE-E36:Error received from TFTP server从TFTP服务器上收到了一个错误的TFTP数据包
* PXE-E38:TFTP cannot open connection当试图送出一个TFTP"Open"包时发生了一个硬件错
* PXE-E39:TFTP cannot read from connection当试图送出一个TFTP应答包时发生了一个硬件错
- PXE-E3A:TFTP too many packages.此信息意味着发生了下列两种情况中的一个:
1.你试图用TFTP下载一个比分配的缓冲区更大的文件
2.你作为一个从(Slave)客户端使用MTFTP开始下载一个文件,而当你变成一个主(Master)客户端时,此文件的大小发生了改变。
* PXE-E3B:TFTP error– File not found请求的文件在TFTP服务器上无法找到。
* PXE-E3C:TFTP error– Access violation已在TFTP服务器上找到了请求的文件,但TFTP服务没有足够的访问权限开启/读取文件。
* PXE-E3F:TFTP packet size is invalid收到的TFTP包大小超过1456bytes BOOTP/DHCP错误代码
* PXE-E51:No DHCP or proxyDHCP offers were received客户端没有收到任何有效的DHCP、BOOTP或proxyDHCP应答。
* PXE-E52:proxyDHCP offers were received.No DHCP offers were received客户端没有收到任何有效的DHCP或BOOTP应答,但客户端收到了至少一个有效的proxyDHCP应答。
* PXE-E53:No boot filename received客户端收到了至少一个有效的DHCP/BOOTP应答,但没有启动文件名可下载。
* PXE-E55:proxyDHCP service did not reply to request on port 4011客户端发出一个proxyDHCP请求到DHCP服务器的4011端口并没有收到回复。
_UNDI错误代码_
* PXE-E60:Invalid UNDI API function number一个被基本代码所使用的API在UNDI ROM中无法执行。
* PXE-E61:Media test failed,check cable网线没有插或没有连接,可能是网线坏、网卡坏或连接问题。
* PXE-E63:Error while initializing the NIC初始化网卡硬件时出现错误,建议换网卡。
* PXE-E64:Error while initializing the PHY试图初始化PHY硬件时出现错误,建议换网卡。
* PXE-E65:Error while reading the configuration data读取网卡设置数据时出现错误,建议换网卡。
* PXE-E66:Error while reading the initialization data读取网卡初始化数据时出现错误,建议换网卡。
* PXE-E67:Invalid MAC address存储在这块网卡中的MAC地址无效,建议换网卡
* PXE-E68:Invalid EEPROM checksum EEPROM校验和错误,EEPROM内容已损坏,建议换网卡
* PXE-E69:Error while setting interrupt无法配置硬件中断,建议换网卡。
_Bootstrap和Discovery错误代码_
* PXE-E74:Bad or missing PXE menu and/or prompt information已检测到PXE标识但启动菜单和/或启动命令提示符标识未发现/不存在
* PXE-E76:Bad or missing multicast discovery address多播创建已启动但多播创建地址标识不符
* PXE-E77:Bad or missing discovery server list多播和广播创建(Discovery)都被禁用,或使用服务器列表启用,但服务器列表标识未发现/不存在
* PXE-E78:Could not locate boot server有效的引导服务器应答未被客户端收到
* PXE-E79:NBP is too big to fit in free base memory NBP太大,超过客户端基本内存容量
* PXE-E7A:Client could not locate asecure server当客户端未从启动服务器收到任何安全信息并且客户端上的BIS已被启用,将显示此信息。
* PXE-E7B:Missing MTFTP server IP address当ROM未收到PXE创建标识或proxyDHCP回应和DHCP SIADDR区域被设置为0.0.0.0,将显示此信息。
_未分类错误代码_
* PXE-EA0:Network boot canceled by keystroke用户在DHCP/创建/TFTP过程中按了"Esc"或"Ctrl C"键
* 基础代码/UNDI Loader错误代码
* PXE-EC1:BaseCode ROM ID structure was not found UNDI引导模块不能发现基础代码ROM ID结构。如果系统中有基础代码ROM映像,它可能已经损坏了
* PXE-EC3:BaseCode ROM ID structure is invalid基础代码ROM ID结构有问题,基础代码ROM映像已经损坏了
* PXE-EC4:UNDI ROM ID structure was not found基础代码载入模块不能在UNDI ROM ID结构中定位
* PXE-EC5:UNDI ROM ID structure is invalid UNDI ROM映像已经损坏了
* PXE-EC6:UNDI driver p_w_picpath is invalid UNDI ROM映像已经损坏了
- PXE-EC8:!PXE structure was not found in UNDI driver code segment UNDI ROM映像已经损坏了,或者未能被BIOS载入,此错误信息通常系如下一个或三个原因所致:
1.当即将调用一个LOM映像的时间点,网卡映像正在被编程进BIOS
2.在PXE可选ROM开始启动之前,PXE可选ROM载入自检内存管理器(POST Memory Manager,$PMM)分配的内存期间被损坏或删除。
3.在载入ROM结构期间UNDI_Loader结构未被正确载入
- PXE-EC9:PXENV structure was not found in UNDI driver code segment UNDI ROM映像可能被损坏了,或未被BIOS载入,此错误信息通常系如下三个原因所致:
1.当即将调用一个LOM映像的时间点,网卡映像正在被编程进BIOS
2.在PXE可选ROM开始启动之前,PXE可选ROM载入自检内存管理器(POST Memory Manager,$PMM)分配的内存期间被损坏或删除。
3.在载入ROM结构期间UNDI_Loader结构未被正确载入。
2. 注意事项
你好看友,欢迎关注博主微信公众号哟! ❤
这将是我持续更新文章的动力源泉,谢谢支持!(๑′ᴗ‵๑)
温馨提示: 未解锁的用户不能粘贴复制文章内容哟!
方式1.请访问本博主的B站【WeiyiGeek】首页关注UP主,
将自动随机获取解锁验证码。
Method 2.Please visit 【My Twitter】. There is an article verification code in the homepage.
方式3.扫一扫下方二维码,关注本站官方公众号
回复:验证码
将获取解锁(有效期7天)本站所有技术文章哟!

@WeiyiGeek - 为了能到远方,脚下的每一步都不能少
欢迎各位志同道合的朋友一起学习交流,如文章有误请在下方留下您宝贵的经验知识,个人邮箱地址【master#weiyigeek.top】或者个人公众号【WeiyiGeek】联系我。
更多文章来源于【WeiyiGeek Blog - 为了能到远方,脚下的每一步都不能少】, 个人首页地址( https://weiyigeek.top )

专栏书写不易,如果您觉得这个专栏还不错的,请给这篇专栏 【点个赞、投个币、收个藏、关个注、转个发、赞个助】,这将对我的肯定,我将持续整理发布更多优质原创文章!。
最后更新时间:
文章原始路径:_posts/系统运维/Linux/系统安装/COBBLER批量安装Windows系统.md
转载注明出处,原文地址:https://blog.weiyigeek.top/2019/5-28-185.html
本站文章内容遵循 知识共享 署名 - 非商业性 - 相同方式共享 4.0 国际协议