[TOC]
0x00 快速入门 命令脑图:
weiyigeek.top-locte与find脑图
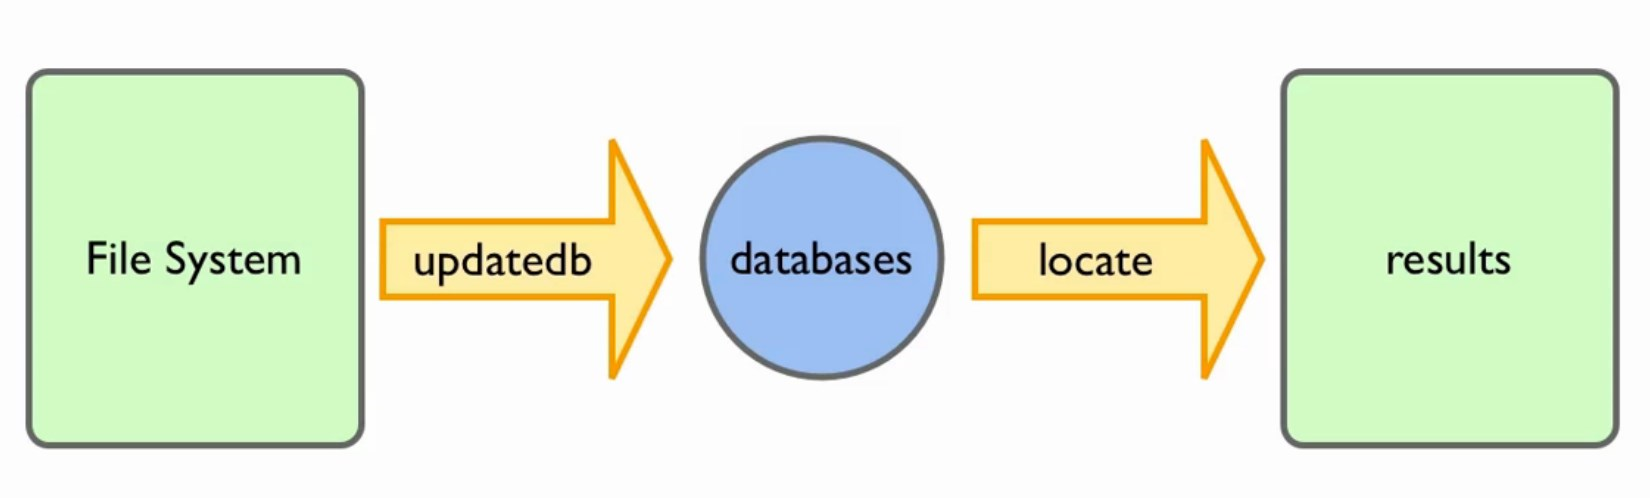
0x01 文件查找 locate 命令 描述:在后台数据库中按文件名搜索,速度更快,通过/var/lib/mlocate内数据库记载找出用户输入的关键字文件名,它的更新速率默认是一天一次,Linux版本的不同名字不同Mac下在/var/db/locate.datebase; 根据距上次更新后更改的文件数目多少,速度不同并且只能通过文件名来搜索
weiyigeek.top-locate查找原理图
基础实例L
[TOC]
0x00 快速入门 命令脑图:
weiyigeek.top-locte与find脑图
0x01 文件查找 locate 命令 描述:在后台数据库中按文件名搜索,速度更快,通过/var/lib/mlocate内数据库记载找出用户输入的关键字文件名,它的更新速率默认是一天一次,Linux版本的不同名字不同Mac下在/var/db/locate.datebase; 根据距上次更新后更改的文件数目多少,速度不同并且只能通过文件名来搜索
weiyigeek.top-locate查找原理图
基础实例L1 2 3 4 5 6 7 8 9 10 11 12 updatedb sudo /usr/libexec/locate.updatedb locate [filename] PRUNE_BIND_MOUNTS = "yes" PRUNEFS = "afs udf" PRUNENAMES = ".git .hg" PRUNEPATHS = "/afs /tmp"
weiyigeek.top-设置搜寻参数
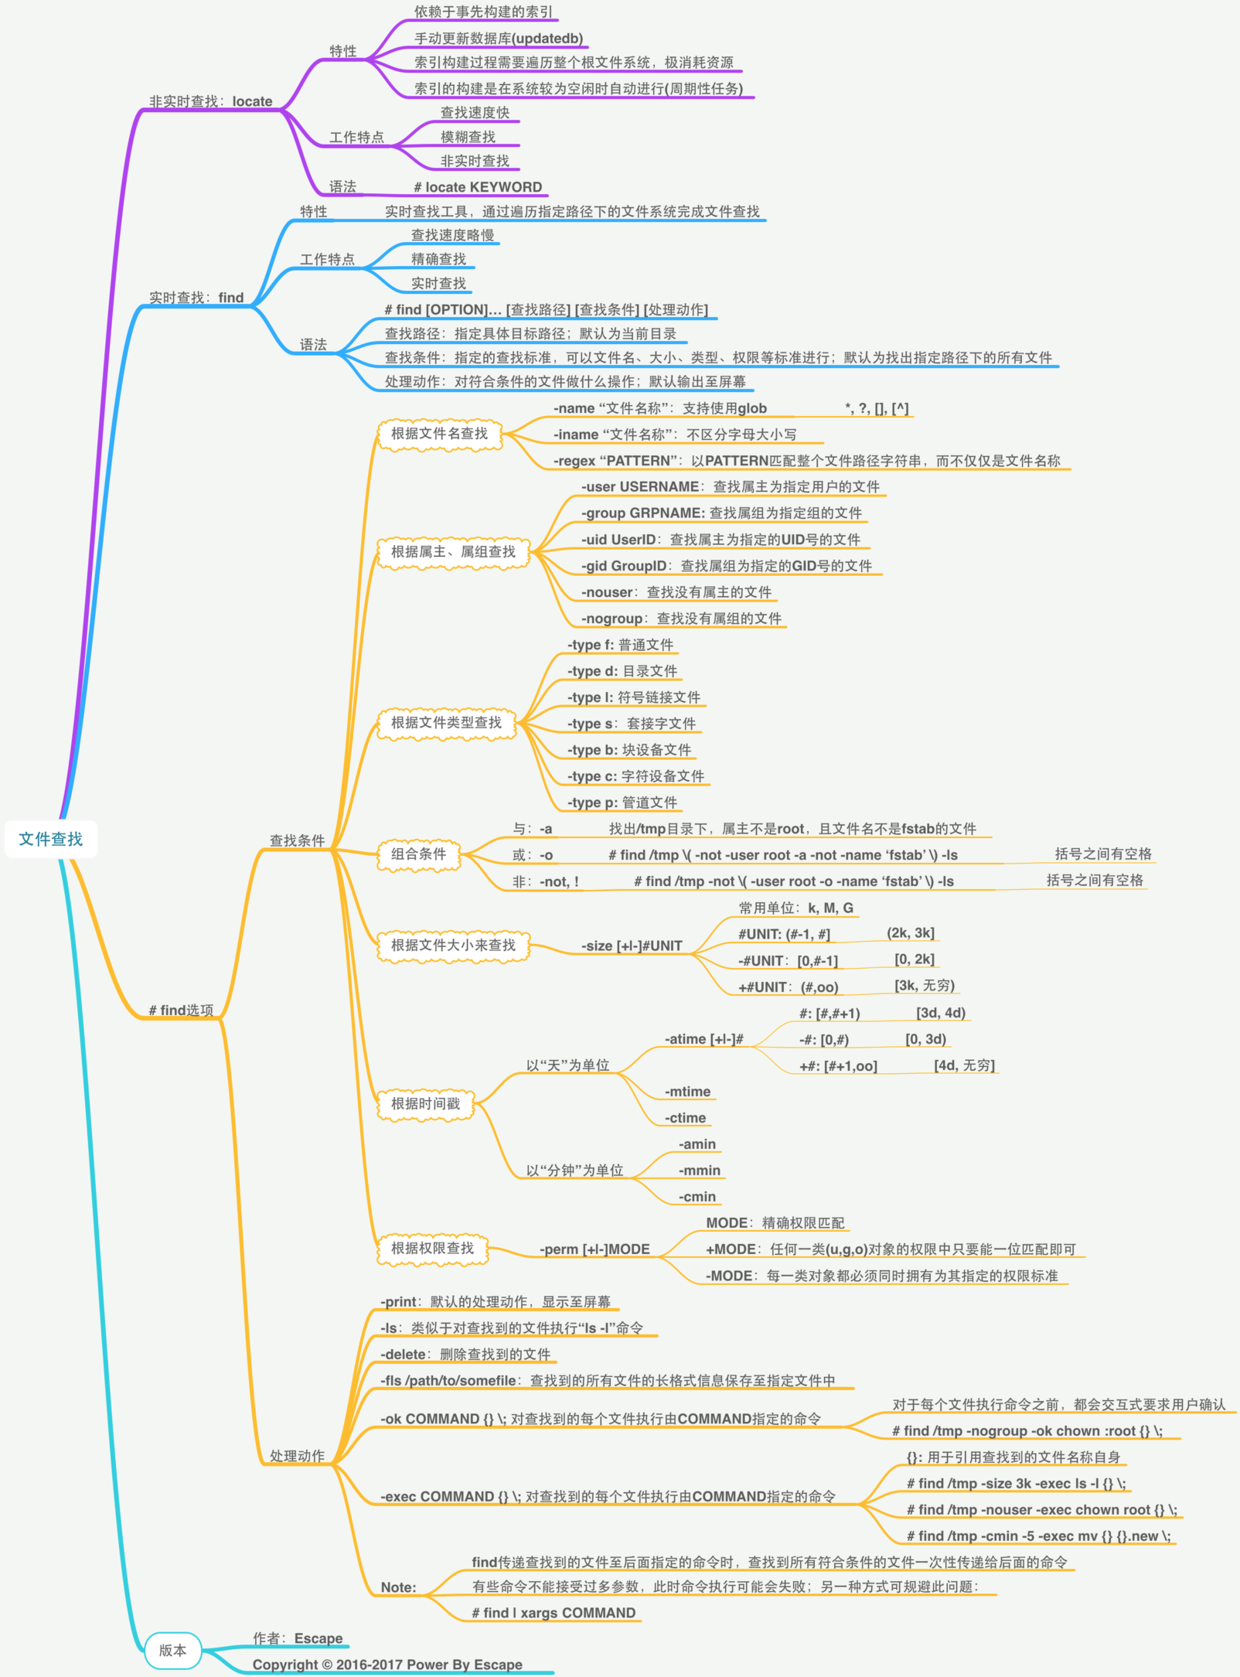
find 命令 - Linux 高级文件目录查询命令 描述:是Linux中最常用搜索文件或者目录的命令,十分强大能从各个维度方面进行搜寻;1 2 3 4 5 6 7 8 9 10 11 12 13 14 15 16 17 18 19 20 21 22 23 24 25 26 27 28 29 30 31 32 33 34 35 36 37 38 39 40 41 42 43 44 45 46 47 48 49 50 51 52 53 find【搜索范围】【搜索条件】 -name 按照文件名搜索 -iname 文件名不区分大小写 -regex "PATTERN" 通过正则查询 -user -group -uid -gid -nouser : 查找没有属主的文件 -nogroup :查找没有属组的文件 -type f/d/l/s(套接字)/b/c(字符设备)/p(管道设备) -a / o / and / ! -perm -/+MODE(u,g,o) -atime(天)/-amin(分) -ctime/-cmin -mtime/-mmin -size -newer -print -ls -empty -delete -fls /tmp/test.log -exec COMMAND {} \; -ok COMMAND {} \; * 匹配任意内容(任意多个字符) ? 匹配任意一个字符 [] 匹配任意一个中括号内的字符 x[ab]->xa或者xb [-] 匹配中括号中任意一个字符,-代表一个范围 例如,[a-z]代表匹配一个小写字母 [^] 逻辑非,表示匹配不是中括号内的一个字符 例如[^0-9]代表匹配一个不是数字的字符 -print0 : 不换行打印find的结果,结果之间采用空格进行分割; -path : 过滤指定目录 -prune : 表示过滤指定子目录 -mindepth,-maxdepth : 设置层级目录
案例示例:1 2 3 4 5 6 7 8 9 10 11 12 13 14 15 16 17 18 19 20 21 22 23 24 25 26 27 28 29 30 31 32 33 34 35 36 37 38 39 40 41 42 43 44 45 46 47 48 49 50 51 52 53 54 55 56 57 58 59 60 61 62 63 64 65 66 67 68 69 70 71 72 73 74 75 76 77 78 79 80 81 82 83 84 85 86 87 88 89 90 91 92 93 94 95 96 97 98 99 100 101 102 103 104 105 106 107 108 109 110 111 112 113 114 115 116 117 118 find . find . | grep .txt find / -name 文件名.db *.git find / -name "ab[cd]" //匹配abc或abd find / -iname SShd_config find . -type f find . -type d find / -type l -ls find /root -user root find /root -nonuser find / -nogroup -print find / -perm -o=w find / -perm +7000 find / -uid 0 -perm -4000 find / -user root -perm -4000 -print find / -group root -perm -2000 -print find / -perm -4000 -o -perm -2000 -print find / \( -not -user root -a -not -name 'fstab' \) -ls find 【搜索范围】 -(?)time (+/-)时间 find /root -mtime +10 find /root -mtime -10 find /root -mtime -0.5 find /root -mtime 10 find 【搜索范围】-size (+/-) *(k/M) find /root -size +10k find /root -size +10k -o -size 10k find /root -size +20k -a -size -50k find /root -size -20k -o -size +50 find 【搜索范围】-inum 【-/+ i节点号】 find / \( -inum +4000000000 -a -inum -4026532147 \) -l find / \( -inum +4000000000 -a -not -inum -4026532147 \) -l find /root -size +20k -a -size -50k -exec ls -lh {} \; find ./ -name "*****" -exec rm -f {} \; find . -type f -exec ls -l '{}' ';' find . mtime +1 -exec wc -l {} \; 6 ./.nvm/versions/node/v11.12.0/lib/node_modules/pm2/node_modules/pm2-axon-rpc/.travis.yml find . cmin -5 -ok mv {} {}.new \; find /tmp -nogroup -ok chown root:nobaby {} \; find / -perm +7000 -exec ls {}\; find . -name *410164689* -exec cp {} f:/sfz/41/1327/1996/411327199612020168.jpg \; find /root -name ding*.sh -delete find /root -name ding*y -fls www.txt && cat www.txt 139002 4 -rwxr-xr-x 1 root root 994 May 13 22:40 /root/dingding.py find . -type f -name "*.yaml" -print find . -type f -name "*.log" -print0 ./var/lib/docker/overlay2/716be24950255cd6668ac1ddbb662f2543d7a8bd6a5feb34d74f3d108ae3262b/diff/usr/lib/node_modules/npm/node_modules/socks/yarn-error.log ./var/log /boot.log ./var/log /tuned/tuned.log find /app/lv/xinghuo/ -mtime +1 -name "itmweb.log_2017-*.log" -exec gzip {} \; find /app/lv/xinghuo/ -mtime +15 -name "host-manager*.gz" -exec rm -rf {} \; find ~/.trash -delete $find . -type f -delete$find . -type d -empty -delete$find ~/.trash -type d -delete> find /etc -newer /etc/passwd /etc /etc/shadow /etc/rc2.d /etc/rc2.d/S01ssh find / -name "*tomcat.txt" -maxdepth 1 -print find . -path "*/BAK" -prune -o -type f -name *.jpg > /tmp/2019.txt find . -path "./code" -prune -o -name "*.txt" -print find . \(-path "./code" -o -path "./code2" \) -prune -o -name "*.txt" -print find . -type f -exec ls -alh {} && echo {} + for i in $(find /tmp -name *.png -o -name *.jpg -o -name *.jpeg -o -name *.tiff); do img1=${i/.png/.webp} ; echo ${img1/image/convert} ; done /tmp/convert/1.jpg /tmp/convert/2.webp find log -studentcenter-{0..11}-*/logs/StudentCenter/info.2023-01-*.log -exec grep -P '50030****222|500108****2' {} \; | grep ".CjxxController.getCj:" >> /tmp/weiyigeek.logs find log -studentcenter-{0..11}-*/logs/StudentCenter/info.2022-06-*.log -exec grep "resetPassword" {} \; | grep "pz" >> /tmp/pz-resetPassword.logs find log -studentcenter-{0..11}-*/logs/StudentCenter/info.2023*.log -exec grep "resetPassword" {} \; | grep "gkys" >> /tmp/gkys-resetPassword.logs
0x02 文件上传下载 sz 与 rz 命令 描述:在debian系列中采用sz和rz命令进行下载或者上传文件到服务器中;
wget 命令 描述:用来从指定的URL下载文件,wget非常稳定,它在带宽很窄的情况下和不稳定网络中有很强的适应性,如果是由于网络的原因下载失败,wget会不断的尝试,直到整个文件下载完毕。
1 2 3 4 5 6 7 8 9 10 11 12 13 14 15 16 17 18 19 20 21 22 23 24 25 26 27 28 29 30 31 32 33 34 35 36 37 38 39 40 41 42 43 44 45 46 47 48 49 50 51 52 53 54 55 56 57 58 59 60 61 62 63 64 65 66 67 68 69 70 71 72 73 74 75 76 77 78 79 80 81 82 83 84 85 86 87 88 89 90 91 92 93 94 95 96 97 98 99 100 101 102 103 104 105 106 107 108 109 110 111 112 113 114 115 116 117 118 119 120 121 122 123 124 125 126 127 128 129 130 用法: wget [选项]... [URL]... Options:长选项所必须的参数在使用短选项时也是必须的 -b, --background 启动后转入后台。 -e, --execute=COMMAND 运行一个“.wgetrc”风格的命令。 -o, --output-file=FILE 将日志信息写入 FILE。 -a, --append-output=FILE 将信息添加至 FILE。 -d, --debug 打印大量调试信息。 -q, --quiet 安静模式 (无信息输出)。 -v, --verbose 详尽的输出 (此为默认值)。 -nv, --no-verbose 关闭详尽输出,但不进入安静模式。 -i, --input-file=FILE 下载本地或外部 FILE 中的 URLs。 -F, --force-html 把输入文件当成 HTML 文件。 -B, --base=URL 解析与 URL 相关的HTML 输入文件 (由 -i -F 选项指定)。 --config=FILE Specify config file to use. -t, --tries=NUMBER 设置重试次数为 NUMBER (0 代表无限制)。 --retry-connrefused 即使拒绝连接也是重试。 -O, --output-document=FILE 将文档写入 FILE。 -nc, --no-clobber skip downloads that would download toexisting files (overwriting them). -c, --continue 断点续传下载文件。(网络较差的时候推荐使用) --progress=TYPE 选择进度条类型。 -N, --timestamping 只获取比本地文件新的文件。 --no-use-server-timestamps 不用服务器上的时间戳来设置本地文件。 -S, --server-response 打印服务器响应。 --spider 不下载任何文件。 -T, --timeout=SECONDS 将所有超时设为 SECONDS 秒。 --dns-timeout=SECS 设置 DNS 查寻超时为 SECS 秒。 --connect-timeout=SECS 设置连接超时为 SECS 秒。 --read -timeout=SECS 设置读取超时为 SECS 秒。 -w, --wait =SECONDS 等待间隔为 SECONDS 秒。 --waitretry=SECONDS 在获取文件的重试期间等待 1..SECONDS 秒。 --random-wait 获取多个文件时,每次随机等待间隔0.5*WAIT...1.5*WAIT 秒。 --no-proxy 禁止使用代理。 -Q, --quota=NUMBER 设置获取配额为 NUMBER 字节。 --bind -address=ADDRESS 绑定至本地主机上的 ADDRESS (主机名或是 IP)。 --limit -rate=RATE 限制下载速率为 RATE。 --no-dns-cache 关闭 DNS 查寻缓存。 --restrict-file-names=OS 限定文件名中的字符为 OS 允许的字符。 --ignore-case 匹配文件/目录时忽略大小写。 -4, --inet4-only 仅连接至 IPv4 地址。 -6, --inet6-only 仅连接至 IPv6 地址。 --prefer-family=FAMILY 首先连接至指定协议的地址FAMILY 为 IPv6,IPv4 或是 none。 --user=USER 将 ftp 和 http 的用户名均设置为 USER。 --password=PASS 将 ftp 和 http 的密码均设置为 PASS。 --ask-password 提示输入密码。 --no-iri 关闭 IRI 支持。 --local -encoding=ENC IRI (国际化资源标识符) 使用 ENC 作为本地编码。 --remote-encoding=ENC 使用 ENC 作为默认远程编码。 --unlink remove file before clobber. -nd, --no-directories 不创建目录。 -x, --force-directories 强制创建目录。 -nH, --no-host-directories 不要创建主目录。 --protocol-directories 在目录中使用协议名称。 -P, --directory-prefix=PREFIX 以设置PREFIX/... 保存文件 --cut-dirs=NUMBER 忽略远程目录中 NUMBER 个目录层。 --http-user=USER 设置 http 用户名为 USER。 --http-password=PASS 设置 http 密码为 PASS。 --no-cache 不在服务器上缓存数据。 --default-page=NAME 改变默认页(默认页通常是“index.html”)。 -E, --adjust-extension 以合适的扩展名保存 HTML/CSS 文档。 --ignore-length 忽略头部的‘Content-Length’区域。 --header=STRING 在头部插入 STRING。 --max-redirect 每页所允许的最大重定向。 --proxy-user=USER 使用 USER 作为代理用户名。 --proxy-password=PASS 使用 PASS 作为代理密码。 --referer=URL 在 HTTP 请求头包含‘Referer: URL’。 --save-headers 将 HTTP 头保存至文件。 -U, --user-agent=AGENT 标识为 AGENT 而不是 Wget/VERSION。 --no-http-keep-alive 禁用 HTTP keep-alive (永久连接)。 --no-cookies 不使用 cookies。 --load-cookies=FILE 会话开始前从 FILE 中载入 cookies。 --save-cookies=FILE 会话结束后保存 cookies 至 FILE。 --keep-session-cookies 载入并保存会话 (非永久) cookies。 --post-data=STRING 使用 POST 方式;把 STRING 作为数据发送。 --post-file=FILE 使用 POST 方式;发送 FILE 内容。 --content-disposition 当选中本地文件名时允许 Content-Disposition 头部 (尚在实验)。 --auth-no-challenge 发送不含服务器询问的首次等待的基本 HTTP 验证信息。 --secure-protocol=PR 选择安全协议,可以是 auto、SSLv2、SSLv3 或是 TLSv1 中的一个。 --no-check-certificate 不要验证服务器的证书。 --certificate=FILE 客户端证书文件。 --certificate-type=TYPE 客户端证书类型,PEM 或 DER。 --private-key=FILE 私钥文件。 --private-key-type=TYPE 私钥文件类型,PEM 或 DER。 --ca-certificate=FILE 带有一组 CA 认证的文件。 --ca-directory=DIR 保存 CA 认证的哈希列表的目录。 --random-file=FILE 带有生成 SSL PRNG 的随机数据的文件。 --egd-file=FILE 用于命名带有随机数据的 EGD 套接字的文件。 --ftp-user=USER 设置 ftp 用户名为 USER。 --ftp-password=PASS 设置 ftp 密码为 PASS。 --no-remove-listing 不要删除‘.listing’文件。 --no-glob 不在 FTP 文件名中使用通配符展开。 --no-passive-ftp 禁用“passive”传输模式。 --retr-symlinks 递归目录时,获取链接的文件 (而非目录)。 -r, --recursive 指定递归下载。 -l, --level=NUMBER 最大递归深度 (inf 或 0 代表无限制,即全部下载)。 --delete-after 下载完成后删除本地文件。 -k, --convert-links 让下载得到的 HTML 或 CSS 中的链接指向本地文件。 -K, --backup-converted 在转换文件 X 前先将它备份为 X.orig。 -m, --mirror -N -r -l inf --no-remove-listing 的缩写形式。 -p, --page-requisites 下载所有用于显示 HTML 页面的图片之类的元素。 --strict-comments 用严格方式 (SGML) 处理 HTML 注释。 -A, --accept=LIST 逗号分隔的可接受的扩展名列表。 -R, --reject=LIST 逗号分隔的要拒绝的扩展名列表。 -D, --domains=LIST 逗号分隔的可接受的域列表 --exclude-domains=LIST 逗号分隔的要拒绝的域列表 --follow-ftp 跟踪 HTML 文档中的 FTP 链接。 --follow-tags=LIST 逗号分隔的跟踪的 HTML 标识列表。 --ignore-tags=LIST 逗号分隔的忽略的 HTML 标识列表。 -H, --span-hosts 递归时转向外部主机。 -L, --relative 只跟踪有关系的链接。 -I, --include-directories=LIST 允许目录的列表。 --trust-server-names use the name specified by the redirection url last component. -X, --exclude-directories=LIST 排除目录的列表。 -np, --no-parent 不追溯至父目录。
实际案例: 1 2 3 4 5 6 7 8 9 10 11 12 13 14 15 16 17 18 19 20 21 22 23 24 25 26 27 28 29 wget http://baidu.com/malicious_source.sh -O /tmp/test.sh -o xx.log wget http://baidu.com/malicious_source.sh -P /tmp/ wget -i filelist.txt wget --user-agent="Mozilla/5.0 (Windows; U; Windows NT 6.1; en-US) AppleWebKit/534.16 (KHTML, like Gecko) Chrome/10.0.648.204 Safari/534.16" http://www.linuxde.net/testfile.zip wget http://baidu.com/malicious_source.sh -O- | sh wget http://192.168.8.13/article/view.asp -O- | cat wget ftp://192.168.1.254/document/test.zip wget --user=admin --password=password ftp://192.168.1.254/document/test.zip wget -r -np -nd --accept=gz --no-check-certificate https://www.xxx.com/dir/ --http-user=username --http-password=password wget -r -np -nd http://tel.mirrors.163.com/centos/6.4/os/x86_64/ wget -c -r --level=1 -k -p -np http://docs.Python.org/2/tutorial/index.html wget --mirror -p --convert-links -P ./LOCAL-DIR WEBSITE-URL
weiyigeek.top-简单示例
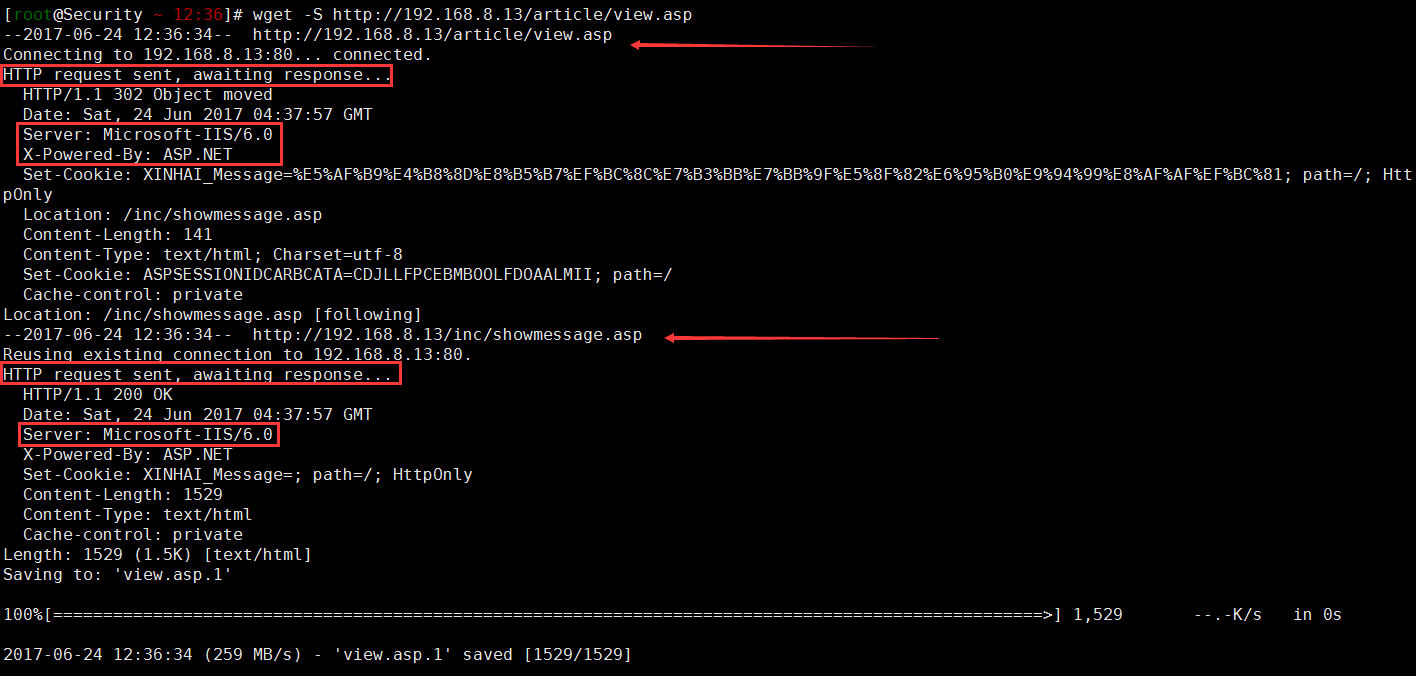
1 2 3 4 5 6 7 8 9 10 11 12 13 14 15 16 17 18 19 20 21 22 23 24 25 26 wget --spider URL wget -S http://192.168.8.13/article/view.asp --spider wget -S http://baidu.com/index.html --spider -o test1.log wget --tries=40 --reject=gif URL wget -r -A.pdf http://192.168.1.10/ wget --mirror --include-directories=/.git http://xxx.com/.git wget --spider DOWNLOAD-URL wget --limit -rate=300k -c -b URL wger -Q5m -i filelist.txt
weiyigeek.top-spider
示例7.代理设置(实验环境:ubuntu 12.04 LTS goagent)1 2 3 4 5 6 7 8 9 10 11 12 13 14 15 16 17 18 export http_proxy=http://127.0.0.1:8087https_proxy = http://127.0.0.1:8087/ http_proxy = http://127.0.0.1:8087/ ftp_proxy = http://127.0.0.1:8087/ use_proxy = on wget -c -r -np -k -L -p -e "http_proxy=http://127.0.0.1:8087" http://www.subversion.org.cn/svnbook/1.4/ 注: 如果是https则参数为:-e "https_proxy=http://127.0.0.1:8087" 注: 使用https时如果想要忽略服务器端证书的校验,可以使用 -k 参数。
curl 命令 描述:利用URL规则在命令行下工作的文件传输工具,它支持文件的上传和下载,所以是综合传输工具,但按传统,习惯称curl为下载工具。
语法参数: 1 2 3 4 5 6 7 8 9 10 11 12 13 14 15 16 17 18 19 20 21 22 23 24 25 26 27 28 29 30 31 32 33 34 35 36 37 38 39 40 41 42 43 44 45 46 47 48 49 50 51 52 53 54 55 56 57 58 59 60 61 62 63 64 65 66 67 68 69 70 71 72 73 74 75 76 77 78 79 80 81 82 83 84 85 86 87 88 89 90 91 92 93 94 95 96 97 98 99 100 curl(选项)(参数) -a/--append 上传文件时,附加到目标文件 -A/--user-agent <string> 设置用户代理发送给服务器 -anyauth 可以使用“任何”身份验证方法 -b/--cookie <name=string/file> cookie字符串或文件读取位置 --basic 使用HTTP基本验证 -B/--use-ascii 使用ASCII /文本传输 -c/--cookie-jar <file> 操作结束后把cookie写入到这个文件中 -C/--continue -at <offset> 断点续转 -d/--data <data> HTTP POST方式传送数据 --data-ascii <data> 以ascii的方式post数据 --data-binary <data> 以二进制的方式post数据 --negotiate 使用HTTP身份验证 --digest 使用数字身份验证 --disable -eprt 禁止使用EPRT或LPRT --disable -epsv 禁止使用EPSV @data.json 需要上传请求或者文件时需要使用 -D/--dump-header <file> 把header信息写入到该文件中 --egd-file <file> 为随机数据(SSL)设置EGD socket路径 --tcp-nodelay 使用TCP_NODELAY选项 -e/--referer 来源网址 -E/--cert <cert[:passwd]> 客户端证书文件和密码 (SSL) --cert-type <type > 证书文件类型 (DER/PEM/ENG) (SSL) --key <key> 私钥文件名 (SSL) --key-type <type > 私钥文件类型 (DER/PEM/ENG) (SSL) --pass <pass> 私钥密码 (SSL) --engine <eng> 加密引擎使用 (SSL). "--engine list" for list --cacert <file> CA证书 (SSL) --capath <directory> CA目录 (made using c_rehash) to verify peer against (SSL) --ciphers <list> SSL密码 --compressed 要求返回是压缩的形势 (using deflate or gzip) --connect-timeout <seconds> 设置最大请求时间 --create-dirs 建立本地目录的目录层次结构 --crlf 上传是把LF转变成CRLF -f/--fail 连接失败时不显示http错误 --ftp-create-dirs 如果远程目录不存在,创建远程目录 --ftp-method [multicwd/nocwd/singlecwd] 控制CWD的使用 --ftp-pasv 使用 PASV/EPSV 代替端口 --ftp-skip-pasv-ip 使用PASV的时候,忽略该IP地址 --ftp-ssl 尝试用 SSL/TLS 来进行ftp数据传输 --ftp-ssl-reqd 要求用 SSL/TLS 来进行ftp数据传输 -F/--form <name=content> 模拟http表单提交数据 --form-string <name=string> 模拟http表单提交数据 -g/--globoff 禁用网址序列和范围使用{}和[] -G/--get 以get的方式来发送数据 -H/--header <line> 自定义头信息传递给服务器 --ignore-content-length 忽略的HTTP头信息的长度 -i/--include 输出时包括protocol头信息 -I/--head 只显示请求头信息 -j/--junk-session-cookies 读取文件进忽略session cookie --interface <interface> 使用指定网络接口/地址 --krb4 <level> 使用指定安全级别的krb4 -k/--insecure 允许不使用证书到SSL站点 -K/--config 指定的配置文件读取 -l/--list-only 列出ftp目录下的文件名称 --limit -rate <rate> 设置传输速度 --local -port<NUM> 强制使用本地端口号 -m/--max-time <seconds> 设置最大传输时间(数据传输的最大允许时间) --max-redirs <num> 设置最大读取的目录数 --max-filesize <bytes> 设置最大下载的文件总量 -M/--manual 显示全手动 -n/--netrc 从netrc文件中读取用户名和密码 --netrc-optional 使用 .netrc 或者 URL来覆盖-n --ntlm 使用 HTTP NTLM 身份验证 -N/--no-buffer 禁用缓冲输出 -o/--output 把输出写到该文件中 -O/--remote-name 把输出写到该文件中,保留远程文件的文件名 -p/--proxytunnel 使用HTTP代理 --proxy-anyauth 选择任一代理身份验证方法 --proxy-basic 在代理上使用基本身份验证 --proxy-digest 在代理上使用数字身份验证 --proxy-ntlm 在代理上使用ntlm身份验证 -P/--ftp-port <address> 使用端口地址,而不是使用PASV -q 作为第一个参数,关闭 .curlrc -Q/--quote <cmd> 文件传输前,发送命令到服务器 -r/--range <range> 检索来自HTTP/1.1或FTP服务器字节范围 --range-file 读取(SSL)的随机文件 -R/--remote-time 在本地生成文件时,保留远程文件时间 --retry <num> 传输出现问题时,重试的次数 --retry-delay <seconds> 传输出现问题时,设置重试间隔时间 --retry-max-time <seconds> 传输出现问题时,设置最大重试时间 -s/--silent 静默模式。不输出任何东西 -S/--show-error 显示错误 --socks4 <host[:port]> 用socks4代理给定主机和端口,此参数会覆盖“-x”参数; --socks5 <host[:port]> 用socks5代理给定主机和端口,此参数会覆盖“-x”参数; --stderr <file> -t/--telnet-option <OPT=val> Telnet选项设置 --trace <file> 对指定文件进行debug --trace-ascii <file> Like --跟踪但没有hex输出 --trace-time 跟踪/详细输出时,添加时间戳 -T/--upload-file <file> 上传文件 --url <URL> Spet URL to work with -u/--user <user[:password]> 设置服务器的用户和密码 -U/--proxy-user <user[:password]> 设置代理用户名和密码 -w/--write-out [format] 什么输出完成后 -x/--proxy <host[:port]> 在给定的端口上使用HTTP代理 -X/--request <command > 指定什么命令 -y/--speed-time 放弃限速所要的时间,默认为30 -Y/--speed-limit 停止传输速度的限制,速度时间
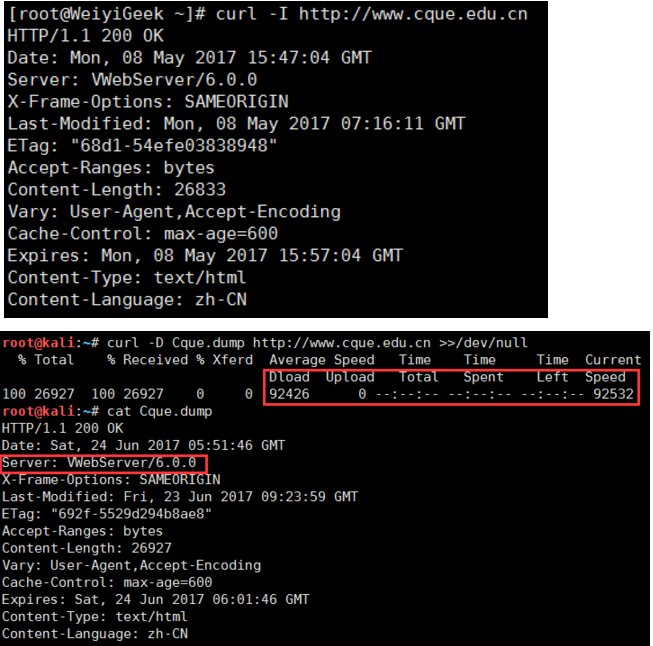
实际案例: 1 2 3 4 5 6 7 8 9 10 11 12 13 14 15 16 17 18 19 20 21 22 23 24 25 26 27 28 29 30 31 32 33 34 35 36 37 38 39 40 41 42 43 44 45 46 47 48 49 50 51 52 53 54 55 56 57 58 59 60 61 62 63 64 curl URL --silent curl -s -o aaa.jpg http://blog.51yip.com/wp-content/uploads/2010/09/compare_varnish.jpg curl http://man.linuxde.net/text.iso --silent -O curl -O http://blog.51yip.com/wp-content/uploads/2010/09/compare_varnish.jpg curl -O http://blog.51yip.com/wp-content/uploads/2010/[0-9][0-9]/aaaaa.jpg curl http://man.linuxde.net/test.iso -o filename.iso --progress curl -C 偏移量 URL/File curl -C -URL curl -C -O http://blog.51yip.com/wp-content/uploads/2010/09/compare_varnish.jpg curl -r 0-100 -o img.part1 http://www.baidu.com/logo.png curl -r 100- -o img.part1 http://www.baidu.com/logo.png curl URL --user-agent "Mozilla/5.0" curl --referer http://www.google.com http://man.linuxde.net curl URL --limit -rate 50k curl URL --max-filesize bytes curl -f http://blog.51yip.com/asdf curl -H "Host:man.linuxde.net" -H "accept-language:zh-cn" URL curl -I http://man.linuxde.net curl -I http://man.linuxde.net 2>/dev/null | head -1 curl http://man.linuxde.net --cookie "user=root;pass=123456" curl URL --cookie-jar cookie_file curl -x 24.10.28.84:32779 -o home.html http://blog.51yip.com curl -u user:pwd http://man.linuxde.net curl -u user http://man.linuxde.net curl -c ./cookie_c.txt -F log =aaaa -F pwd =****** http://blog.51yip.com/wp-login.php curl -b ./cookie_c.txt http://blog.51yip.com/wp-admin curl -D Cque.dump --silent http://www.cque.edu.cn >>/dev/null curl -D ./cookie_D.txt -F log =aaaa -F pwd =****** http://blog.51yip.com/wp-login.php curl -u 用户名:密码 -O ftp://blog.51yip.com/demo/curtain/bbstudy_files/style.css curl -T test.sql ftp://用户名:密码@ip:port/demo/curtain/bbstudy_files/
weiyigeek.top-示例解决
1 2 3 4 5 6 7 8 9 10 11 12 13 14 15 16 17 18 19 20 21 22 23 24 25 26 27 28 29 30 31 32 33 34 35 36 37 38 39 40 41 42 43 44 45 46 47 48 49 50 51 52 53 54 55 56 57 curl -X PUT "http://**.**.**.**/1123123.jsp/" -d "title=comewords&content=articleConten" curl -X POST "http://**.**.**.**/1123123.jsp/" -H "Content-Type:application/json" -d '{"title":"comewords","content":"articleContent"}' curl -X POST -H "Content-Type: application/json" "http://**.**.**.**/1123123.jsp/" -d@data.json curl -F "file=@/Users/fungleo/Downloads/401.png" -H "token: 222" -v "http://localhost:8000/api/v1/upimg" $ curl --connect-timeout 2 -m 2 -s -I http://172.20.33.96:8080 $ curl -m 5 -s -w %{http_code} http://www.cqsdzy.com/index.html -o /dev/null/span;echo " " $ curl -I -s -o /dev/null -w "%{http_code} \n" http://weiyigeek.top $ curl -o /dev/null -s -w "DNS 解析时间: " %{time_namelookup}"\nTCP 建立连接时间: " %{time_connect}"\nC/S 传输时间: " %{time_starttransfer}"\n完整耗时: " %{time_total}"\n下载速度(bytes): " %{speed_download}"\n" "http://weiyigeek.top/" $ curl -o /dev/null -s -w "DNS解析耗时: " %{time_namelookup}"s_重定向耗时: " %{time_redirect}"s_TCP连接耗时: " %{time_connect}"s_请求准备耗时: " %{time_pretransfer}"s_应用连接耗时: " %{time_appconnect}"s_传输耗时: " %{time_starttransfer}"s_下载速度: " %{speed_download}"byte/s_整体请求响应耗时: " %{time_total}"s" "http://weiyigeek.top/" DNS 解析时间: 0.255072 TCP 建立连接时间: 1.471698 C/S 传输时间: 1.688269 合计用时: 7.808575 下载速度(bytes): 7245.000 cat > fmt.txt <<END \n Response Time for : %{url_effective}\n\n DNS Lookup Time:\t\t%{time_namelookup}s\n Redirection Time:\t\t%{time_redirect}s\n Connection Time:\t\t%{time_connect}s\n App Connection Time:\t\t%{time_appconnect}s\n Pre-transfer Time:\t\t%{time_pretransfer}s\n Start-transfer Time:\t\t%{time_starttransfer}s\n\n Total Time:\t\t\t%{time_total}s\n END $ curl -L -s -w @fmt.txt -o /dev/null http://weiyigeek.top/
weiyigeek.top-响应码
示例12.curl和wget指定ssl ca证书,openwrt下curl使用mbedtls校验ssl要安装ca-bundle,wget使用libssl校验ssl要安装ca-certificates,索性单独下载ca证书文件1 2 3 4 5 6 7 8 curl -k https://www.weiyigeek.top/cacert.pem -o /etc/ssl/certs/ca-certificates.crt echo 'ca-certificate = /etc/ssl/certs/ca-certificates.crt' > ~/.wgetrcecho 'cacert=/etc/ssl/certs/ca-certificates.crt' > ~/.curlrc$ wget 'https://x.x.x.x/get_ips' --no-check-certificate $ curl 'https://x.x.x.x/get_ips' -k
示例13.指定主机头测试Nginx虚拟主机的配置:1 2 3 4 5 6 7 8 9 10 11 12 13 14 15 16 17 18 19 20 curl https://104.154.30.67 -H 'Host:foo.bar.com' -k
示例14.curl 命令如何使用代理下载资源1 2 3 4 5 6 7 curl -x 192.168.11.215:3128 -o /etc/yum.repos.d/CentOS-Base.repo http://mirrors.aliyun.com/repo/Centos-7.repo
注意事项:curl是将下载文件输出到stdout,将进度信息输出到stderr,不显示进度信息使用–silent选项
lynx 命令 lynx命令是纯文本模式的网页浏览器,不支持图形、音视频等多媒体信息,Linux发行版都没有默认安装,需要您自己下载;
yum install -y lynx
基础语法:1 2 3 4 5 6 7 8 9 10 11 12 13 14 15 16 17 18 19 20 21 22 23 24 25 26 27 28 29 30 31 32 33 34 35 36 37 38 39 40 41 42 43 44 45 46 47 48 49 50 51 52 53 54 55 56 57 58 59 60 61 62 63 64 65 66 67 68 69 70 71 72 73 74 75 76 77 lynx [选项] [参数] -case :在搜索字符串时,区分大小写; -ftp:关闭ftp功能; -nobrowse:关闭目录浏览功能; -noclor:关闭色彩显示模式; -reload:更新代理服务器的缓存,只对首页有效; * 下方向键:页面上的下一个链接(用高亮度显示)。 * 上方向键:页面上的前一个链接(用高亮度显示)。 * 回车和右方向键:跳转到链接指向的地址。 * 左方向键:回到上一个页面。 * +、Page-Down、Space、Ctrl+f:向下翻页。 * -、Page-Up、b、Ctrl+b:向上翻页。 * Ctrl+a:移动到当前页的最前面。 * Ctrl+e:移动到当前页的最后面。 * Ctrl+n:向下翻两行。 * Ctrl+p:往回翻两行。 * ):向下翻半页。 * (:往回翻半页。 * \ c:建立一个新文件。 d:下载选中的文件。 E:编辑选中的文件。 f:为当前文件显示一个选项菜单。 m:修改选中文件的名字或位置。 r:删除选中的文件。 t:Tag highlighted file。 u:上载一个文件到当前目录。 ?、h:帮助。 a:把当前链接加入到一个书签文件里。 c:向页面的拥有者发送意见或建议。 d:下载当前链接。 e:编辑当前文件。 g:跳转到一个用户 指定的URL或文件。 G:编辑当前页的URL,并跳转到这个URL。 i:显示文档索引。 j:执行预先定义的“短”命令。 k:显示键盘命令列表。 l:列出当前页上所有链接的地址。 m:回到首页 。 o:设置选项。 p:把当前页输出到文件,e-mail,打印机或其他地方。 q:退出。 /:在当前页内查找字符串。 s:在外部搜索输入的字符串。 n:搜索下一个。 v:查看一个书签文件。 V:跳转到访问过的地址。 x:不使用缓存。 z:停止当前传输。 [backspace]:跳转到历史页(同 V 命令)。 =:显示当前页的信息。 :查看当前页的源代码。 !:回到shell提示符下。 _:清除当前任务的所有授权信息。 *:图形链接模式的切换开关。 @:8位传输模式或CJK模式的切换开关。 [:pseudo_inlines 模式的切换开关。 ]:为当前页或当前链接发送一个“head”请求。 Ctrl+r:重新装如当前页并且刷新屏幕。 Ctrl+w:刷新屏幕。 Ctrl+u:删除输入的行。 Ctrl+g:取消输入或者传送。 Ctrl+t:跟踪模式的切换开关。 ;:看Lynx对当前任务的跟踪记录。 Ctrl+k:调用 Cookie Jar 页。 数字键:到后面的第 n 个链接。
实际案例:
weiyigeek.top-lynx案例