[TOC]
0x00 前言简述 Pipeline 介绍 Q: 什么是 Pipeline?
答: Pipeline(流水线)是 Jenkins 2.0 的精髓它基于Groovy语言实现的一种DSL(领域特定语言),简而言之就是一套运行于Jenkins上的工作流框架,用于描述整条流水线是如何进行的。复杂流程编排与可视化。
Q: 什么是DSL?
答: DSL即 (Domain Specific Language) 领域专用语言,专门针对一个特定的问题领域,具有建模所需的语法和语义的语言。在与问题域相同的抽象层次对概念建模。
Q: 什么是 Groovy 语言
Tips: PipeLine在Jenkins中的发展历史
1.Jenkins 1.x 支持 Pipeline ,只不过是通过页面手动配置流水线。
2.Jenkins 2.x 开始支持 pipeline as code ,可以通过代码来配置流水线了。
Q: 为什么要使用Pipeline?
1.Pipeline是Jenkins2.X的最核心的特性,帮助Jenkins实现从CI到CD与AutoDevOps的转变;Pipeline Domain Specific Language(DSL) syntax可以达到 Pipeline as Code(Jenkinsfile存储在项目的源代码库)的目的。
Tips: 流水线的内容包括执行编译、打包、测试、输出测试报告等步骤。Pipeline (CD Pipeline)是将软件从版本控制阶段到交付给用户或客户的完整过程的自动化表现, 软件的每一次更改(提交到源代码管理系统)都要经过一个复杂的过程才能被发布。
Pipeline五大特性(优点)
代码: Pipeline以代码的形式实现,通常被检入源代码控制,使团队能够编辑、审查和迭代其CD流程。
可持续性:Jenklins重启或者中断后都不会影响Pipeline Job。
停顿:Pipeline可以选择停止并等待构建人员的输入或批准,然后再继续Pipeline运行。
多功能:Pipeline支持现实世界的复杂CD要求,包括fork/join子进程,循环和并行执行工作的能力
可扩展:Pipeline插件支持其DSL的自定义扩展以及与其他插件集成的多个选项。
Tips: 它实现持续集成与部署、节省产品发布时间、优化部署策略、节省人力成本、以及自动化脚本复用等等;
Q: 怎样安装Pipeline插件?
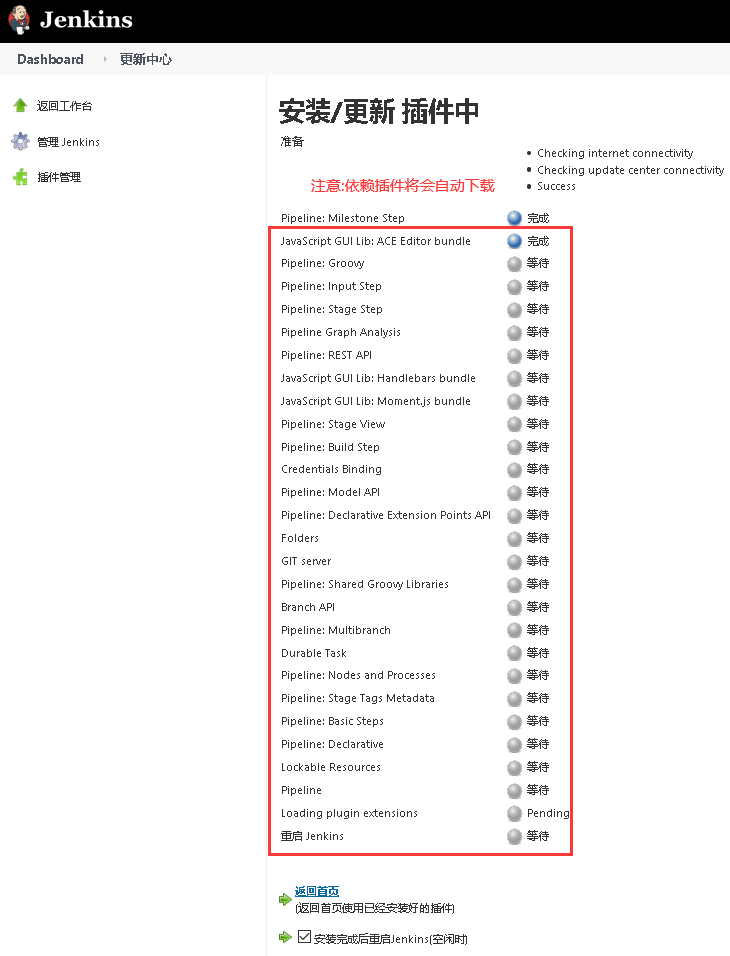
答: 熟话说工欲善其事必先利其器,第一步当然需要安装Jenkins使用Pipeline所需的插件;
Jenkins pipeline 相关插件安装: 打开 Jenkins 找到 【系统管理】->【插件管理】->【可选插件】 然后在搜索框输入 Pipeline1 2 Pipeline 命令行接口 杂项 代理启动器和控制器 构建触发器 2.6 2 年 3 月 ago
weiyigeek.top-Pipeline-Plug
Pipeline 基础知识 基础说明:
Pipeline 脚本是由 Groovy 语言结合 DSL 语言实现的。
Pipeline 支持两种语法:Declarative Pipeline (声明式 - 2.5 引入) 和 Scripted Pipeline (脚本式)语法
Pipeline 也有两种创建方法:
方式1、在 Jenkins 的 Web UI 界面中输入脚本;
方式2、通过创建一个 Jenkinsfile 脚本文件(Groovy 语言结合 DSL 开发)放入项目源码库中 (推荐在 Jenkins 中直接从源代码控制(SCMD) 中直接载入 Jenkinsfile Pipeline)
语法差异:
由于它是功能齐全的编程环境,因此脚本化 Pipeline为Jenkins用户提供了极大的灵活性和可扩展性。Groovy学习曲线通常不是给定团队的所有成员所希望的,因此创建了声明式 Pipeline,以为编写Jenkins Pipeline提供更简单,更自以为是的语法。
两者基本上是下面的相同 Pipeline子系统。它们都是“ Pipeline作为代码”的持久实现。他们都可以使用内置在Pipeline中或由插件提供的步骤。两者都可以利用 共享库
但是它们的区别在于语法和灵活性。声明性限制使用更严格和预定义的结构为用户提供的功能,使其成为更简单的连续交付 Pipeline的理想选择。脚本化脚本提供的限制非常少,以至于对结构和语法的唯一限制往往是由Groovy本身定义的,而不是由任何特定于 Pipeline的系统定义的,因此,它成为高级用户和要求更复杂的用户的理想选择。顾名思义,声明性流水线鼓励使用声明性编程模型,而脚本 Pipeline 遵循更强制性的编程模型。
Q: 选择Declarative Pipeline还是Scripted Pipeline?
答: 最开始Pipeline plugin仅支持Scripted Pipeline一种脚本类型,而 Declarative Pipeline 为Pipeline plugin在2.5版本之后新增的一种脚本类型与原先的Scripted Pipeline一样都可以用来编写脚本。
由于在我们使用BlueOcean流水线UI插件后,Declarative Pipeline 与 BlueOcean 脚本编辑器是可以兼容使用,并且在eclarative Pipeline中,也是可以内嵌Scripted Pipeline代码的,所以通常建议使用 Declarative Pipeline (英 /dɪˈklærətɪv/)的方式进行编写
Declarative pipeline和Scripted pipeline的比较?
1.共同点:
声明式和脚本式流水线都是 DSL 语言,用来描述软件交付流水线的一部分。
两者都能够使用pipeline内置的插件或者插件提供的step步骤部分。
两者都可以利用共享库扩展。
2.区别: 两者不同之处在于语法和灵活性;
Declarative pipeline 语法更严格 (例如必须以 pipeline 关键词打头),有固定的组织结构但更容易生成代码段,所以它成为用户更理想的选择。
Scripted pipeline 语法更加灵活,因为Groovy本身只能对结构和语法进行限制,对于更复杂的pipeline来说,用户可以根据自己的业务进行灵活的实现和扩展。
Tips: 脚本式语法的确灵活、可扩展,但是也意味着更复杂。而声明式语法供更简单、更结构化(more opinionated)的语法 (模块化的感觉)。
Pipeline 扩展共享库 描述: 由于流水线被组织中越来越多的项目所采用,常见的模式很可能会出现在多个项目之间共享流水线, 共享流水线有助于减少冗余并保持代码 “DRY(Don’t Repeat Yourself)”。
Q: 如何定义共享库?
答: 我们将一些通用的代码或者代码包,封装定义为底层代码库,方便流水线创建。
特定的目录结构:1 2 3 4 5 6 7 8 9 10 11 12 (root) +- src | +- org | +- foo | +- Bar.groovy +- vars | +- foo.groovy | +- foo.txt +- resources | +- org | +- foo | +- bar.json
目录结构解析:
1、src 目录应该看起来像标准的 Java 源目录结构。当执行流水线时,该目录被添加到类路径下。
2、vars 目录定义可从流水线访问的全局变量的脚本。 每个 .groovy 文件的基名应该是一个 Groovy (~ Java) 标识符, 通常是 驼峰命名法(camelCased)。 匹配 .txt, 如果存在可以包含文档, 通过系统的配置标记格式化从处理 (所以可能是 HTML, Markdown 等,虽然 txt 扩展是必需的)。这些目录中的 Groovy 源文件 在脚本化流水线中的 “CPS transformation” 一样。
3、resources 目录允许从外部库中使用 libraryResource 步骤来加载有关的非 Groovy 文件。 目前,内部库不支持该特性。
4、根目录下的其他目录被保留下来以便于将来的增强。
Q: 如何将将共享库设置为全局共享库?
描述: 在Jenkins 管理页面中的 “Configure System” 页面中的 “Global Pipeline Libraries” 中设置全局共享库。
Q: 如何使用封装的代码库
答: Jenkinsfile 文件中需要使用 @Library 注解,指定库的名字。另外关于代码库的动态加载、版本管理和检索方式等,请见官网。
Q: 如何编写自己的 Jenkins 共享库,共享库中的变量作用域?
答: 其他关于写库的访问步骤、定义全局变量 请见官网。
BlueOcean 介绍 Q: 什么是BlueOcean?
A: BlueOcean 重新考虑了 Jenkins 的用户体验而重新设置UI界面,从而更加直观的展现Pipeline各流程执行情况;
Q: 为啥要使用BlueOcean?
连续交付(CD)Pipeline的复杂可视化,允许快速和直观地了解Pipeline的状态。
Q: 如何安装BlueOcean?
A: 同样是在插件中搜索 ”Blue Ocean“ 下载安装即可
0x01 Pipeline Syntax (0) Groovy Basic Syntax 描述: 我们前面说过不管是声明式还是脚本式都是基于Groovy语言,所以学习 Groovy 基础知识是必须的。
1.虽然Groovy同时支持静态类型和动态类型,但是在定义变量时,在Groovy中我们习惯使用def关键字
2.不像 Java语法语句,Groovy语句最后的分号不是必需的。
3.Groovy中的方法调用可以省略括号,比如System.out.println “Hello world”。
1 2 System.out.println x println t
4.支持单引号、双引号。双引号支持插值(变量),单引号不支持。
5.支持三引号。三引号分为三单引号和三双引号。它们都支持换行,区别在于只有三双引号支持插值(变量)。
1 2 3 4 5 def var = "" " This is Variable! <br> Test defiend " ""
6.支持函数。
1 2 3 4 5 6 def getSecure(String Ticket_Token) { def token = "Ticket Token is " + Ticket_Token return token } println getSecure("weiyigeek" )
7.支持闭包。
1 2 3 4 5 6 7 8 9 10 11 12 13 def codeBlock = {print "hello world!" }def stage(String name, closue) { println name def closue() { println "闭包调用的 closue function!" } } stage("stage name" ,{println "closue" })
8.支持类定义和实例化。
1 2 3 4 5 6 7 8 class Greet { def name Greet(who) { name = who[0 ].toUpperCase() + who[1. .-1 ] } def salute() { println "Hello " + name + "!" } } g = new Greet('world' ) g.salute()
(1) Scripted Pipeline Syntax 描述: Scripted Pipeline 是基于 groovy 的一种 DSL 语言相比于 Declarative pipeline,它为jenkins用户提供了更巨大的灵活性和可扩展性。
Scripted Pipeline 基础结构说明:
Node:节点,一个 Node 就是一个 Jenkins 节点,Master 或者 Agent,是执行 Step 的具体运行环境,比如我们之前动态运行的 Jenkins Slave 就是一个 Node 节点
Stage:阶段,一个 Pipeline 可以划分为若干个 Stage,每个 Stage 代表一组操作,比如:Build、Test、Deploy,Stage 是一个逻辑分组的概念,可以跨多个 Node
Step:步骤,Step 是最基本的操作单元,可以是打印一句话,也可以是构建一个 Docker 镜像,由各类 Jenkins 插件提供,·比如命令:sh 'make',就相当于我们平时 shell 终端中执行 make 命令一样。 (注意:此处Step不是cripted Pipeline关键字而是代表一条执行语句)
Scripted Pipeline 语法示例: 1 2 3 4 5 6 7 8 9 10 11 node { def mvnHome stage('Preparation' ) { echo "Scripted Pipeline" } }
Tips : 注释(Comments)和Java一样,支持单行(使用//)、多行(/* */)和文档注释(使用/** */)。
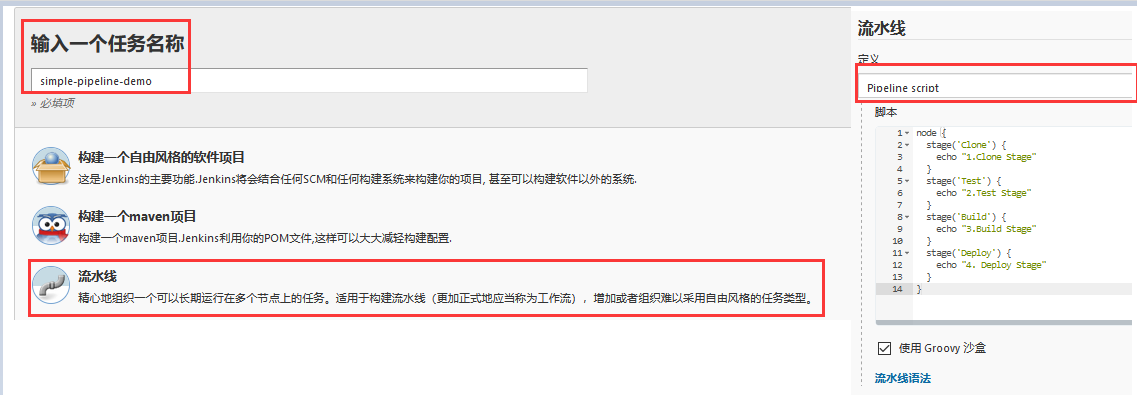
Hello-World 实践 Step 1.在Jenkins的WEB UI -> 新建任务 -> simple-pipeline-demo 任务名称 -> 选择流水线 -> 确定
Step 2.在 Dashboard -> simple-pipeline-demo -> 流水线 -> 可以选择pipeline script(或者直接从scm拉取Jenkinsfile)此处为了演示只是简单的了解 -> 应用保存
1 2 3 4 5 6 7 8 9 10 11 12 13 14 15 node { stage('Clone' ) { echo "1.Clone Stage" } stage('Test' ) { echo "2.Test Stage" } stage('Build' ) { echo "3.Build Stage" } stage('Deploy' ) { echo "4. Deploy Stage" } }
weiyigeek.top-Create PipeLine 流水线项目
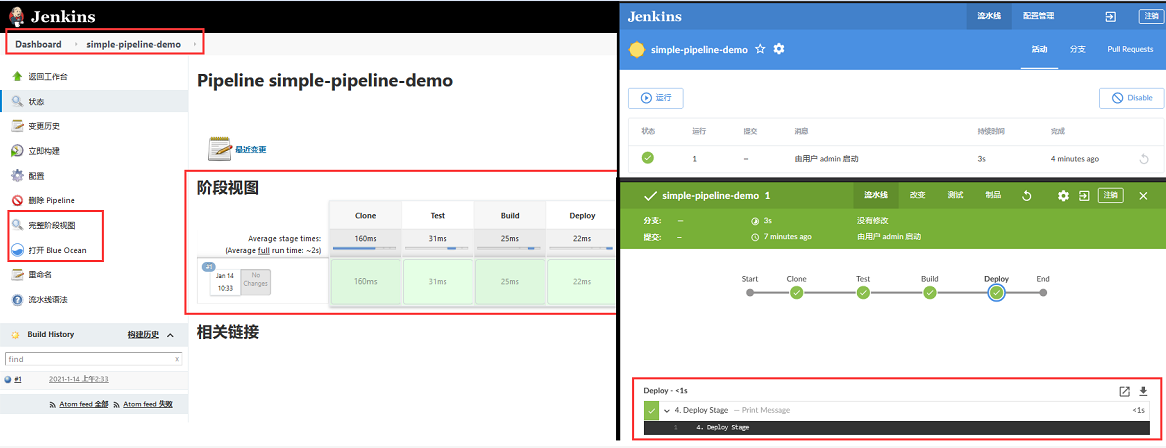
Step 3.立即构建 -> 查看阶段视图 (或者利用blue-Ocean插件)进行更加直观的查看 -> 观察构建的日志信息1 2 3 4 5 6 7 8 9 10 11 12 13 14 15 16 17 18 19 20 21 22 23 24 25 26 27 28 29 30 31 32 33 34 Started by user admin Running in Durability level: MAX_SURVIVABILITY [Pipeline] Start of Pipeline [Pipeline] node Running on Jenkins in /var/lib/jenkins/workspace/simple-pipeline-demo [Pipeline] { [Pipeline] stage [Pipeline] { (Clone) [Pipeline] echo 1.Clone Stage [Pipeline] } [Pipeline] // stage [Pipeline] stage [Pipeline] { (Test) [Pipeline] echo 2.Test Stage [Pipeline] } [Pipeline] // stage [Pipeline] stage [Pipeline] { (Build) [Pipeline] echo 3.Build Stage [Pipeline] } [Pipeline] // stage [Pipeline] stage [Pipeline] { (Deploy) [Pipeline] echo 4. Deploy Stage [Pipeline] } [Pipeline] // stage [Pipeline] } [Pipeline] // node [Pipeline] End of Pipeline Finished: SUCCESS
weiyigeek.top-jenkins流水线执行结果与blue-Ocean
PS : 你可以选择使用BlueOcean或者jenkins原生的流水控制台展示两则并不冲突,但是需要注意Scripted pipeline不完全兼容BlueOcean;
变量名-Identifiers 描述: 标识符(Identifiers)也称变量名, 以字母、美元符号$或下划线_开始,不能以数字开始。1 2 3 4 def namedef item3def with_underscoredef $dollarStart
1 2 3 def 3 tier def a+b def a#b // #号也不是可用的字符
Tips : 在点号后是可以使用关键字作为标识符时产生org.codehaus.groovy.control.MultipleCompilationErrorsException: startup failed:错误;1 2 3 4 5 foo.as foo.assert foo.break foo.case foo.catch
字符串-String 描述: 在Groovy中字符串有两种类型,一种是Java原生的java.lang.String;另一种是groovy.lang.GString,又叫插值字符串(interpolated strings)。
(1) 单引号字符串(Single quoted string)
1 2 def name = 'yjiyjgie' println name.class
(2) 三单引号字符串(Triple single quoted string)
1 2 3 4 5 6 7 8 9 10 11 12 def strippedFirstNewline = '''line one line two line three ''' def strippedFirstNewline = '''\ line one line two line three '''
(3) 双引号字符串(Double quoted string)
1 2 3 def normalStr = "yjiyjige" def interpolatedStr = "my name is ${normalStr}"
(4) 字符串插值(String interpolation)
1 2 3 4 5 6 7 def name = 'Guillaume' def greeting = "Hello ${name}" assert greeting.toString() == 'Hello Guillaume' def person = [name: 'Guillaume' , age: 36 ]println "$person.name is $person.age years old"
补充说明:1 2 3 4 5 6 7 8 9 10 11 def number = 1 def eagerGString = "value == ${number}" def lazyGString = "value == ${-> number}" println eagerGString println lazyGString number = 2 println eagerGString println lazyGString
Tips: GString与String的hashCode是不一样的即使他们最终结果一样。所以在Map中不应该用GString去做元素的Key,而又使用普通的String去取值;1 2 3 4 5 def key = "a" def m = ["${key}" : "letter ${key}" ] assert m["a" ]
Tips : 对于输出对象带有指定方法时如有需要拼接其它字符串需要以${对象.方法}进行包含;1 2 3 def number = 3.14 println "$number.toString()" println "${number.toString()} -- Other String、"
数字 - Numbers 描述: 当使用def指明整数字面量时,变量的类型会根据数字的大小自动调整:1 2 3 4 5 6 7 8 9 10 11 12 13 14 15 16 17 18 19 20 21 22 23 24 25 26 27 28 BigInteger 使用G或g Long 使用L或l Integer 使用I或i BigDecimal 使用G或g Double 使用D或d Float 使用F或f def a = 1 assert a instanceof Integerdef b = 2147483647 assert b instanceof Integerdef c = 2147483648 assert c instanceof Longdef d = 9223372036854775807 assert d instanceof Longdef e = 9223372036854775808 assert e instanceof BigInteger
1 2 def decimal = 123.456 println decimal.getClass()
列表-List 描述:默认情况下Groovy的列表使用的是java.util.ArrayList,用中括号[]括住,使用逗号分隔:1 2 3 4 5 6 7 8 9 10 11 12 13 def numbers = [1, 2, 3] println numbers.getClass() def arrayList = [1, 2, 3] def linkedList = [2, 3, 4] as LinkedList LinkedList otherLinked = [3, 4, 5]
Groovy重载了列表的[]和<<操作符,可以通过List[index]访问指定位置元素,也可以通过List << element往列表末尾添加元素:1 2 3 4 5 6 7 8 9 10 11 12 13 14 15 16 17 18 19 20 def letters = ['a' , 'b' , 'c' , 'd' ]assert letters[0 ] assert letters[1 ] assert letters[-1 ] assert letters[-2 ] letters[2 ] = 'C' assert letters[2 ] letters << 'e' assert letters[4 ] == 'e' assert letters[-1 ] == 'e' assert letters[1 , 3 ] == ['b' , 'd' ] assert letters[2. .4 ] == ['C' , 'd' , 'e' ] def multi = [[0 , 1 ], [2 , 3 ]]assert multi[1 ][0 ] == 2
常用方法 1 2 3 4 5 6 7 8 9 10 11 12 13 14 15 16 17 18 19 20 21 22 23 24 25 26 27 28 29 30 31 32 33 34 35 36 37 38 39 40 41 42 43 44 45 46 47 48 49 50 51 52 53 54 55 56 57 58 59 60 61 62 63 64 65 66 67 68 69 70 71 72 73 74 75 76 77 78 79 80 81 82 83 84 85 86 87 88 89 90 91 92 93 94 95 96 97 98 def mylist = [1 ,2 ,3 ,4 ,5 ,"weiyigeek.top" ,"devops" ,"jenkins" ] println(numList[5 ]) println(mylist.size()) println(numList.count(4 )) println(mylist.isEmpty()) def newlist = mylist.add("gitlab" )println(mylist + "jenkins" ) println(mylist - "devops" ) println(mylist << "java" ) println(mylist.remove("java" )) println(mylist.removeAll()) println(mylist.min()) println(mylist.max()) println(mylist.sum()) println(mylist.unique()) println(mylist.reverse()) println(mylist.sort()) println(mylist.intersect([2 ,3 ])) println(mylist.disjoint([2 ,3 ])) println(mylist.contains("devops" )) def isContains = 'devops' in strListprintln(isContains) println(mylist.join("geek" )) def list = ['a' , 'b' , 'c' ]def newlist = list.clone()def mylist = [1 ,2 ,3 ,[4 ,5 ],5 ,"weiyigeek.top" ,"devops" ,"jenkins" ]println(mylist.flatten()) String[] stus = ["Weiyi" , "Geek" ,"Top" ] def numList = [1 ,2 ,3 ,4 ,5 ,6 ,6 ] as int []def list = [1 , 2 , 3 ]def newList = list.collect { it * 2 }def newList = list*.multiply(2 )def list = [1 ,2 ,3 ]def newList = list*3 def newList = list.multiply(2 )println(list.findAll{ it > 1 }) def isTrue = list.every { it < 5 }def isTrue = list.any { it < 5 }def list = [1 ,2 ,4 ]def num = list.inject(93 ){ count, item -> count + item }println (num) def strList = ['a' , 'b' , 'c' , 'd' , 'e' ]def index = strList.findIndexOf { it in ['c' , 'e' , 'g' ] } println(index) def index = strList.indexOf('c' ) println(index)
字典 - Maps 描述: Groovy使用中括号[]来定义字典,元素需要包含key和value使用冒号分隔,元素与元素之间用逗号分隔:1 2 3 4 5 6 7 8 9 10 11 12 def colors = [red: '#FF0000' , green: '#00FF00' , blue: '#0000FF' ]assert colors['red' ] == '#FF0000' assert colors.green == '#00FF00' colors['pink' ] = '#FF00FF' colors.yellow = '#FFFF00' assert colors.pink assert colors['yellow' ] assert colors instanceof java.util.LinkedHashMap
在上边的例子中,虽然没有明确的使用字符串’red‘、’green‘,但Groovy会自动把那些key转化为字符串。并且在默认情况下,初始化字典时key也不会去使用已经存在的变量:1 2 3 4 5 6 7 8 9 10 11 12 def keyVal = 'name' def persons = [keyVal: 'Guillaume' ] assert !persons.containsKey('name' )assert persons.containsKey('keyVal' )def keyVal = 'name' def persons = [(keyVal): 'Guillaume' ] assert persons.containsKey('name' )assert !persons.containsKey('keyVal' )
条件语句 - Condition if 语句 1 2 3 4 5 6 if (condition) { statement #1 statement #2 ... }
例子:1 2 3 4 5 6 if (env.BRANCH_NAME == 'master' ) { echo 'I only execute on the master branch' } else { echo 'I execute elsewhere' }
For循环 1 2 3 4 5 for (variable declaration;expression;Increment) { statement #1 statement #2 … }
1 2 3 4 5 6 7 8 9 10 for (int i = 0 ;i<5 ;i++) { println(i); } def mylist = [1 ,2 ,3 ,"weiyigeek.top" ,"devops" ,"jenkins" ]mylist.each{ println(it) } mylist.eachWithIndex { it, i -> println "$i: $it" } mylist.eachWithIndex { count, count -> count + item }
Switch 语句 1 2 3 4 5 6 7 8 9 10 switch () { case '1': echo 1 break case '2': echo 2 break default: }
异常 - Exception 描述:流程控制是Groovy的异常处理机制,在实际过程中建议同时使用try…catch..finally进行捕获异常;1 2 3 4 5 6 7 8 9 10 11 12 try { helloWorld() dir("place" ) { sh 'id' } } catch (e) { currentBuild.result = "FAILED" throw e } finally { println "success or failure, always send notifications" }
函数 - Functions 描述:Groovy中的方法是使用返回类型或使用def关键字定义的, 方法可以接收任意数量的参数并定义参数时不必显式定义类型,可以添加修饰符如public,private和protected。
Tips : 注意事项
默认情况下如果未提供可见性修饰符则该方法为public。
注意: 函数定义不能被包含在node{}块之中, 而函数调用是在 node { stage() { 函数名称} } 之中的;
注意: 函数参数有定义默认值
简单示例 :1 2 3 4 5 6 7 8 9 10 11 12 13 14 15 16 17 18 19 20 21 22 23 24 25 def methodName(String param){ println param } def methodName(String param = 'default1' ,int number = 1024 ) { println "Hello Wrold function - ${param} - ${age}!" println param+" " +age return "Hello Wrold function - ${param} - ${age}!" } def methodName(... param){ println param[0 ] } def printHello=this .&methodNamenode { stage('函数调用' ) { res00 = methodName("WeiyiGeek" ) res01 = methodName("WeiyiGeek" ,1024 ) res02 = printHello("WeiyiGeek" ) } }
闭包函数
Tips: 闭包可以访问外部的变量,记住一点方法是不能访问外部变量的。
1 2 3 4 5 6 7 8 9 10 11 12 13 14 15 16 17 18 19 20 21 22 23 24 25 26 27 28 29 30 31 32 33 34 35 36 37 38 39 40 41 42 43 44 45 46 47 48 49 50 51 52 53 54 55 56 57 58 59 60 61 62 63 64 65 66 67 def xxx = { params -> code }def xxx={code} def str="hello world" def closure={ println str } closure() def closure = { param -> println param } closure("hello world" ) closure "hello world" closure.call("hell call" ) def noReturn={ println "hello world" } println noReturn() def closure={ println "hello $it" } closure("admin" ) def closure={ param01,param02,param03->println param01+param02+param03 } closure "hello" ,"world" ,"ok" def closure={ println it } closure "hello world" def toTriple = { n -> n * 3 }def runTwice = { a, c -> c(c(a)) }println runTwice(5 , toTriple) def times = { x -> { y -> x * y } }println times(3 )(4 ) def runTwice = { a, c -> c(c(a)) }println runTwice(5 , { it * 3 }) def runTwoClosures = { a, c1, c2 -> c1(c2(a)) }assert runTwoClosures(5 , { it * 3 }, { it * 4 }) == 60 def f= {m, i, j-> i + j + m.x + m.y }println f(6 , x: 4 , y: 3 , 7 ) def c = { a, b, c -> a + b + c }def list = [1 , 2 , 3 ]println c(list)
参考地址: https://stackoverflow.com/questions/40870657/groovy-method-definition-not-expected-here
类和对象 Groovy类与Java类似,在字节码级都被编译成Java类,由于其在定义变量上面的灵活性,所以在新建一个Groovy类时还是有一些不同的,增加了许多灵活性。
1.由于Groovy是松散型语言,它并不强制你给属性、方法参数和返回值定义类型。如果没有指定类型,在字节码级别会被编译成Object,所以在定义类的属性时不用刻意加上权限修饰符,默认就是public的。
1 2 3 4 5 6 7 8 9 10 11 12 13 14 15 16 17 18 19 20 21 22 23 24 class Book { def title String author private int price public Book(title){ this .title=title } boolean order(int isbn){ true } def title(){ "Booke Title" } } Book book=new Book("Hello Groovy" ) book.order(1001 ) book.title book.title()
2.Groovy在编译完成后会自动帮助我们生成getter与setter方法,但是私有属性除外也就是说 price 属性我们不能使用getter与setter方法。1 2 3 4 5 6 7 Book book=new Book("Hello Groovy" ) println book.getTitle() book.setTitle("New Groovy" ) println book.getTitle() println book.title
3.在Groovy中类名和文件名并不需要严格的映射关系,我们知道在Java中主类名必须与文件同名,但是在Groovy中一个文件可以定义多个public类。
1 2 3 4 5 6 7 8 9 10 11 12 13 14 15 16 17 class Hello { public static String hello(){ return "hello" } } class World { public static String world(){ return "world" } } println Hello.hello()+World.world() def helloWorld(){return "hello world" }
上面一个文件名定义为Structure.groovy,在这个文件中包含了类的定义和独立方法声明,它编译之后会发生什么呢。
首先会生成一个与文件同名的class文件,所有的松语句都集中在run方法中,并且run方法被该类的main方法调用。Hello.class、World.class和Structure.class。
字符串处理 字符串分隔
split() :结果为字符串数组、保留空字符串、按照单词切割、支持使用使用正则
tokenize() :结果为List、但不会保留空字符串、按字符串切割、不支持使用使用正则1 2 3 4 5 6 7 8 def demo_string = "Hello WeiyiGeek" out1 = demo_string.split("l" ) out2 = demo_string.tokenize("l" ) out3 = demo_string.split('lo' ) out4 = demo_string.tokenize('li' ) out5 = demo_string.split(/We\w{3}/)
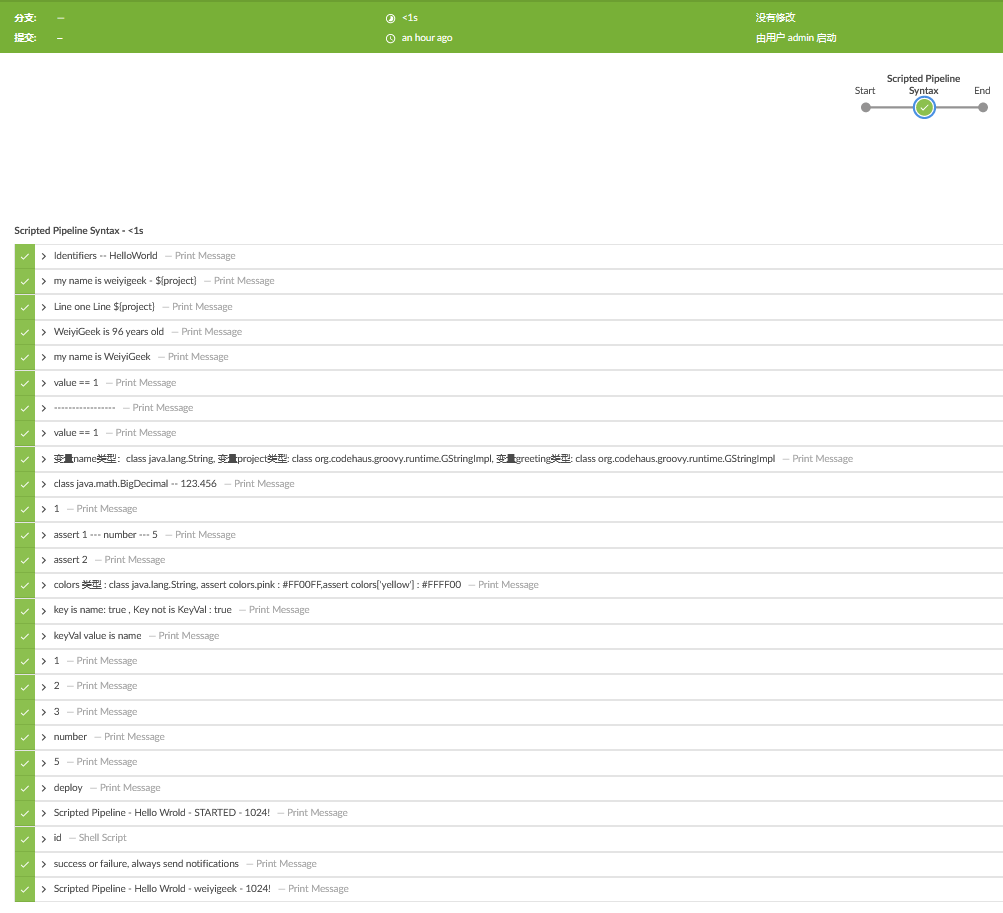
语法总结 描述: 此次对 Scripted Pipeline 语法的使用进行一个简单的总结, 或许在后面的Declarative Pipeline中可以进行使用;1 2 3 4 5 6 7 8 9 10 11 12 13 14 15 16 17 18 19 20 21 22 23 24 25 26 27 28 29 30 31 32 33 34 35 36 37 38 39 40 41 42 43 44 45 46 47 48 49 50 51 52 53 54 55 56 57 58 59 60 61 62 63 64 65 66 67 68 69 70 71 72 73 74 75 76 77 78 79 80 81 82 83 84 85 86 87 88 89 90 91 92 93 94 95 96 97 98 99 100 101 102 103 104 105 106 107 108 109 110 111 112 113 114 115 116 117 118 119 120 121 122 123 124 125 126 127 128 129 130 131 132 133 134 135 136 137 138 node { def foo def project="HelloWorld" def name='weiyigeek - ${project}' def line='''\ Line one Line ${project} ''' def person = [name: 'WeiyiGeek' , age: 96 ] stage('Scripted Pipeline Syntax' ) { foo="Identifiers" echo "${foo} -- ${project}" echo "my name is ${name}" echo "${line}" echo "$person.name is $person.age years old" name = 'WeiyiGeek' project = "my name is ${name}" def greeting = "Hello ${name}" assert greeting.toString() println "${project.toString()}" def number = 1 def eagerGString = "value == ${number}" def lazyGString = "value == ${-> number}" println eagerGString println lazyGString number=1024 echo "-----------------" println eagerGString println lazyGString println "变量name类型:" +name.class +", \n 变量project类型: " +project.class +", \n 变量greeting类型: " +greeting.class def decimal = 123.456 println "${decimal.getClass()} -- ${decimal} " def arrayList = [1 ,2 ,3 ,"number" ] println arrayList[0 ] arrayList << '5' echo "assert ${arrayList[0]} --- ${arrayList[-2]} --- ${arrayList[-1]}" def multi = [[0 , 1 ], [2 , 3 ]] echo "assert ${multi[1][0]}" def colors = [red: '#FF0000' , green: '#00FF00' , blue: '#0000FF' ] colors['pink' ] = '#FF00FF' colors.yellow = '#FFFF00' println "colors 类型 : " + colors.pink.class + ", assert colors.pink : " + colors.pink + ",assert colors['yellow'] : " + colors['yellow' ] def keyVal = 'name' def persons = [(keyVal): 'WeiyiGeek' ] println "key is name: " + persons.containsKey('name' ) + " , Key not is KeyVal : " + !persons.containsKey('keyVal' ) if ( keyVal == 'name' ) { echo "keyVal value is name" } else { echo "keyVal value is not name" } if (env.BRANCH_NAME == 'master' ) { echo 'I only execute on the master branch' } else { echo 'I execute elsewhere' } for (int i=0 ; i < 5 ; i++) { println arrayList[i] } def option = "deploy" switch ("${option}" ) { case 'deploy' : echo "deploy" break case 'rollback' : echo "rollback" break default: echo "default" } try { helloWorld() dir("place" ) { sh 'id' } } catch (e) { currentBuild.result = "FAILED" throw e } finally { println "success or failure, always send notifications" } helloWorld("weiyigeek" ) } } def helloWorld (String username = 'STARTED' ,int age = 1024 ) { println "Scripted Pipeline - Hello Wrold - ${username} - ${age}!" }
weiyigeek.top-Scripted Pipeline 示例
(2) Declarative Pipeline Syntax 描述: 前面说过Declarative Pipeline是 Jenkins Pipeline 的一个相对较新的补充, 它在Pipeline子系统之上提出了一种更为简化和有意义的语法。
Declarative Pipeline 中的基本语句和表达式遵循与Groovy语法相同的规则 ,但有以下例外:
1.Pipeline的顶层必须是块,即所有有效的Declarative Pipeline必须包含在一个pipeline块内.
2.没有分号作为语句分隔符,每个声明必须在自己的一行。
3.块只能包含Sections, Directives, Steps或赋值语句。
4.属性引用语句被视为无参方法调用。(例如: 输入被视为input)
参考流水线语法: http://jenkins.weiyigeek.top:8080/job/simple-pipeline-demo/pipeline-syntax
简单语法规范示例:1 2 3 4 5 6 7 8 9 10 11 12 13 14 15 16 17 18 19 20 21 22 23 24 25 26 27 28 29 30 31 32 pipeline { agent any environment { hostname='Jenkins Pipeline' } stages { stage ('clone' ) { steps { echo "git Clone Stage!" } } stage ('build' ) { steps { sh "echo $hostname" } } } post { always { echo "构建成功" } } }
语法格式说明:
agent 部分:指定流水线的执行位置(Jenkins agent)。流水线中的每个阶段都必须在某个地方(物理机、虚拟机或Docker容器)执行。
stage 部分:阶段,代表流水线的阶段。每个阶段都必须有名称。本例中,build就是此阶段的名称。
stages 部分:流水线中多个stage的容器。stages部分至少包含一个stage。
steps 部分:代表阶段中的一个或多个具体步骤(step)的容器。steps部分至少包含一个步骤。
post 部分:包含的是在整个pipeline或阶段完成后一些附加的步骤 (可选)
2.1) Sections - 章节 描述: 声明性 Pipeline中的节通常包含一个或多个指令或步骤(Steps)。
agent - 代理 描述: 指定整个Pipeline或特定阶段将在Jenkins环境中执行的位置,具体取决于该agent 部分的放置位置;
语法参数: 1 2 3 4 5 6 7 8 9 10 必须: YES 参数:any / none / label / node / docker / dockerfile / kubernetes - 1.在任何可用的 agent 上执行Pipeline或stage - 2.在pipeline块的顶层应用时,不会为整个 Pipeline运行分配全局代理,并且每个stage部分都需要包含自己的agent部分。 - 3.使用提供的标签在Jenkins环境中可用的代理上执行 Pipeline或阶段, 注意标签条件也可以使用。 - 4.node使用与lable类似 - 5.执行Pipeline或stage时会动态供应一个docker节点去接受Docker-based的Pipelines。 - 6.使用从Dockerfile源存储库中包含的容器构建的容器执行 Pipeline或阶段,Jenkinsfile 必须从多分支 Pipeline或 SCM Pipeline加载。 - 7.在Kubernetes集群上部署的Pod内执行 Pipeline或阶段,同样Jenkinsfile 必须从多分支 Pipeline或 SCM Pipeline加载,Pod模板在kubernetes {} 块内定义。 允许:在顶层pipeline块和每个stage块中。
语法示例: 1 2 3 4 5 6 7 8 9 10 11 12 13 14 15 16 17 18 19 20 21 22 23 24 25 26 27 28 29 30 31 32 33 34 35 36 37 38 39 40 41 42 43 44 45 46 47 48 49 50 51 52 53 54 55 56 57 58 59 60 61 62 63 64 65 66 67 68 69 70 71 pipeline { agent any agent none agent { label 'my-label1 && my-label2' } agent { node { label 'labelName' } } agent { docker { image 'maven:3-alpine' label 'my-defined-label' args '-v /tmp:/tmp' registryUrl 'https://myregistry.com/' registryCredentialsId 'myPredefinedCredentialsInJenkins' } } agent { dockerfile { filename 'Dockerfile.build' dir 'build' label 'my-defined-label' additionalBuildArgs '--build-arg version=1.0.2' args '-v /tmp:/tmp' registryUrl 'https://myregistry.com/' registryCredentialsId 'myPredefinedCredentialsInJenkins' } } agent { kubernetes { label podlabel yaml """ kind: Pod metadata: name: jenkins-agent spec: containers: - name: kaniko image: gcr.io/kaniko-project/executor:debug imagePullPolicy: Always command: - /busybox/cat tty: true volumeMounts: - name: aws-secret mountPath: /root/.aws/ - name: docker-registry-config mountPath: /kaniko/.docker restartPolicy: Never volumes: - name: aws-secret secret: secretName: aws-secret - name: docker-registry-config configMap: name: docker-registry-config """ } }
常用选项:
1.label (参数:字符串): 运行 Pipeline或单个 Pipeline的标签或标签条件stage。 【此选项对node,docker和有效对dockerfile必需 node。】
2.customWorkspace (参数: 字符串) : 运行 Pipeline或个人 stage 这 agent 是这个自定义的工作空间内的应用,而不是默认的, 它可以是相对路径(在这种情况下自定义工作空间将位于节点上的工作空间根目录下),也可以是绝对路径。【此选项是有效的node,docker和dockerfile。】
3.reuseNode(参数: 布尔值-false): 如果为true在同一工作空间中在 Pipeline顶级指定的节点上运行容器,而不是在整个新节点上运行
4.args (参数: 字符串): 要传递给的运行时参数docker run,此选项对docker和有效dockerfile。
1 2 3 4 5 6 7 8 9 10 11 12 13 14 15 16 17 18 19 20 21 22 23 24 25 26 27 28 29 30 31 32 33 34 35 36 pipeline { agent { docker 'maven:3-alpine' } stages { stage('Example Build' ) { steps { sh 'mvn -B clean verify' } } } } pipeline { agent none stages { stage('Example Build' ) { agent { docker 'maven:3-alpine' } steps { echo 'Hello, Maven' sh 'mvn --version' } } stage('Example Test' ) { agent { docker 'openjdk:8-jre' } steps { echo 'Hello, JDK' sh 'java -version' } } } }
stages - 阶段 描述: Stages 是 Pipeline描述的大部分“工作”所在的位置, 该部分包含一个或多个阶段指令的序列。对于连续交付过程的每个离散部分,建议stages至少包含一个阶段指令,例如Build,Test和Deploy。
位置&参数:1 2 3 必须: YES 参数:NONE 允许:pipeline块内只有一次
例子.阶段声明性 Pipeline1 2 3 4 5 6 7 8 9 10 11 pipeline { agent any stages { stage('Example' ) { steps { echo 'Hello World' } } } }
Tips : 该部分必须在pipeline块内的顶层定义,但stage级使用是可选的。
steps - 步骤 描述: 该阶段包含在给定指令中执行的一系列一个或多个步骤 stage 之中
位置&参数:1 2 3 必须: YES 参数:None 允许:每个Stage块之中
script - 脚本 描述: 前面我们说过我们可在Declarative Pipeline 中 采用script指令来执行Scripted Pipeline中的一些脚本;
例子.单步式声明式 && Script Block in Declarative Pipeline1 2 3 4 5 6 7 8 9 10 11 12 13 14 15 16 17 18 pipeline { agent any stages { stage('Example' ) { steps { echo 'Hello World' script { def browsers = ['chrome' , 'firefox' ] for (int i = 0 ; i < browsers.size(); ++i) { echo "Testing the ${browsers[i]} browser" } } } } } }
sh - 命令执行 描述: pipeline中获取shell命令的输出以及状态,注意其必须在steps 块以及 script 块之中
(0) 最简单的方式最简单的方式
(1) 获取标准输出
1 2 3 4 5 6 7 8 result = sh returnStdout: true ,script: "<shell command>" result = result.trim() result = sh(script: "<shell command>" , returnStdout: true ).trim() sh "<shell command> > commandResult" result = readFile('commandResult' ).trim()
(2) 获取执行状态
1 2 3 4 5 6 7 8 9 10 11 12 13 14 15 16 17 18 19 20 result = sh returnStatus: true ,script: "<shell command>" result = result.trim() result = sh(script: "<shell command>" , returnStatus: true ).trim() sh '<shell command>; echo $? > status' def r = readFile('status' ).trim() sh label: 'release' , returnStdout: true , script: """ sudo apk add jq && \ if ( \$(curl -s --header 'PRIVATE-TOKEN: ${private_token}' ${GITLAB_REL} | jq .[].tag_name | grep -c '${params.RELEASE_VERSION}') != 0 );then echo -n 1 > result.txt;else echo -n 0 > result.txt;fi """ def r = readFile('result.txt' ).trim() sh(returnStatus: true , script: "sudo apk add jq && curl -s --header 'PRIVATE-TOKEN: ${private_token}' ${GITLAB_REL} | jq .[].tag_name | grep -c '${params.RELEASE_VERSION}'" )
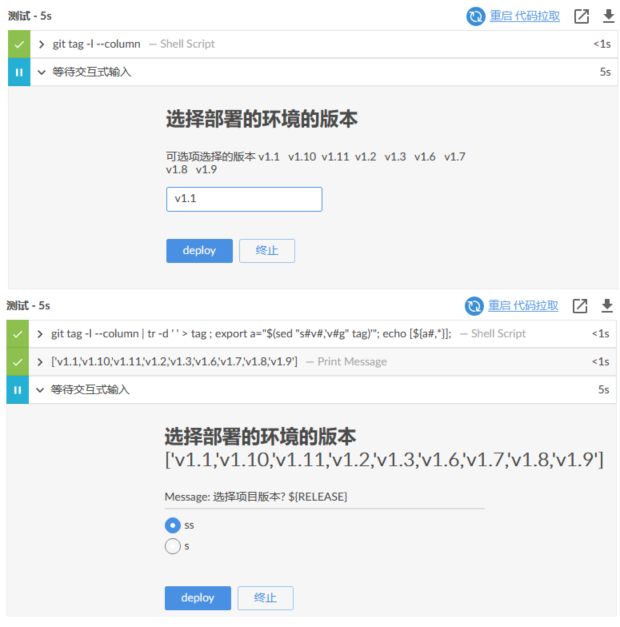
实际案例:1 2 3 4 5 6 7 8 9 10 11 12 13 14 15 16 17 18 19 20 21 22 23 24 25 26 27 28 29 30 31 32 33 34 35 36 37 38 39 40 sh ' $SonarScannerHome/bin/sonar-scanner ' + '-Dsonar.sources=src/main ' + '-Dsonar.projectKey="test" ' + '-Dsonar.projectName="test" ' stage ("测试" ) { steps { timeout(time: 1 , unit: 'MINUTES' ) { script { def RELEASE=sh returnStdout: true , script: 'git tag -l --column' env.DEPLOY_ENV = input message: "选择部署的环境的版本" , ok: 'deploy' , parameters: [string(name: 'DEPLOY_ENV' ,defaultValue: "${RELEASE}" ,description: "可选项选择的版本 ${RELEASE}" )] } } } } stage ("测试" ) { steps { timeout(time: 1 , unit: 'MINUTES' ) { script { def RELEASE=sh returnStdout: true , script: 'git tag -l --column' def RELE=sh returnStdout: true , script: """\ git tag -l --column | tr -d ' ' > tag ; export a="\$(sed "s#v#,'v#g" tag)'"; echo [\${a#,*}]; """ println RELE env.DEPLOY_RELEASE = input message: "选择部署的环境的版本 ${RELE}" , ok: 'deploy' , parameters: [choice(name: 'PREJECT_OPERATION' , choices: ["ss" ,"s" ], description: 'Message: 选择项目版本? ${RELE}' )] } } }
weiyigeek.top-script块&sh指令联合使用
Tips : 注意传递变量得生存周期以及范围,在pipeline全局中则全局有效,而stage块中则该块中有效,其他stage引用则报No such property: 变量名称 for class: groovy.lang.Binding错误
post - 发布 描述: 本post部分定义了在 Pipeline或阶段的运行完成后运行的一个或多个其他步骤(取决于该post部分在 Pipeline中的位置),即定义Pipeline或stage运行结束时的操作, 通常将清理工作空间以及构建状态的消息通知(Email/钉钉、企业微信或者其他WebHook);always, changed,fixed,regression,aborted,failure,success, unstable,unsuccessful,和cleanup, 条件块允许根据 Pipeline或阶段的完成状态在每个条件内执行步骤。
位置&参数: 1 2 3 4 5 6 7 8 9 10 11 12 13 14 15 必须: NO 参数:`always,changed,fixed,regression,aborted,failure,success, unstable,unsuccessful,和cleanup` - always :post不管 Pipeline运行或阶段运行的完成状态如何,都运行本节中的步骤。 - changed :仅post当当前 Pipeline或阶段的运行与之前的运行具有不同的完成状态时,才运行步骤。 - fixed :仅post在当前 Pipeline或阶段的运行成功并且前一运行失败或不稳定的情况下运行步骤。 - regression :仅post当当前 Pipeline或阶段的运行状态为失败,不稳定或中止并且上一次运行成功时,才运行步骤。 - aborted :仅post在当前 Pipeline或阶段的运行状态为“中止”时才运行步骤,通常是由于手动中止了 Pipeline。通常在网络用户界面中用灰色表示。 - failure :仅post当当前 Pipeline或阶段的运行具有“失败”状态时才运行这些步骤,通常在Web UI中用红色表示。 - success :仅post当当前 Pipeline或阶段的运行具有“成功”状态时才运行步骤,通常在Web UI中用蓝色或绿色表示。 - unstable :仅post在当前 Pipeline或阶段的运行状态为“不稳定”(通常由测试失败,代码冲突等引起)的情况下,才运行步骤。通常在Web UI中以黄色表示。 - unsuccessful :仅post当当前 Pipeline或阶段的运行状态不是“成功”时才运行步骤。这通常根据前面提到的状态在Web UI中表示。 - cleanup : 在评估post所有其他条件之后post,无论 Pipeline或阶段的状态如何,都在此条件下运行步骤。 允许位置:在顶层pipeline块和每个stage块中。
示例.Post 部分示例:1 2 3 4 5 6 7 8 9 10 11 12 13 14 15 pipeline { agent any stages { stage('Example' ) { steps { echo 'Hello World' } } } post { always { echo 'I will always say Hello again!' } } }
2.2) Directives - 指令 描述: 显然基本结构满足不了现实多变的需求。所以Jenkins pipeline通过各种指令(directive)来丰富自己。指令可以被理解为对Jenkins pipeline基本结构的补充。
Jenkins pipeline支持的指令有:
environment:用于设置环境变量,可定义在stage或pipeline部分。
tools:可定义在pipeline或stage部分。它会自动下载并安装我们指定的工具,并将其加入PATH变量中。
input:定义在stage部分,会暂停pipeline,提示你输入内容。
options:用于配置Jenkins pipeline本身的选项,比如options {retry(3)}指当pipeline失败时再重试2次。options指令可定义在stage或pipeline部分。
parallel:并行执行多个step。在pipeline插件1.2版本后,parallel开始支持对多个阶段进行并行执行。
parameters:与input不同,parameters是执行pipeline前传入的一些参数。
triggers:用于定义执行pipeline的触发器。
when:当满足when定义的条件时,阶段才执行。
Tips: 在使用指令时需要注意的是每个指令都有自己的“作用域”。如果指令使用的位置不正确Jenkins将会报错。
environment - 环境 描述: 该指定了一系列键值对,这些键值对将被定义为所有步骤或特定于阶段的步骤的环境变量,具体取决于该environment指令在 Pipeline中的位置。
位置&参数: 1 2 3 必须: No 参数:Yes 允许:在pipeline块内,或在stage指令内。
Tips : 非常注意该块中的变量将写入到Linux环境变量之中作为全局变量,在shell可通过变量名访问,而在script pipeline脚本中通过env.变量名称访问.
支持的凭证类型:Supported Credentials Type
Secret Text :设置为加密文本字符串内容
Secret File : 设置为临时创建的文件文件的位置, 并自动定义变量存储该文件内容。
Username and password : 将设置为username:password并且两个其他环境变量将自动定义为MYVARNAME_USR 和MYVARNAME_PSW。
SSH with Private Key : 设置为临时创建的SSH密钥文件的位置,并且可能会自动定义两个其他环境变量:MYVARNAME_USR和MYVARNAME_PSW(保留密码)。
示例1:秘密文本凭证,声明性 Pipeline1 2 3 4 5 6 7 8 9 10 11 12 13 14 15 16 17 18 19 20 21 pipeline { agent any environment { CC = 'clang' } stages { stage('Example' ) { environment { AN_ACCESS_KEY = credentials('my-predefined-secret-text' ) } steps { sh 'printenv' echo "${env.AN_ACCESS_KEY}" echo "${env.CC}" } } } }
示例2.用户名和密码凭证1 2 3 4 5 6 7 8 9 10 11 12 13 14 15 16 17 18 19 20 21 22 23 24 25 26 27 28 29 30 31 32 33 34 35 36 37 38 39 40 41 42 43 44 45 46 47 48 pipeline { agent any stages { stage('Example Username/Password' ) { environment { SERVICE_CREDS = credentials('my-predefined-username-password' ) } steps { sh 'echo "Service user is $SERVICE_CREDS_USR"' sh 'echo "Service password is $SERVICE_CREDS_PSW"' sh 'curl -u $SERVICE_CREDS https://myservice.example.com' } } stage('Example SSH Username with private key' ) { environment { SSH_CREDS = credentials('my-predefined-ssh-creds' ) } steps { sh 'echo "SSH private key is located at $SSH_CREDS"' sh 'echo "SSH user is $SSH_CREDS_USR"' sh 'echo "SSH passphrase is $SSH_CREDS_PSW"' echo "${JOB_NAME}" echo env.'JOB_NAME' println(env.'JOB_NAME' ) script { def projectProduct = sh returnStdout: true , script: "find ${APP_NAME}" if ( projectProduct != '' ){ echo "${projectProduct}" writeFile file: 'abc.sh' , text: "${projectProduct}" change_id = readFile 'abc.sh' print(change_id) } else { error "[-Error] : projectProduct 不能为空!" } } } } } }
Tips : 该指令支持特殊的帮助程序方法credentials(),该方法可用于在Jenkins环境中通过其标识符访问预定义的凭据。
Tips : 如有不支持的凭据类型导致 Pipeline失败,并显示以下消息:org.jenkinsci.plugins.credentialsbinding.impl.CredentialNotFoundException: No suitable binding handler could be found for type <unsupportedType>.
options - 选项 描述: options 指令 允许在 Pipeline 本身内配置 Pipeline 专用选项, 例如 buildDiscarder 它们也可能由插件提供;
位置&参数: 1 2 3 必须: No 参数:None 允许:pipeline块内只有一次。
可用选项:
1.buildDiscarder : 保存最近历史构建记录的数量。设置此选项后会自动清理pipeline 的构建历史。
1 options { buildDiscarder(logRotator(numToKeepStr: '1' )) }
2.disableConcurrentBuilds : 禁止并发执行 Pipeline 对于防止同时访问共享资源等很有用
1 options { disableConcurrentBuilds() }
3.checkoutToSubdirectory : Jenkins从版本控制库拉取源码时,默认检出到工作空间的根目录中,此选项可以指定检出到工作空间的子目录中。
1 options { checkoutToSubdirectory('foo' ) }
4.newContainerPerStage : 当agent为docker或dockerfile时,指定在同一个Jenkins节点上,每个stage都分别运行在一个新的容器中,而不是所有stage都运行在同一个容器中。
5.disableResume : 如果控制器重新启动则不允许 Pipeline恢复
1 options { disableResume() }
6.overrideIndexTriggers : 允许重写分支索引触发器的默认处理,如果在多分支或组织标签处禁用了分支索引触发器。
1 2 3 4 5 options { overrideIndexTriggers(true ) } options { overrideIndexTriggers(false ) }
7.preserveStashes: 保留已完成构建中的隐藏项,以用于阶段重新启动。
1 2 3 4 5 options { preserveStashes() } options { preserveStashes(buildCount: 5) }
8.quietPeriod:设置 Pipeline的静默时间段(以秒为单位),以覆盖全局默认值
1 options { quietPeriod(30) }
9.retry:如果失败重试整个 Pipeline指定次数。该次数是指总次数包括第1次失败。
10.skipDefaultCheckout : 默认跳过来自源代码控制的代码(代理指令)。
1 options { skipDefaultCheckout() }
11.skipStagesAfterUnstable : 一旦构建状态变得不稳定就跳过各个阶段;
1 options { skipStagesAfterUnstable() }
12.timestamps : 预定义由Pipeline生成的所有控制台输出时间
1 options { timestamps() }
13.parallelsAlwaysFailFast :将 Pipeline中所有后续并行阶段的failfast设置为true。
1 options { parallelsAlwaysFailFast() }
14.timeout(常用) : 设置 Pipeline运行的超时时间在此之后Jenkins 应中止 Pipeline(运行的超时时间)。
1 2 3 4 5 6 7 8 9 10 11 12 13 14 15 16 17 18 options { timeout(time: 1, unit: 'HOURS' ) } pipeline { agent any options { // 将全局执行超时指定为一小时,然后Jenkins将中止 Pipeline运行。 timeout(time: 1, unit: 'HOURS' ) } stages { stage('Example' ) { steps { echo 'Hello World' } } } }
Tips: 在 stage 块中支持的 options 要少于 pipeline 块中,只能采用skipDefaultCheckout,timeout,retry,timestamps 等选项;
例如:1 2 3 4 5 6 7 8 9 10 11 12 13 14 pipeline { agent any stages { stage('Example' ) { options { timeout(time: 1 , unit: 'HOURS' ) } steps { echo 'Hello World' } } } }
parameters - 参数 描述: 该指令提供了一个用户在触发 Pipeline时应该提供的参数列表。这些用户指定参数的值通过params对象提供给 Pipeline步骤,请参阅参数,声明式 Pipeline的具体用法。
目前可用参数有string , text, booleanParam, choice, password等参数,其他高级参数化类型还需等待社区支持。
位置&参数: 1 2 3 必须: No 参数: None 允许: 在`Pipeline`块内仅一次。
Tips : 非常注意全局参数, 在shell可通过变量名访问,而在script pipeline脚本中通过params.参数名称访问.
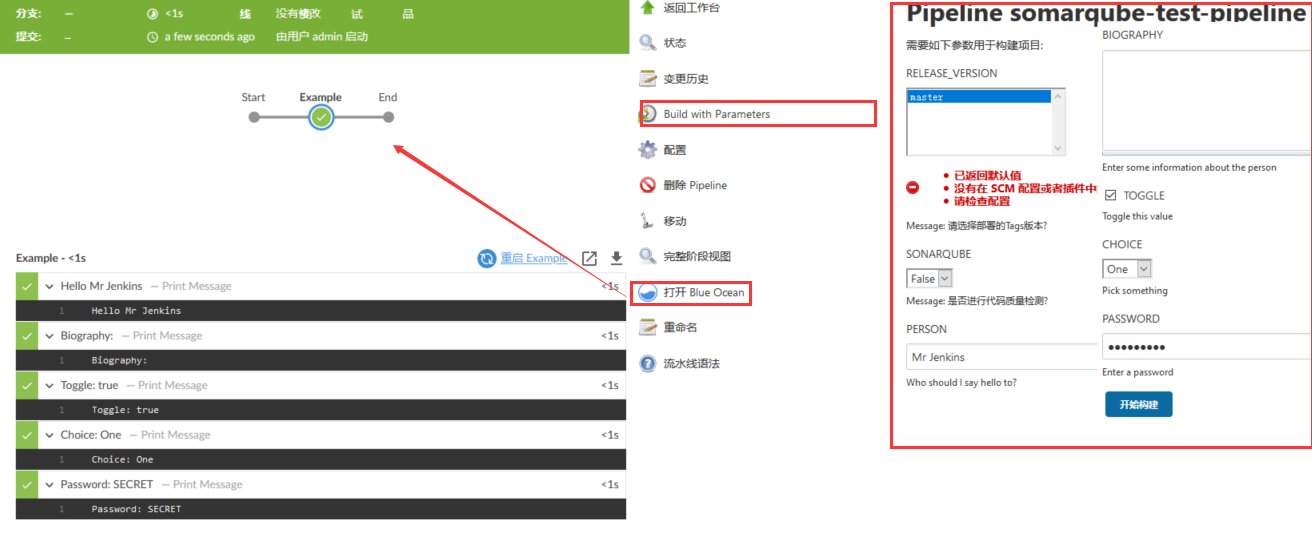
示例: Parameters, Declarative Pipeline 1 2 3 4 5 6 7 8 9 10 11 12 13 14 15 16 17 18 19 20 21 22 23 24 25 26 27 28 29 30 31 32 33 34 35 36 37 38 39 40 41 42 43 Parameters, Declarative Pipeline pipeline { agent any parameters { gitParameter name: 'RELEASE_VERSION' , type: 'PT_BRANCH_TAG' , branchFilter: 'origin/(.*)' , defaultValue: 'master' , selectedValue: 'DEFAULT' , sortMode: 'DESCENDING_SMART' , description: 'Message: 请选择部署的Tags版本?' choice(name: 'SONARQUBE' , choices: ['False' ,'True' ], description: 'Message: 是否进行代码质量检测?' ) string(name: 'PERSON' , defaultValue: 'Mr Jenkins' , description: 'Who should I say hello to?' ) text(name: 'BIOGRAPHY' , defaultValue: '' , description: 'Enter some information about the person' ) booleanParam(name: 'TOGGLE' , defaultValue: true , description: 'Toggle this value' ) choice(name: 'CHOICE' , choices: ['One' , 'Two' , 'Three' ], description: 'Pick something' ) password(name: 'PASSWORD' , defaultValue: 'SECRET' , description: 'Enter a password' ) } stages { stage('Example' ) { steps { echo "Hello ${params.PERSON}" echo "Biography: ${params.BIOGRAPHY}" echo "Toggle: ${params.TOGGLE}" echo "Choice: ${params.CHOICE}" echo "Password: ${params.PASSWORD}" } } } }
weiyigeek.top-parameters
triggers - 触发器 描述: 该指令定义了Pipeline自动化触发的方式,对于与GitHub或BitBucket等源集成的 Pipeline可能不需要触发器,因为基于webhook的集成可能已经存在了。
位置&参数: 1 2 3 必须: No 参数: None 允许: 在Pipeline块内
Tips : 当前可用的触发器是cron、pollSCM和upstream。
1.cron : 以Linux中Cron风格的字符串,以定义应该重新触发 Pipeline的定期间隔
1 triggers { cron('H */4 * * 1-5' ) }
2.pollSCM : 接受cron样式的字符串以定义Jenkins应检查新源更改的定期间隔。如果存在新的更改则将重新触发 Pipeline。
1 triggers { pollSCM('H */4 * * 1-5' ) }
Tips : pollSCM触发器仅在Jenkins 2.22或更高版本中可用。
3.upstream : 接受以逗号分隔的作业字符串和阈值。当字符串中的任何作业以最小阈值结束时 Pipeline将被重新触发
1 triggers { upstream(upstreamProjects: 'job1,job2' , threshold: hudson.model.Result.SUCCESS) }
cron语法 1 2 3 4 5 6 7 8 9 10 * * * * * MINUTE - Minutes within the hour (0–59) HOUR - The hour of the day (0–23) DAY - The day of the month (1–31) MONTH - The month (1–12) WEEK - The day of the week (0–7) where 0 and 7 are Sunday.
如果要为一个字段指定多个值,可以使用以下操作符。按照优先顺序,1 2 3 4 5 6 7 * specifies all valid values (指定所有有效值) M-N specifies a range of values (指定值范围) M-N/X or */X steps by intervals of X through the specified range or whole valid range (在指定范围或整个有效范围内按X的间隔步进) A,B,…,Z enumerates multiple values (枚举多个值)
Tips : 在 Cron 中使用 H 字符为了使定期计划的任务在系统上产生均匀的负载,H符号可以被认为是在一定范围内的随机值。使用0 0 * * *一打日常工作将导致午夜时分大幅增加。相反使用H H * * *仍会每天执行一次每个作业,但不是同时执行所有作业,更好地使用有限的资源。
Tips : 此外@yearly,@annually,@monthly, @weekly,@daily,@midnight,并且@hourly也支持方便的别名。这些使用哈希系统进行自动平衡。 并且可能表示该小时中的任何时间, @midnight实际上是指在12:00 AM和2:59 AM之间的某个时间。
示例.Triggers, Declarative Pipeline: 1 2 3 4 5 6 7 8 9 10 11 12 13 14 15 16 17 18 19 20 21 22 23 24 25 26 27 28 29 30 triggers{ cron('H/15 * * * *' ) } triggers{ cron('H(0-29)/10 * * * *' ) } triggers{ cron('45 9-16/2 * * 1-5' ) } triggers{ cron('H H(9-16)/2 * * 1-5' ) } triggers{ cron('H H 1,15 1-11 *' ) } pipeline { agent any triggers { cron('H */4 * * 1-5' ) } stages { stage('Example' ) { steps { echo 'Hello World' } } } }
stage - 单阶段 描述: 该 stage 指令位于stages中并且应包含Step 节,可选 agent 节或其他特定于阶段的指令, 实际上管道完成的所有实际工作都将包含在一个或多个stage指令中。
位置&参数: 1 2 3 必须: YES 参数: 步骤名称(字符串、必填) 允许: 在 Pipeline块 -> stages部分 内
示例.stage , Declarative Pipeline 1 2 3 4 5 6 7 8 9 10 11 pipeline { agent any stages { stage('Example' ) { steps { echo 'Hello World' } } } }
描述: 定义自定义安装的Tools工具路径,并放置环境变量到PATH。如果agent none 这将被忽略
位置&参数: 1 2 3 必须: No 参数: None 允许: 在 Pipeline 块 或者 stage 部分 内
示例.Tools ,声明性管道 1 2 3 4 5 6 7 8 9 10 11 12 13 14 15 16 17 18 19 20 21 pipeline { agent any tools { maven 'apache-maven-3.0.1' } stages { stage('Example' ) { steps { sh 'mvn --version' script { def scannerHome = tool 'sonarqubescanner' } withSonarQubeEnv('SonarQube' ) { sh "${scannerHome}/bin/sonar-scanner -Dsonar.projectKey=YourProjectKey -Dsonar.sources=." } } } } }
描述: input指令允许您使用输入步骤提示输入。在应用了任何选项之后,在进入该阶段的代理块或评估该阶段的when条件之前,该阶段将暂停。如果输入被批准,该阶段将继续。作为输入提交的一部分提供的任何参数都将在该阶段的其余部分的环境中可用。
位置&参数: 1 2 3 必须: No 参数: message 、id 、ok、submitter、submitterParameter、parameters 允许: 在 Pipeline块 -> stages 块内 (注意不是在stage中)
配置选项
message : 必须的前台输入时提示用户的信息;
id : 此输入的可选标识符。默认为阶段名称。
ok : 输入表单上“确定”按钮的可选文本。
Parameter : 提示提交者提供的可选参数列表。请参阅参数 以获取更多信息。
submitter : 可选的用逗号分隔的用户或允许输入此输入的外部组名的列表,默认为允许任何用户。
submitterParameter : 可以使用提交者名称设置的环境变量的可选名称(如果存在)。
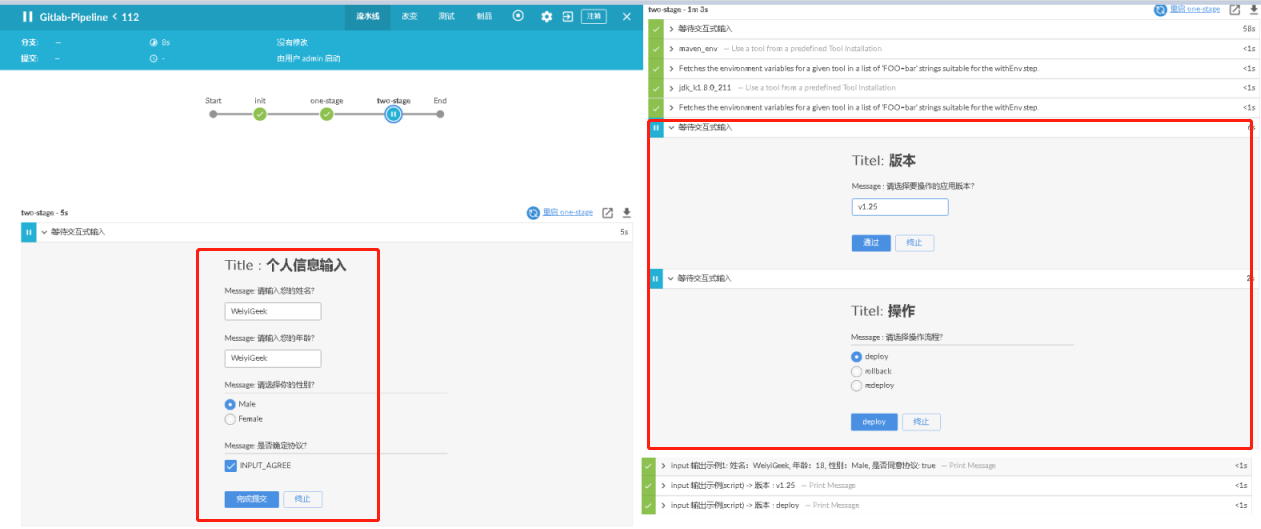
基础示例:1 2 3 4 5 6 7 8 9 10 11 12 13 14 15 16 17 18 19 20 21 22 23 24 25 26 27 28 29 30 31 32 33 34 35 36 37 38 39 40 41 42 pipeline { agent any stages { stage('Example' ) { input { message "Title : 个人信息输入" ok "完成提交" submitter "alice,bob" parameters { string(name: 'INPUT_PERSON' , defaultValue: 'WeiyiGeek' , description: 'Message: 请输入您的姓名?' ) string(name: 'INPUT_AGE' , defaultValue: 'WeiyiGeek' , description: 'Message: 请输入您的年龄?' ) choice(name: 'INPUT_SEX' , choices: ['Male' ,'Female' ], description: 'Message: 请选择你的性别?' ) booleanParam(name: 'INPUT_AGREE' , defaultValue: true , description: 'Message: 是否确定协议?' ) } } steps { script { env.git_version=input message: 'Titel: 版本' , ok: '通过' ,parameters: [string ( name: 'git_version' , trim: true , description: 'Message : 请选择要操作的应用版本?' )]; env.deploy_option = input message: 'Titel: 操作' , ok: 'deploy' , parameters: [choice(name: 'deploy_option' , choices: ['deploy' , 'rollback' , 'redeploy' ], description: 'Message : 请选择操作流程?' )]; } echo "局部可用 输出示例1: 姓名:${INPUT_PERSON}, 年龄:${INPUT_AGE}, 性别:${INPUT_SEX}, 是否同意协议: ${INPUT_AGREE}" echo "全局可用 输出示例(script) -> 版本 : ${env.git_version}" echo "全局可用 输出示例(script) -> 版本 : ${env.deploy_option}" } } stage ('调用' ) { steps { echo "调用1 : ${env.git_version}" echo "调用2 : ${env.deploy_option}" } } }
weiyigeek.top-实际案例
when - 执行条件 描述: 该指令允许管道根据给定条件确定是否应执行该阶段,when指令必须至少包含一个条件,如果when指令包含多个条件,则所有子条件必须返回true才能执行该阶段;
使用嵌套条件构建更复杂的条件结构:not,allOf或anyOf,嵌套条件可以嵌套到任意深度。
1.如果使用allOf条件,则表示所有条件为真才继续执行。
2.如果使用anyOf条件,请注意一旦找到第一个“真”条件,该条件将跳过其余测试。
3.使用使用not条件是,则当条件为false是为真才进行执行
1 2 3 4 5 6 7 8 when { not { branch 'master' } } when { allOf { branch 'master' ; environment name: 'DEPLOY_TO' , value: 'production' } } when { anyOf { branch 'master' ; branch 'staging' } }
位置&参数: 1 2 3 必须: No 参数: Express 允许: 在 Pipeline块 -> stage 块内
内置条件:
branch : 当正在构建的分支与给出的分支模式匹配时执行,请注意这仅适用于多分支管道;
1 when { branch 'master' }
environment : 当指定的环境变量设置为给定值时执行,
1 when { expression { return params.DEBUG_BUILD } }
equals : 当期望值等于实际值时执行阶段,
1 when { equals expected: 2 , actual: currentBuild.number }
expression : 在指定的Groovy表达式计算为true时执行阶段, 注意当从表达式返回字符串时,它们必须被转换为布尔值,或者返回null来计算为false。简单地返回"0"或"false"仍然会计算为"true"。
1 when { expression { return params.DEBUG_BUILD } }
Tag : 如果TAG_NAME变量匹配给定的模式则执行该阶段, 注意如果提供了一个空模式,那么阶段将在TAG_NAME变量存在时执行(与buildingTag()相同)。
1 when { tag "release-*" }
buildingTag : 执行构建构建标签的阶段.
changelog : 如果构建的SCM更改日志包含给定的正则表达式模式则执行阶段;
1 when { changelog '.*^\\[DEPENDENCY\\] .+$' }
changeset : 如果构建的SCM变更集包含一个或多个与给定模式匹配的文件,则执行阶段。
1 2 3 when { changeset "**/*.js" } when { changeset pattern: ".TEST\\.java" , comparator: "REGEXP" } when { changeset pattern: "*/*TEST.java" , caseSensitive: true }
changeRequest : 如果当前构建是针对“变更请求”的,则执行阶段(也称为GitHub和Bitbucket上的Pull Request,GitLab上的Merge Request,Gerrit变更等)。如果未传递任何参数,则阶段将在每个更改请求上运行
1 2 3 4 5 6 7 8 9 10 11 when { changeRequest() }. when { changeRequest target: 'master' }. when { changeRequest authorEmail: "[\\w_-.]+@example.com" , comparator: 'REGEXP' }
triggeredBy : 在给定的参数触发当前构建时执行该阶段。
1 2 3 4 5 6 7 when { triggeredBy 'SCMTrigger' } when { triggeredBy 'TimerTrigger' } when { triggeredBy 'UpstreamCause' } when { triggeredBy cause: "UserIdCause" , detail: "vlinde" }
优先级说明
1.when在input指令前评估 : 默认情况下,如果定义了阶段则在输入之前不会评估阶段的when条件。但是可以通过beforeInput在when块中指定选项来更改此设置。如果beforeInput设置为true,则将首先评估when条件并且仅当when条件评估为true时才输入。
1 2 3 4 5 6 7 8 9 10 11 12 13 14 15 16 17 18 19 20 21 22 23 pipeline { agent none stages { stage('Example Build' ) { steps { echo 'Hello World' } } stage('Example Deploy' ) { when { beforeInput true branch 'production' } input { message "Deploy to production?" id "simple-input" } steps { echo 'Deploying' } } } }
2.when在options指令前评估 : 默认情况下,when一个条件stage会进入之后进行评价options为stage,如果任何限定。但是可以通过beforeOptions在when 块中指定选项来更改此设置。如果beforeOptions将设置为true,when则将首先评估条件,并且options仅在 when 条件评估为true时才输入。
1 2 3 4 5 6 7 8 9 10 11 12 13 14 15 16 17 18 19 20 21 22 pipeline { agent none stages { stage('Example Build' ) { steps { echo 'Hello World' } } stage('Example Deploy' ) { when { beforeOptions true branch 'testing' } options { lock label: 'testing-deploy-envs' , quantity: 1 , variable: 'deployEnv' } steps { echo "Deploying to ${deployEnv}" } } } }
3.when在stage进入agent前评估 : 默认情况下,如果定义了一个阶段的when条件,那么将在进入该阶段的代理之后计算。但是,这可以通过在when块中指定beforeAgent选项来更改。如果beforeAgent被设置为true,那么将首先计算when条件,只有当when条件计算为true时才会输入agent。
1 2 3 4 5 6 7 8 9 10 11 12 13 14 15 16 17 18 19 20 21 22 pipeline { agent none stages { stage('Example Build' ) { steps { echo 'Hello World' } } stage('Example Deploy' ) { agent { label "some-label" } when { beforeAgent true branch 'production' } steps { echo 'Deploying' } } } }
示例.Condition When 1 2 3 4 5 6 7 8 9 10 11 12 13 14 15 16 17 18 19 20 21 22 23 24 25 26 27 28 29 30 31 32 33 34 35 36 37 38 39 40 41 42 43 44 45 46 47 48 49 50 51 52 53 54 55 56 57 58 pipeline { agent none stages { stage('Example Build' ) { steps { echo 'Hello World' } } stage('Example Deploy' ) { when { branch 'production' } when { branch 'production' environment name: 'DEPLOY_TO' , value: 'production' } when { allOf { branch 'production' environment name: 'DEPLOY_TO' , value: 'production' } } when { branch 'production' anyOf { environment name: 'DEPLOY_TO' , value: 'production' environment name: 'DEPLOY_TO' , value: 'staging' } } when { expression { BRANCH_NAME ==~ /(production|staging)/ } anyOf { environment name: 'DEPLOY_TO' , value: 'production' environment name: 'DEPLOY_TO' , value: 'staging' } } when { triggeredBy "TimerTrigger" } steps { echo 'Deploying' } } } }
Tips : GLOB(对于默认)对于不区分大小写的ANT样式路径所以可以使用caseSensitive参数将其关闭;
2.3) Sequential Stages - 顺序阶段 描述: 声明式管道中的阶段可能有一个包含要按顺序运行的嵌套阶段列表的stage节。注意,一个阶段必须有且只有一个步骤、阶段、并行或 Matrix。如果stage指令嵌套在一个并行块或 Matrix 块本身中, 则不可能在stage指令中嵌套一个并行块或 Matrix 块。然而一个并行或 Matrix 块中的stage指令可以使用stage的所有其他功能,包括代理、工具、when等。
示例:Sequential Stages, Declarative Pipeline 1 2 3 4 5 6 7 8 9 10 11 12 13 14 15 16 17 18 19 20 21 22 23 24 25 26 27 28 29 30 31 32 33 34 35 36 37 38 39 40 41 42 43 44 45 46 47 48 49 50 51 52 pipeline { agent none stages { stage('Non-Sequential Stage' ) { agent { label 'for-non-sequential' } steps { echo "On Non-Sequential Stage" } } stage('Sequential Stage' ) { agent { label 'for-sequential' } environment { FOR_SEQUENTIAL = "some-value" } stages { stage('In Sequential 1' ) { steps { echo "In Sequential 1" } } stage('In Sequential 2' ) { steps { echo "In Sequential 2" } } stage('Parallel In Sequential' ) { parallel { stage('In Parallel 1' ) { steps { echo "In Parallel 1" } } stage('In Parallel 2' ) { steps { echo "In Parallel 2" } } } } } } } }
2.4) Parallel - 并行 描述:声明式管道中的阶段可能有一个包含要并行运行的嵌套阶段列表的并行部分。注意,一个阶段必须有且只有一个步骤、阶段、并行或 Matrix 。如果stage指令嵌套在一个并行块或 Matrix 块本身中,则不可能在stage指令中嵌套一个并行块或 Matrix 块。然而,一个并行或 Matrix 块中的stage指令可以使用stage的所有其他功能,包括代理、工具、when等。
Tips : 此外,通过在包含并行的阶段中添加failFast true,可以在任何一个阶段失败时强制终止所有并行阶段。添加failfast 的另一个选项是在管道定义中添加一个option{ parallelsAlwaysFailFast() }
示例:Parallel Stages, Declarative Pipeline 1 2 3 4 5 6 7 8 9 10 11 12 13 14 15 16 17 18 19 20 21 22 23 24 25 26 27 28 29 30 31 32 33 34 35 36 37 38 39 40 41 42 43 44 45 46 47 48 49 50 51 52 53 54 55 56 57 pipeline { agent any options { parallelsAlwaysFailFast() } stages { stage('Non-Parallel Stage' ) { steps { echo 'This stage will be executed first.' } } stage('Parallel Stage' ) { when { branch 'master' } failFast true parallel { stage('Branch A' ) { agent { label "for-branch-a" } steps { echo "On Branch A" } } stage('Branch B' ) { agent { label "for-branch-b" } steps { echo "On Branch B" } } stage('Branch C' ) { agent { label "for-branch-c" } stages { stage('Nested 1' ) { steps { echo "In stage Nested 1 within Branch C" } } stage('Nested 2' ) { steps { echo "In stage Nested 2 within Branch C" } } } } } } } }
2.5) Matrix - 模型 描述: 声明式管道(Declarative pipeline)中的阶段可能有一个 Matrix 节,定义要并行运行的名称-值组合的多维 Matrix 。我们将把这些组合称为 Matrix 中的“细胞”。 Matrix 中的每个单元可以包括一个或多个阶段,使用该单元的配置按顺序运行。注意一个阶段必须有且只有一个步骤、阶段、并行或 Matrix 。如果stage指令嵌套在一个并行块或 Matrix 块本身中,则不可能在stage指令中嵌套一个并行块或 Matrix 块。然而,一个并行或 Matrix 块中的stage指令可以使用stage的所有其他功能,包括代理、工具、when等。
此外,通过在包含 Matrix 的阶段同样也可添加 failFast true,您可以强制您的 Matrix 单元在其中任何一个失败时全部终止。添加failfast的另一个选项是在管道定义中添加一个option { parallelsAlwaysFailFast() } Matrix 部分必须包括一个轴部分和一个级部分。
axis部分定义了 Matrix 中每个轴的值。
stage部分定义了要在每个单元格中按顺序运行的阶段列表。
Tips : 同时Matrix 可以有一个exclude节来移除无效的单元格, 舞台上可用的许多指令,包括代理、工具、何时等,也可以添加到matrix中来控制每个单元格的行为。
axis 指定了一个或多个axis指令。每个轴由一个名称和一个值列表组成。每个轴上的所有值都与其他轴上的值组合起来生成单元格。
stages
示例: Matrix1 2 3 4 5 6 7 8 9 10 11 12 13 14 15 16 17 18 19 20 21 22 23 24 25 26 27 28 29 30 31 32 33 34 35 36 37 38 39 40 41 matrix { axes { axis { name 'PLATFORM' values 'linux' , 'mac' , 'windows' } } stages { stage('build' ) { } stage('test' ) { } stage('deploy' ) { } } } matrix { axes { axis { name 'PLATFORM' values 'linux' , 'mac' , 'windows' } axis { name 'BROWSER' values 'chrome' , 'edge' , 'firefox' , 'safari' } axis { name 'ARCHITECTURE' values '32-bit' , '64-bit' } } }
excludes (optional) - 排出
当处理一长串要排除的值时 exclude axis指令可以使用 notValues 代替 values.这将排除与传递给notValues的值之一不匹配的单元格。
示例.具有24个单元的三轴矩阵,不包括“ 32位,mac”(不包括4个单元)1 2 3 4 5 6 7 8 9 10 11 12 13 14 15 16 17 18 19 20 21 22 23 24 25 26 27 28 29 30 31 32 33 34 35 36 37 38 39 40 41 42 43 44 45 46 47 48 49 50 51 52 53 matrix { axes { axis { name 'PLATFORM' values 'linux' , 'mac' , 'windows' } axis { name 'BROWSER' values 'chrome' , 'edge' , 'firefox' , 'safari' } axis { name 'ARCHITECTURE' values '32-bit' , '64-bit' } } excludes { exclude { axis { name 'PLATFORM' values 'mac' } axis { name 'ARCHITECTURE' values '32-bit' } } exclude { axis { name 'PLATFORM' values 'linux' } axis { name 'BROWSER' values 'safari' } } exclude { axis { name 'PLATFORM' notValues 'windows' } axis { name 'BROWSER' values 'edge' } } } }
Matrix 单元级指令(可选) 描述: 通过在Matrix本身下添加阶段级指令,用户可以有效地为每个单元配置整体环境。这些指令的行为与它们在舞台上的行为相同,但它们也可以接受矩阵为每个单元格提供的值。
注意 axis和exclude指令定义了组成矩阵的静态单元格集, 这组组合是在管道运行开始之前生成的。另一方面“per-cell”指令在运行时进行计算。
directives include:
agent
environment
input
options
post
tools
when
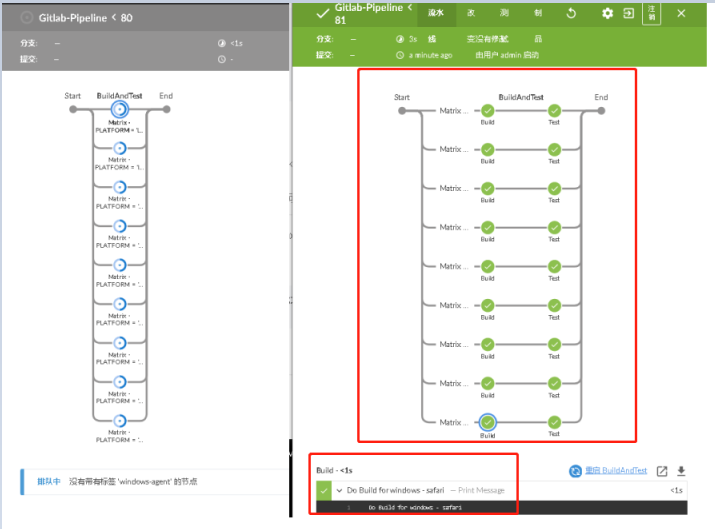
Example.完整的矩阵示例,声明性管道 1 2 3 4 5 6 7 8 9 10 11 12 13 14 15 16 17 18 19 20 21 22 23 24 25 26 27 28 29 30 31 32 33 34 35 36 37 38 39 40 41 42 43 44 45 46 47 48 49 50 51 52 53 54 55 56 57 58 59 60 61 62 63 64 65 66 67 68 pipeline { parameters { choice(name: 'PLATFORM_FILTER' , choices: ['all' , 'linux' , 'windows' , 'mac' ], description: 'Run on specific platform' ) } agent none stages { stage('BuildAndTest' ) { matrix { agent { label "${PLATFORM}-agent" } when { anyOf { expression { params.PLATFORM_FILTER == 'all' } expression { params.PLATFORM_FILTER == env.PLATFORM } } } axes { axis { name 'PLATFORM' values 'linux' , 'windows' , 'mac' } axis { name 'BROWSER' values 'firefox' , 'chrome' , 'safari' , 'edge' } } excludes { exclude { axis { name 'PLATFORM' values 'linux' } axis { name 'BROWSER' values 'safari' } } exclude { axis { name 'PLATFORM' notValues 'windows' } axis { name 'BROWSER' values 'edge' } } } stages { stage('Build' ) { steps { echo "Do Build for ${PLATFORM} - ${BROWSER}" } } stage('Test' ) { steps { echo "Do Test for ${PLATFORM} - ${BROWSER}" } } } } } } }
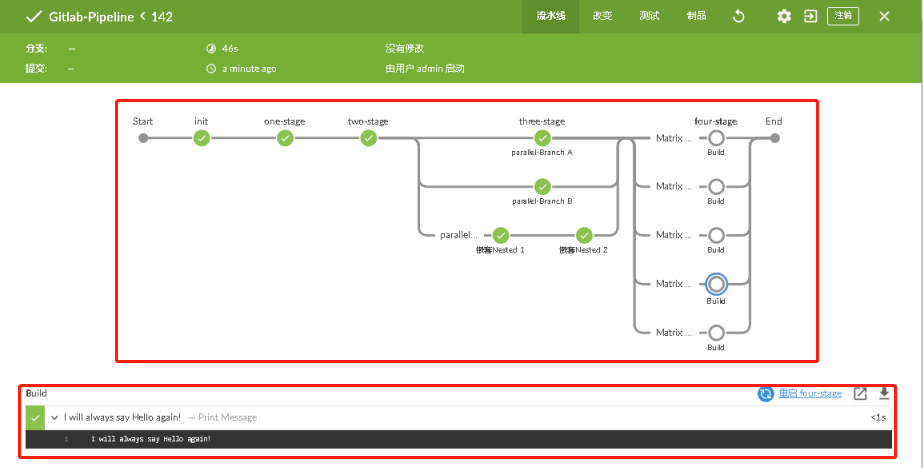
weiyigeek.top-Matrix示例
语法总结 1 2 3 4 5 6 7 8 9 10 11 12 13 14 15 16 17 18 19 20 21 22 23 24 25 26 27 28 29 30 31 32 33 34 35 36 37 38 39 40 41 42 43 44 45 46 47 48 49 50 51 52 53 54 55 56 57 58 59 60 61 62 63 64 65 66 67 68 69 70 71 72 73 74 75 76 77 78 79 80 81 82 83 84 85 86 87 88 89 90 91 92 93 94 95 96 97 98 99 100 101 102 103 104 105 106 107 108 109 110 111 112 113 114 115 116 117 118 119 120 121 122 123 124 125 126 127 128 129 130 131 132 133 134 135 136 137 138 139 140 141 142 143 144 145 146 147 148 149 150 151 152 153 154 155 156 157 158 159 160 161 162 163 164 165 166 167 168 169 170 171 172 173 174 175 176 177 178 179 180 181 182 183 184 185 186 187 188 189 190 191 192 193 194 195 196 197 198 199 200 201 202 203 204 205 206 207 208 209 210 211 212 213 214 215 216 217 218 219 220 221 222 223 224 225 226 227 228 229 230 231 232 233 pipeline { agent any environment { global_env = 'Jenkins global environment' global_when = 'true' } options { retry(3 ) parallelsAlwaysFailFast() } parameters { string(name: 'PERSON' , defaultValue: 'Mr Jenkins' , description: 'Who should I say hello to?' ) booleanParam(name: 'TOGGLE' , defaultValue: true , description: 'Toggle this value' ) text(name: 'BIOGRAPHY' , defaultValue: '' , description: 'Enter some information about the person' ) choice(name: 'CHOICE' , choices: ['One' , 'Two' , 'Three' ], description: 'Pick something' ) password(name: 'PASSWORD' , defaultValue: 'SECRET' , description: 'Enter a password' ) } triggers{ cron('H/2 * * * *' ) } tools { maven 'maven_env' jdk 'jdk_1.8.0_211' } stages { stage ('init' ) { steps { echo "init - steps one - built-in functions echo" println "init - steps one - built-in functions println " script { def browsers = ['chrome' , 'firefox' , 'edge' ] for (int i = 0 ; i < browsers.size(); ++i) { echo "Testing the ${browsers[i]} browser" } } } } stage ('one-stage' ) { environment { local_env = "Jenkins local environment" Local_userpass_creds = credentials('43287e62-ce5b-489a-9c11-cedf38e16e92' ) Local_ssh_creds = credentials('b4c8b4e9-2777-44a1-a1ed-e9dc21d37f4f' ) } steps { println "全局变量: " + global_env +", 局部变量: " + local_env sh 'echo "user is $Local_userpass_creds_USR"' sh 'echo "password is $Local_userpass_creds_PSW"' sh 'echo "SSH private key is located at $Local_ssh_creds"' sh 'echo "SSH user is $Local_ssh_creds_USR"' script { scannerHome = tool 'sonarqubescanner' } } } stage ('two-stage' ) { when { beforeInput true anyOf { branch 'master' ; environment name: 'global_when' , value: 'true' } } options { timeout(time: 5 , unit: 'MINUTES' ) } input { message "Title : 个人信息输入" ok "完成提交" submitter "alice,bob" parameters { string(name: 'INPUT_PERSON' , defaultValue: 'WeiyiGeek' , description: 'Message: 请输入您的姓名?' ) text(name: 'INPUT_AGE' , defaultValue: 'WeiyiGeek' , description: 'Message: 请输入您的年龄?' ) choice(name: 'INPUT_SEX' , choices: ['Male' ,'Female' ], description: 'Message: 请选择你的性别?' ) password(name: 'INPUT_PASSWORD' , defaultValue: 'SECRET' , description: 'Message: 请输入您注册密码?' ) booleanParam(name: 'INPUT_AGREE' , defaultValue: true , description: 'Message: 是否确定协议?' ) } } steps { script { env.git_version=input message: 'Titel: 版本' , ok: '通过' ,parameters: [string ( name: 'git_version' , trim: true , description: 'Message : 请选择要操作的应用版本?' )]; env.deploy_option = input message: 'Titel: 操作' , ok: 'deploy' , parameters: [choice(name: 'deploy_option' , choices: ['deploy' , 'rollback' , 'redeploy' ], description: 'Message : 请选择操作流程?' )]; } echo "全局 - Hello ${params.PERSON}" echo "全局 - Toggle: ${params.TOGGLE}" echo "全局 - Choice: ${params.CHOICE}" echo "全局 - Password: ${params.PASSWORD}" echo "全局 - Biography: ${params.BIOGRAPHY}" echo "input 输出示例1: 姓名:${INPUT_PERSON}, 年龄:${INPUT_AGE}, 性别:${INPUT_SEX}, 是否同意协议: ${INPUT_AGREE}" echo "input 输出示例(script) -> 版本 : ${env.git_version}" echo "input 输出示例(script) -> 版本 : ${env.deploy_option}" } } stage ('three-stage' ) { parallel { stage('parallel-Branch A' ) { steps { echo "On Branch A" } } stage('parallel-Branch B' ) { steps { echo "On Branch B" } } stage('parallel-Branch C' ) { stages { stage('嵌套Nested 1' ) { steps { echo "In stage Nested 1 within Branch C" } } stage('嵌套Nested 2' ) { steps { echo "In stage Nested 2 within Branch C" } } } } } } stage ('four-stage' ) { input { message "Title : 部署平台" ok "完成提交" submitter "alice,bob" parameters { choice(name: 'PLATFORM_FILTER' , choices: ['all' , 'linux' , 'windows' , 'mac' ], description: 'Run on specific platform' ) } } matrix { when { anyOf { expression { params.PLATFORM_FILTER == 'all' } expression { params.PLATFORM_FILTER == env.PLATFORM } } } axes { axis { name 'PLATFORM' values 'linux' , 'windows' , 'mac' } axis { name 'ARCHITECTURE' values '32-bit' ,'64-bit' } } excludes { exclude { axis { name 'PLATFORM' values 'windows' } axis { name 'ARCHITECTURE' notValues '64-bit' } } } stages { stage('Build' ) { steps { echo "matrix - Do Build for ${PLATFORM} - ${BROWSER}" } } } } } } post { always { echo 'I will always say Hello again!' } } }
输出结果:1 2 3 4 5 6 7 8 9 10 11 12 13 14 15 16 17 18 19 20 21 22 23 24 25 26 27 28 29 30 31 32 33 34 35 36 37 38 39 40 41 42 43 44 45 46 maven_env— Use a tool from a predefined Tool Installation <1s jdk_k1.8.0_211— Use a tool from a predefined Tool Installation <1s maven_env— Use a tool from a predefined Tool Installation <1s jdk_k1.8.0_211— Use a tool from a predefined Tool Installation <1s init - steps one - built-in functions echo — Print Message <1s init - steps one - built-in functions println — Print Message <1s Testing the chrome browser— Print Messag e<1s Testing the firefox browser— Print Message 1s Testing the edge browser— Print Message <1s 全局变量: Jenkins global environment, 局部变量: Jenkins local environment + echo user is **** user is **** + echo **** is **** **** is **** + echo SSH private key is located at **** SSH private key is located at **** + echo SSH user is **** SSH user is **** 全局 - Hello Mr Jenkins— Print Message<1s 全局 - Toggle: true — Print Message<1s 全局 - Choice: One— Print Message<1s 全局 - Password: SECRET— Print Message<1s 全局 - Biography: — Print Message<1s input 输出示例1: 姓名:WeiyiGeek, 年龄:185, 性别:Male, 是否同意协议: true — Print Message<1s input 输出示例(script) -> 版本 : v1.2— Print Message<1s input 输出示例(script) -> 版本 : deploy— Print Message On Branch A— Print Message On Branch B— Print Message In stage Nested 1 within Branch C In stage Nested 2 within Branch C I will always say Hello again!— Print Message<1s
weiyigeek.top-结果一览
0x03 pipeline 内置支持 3.0) 字符串和标准输出
echo: Print Message
println: Print Message1 2 echo "Hello" println "World!"
脚本中操作字符串替换值 1 2 3 4 5 6 7 8 9 script { sourceStr = "这是要替换的值:#value1, 这是要替换的值:#value2" afterStr = sourceStr.replaceAll("#value1" ,"AAA" ).replaceAll("#value2" ,"BBB" ) print "${afterStr}" }
3.1) 文件目录相关步骤
isUnix: 如果封闭节点运行在类unix系统(如Linux或Mac OS X)上,则返回true,如果Windows。
pwd:确认当前目录
dir: 默认pipeline工作在工作空间目录下,dir步骤可以让我们切换到其他目录。
deleteDir:是一个无参步骤删除的是当前工作目录。通常它与dir步骤一起使用,用于删除指定目录下的内容。1 2 dir("./delete_dir" ) deleteDir()
fileExists:检查给定的文件(作为当前目录的相对路径)是否存在。参数file返回 true | false 。
1 2 fileExists file: "./pom.xml"
writeFile:将内容写入指定文件中; 参数为:file, text, encoding
readFile:读取文件内容; 参数为:file, encoding1 writeFile encoding: 'utf-8' , file: 'file' , text: '测试写入'
3.2) 制品相关步骤
stash : 步骤可以将一些文件保存起来以便被同一次构建的其他步骤或阶段使用。
1 2 3 4 5 6 7 8 9 10 11 12 13 14 15 16 17 18 19 20 21 22 23 name Name of a stash. Should be a simple identifier akin to a job name. Type: String allowEmpty (optional) Type: boolean excludes (optional) Optional set of Ant-style exclude patterns. Use a comma separated list to add more than one expression. If blank, no files will be excluded. Type: String includes (optional) Optional set of Ant-style include patterns. Use a comma separated list to add more than one expression. If blank, treated like **: all files. The current working directory is the base directory for the saved files, which will later be restored in the same relative locations, so if you want to use a subdirectory wrap this in dir. Type: String useDefaultExcludes (optional) If selected, use the default excludes from Ant - see here for the list. Type: boolean
unstash:恢复以前存储在当前工作区中的一组文件。
wrap: 一般构建包装,它是特殊的步骤允许调用构建包装器(在freestyle或类似项目中也称为“环境配置”)
1 wrap([$class : 'AnsiColorBuildWrapper' ]).
archive: Archive artifacts-归档的工件
unarchive: Copy archived artifacts into the workspace-将存档工件复制到工作区中
archiveArtifacts: 存档构建的成品 (重点)1 2 3 4 5 6 7 8 9 10 11 12 archive unarchive archiveArtifacts artifacts: './target/*.jar' , excludes: './target/test/*' , fingerprint: true , onlyIfSuccessful: true , allowEmptyArchive: true
3.3) 命令相关步骤 描述: 与命令相关的步骤其实是 Pipeline:Nodes and Processes 插件提供的步骤。由于它是 Pipeline 插件的一个组件,所以基本不需要单独安装
withEnv: 设置环境变量 1 2 3 4 5 node { withEnv(['MYTOOL_HOME=/usr/local/mytool' ]) { sh '$MYTOOL_HOME/bin/start' } }
Tips: 注意这里我们在Groovy中使用了单引号,所以变量展开是由Bourne shell完成的而不是Jenkins;
sh:执行shell命令
script:将要执行的shell脚本,通常在类UNIX系统上可以是多行脚本。
encoding:脚本执行后输出日志的编码,默认值为脚本运行所在系统的编码。
returnStatus:布尔类型,默认脚本返回的是状态码,如果是一个非零的状态码,则会引发pipeline执行失败。如果 returnStatus 参数为true,则不论状态码是什么,pipeline的执行都不会受影响。
returnStdout:布尔类型,如果为true,则任务的标准输出将作为步骤的返回值,而不是打印到构建日志中(如果有错误,则依然会打印到日志中)。除了script参数,其他参数都是可选的。
Tips: returnStatus与returnStdout参数一般不会同时使用,因为返回值只能有一个。如果同时使用则只有returnStatus参数生效。
Tips : 注意采用sh执行echo 1 > 1.txt命令时然后采用readFile读取时带有换行符,解决办法:
bat、powershell步骤
bat步骤执行的是Windows的批处理命令。
powershell步骤执行的是PowerShell脚本,支持3+版本。
Tips: 步骤支持的参数与sh步骤的一样就不重复介绍了。
3.4) 其他步骤 异常终止 1 2 3 4 5 6 7 8 9 10 try { sh 'might fail && whoami' echo 'Succeeded!' } catch (err) { echo "Failed: ${err} - " + err.toString() error "[-Error] : 项目部署失败 \n[-Msg] : ${err.getMessage()} " } finally { sh './tear-down.sh' }
1 2 3 catchError { sh 'might fail' }
1 2 3 4 unstable '阶段结果为不稳定' unstable { echo "阶段结果为不稳定" }
电子邮件
mail: Simple step for sending email.1 2 3 4 5 6 7 8 9 10 11 12 13 14 15 16 17 18 19 20 21 22 23 24 25 26 27 subject Email subject line. Type: String body Email body. Type: String bcc (optional) BCC email address list. Comma separated list of email addresses. Type: String cc (optional) CC email address list. Comma separated list of email addresses. Type: String charset (optional) Email body character encoding. Defaults to UTF-8 Type: String from (optional) From email address. Defaults to the admin address globally configured for the Jenkins instance. Type: String mimeType (optional) Email body MIME type . Defaults to text/plain. Type: String replyTo (optional) Reploy-To email address. Defaults to the admin address globally configured for the Jenkins instance. Type: String to (optional) To email address list. Comma separated list of email addresses. Type: String
重试休眠和超时
retry:重试正文最多N次, 如果在块体执行过程中发生任何异常,请重试该块(最多N次)。如果在最后一次尝试时发生异常,那么它将导致中止构建(除非以某种方式捕获并处理它),不会捕获生成的用户中止。
sleep:让pipeline休眠指定的一段时间 , 只需暂停管道构建直到给定的时间已经过期相当于(在Unix上)sh 'sleep…'。
timeout:以确定的超时限制执行块内的代码。
waitUntil:反复运行它的主体直至条件满足。1 2 3 4 5 6 7 8 9 10 11 12 13 14 15 16 retry(count: 5) sleep(time: 60,unit: SECONDS timeout(time: 10,unit: MINUTES) waitUntil(initialRecurrencePeriod: 250, quiet: false ){ sh "./monitor.sh" }
tool:使用预定义的工具,在Global Tool Configuration(全局工具配置)中配置了工具。1 2 tool name: 'Sonar-Scanner' , type : 'hudson.plugins.sonar.SonarRunnerInstallation' tool name: 'docker' , type : 'dockerTool'
getContext: 从内部api获取上下文对象1 2 3 4 5 6 7 8 9 10 getContext hudson.FilePath withContext(new MyConsoleLogFilter()) { sh 'process' }
参考地址: https://www.jenkins.io/doc/pipeline/steps/workflow-basic-steps/
0x04 Pipeline 片段示例 (1) 超时设置与部署参数switch语句选择 1 2 3 4 5 6 7 8 9 10 11 12 13 14 15 16 17 18 19 timeout(time: 1 , unit: 'MINUTES' ) { script { env.deploy_option = input message: '选择操作' , ok: 'deploy' , parameters: [choice(name: 'deploy_option' , choices: ['deploy' , 'rollback' , 'redeploy' ], description: '选择部署环境' )] switch ("${env.deploy_option}" ){ case 'deploy' : println('1.deploy prd env' ) break ; case 'rollback' : println('2.rollback env' ) break ; case 'redeploy' : println('3.redeploy env' ) break ; default: println('error env' ) } } }
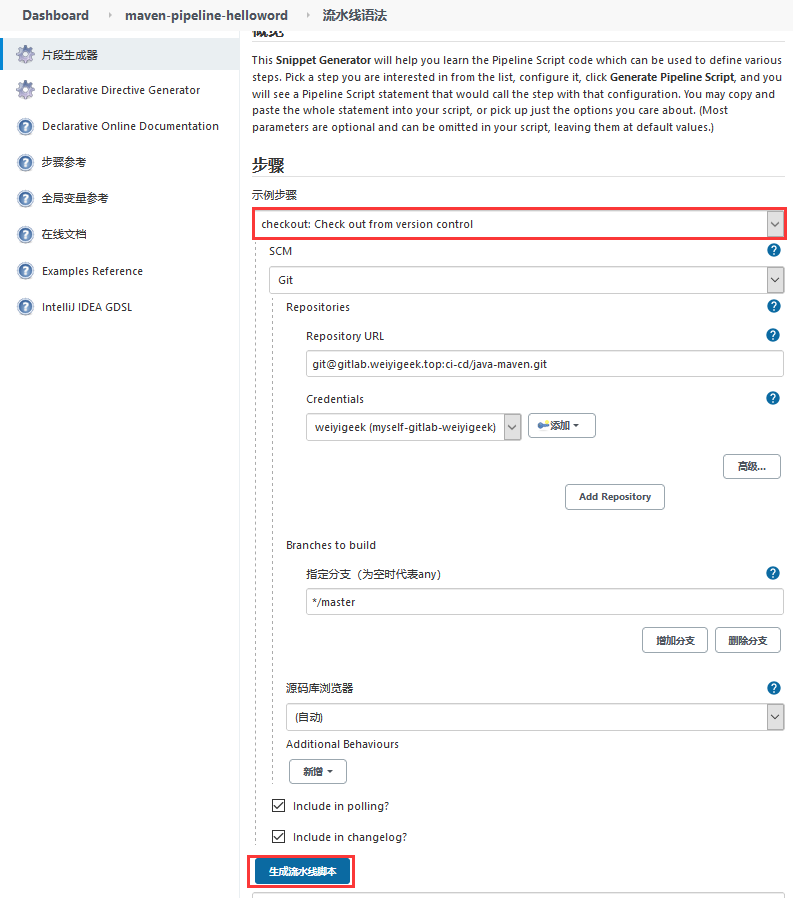
(1)代码仓库拉取之checkout SCM
1 checkout([$class: 'GitSCM' , branches: [[name: '*/master' ]], doGenerateSubmoduleConfigurations: false , extensions: [], submoduleCfg: [], userRemoteConfigs: [[credentialsId: 'b4c8b4e9-2777-44a1-a1ed-e9dc21d37f4f' , url: 'git@gitlab.weiyigeek.top:ci-cd/java-maven.git' ]]])
weiyigeek.top-流水线之代码拉取
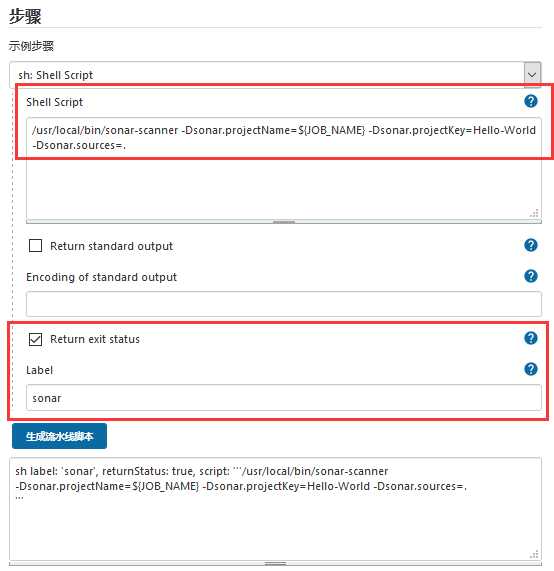
(2) 代码质量检测之shell Script
1 2 3 4 /usr/ local/bin/ sonar-scanner -Dsonar.projectName=${JOB_NAME} -Dsonar.projectKey=Hello-World -Dsonar.sources=.sh label: 'sonar' , returnStatus: true , script: '''/usr/local/bin/sonar-scanner -Dsonar.projectName=${JOB_NAME} -Dsonar.projectKey=Hello-World -Dsonar.sources=.'''
weiyigeek.top-流水线之代码质量检测
(3) Kubernetes 动态节点 Pod 模板的选择
1 2 3 4 5 6 7 8 podTemplate(label: 'jenkins-jnlp-slave' , cloud: 'k8s_115' ) { node ('jenkins-jnlp-slave' ) { stage ('dynamic-checkout' ) { checkout([$class: 'GitSCM' , branches: [[name: '*/master' ]], userRemoteConfigs: [[credentialsId: '69c0dbf0-f786-4aa0-975a-76528f10de8b' , url: 'http://127.0.0.1/xxx/devops_test.git' ]]]) } } }

