[TOC]
0x01 基础实践 (1) Maven 构建之 Pipeline Script 描述:此处重新不在累述新建流水线任务(maven-pipeline-helloword)而是直接进行配置测试等关键项;代码拉取 -> 代码检测 -> 代码构建 -> 代码部署 -> 消息通知
Step 1. Dashboard -> maven-pipeline-helloword -> 流水线项目配置 (名称|丢弃旧的构建|参数化构建过程(Git/名称))
[TOC]
0x01 基础实践 (1) Maven 构建之 Pipeline Script 描述:此处重新不在累述新建流水线任务(maven-pipeline-helloword)而是直接进行配置测试等关键项;代码拉取 -> 代码检测 -> 代码构建 -> 代码部署 -> 消息通知
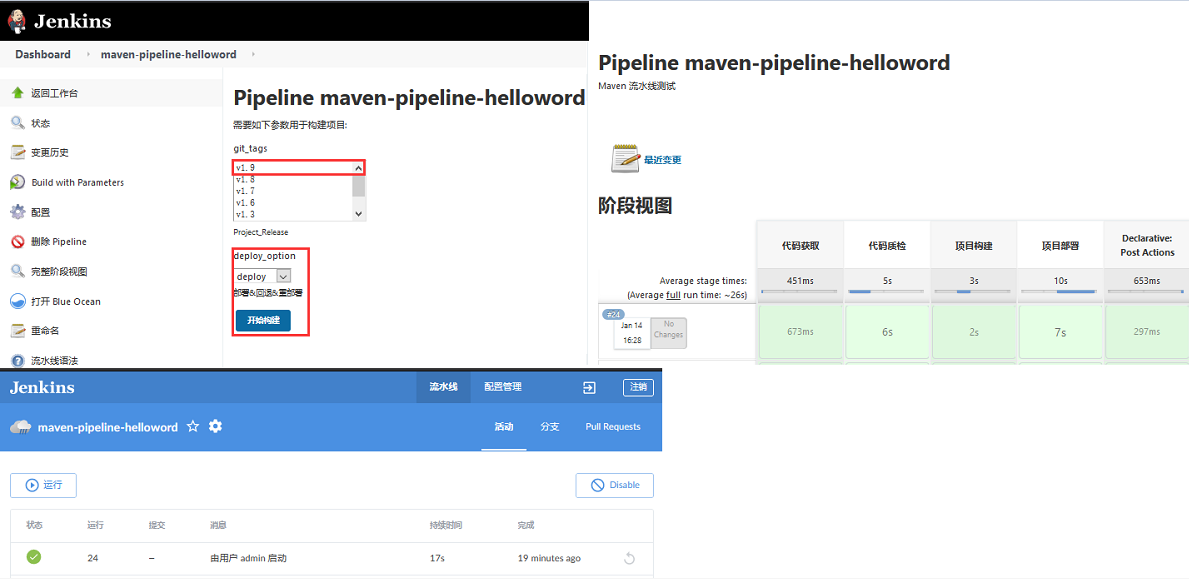
Step 1. Dashboard -> maven-pipeline-helloword -> 流水线项目配置 (名称|丢弃旧的构建|参数化构建过程(Git/名称))1 2 3 4 5 6 7 8 9 10 11 12 13 14 名称: git_tags 描述: Project_Release 参数类型: 标签 默认值: origin/master 排序方式: DESCENDING SMART ---------------------------- 名称: deploy_option 选项: deploy rollback redeploy 描述: 部署&回退&重部署
weiyigeek.top-参数构建
weiyigeek.top-Kubernets部署结果与消息通知
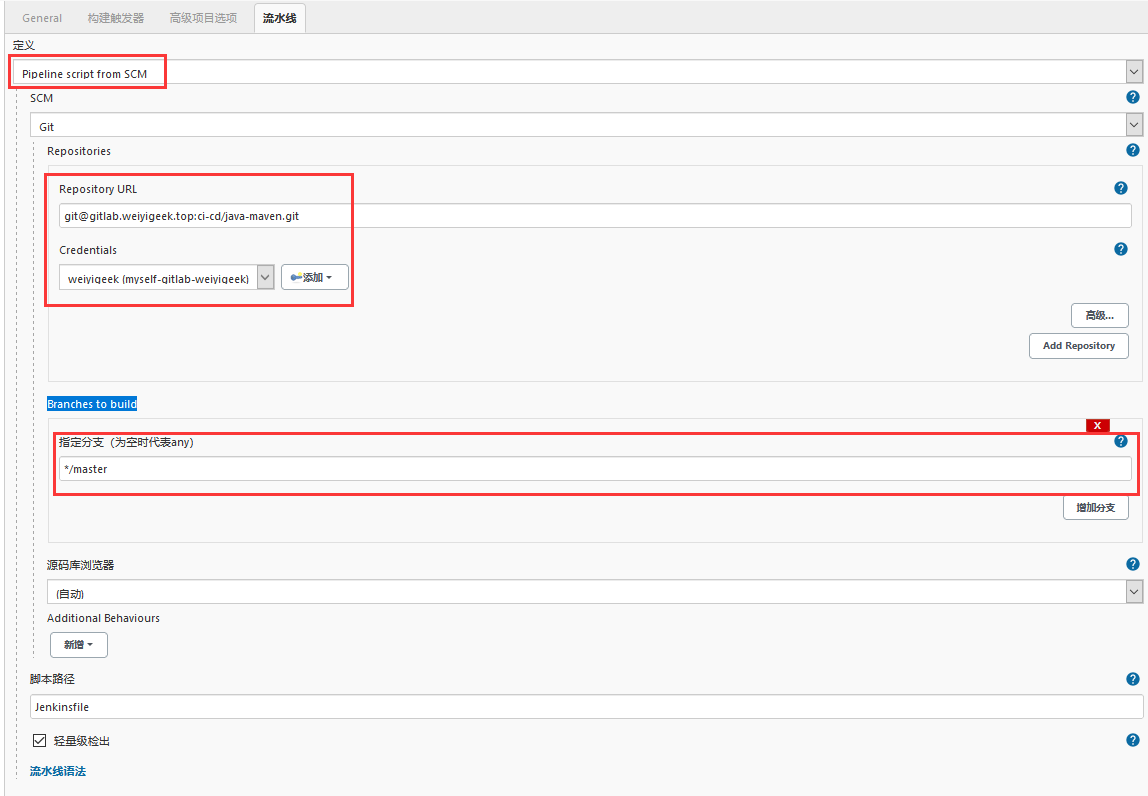
(2) Maven 构建之 Pipeline Script from SCM 描述: 我也可以将上面流水线的脚本放在我们的代码项目之中,在流水线拉取项目时候便会自动按照项目中的Jenkinsfile文件内容进行执行对于操作
Step 1.修改项目首页文件以及在项目根添加Jenkinsfile文件(内容将取消第一阶段的代码拉取),例如:1 2 3 4 5 6 7 8 9 10 11 12 13 14 15 16 17 18 19 20 21 22 23 24 25 26 27 28 29 30 31 32 33 34 35 36 37 38 39 40 41 42 43 44 45 46 47 48 49 50 51 52 53 54 55 56 57 58 59 # (1) E:\EclipseProject\hello-world\src\main\webapp\index.jsp <h1>Maven - Hello World - v1.10 - Pipeline script for SCM</h1> # (2) 项目信息 /e/ EclipseProject/hello-world (master)$ ls Jenkinsfile pom.xml src/ target/ # (3) Jenkinsfile : 注意内容将取消第一阶段的代码拉取 pipeline { agent any stages { stage ("代码质检" ) { steps { sh label: 'sonar' , returnStatus: true , script: '''/usr/local/bin/sonar-scanner -Dsonar.projectName=${JOB_NAME} -Dsonar.projectKey=Hello-World -Dsonar.sources=.''' } } stage ("项目构建" ) { steps { sh label: 'build' , script: 'cd /var/lib/jenkins/workspace/maven-pipeline-helloword/ && /usr/local/maven/bin/mvn clean package -Dmaven.test.skip=true ' } } stage ("项目部署" ) { steps { sh label: 'deploy' , script: '/tmp/script/maven-jenkins-ci-script.sh' } } } post { always { qyWechatNotification aboutSend: true , failNotify: true , failSend: true , mentionedId: 'ALL' , mentionedMobile: '' , startBuild: true , successSend: true , unstableSend: true , webhookUrl: 'https://qyapi.weixin.qq.com/cgi-bin/webhook/send?key=c222f3fc-f645-440a-ad24-0ce8d9626fa0' } success { echo 'success' dingtalk ( robot: 'weiyigeek-1000' , type: 'LINK' , title: 'Jenkins 持续集成 - 任务名称 ${JOB_NAME}' , text: [ '项目构建成功' , 'Pipeline 流水线测试' ], messageUrl: 'http://www.weiyigeek.top' , picUrl: 'https://ss2.bdstatic.com/70cFvnSh_Q1YnxGkpoWK1HF6hhy/it/u=2319834554,1372531032&fm=26&gp=0.jpg' , atAll: true ) } } }
weiyigeek.top-Pipeline script from SCM
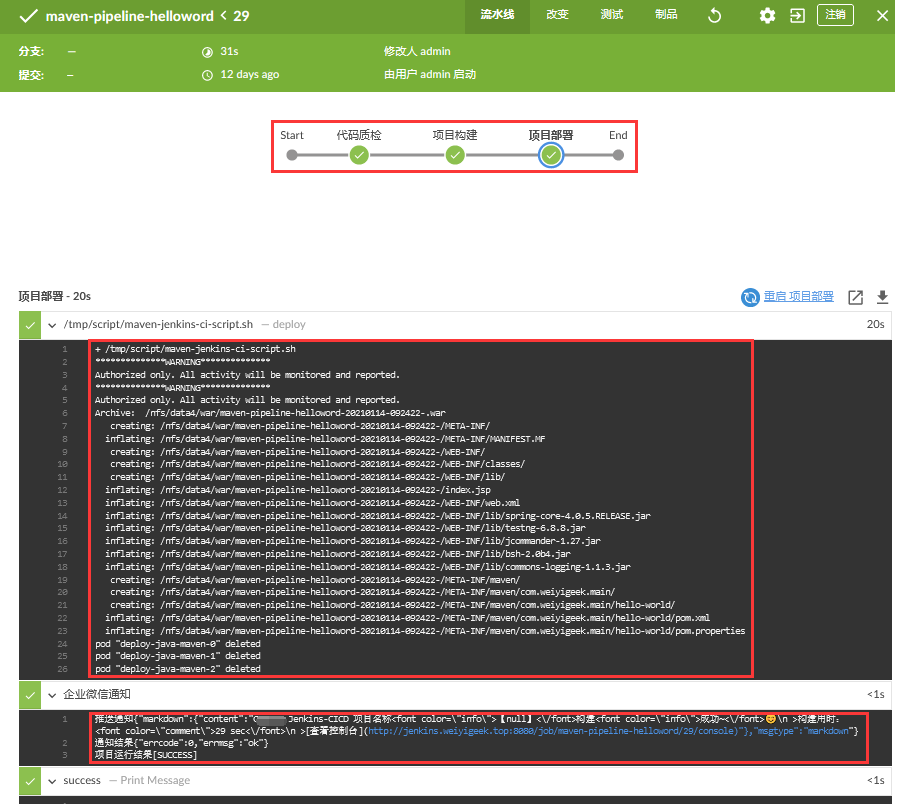
Step 4.项目构建参数输入 -> v1.10 | deploy -> 进行构建 -> 查看流水线
weiyigeek.top-PIPE 流水线
Step 5.查看部署结果http://10.10.107.202:30089/结果正常;1 2 3 4 5 6 7 8 9 10 11 Maven - Hello World - v1.10 - Pipeline script for SCM 访问时间: Tue Jan 26 2021 14:54:35 GMT+0800 (中国标准时间) Server : Apache Tomcat/8.5.61 | 10.244.1.217 Client : 10.244.0.0 | 10.244.0.0 Document_Root : /usr/local /tomcat/webapps/ROOT/ URL : 10.10.107.202/index.jsp
(3) Jenkins pipeline 之 邮件(Email)发信管理 描述: 如果利用 Freestyle 的原生Job我们可以很好的进行Job邮件发信,而在与 Jenkins 流水线中需要Extended E-mail Notification的方式进行实现(此处只是简单说明建议采用钉钉或者企业微信的方式更加及时方便);
下面提供两种格式进行参考:
(1) Scripted Pipeline1 2 3 4 5 6 7 8 9 10 11 12 13 14 15 16 17 18 19 20 21 22 23 24 25 26 27 28 29 30 31 32 33 34 35 36 37 38 39 40 41 42 43 44 45 46 47 48 49 50 51 52 53 54 55 56 57 58 59 60 61 62 63 64 65 66 67 68 69 70 71 72 73 74 75 76 77 78 79 80 81 82 83 84 85 86 87 88 89 90 91 92 93 94 95 96 97 98 99 100 101 102 103 104 105 106 107 108 109 110 111 112 113 114 115 116 117 118 119 120 121 122 123 124 125 126 127 128 129 130 131 132 133 134 135 136 137 138 139 140 141 142 143 144 145 146 147 148 149 node ("master" ){ parameters {string(name: 'Jenkins' ,defaultValue: 'Hello' ,description: 'How should I greet the world' )} echo "${params.nane} 你好!" gitlabCommitStatus { stage('第1步拉代码' ){ echo "拉代码" git credentialsId: '03fd8295-c536-4871-9794-1c37394676e0' , url: 'git@gitlab.weiyigeek.top:weiyigeek/ops.git' } stage('第2步编译' ){ echo "编译" } stage('第3步打包' ){ echo "打包,有一个mail模块是系统级别的,需要sudo" } stage('第四步单元测试' ){ echo "单元测试" } stage("放到下载服务器上" ){ echo "发送文件" } } stage("发送邮件" ){ def git_url = 'git@gitlab.weiyigeek.top:weiyigeek/ops.git' def branch = 'dev' def username = 'Jenkins' echo "Hello Mr.${username}" echo "GIT路径: ${git_url}" echo "发送邮件" emailext body: """ <!DOCTYPE html> <html> <head> <meta charset="UTF-8"> <title>${ENV, var="JOB_NAME"}-第${BUILD_NUMBER}次构建日志</title> </head> <body leftmargin="8" marginwidth="0" topmargin="8" marginheight="4" offset="0"> <table width="95%" cellpadding="0" cellspacing="0" style="font-size: 11pt; font-family: Tahoma, Arial, Helvetica, sans-serif"> <tr> <td>(本邮件由程序自动下发,请勿回复!)</td> </tr> <tr> <td> <h2><font color="#FF0000">构建结果 - ${BUILD_STATUS}</font></h2> </td> </tr> <tr> <td><br /> <b><font color="#0B610B">构建信息</font></b> <hr size="2" width="100%" align="center" /> </td> </tr> <tr><a href="${PROJECT_URL}">${PROJECT_URL}</a> <td> <ul> <li>项目名称:${PROJECT_NAME}</li> <li>GIT路径:<a href="git@gitlab.weiyigeek.top:weiyigeek/ops.git">git@gitlab.weiyigeek.top:weiyigeek/ops.git</a></li> <li>GIT分支: master</li> <li>构建编号:${BUILD_NUMBER}</li> <li>触发原因:${CAUSE}</li> <li>构建日志:<a href="${BUILD_URL}console">${BUILD_URL}console</a></li> </ul> </td> </tr> <tr> <td> <b><font color="#0B610B">变更信息:</font></b> <hr size="2" width="100%" align="center" /> </td> </tr> <tr> <td> <ul> <li>上次构建成功后变化 : ${CHANGES_SINCE_LAST_SUCCESS}</a></li> </ul> </td> </tr> <tr> <td> <ul> <li>上次构建不稳定后变化 : ${CHANGES_SINCE_LAST_UNSTABLE}</a></li> </ul> </td> </tr> <tr> <td> <ul> <li>历史变更记录 : <a href="${PROJECT_URL}changes">${PROJECT_URL}changes</a></li> </ul> </td> </tr> <tr> <td> <ul> <li>变更集:${JELLY_SCRIPT,template="html"}</a></li> </ul> </td> </tr> <!-- <tr> <td> <b><font color="#0B610B">Failed Test Results</font></b> <hr size="2" width="100%" align="center" /> </td> </tr> <tr> <td> <pre style="font-size: 11pt; font-family: Tahoma, Arial, Helvetica, sans-serif">${FAILED_TESTS}</pre> <br /> </td> </tr> <tr> <td> <b><font color="#0B610B">构建日志 (最后 100行):</font></b> <hr size="2" width="100%" align="center" /> </td> </tr>--> <!-- <tr> <td>Test Logs (if test has ran): <a href="${PROJECT_URL}ws/TestResult/archive_logs/Log-Build-${BUILD_NUMBER}.zip">${PROJECT_URL}/ws/TestResult/archive_logs/Log-Build-${BUILD_NUMBER}.zip</a> <br /> <br /> </td> </tr> --> <!-- <tr> <td> <textarea cols="80" rows="30" readonly="readonly" style="font-family: Courier New">${BUILD_LOG, maxLines=100,escapeHtml=true}</textarea> </td> </tr>--> <hr size="2" width="100%" align="center" /> </table> </body> </html> """ , subject: '$PROJECT_NAME - Build # $BUILD_NUMBER - $BUILD_STATUS!' , to: 'master@weiyigeek.top' } }
(2) Declarative Pipeline1 2 3 4 5 6 7 8 9 10 11 12 13 14 15 16 17 18 19 20 21 22 23 24 25 26 27 28 29 30 31 32 33 34 35 36 37 38 39 40 41 42 43 44 45 46 47 48 49 50 51 52 53 54 55 56 57 58 59 60 61 62 63 64 65 66 67 68 69 70 71 72 73 74 75 76 77 78 79 80 81 82 83 84 85 86 87 88 89 90 91 92 93 94 95 96 97 98 99 100 101 102 103 104 105 106 107 108 109 110 111 112 113 114 115 116 117 118 119 120 121 122 123 124 125 126 127 128 129 130 131 132 133 134 135 136 137 138 139 140 141 142 143 144 145 146 147 148 149 150 151 152 153 154 155 156 pipeline{ agent{label 'master' } environment { git_url = 'git@gitlab.weiyigeek.top:weiyigeek/ops.git' git_key = '03fd8295-c536-4871-9794-1c37394676e0' git_branch = 'master' } stages { stage('下载代码' ) { steps { git branch: "${git_branch}" ,credentialsId: "${git_key}" , url: "${env.git_url}" } } } post { always{ script{ emailext body: ''' <!DOCTYPE html> <html> <head> <meta charset="UTF-8"> <title>${ENV, var="JOB_NAME"}-第${BUILD_NUMBER}次构建日志</title> </head> <body leftmargin="8" marginwidth="0" topmargin="8" marginheight="4" offset="0"> <table width="95%" cellpadding="0" cellspacing="0" style="font-size: 11pt; font-family: Tahoma, Arial, Helvetica, sans-serif"> <tr> <td>(本邮件由程序自动下发,请勿回复!)</td> </tr> <tr> <td> <h2><font color="#FF0000">构建结果 - ${BUILD_STATUS}</font></h2> </td> </tr> <tr> <td><br /> <b><font color="#0B610B">构建信息</font></b> <hr size="2" width="100%" align="center" /> </td> </tr> <tr><a href="${PROJECT_URL}">${PROJECT_URL}</a> <td> <ul> <li>项目名称:${PROJECT_NAME}</li> <li>GIT路径:<a href="git@gitlab.weiyigeek.top:weiyigeek/ops.git">git@gitlab.weiyigeek.top:weiyigeek/ops.git</a></li> <li>GIT分支: master</li> <li>构建编号:${BUILD_NUMBER}</li> <li>触发原因:${CAUSE}</li> <li>构建日志:<a href="${BUILD_URL}console">${BUILD_URL}console</a></li> </ul> </td> </tr> <tr> <td> <b><font color="#0B610B">变更信息:</font></b> <hr size="2" width="100%" align="center" /> </td> </tr> <tr> <td> <ul> <li>上次构建成功后变化 : ${CHANGES_SINCE_LAST_SUCCESS}</a></li> </ul> </td> </tr> <tr> <td> <ul> <li>上次构建不稳定后变化 : ${CHANGES_SINCE_LAST_UNSTABLE}</a></li> </ul> </td> </tr> <tr> <td> <ul> <li>历史变更记录 : <a href="${PROJECT_URL}changes">${PROJECT_URL}changes</a></li> </ul> </td> </tr> <tr> <td> <ul> <li>变更集:${JELLY_SCRIPT,template="html"}</a></li> </ul> </td> </tr> <!-- <tr> <td> <b><font color="#0B610B">Failed Test Results</font></b> <hr size="2" width="100%" align="center" /> </td> </tr> <tr> <td> <pre style="font-size: 11pt; font-family: Tahoma, Arial, Helvetica, sans-serif">$FAILED_TESTS</pre> <br /> </td> </tr> <tr> <td> <b><font color="#0B610B">构建日志 (最后 100行):</font></b> <hr size="2" width="100%" align="center" /> </td> </tr>--> <!-- <tr> <td>Test Logs (if test has ran): <a href="${PROJECT_URL}ws/TestResult/archive_logs/Log-Build-${BUILD_NUMBER}.zip">${PROJECT_URL}/ws/TestResult/archive_logs/Log-Build-${BUILD_NUMBER}.zip</a> <br /> <br /> </td> </tr> --> <!-- <tr> <td> <textarea cols="80" rows="30" readonly="readonly" style="font-family: Courier New">${BUILD_LOG, maxLines=100,escapeHtml=true}</textarea> </td> </tr>--> <hr size="2" width="100%" align="center" /> </table> </body> </html> ''' , subject: '$PROJECT_NAME - Build # $BUILD_NUMBER - $BUILD_STATUS!' , to: 'master@weiyigeek.top' } } success { echo 'success' } failure { echo 'failure' } unstable { echo 'unstable' } aborted { echo 'aborted' } changed { echo 'changed' } } }
0x02 进阶实践 (1) Sonarqube 代码质量检测之 Pipeline Script from SCM 实验需求: 拉取代码并指定Tag、采用sonarqube进行代码质量检测并进行构建
Tips : sonarQube 是sonarQube扫描插件工具, 该工具除了前面直接下载二进制执行文件到Jenkins种(登陆jenkins页面–>系统管理–>全局工具配置)进行配置; 还可以通过自动化构建工具安装,不管是maven项目还是gradle项目都提供了安装sonarQube扫描工具的插件。;1 2 3 plugins { id "org.sonarqube" version "2.7" }
实验流程:
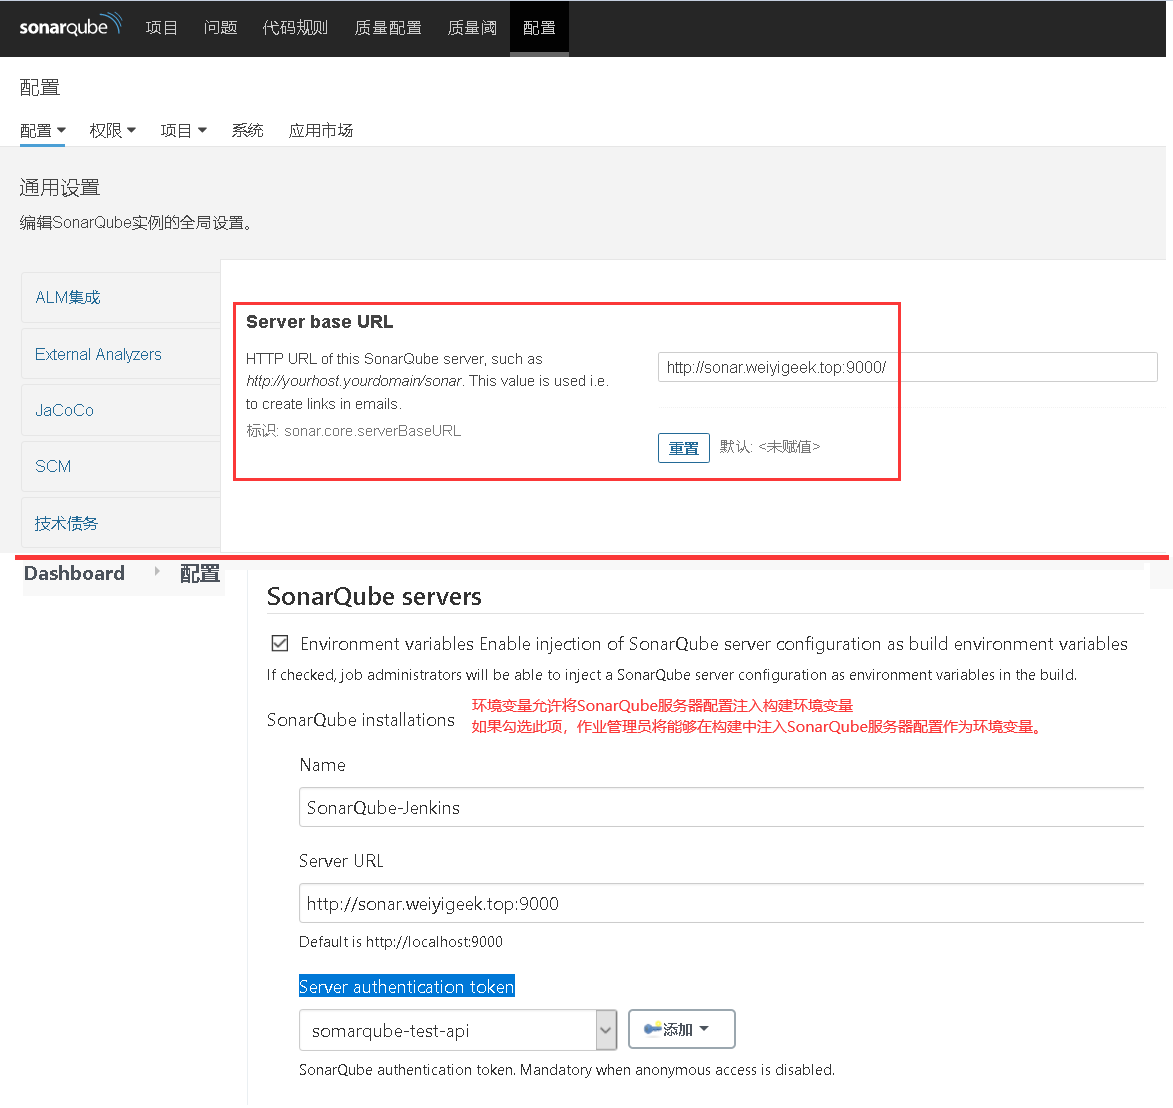
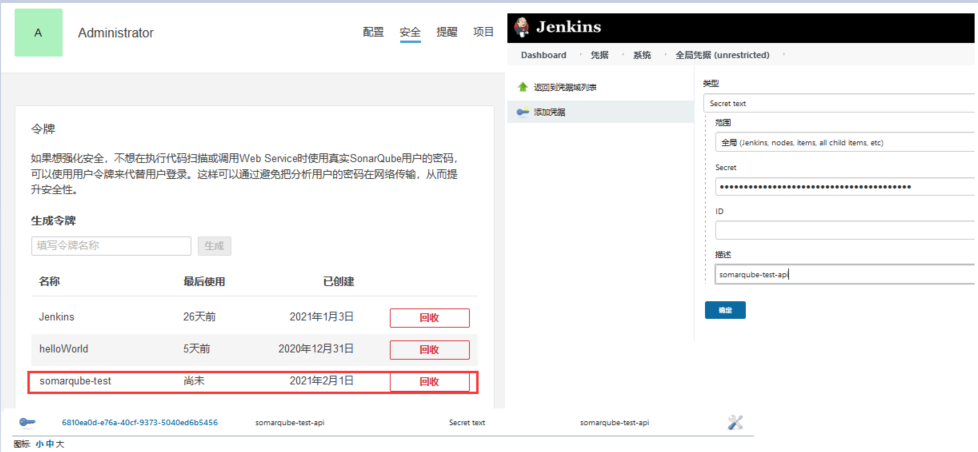
Step 0.按照前面的流程在Jenkins中下载并配置好SonarQube并且在SonarQube中进行URL设置1 2 3 4 5 6 7 8 Server base URL : http://sonar.weiyigeek.top:9000/ Server URL : http://sonar.weiyigeek.top:9000 Server authentication token : 可以参照下面的Step2步骤
weiyigeek.top-Jenkins && Sonarqube
Step 1.并生成项目标识符名称(somarqube-test)并获取令牌somarqube-test: 4354fc222bee3c2bad2d812b087dabab943a7ab0
Step 2.将该Token添加到Jenkins凭据之中Dashboard -> 凭据 -> 系统 -> 全局凭据 (unrestricted)选择Secret类型文本 -> Secret(输入上面的Token) -> 描述:somarqube-test-api;
1 Secret text 6810ea0d-e76a-40cf-9373-5040ed6b5456 somarqube-test-api Secret text somarqube-test-api
weiyigeek.top-somarqube-test-api
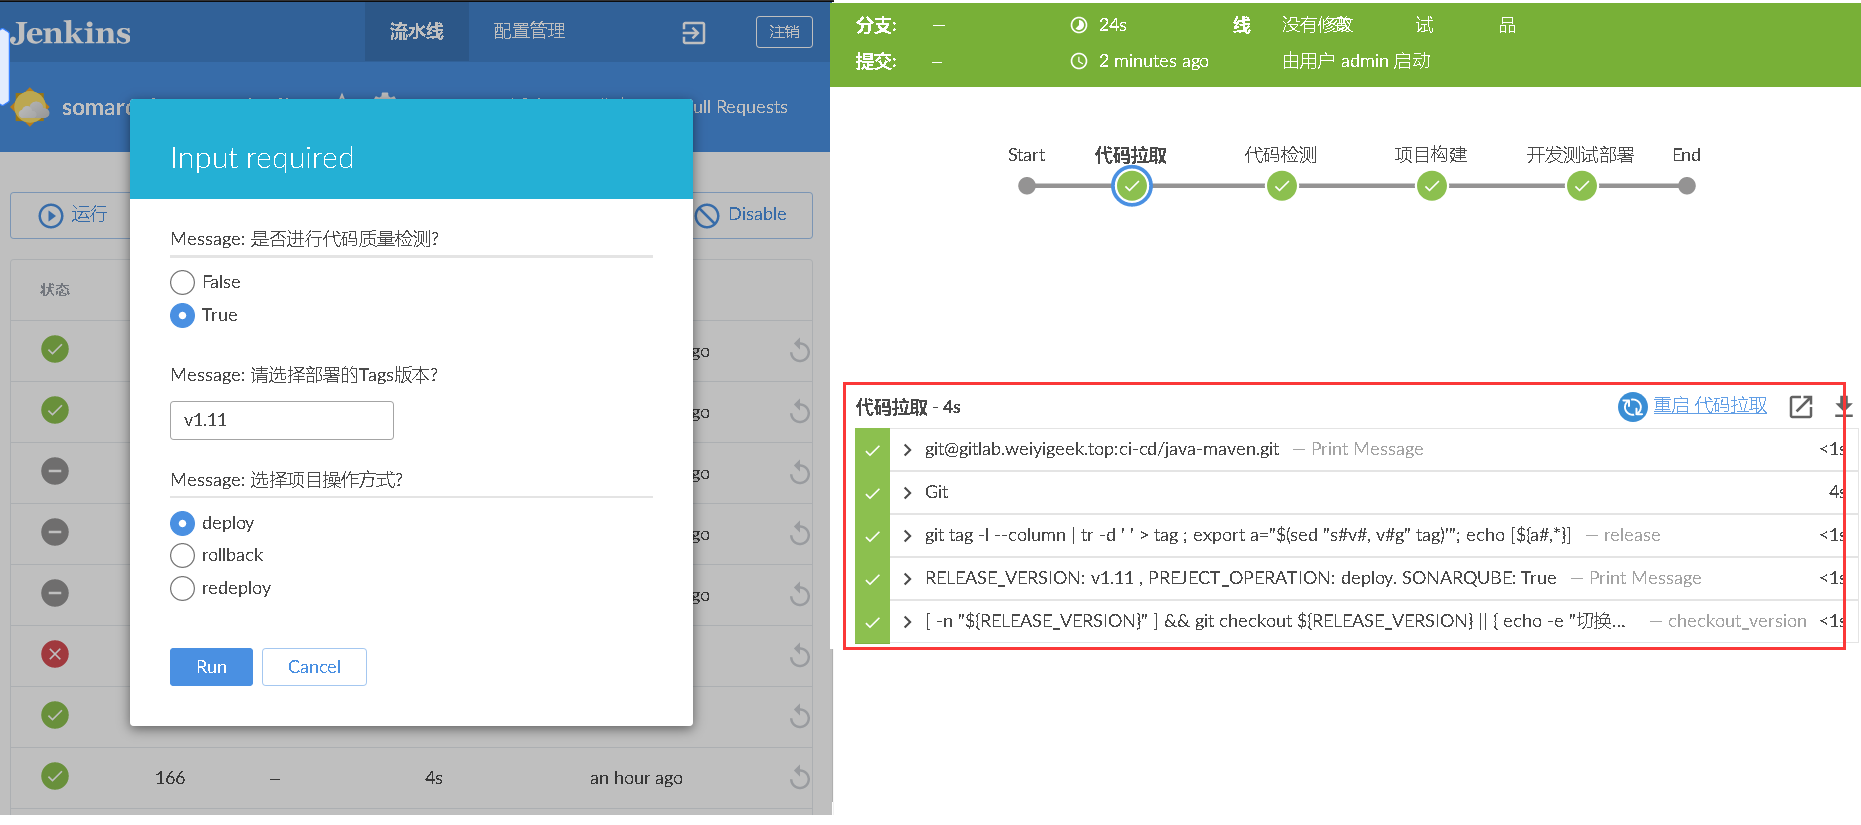
Step 3.创建一个流水线项目somarqube-test-pipeline -> 编写Pipeline Script脚本如下(非常值得注意涵盖的知识较多)
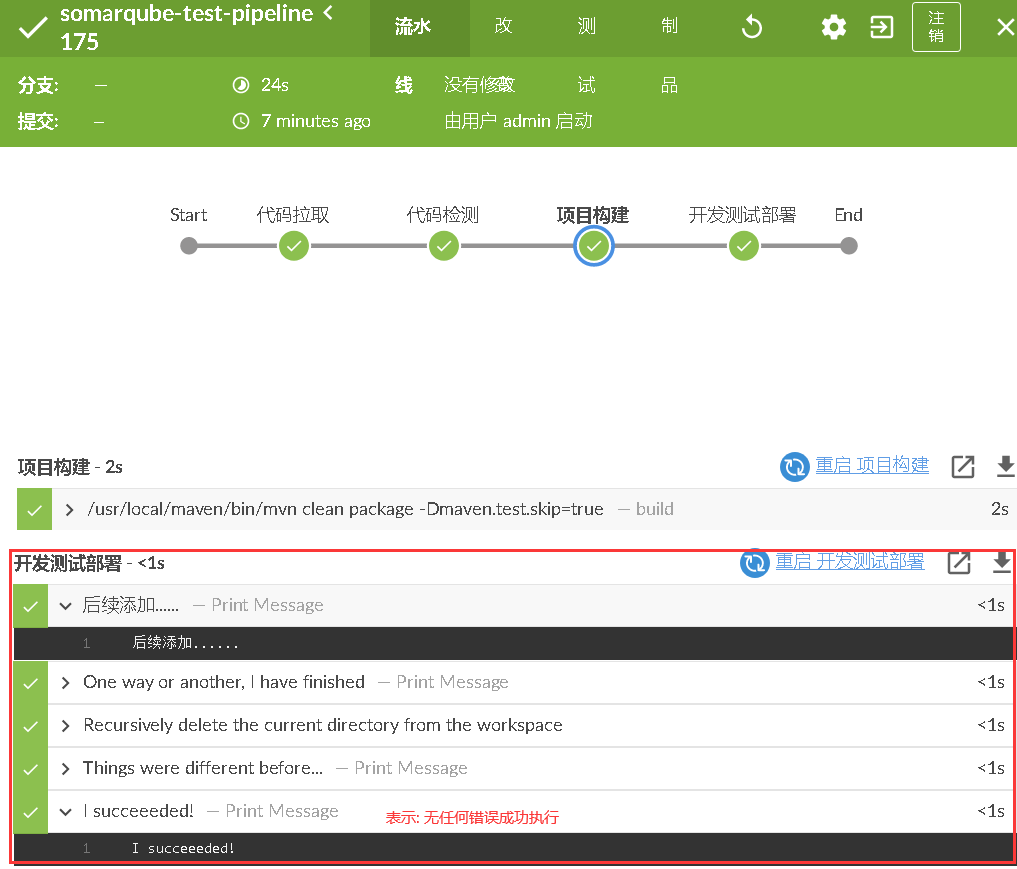
1 2 3 4 5 6 7 8 9 10 11 12 13 14 15 16 17 18 19 20 21 22 23 24 25 26 27 28 29 30 31 32 33 34 35 36 37 38 39 40 41 42 43 44 45 46 47 48 49 50 51 52 53 54 55 56 57 58 59 60 61 62 63 64 65 66 67 68 69 70 71 72 73 74 75 76 77 78 79 80 81 82 83 84 85 86 87 88 89 90 91 92 93 94 95 96 97 98 99 100 101 102 103 104 105 106 107 108 109 110 111 112 113 114 115 116 117 118 119 120 121 122 123 124 125 126 127 128 129 130 131 132 133 134 135 136 137 138 139 140 141 142 143 144 145 146 147 148 149 150 151 152 153 pipeline { agent any environment { GITLAB_URL = 'git@gitlab.weiyigeek.top:ci-cd/java-maven.git' SONARQUBE_PROJECTKEY = 'somarqube-test' ; SONARQUBE_TIMEOUT = '10' ; } parameters { choice(name: 'SONARQUBE' , choices: ['False' ,'True' ],description: 'Message: 是否进行代码质量检测?' ) string(name: 'RELEASE_VERSION' , defaultValue: "" , description: 'Message: 请选择部署的Tags版本?' ) choice(name: 'PREJECT_OPERATION' , choices: ['deploy' , 'rollback' , 'redeploy' ], description: 'Message: 选择项目操作方式?' ) } stages { stage ('代码拉取' ) { steps { git branch: "${params.RELEASE_VERSION}" , credentialsId: 'b4c8b4e9-2777-44a1-a1ed-e9dc21d37f4f' , url: "${env.GITLAB_URL}" timeout(time: 1 , unit: 'MINUTES' ) { script { def RELEASE=sh label: 'release' ,returnStdout: true , script: """\ git tag -l --column | tr -d ' ' > tag ; export a="\$(sed "s#v#, v#g" tag)'"; echo [\${a#,*}] """ echo "RELEASE_VERSION: ${RELEASE_VERSION} , PREJECT_OPERATION: ${PREJECT_OPERATION}. SONARQUBE: ${params.SONARQUBE}" sh label: 'checkout_version' , script: '[ -n "${RELEASE_VERSION}" ] && git checkout ${RELEASE_VERSION} || { echo -e "切换至指定的tag的版本 tag:${RELEASE_VERSION} 不存在或为空,请检查输入的tag!" && exit 1; }' } } } } stage ('代码检测' ) { when { anyOf { environment name: 'SONARQUBE' , value: 'True' environment name: 'PREJECT_OPERATION' , value: 'deploy' environment name: 'PREJECT_OPERATION' , value: 'redeploy' } } steps { script { def sonarqubeScanner = tool 'sonarqubescanner' ; withSonarQubeEnv(credentialsId: '6810ea0d-e76a-40cf-9373-5040ed6b5456' ) { sh "${sonarqubeScanner}/bin/sonar-scanner " + "-Dsonar.projectName=${JOB_NAME} " + "-Dsonar.projectKey=${SONARQUBE_PROJECTKEY} " + "-Dsonar.projectVersion=${RELEASE_VERSION} " + "-Dsonar.sourceEncoding=utf8 " + "-Dsonar.sources=. " + "-Dsonar.language=java " + "-Dsonar.java.binaries=." } sh "sleep ${SONARQUBE_TIMEOUT}" timeout(time: 1 , unit: 'MINUTES' ) { waitForQualityGate abortPipeline: true } } } } stage ("项目构建" ) { steps { sh label: 'build' , script: '/usr/local/maven/bin/mvn clean package -Dmaven.test.skip=true ' } } stage ("开发测试部署" ) { steps { echo "后续添加......" } } } post { always { echo 'One way or another, I have finished' deleteDir() } success { echo 'I succeeeded!' } unstable { echo 'I am unstable :/' } failure { echo 'I failed :(' } changed { echo 'Things were different before...' } } }
weiyigeek.top-项目运行以及代码拉取
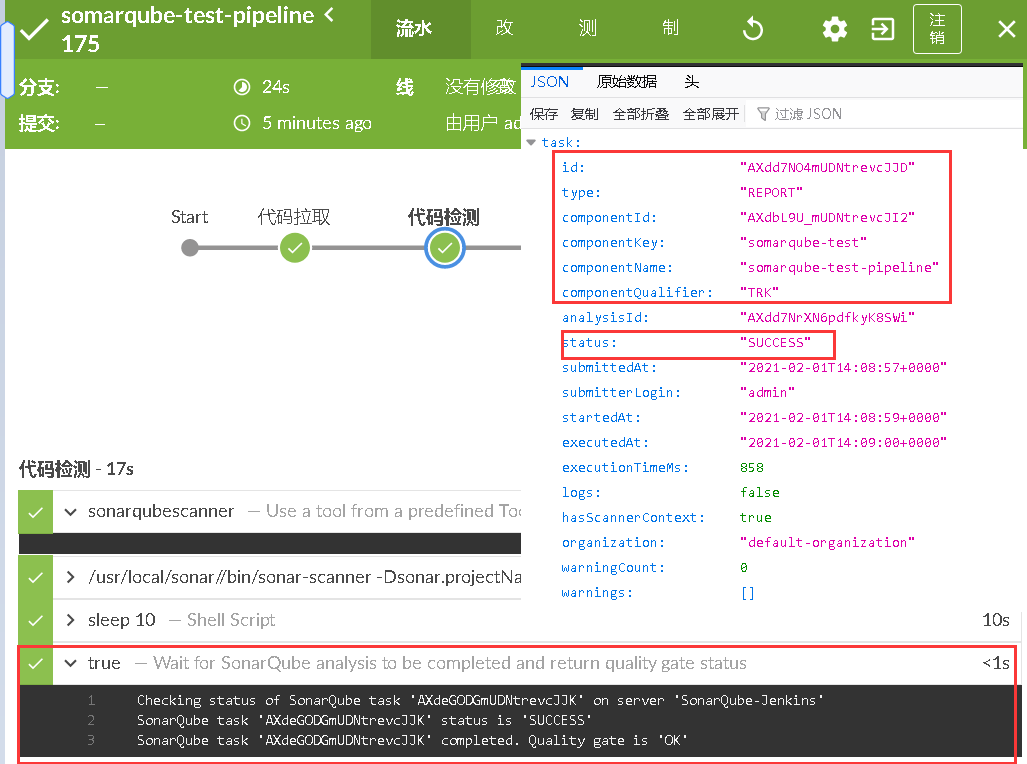
Step 5.代码检测阶段查看(重点), SonarQube analysis api 接口URL(http://sonar.weiyigeek.top:9000/api/ce/task?id=AXdd7NO4mUDNtrevcJJD)
weiyigeek.top-代码检测阶段查
weiyigeek.top-最终效果
(2) Gitlab 自动触发构建之 Pipeline Script from SCM 实验需求:Gitlab 上传自动触发Jenkins构建并通过BlueOcan进行控制构建, 以及与 Gitlab 流水线状态同步
实验流程:
Step 1.此处假设您已安装配置Gitlab Authentication plugin、GitLab Plugin这两个插件
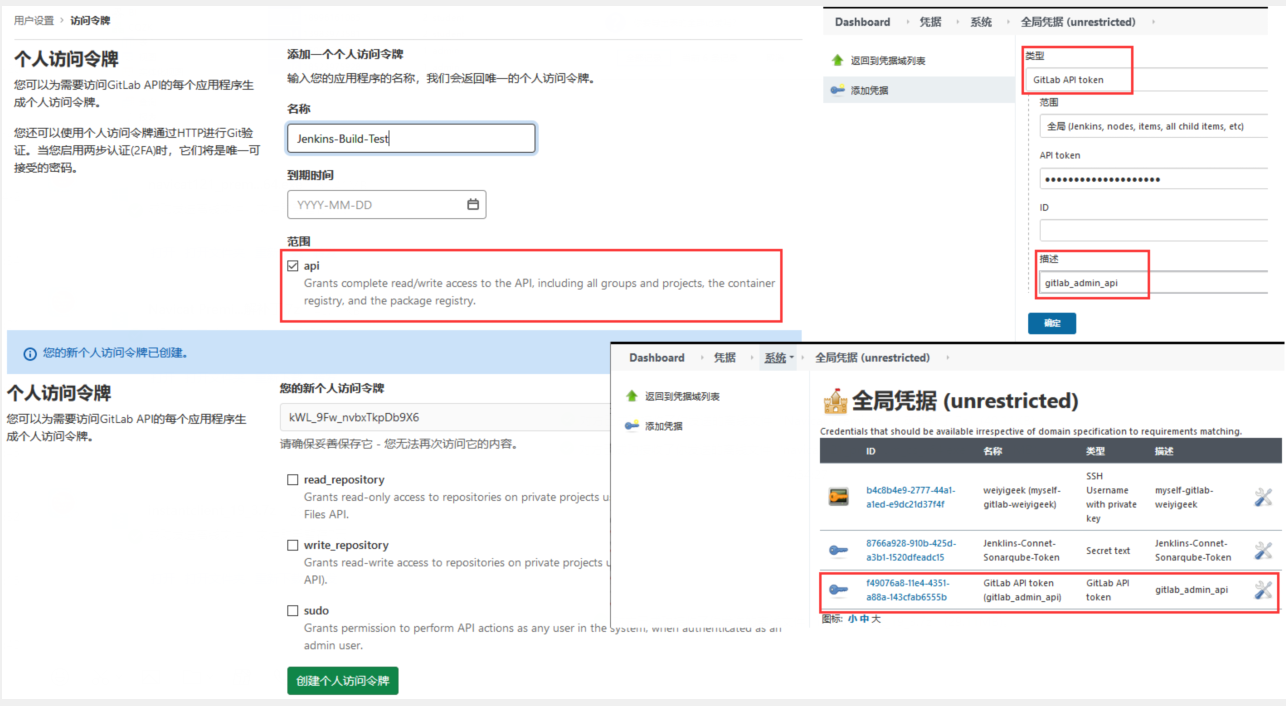
Step 2.到 Gitlab私有仓库中进行生成项目API Access Token -> 用户设置 -> 访问令牌 -> 输入您的应用程序的名称 -> 选择相应到期时间 -> 范围: 授予对API的完全读/写访问权,包括所有组和项目、容器注册表和包注册表 -> 然后创建个人访问令牌;
Step 3.得到api Token(kWL_9Fw_nvbxTkpDb9X6)后在Jenkins中添加全局凭据 -> Dashboard -> 凭据 -> 系统 -> 全局凭据 (unrestricted) -> 选择凭据类型为Gitlab API Token -> 然后确定即可 -> 他会自动生成一个类似于UUID的一个字符串
1 2 f49076a8-11e4-4351-a88a-143cfab6555b GitLab API token (gitlab_admin_api) GitLab API token gitlab_admin
weiyigeek.top-Gitlab-API-Token
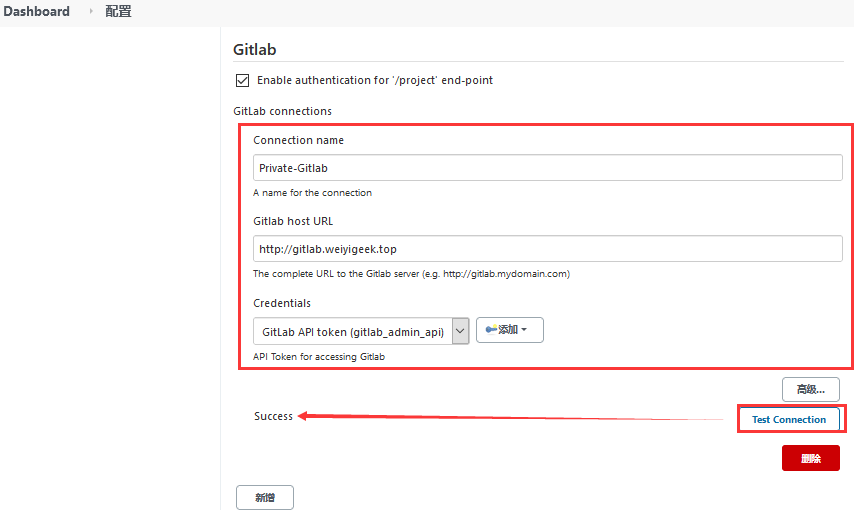
Step 4.或者直接在全局配置的 Gitlab -> Enable authentication for ‘/project’ end-point -> 应用保存;
weiyigeek.top-Gitlab-Token-配置
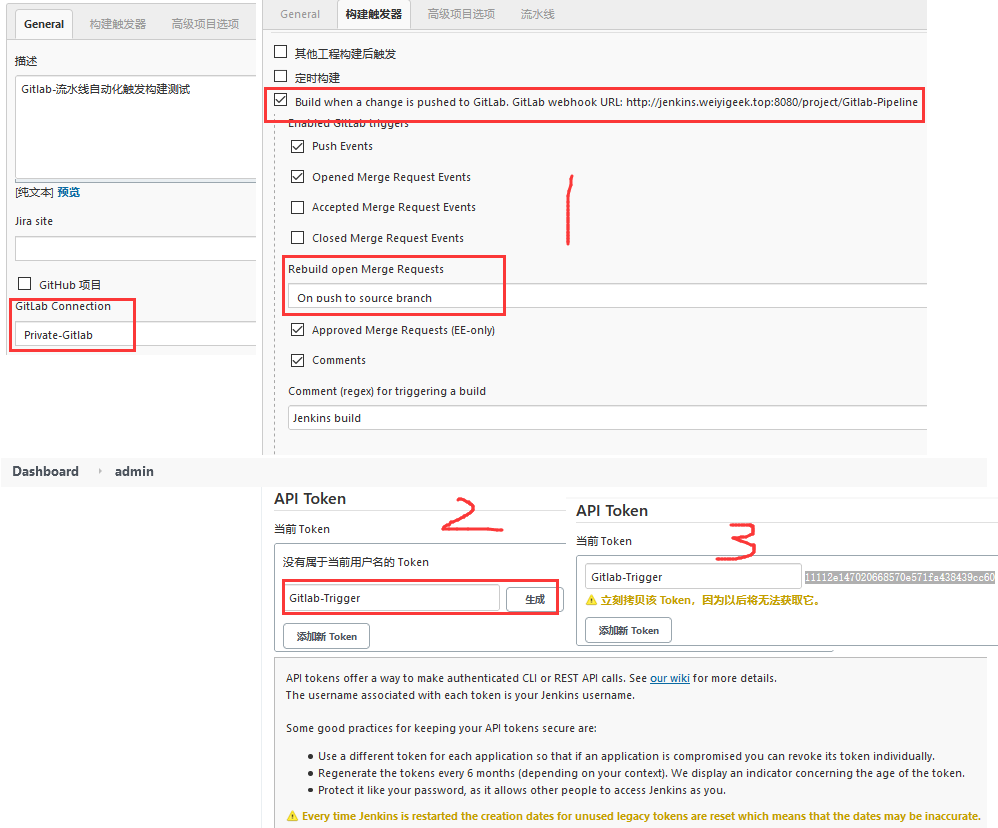
Step 5.在Dashboard -> Gitlab-Pipeline Job 中 -> 构建触发器 -> 勾选Build when a change is pushed to GitLab. -> 重新生成打开的合并请求为On push to source branch -> Comment (regex) for triggering a build 可以在提交Jenkins build字符串进行触发构建编译;
Step 6.Jenkins 生成 Api Token -> 面板 _> 用户设置 -> API Token 生成 (APl令牌提供了一种进行经过身份验证的CLI或REST API调用的方法。注意每六个月需要重新生成一次) 11112e147020668570e571fa438439cc60
weiyigeek.top-Jenkins-API-Token
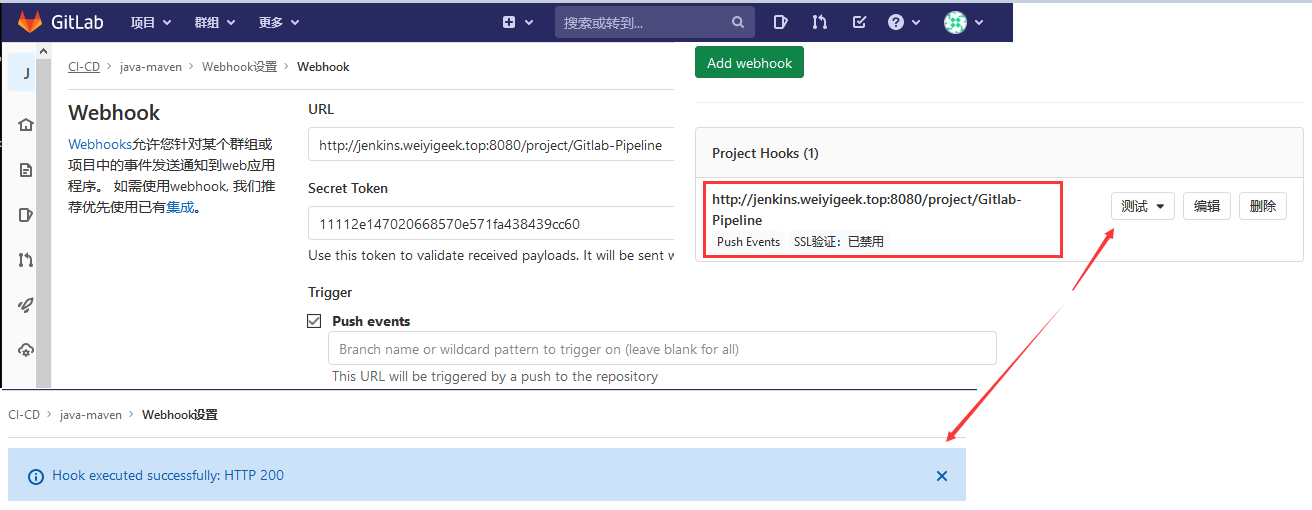
Step 7.在Gitlab -> java-maven 项目 -> 设置 -> WebHooks -> 地址为是前面Build when a change is pushed to GitLab. GitLab webhook URL中的地址 http://jenkins.weiyigeek.top:8080/project/Gitlab-Pipeline-> 输入 Secret Token -> 选择Push events Trigger -> add Webhook -> 最后进行选择push events测试 -> Hook executed successfully: HTTP 200
注意事项:1 2 3 4 5 6 7 8 9 10 11 12 13 14 Gitlab Project -> helloworld -> Webhook设置 URL :Jenkins Job Secret Token Trigger Push events : This URL will be triggered by a push to the repository (每次提交都将触发-如不需要则不要勾选即可) Tag push events : This URL will be triggered when a new tag is pushed to the repository (非常建议设置tag后才会触发) - 一般开启该事件选项后不建议开启Push evnts Comments : This URL will be triggered when someone adds a comment (评论触发)
weiyigeek.top-GitLab webhook URL
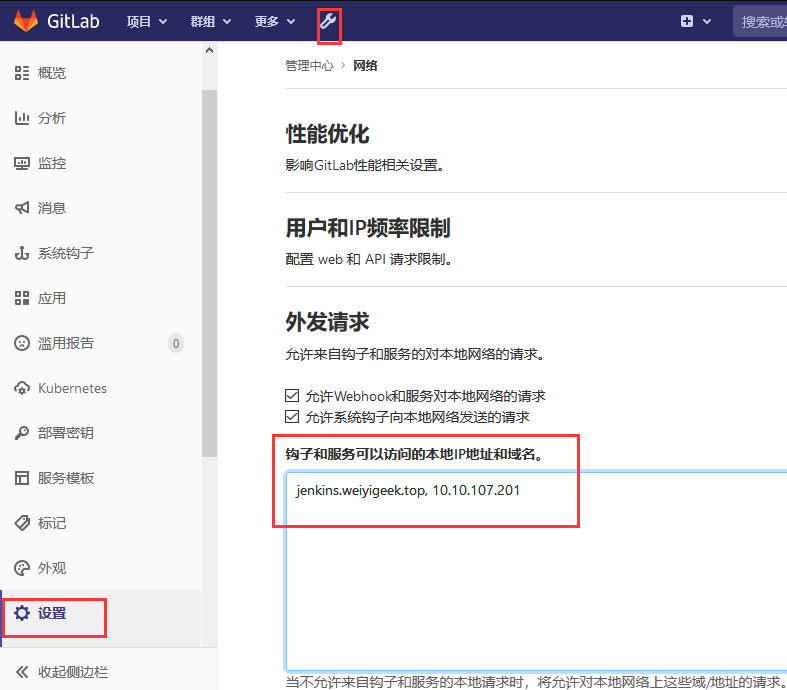
Tips : 此处需要设置允许来自钩子和服务的对本地网络的请求。
Step 8.此处先使用Pipeine Script脚本然后应用保存然后上传v1.11版本到Gitlab,查看是否自动触发Build;
1 2 3 4 5 6 7 8 9 10 11 12 13 14 15 16 17 18 19 20 21 22 23 24 25 26 27 28 29 30 31 32 33 34 35 36 37 38 39 40 41 42 43 44 45 46 47 48 49 50 51 52 53 54 55 56 57 58 59 60 61 62 63 64 65 66 67 68 69 70 71 72 73 74 75 76 77 78 79 80 81 82 83 84 85 86 87 88 89 90 91 92 93 94 95 96 97 98 99 100 101 102 103 104 105 106 107 108 109 110 111 112 113 114 115 116 117 118 119 120 121 122 123 124 125 126 127 128 129 130 131 132 133 134 135 136 137 138 139 140 141 142 143 144 145 146 147 148 149 150 151 152 153 154 155 156 157 158 159 160 161 162 163 164 165 166 167 168 169 170 171 172 173 174 175 176 177 178 179 180 181 182 183 184 185 186 187 188 189 190 191 192 193 194 195 196 197 198 199 200 201 202 203 204 205 206 207 208 pipeline { agent any options { gitLabConnection('Private-Gitlab' ) gitlabBuilds(builds: ['代码拉取' , '代码检测' , '项目构建' ,'测试部署' ,'成品归档' ]) timeout } environment { GITLAB_URL = 'git@gitlab.weiyigeek.top:ci-cd/java-maven.git' SONARQUBE_PROJECTKEY = 'Hello-World' ; SONARQUBE_TIMEOUT = '10' ; QYWX_WEBHOOK = 'https://qyapi.weixin.qq.com/cgi-bin/webhook/send?key=c222f3fc-f645-440a-ad24-0ce8d9626fa0' } parameters { string(name: 'RELEASE_VERSION' , defaultValue: "master" , description: 'Message: 请选择部署的Tags版本?' ,trim: 'True' ) choice(name: 'PREJECT_OPERATION' , choices: ['deploy' , 'rollback' , 'redeploy' ], description: 'Message: 选择项目操作方式?' ) choice(name: 'SONARQUBE' , choices: ['False' ,'True' ],description: 'Message: 是否进行代码质量检测?' ) } triggers { gitlab(triggerOnPush: true , triggerOnMergeRequest: true , branchFilterType: 'All' ) } stages { stage ('代码拉取' ) { steps { echo "${env.GITLAB_URL} -- ${params.RELEASE_VERSION}" timeout(time: 1 , unit: 'MINUTES' ) { script { try { echo "${env.GITLAB_URL} -- ${params.RELEASE_VERSION}" checkout([$class: 'GitSCM' , branches: [[name: "${params.RELEASE_VERSION}" ]], doGenerateSubmoduleConfigurations: false , extensions: [], submoduleCfg: [], userRemoteConfigs: [[credentialsId: 'b4c8b4e9-2777-44a1-a1ed-e9dc21d37f4f' , url: "${env.GITLAB_URL}" ]]]) updateGitlabCommitStatus name: '代码拉取' , state: 'success' } catch (Exception err) { updateGitlabCommitStatus name: '代码拉取' , state: 'failed' echo err.toString() unstable '拉取代码失败' error "[-Error] : 代码拉取失败\n [-Msg] : ${err.getMessage()} " } def RELEASE=sh label: 'release' ,returnStdout: true , script: """\ git tag -l --column | tr -d ' ' > tag ; export a="\$(sed "s#v#, v#g" tag)'"; echo [\${a#,*}] """ echo "RELEASE_VERSION: ${params.RELEASE_VERSION} , PREJECT_OPERATION: ${params.PREJECT_OPERATION}. SONARQUBE: ${params.SONARQUBE}" sh "git branch" } } } } stage ('代码检测' ) { when { expression { return params.PREJECT_OPERATION != "rollback" } anyOf { environment name: 'SONARQUBE' , value: 'True' environment name: 'PREJECT_OPERATION' , value: 'deploy' environment name: 'PREJECT_OPERATION' , value: 'redeploy' } } steps { script { def sonarqubeScanner = tool 'sonarqubescanner' ; withSonarQubeEnv(credentialsId: '6810ea0d-e76a-40cf-9373-5040ed6b5456' ) { sh "${sonarqubeScanner}/bin/sonar-scanner " + "-Dsonar.projectName=${JOB_NAME} " + "-Dsonar.projectKey=${SONARQUBE_PROJECTKEY} " + "-Dsonar.projectVersion=${RELEASE_VERSION} " + "-Dsonar.sourceEncoding=utf8 " + "-Dsonar.sources=. " + "-Dsonar.language=java " + "-Dsonar.java.binaries=." } sleep time: "${env.SONARQUBE_TIMEOUT}" , unit: 'NANOSECONDS' sh "sleep ${SONARQUBE_TIMEOUT}" try { timeout(time: 1 , unit: 'MINUTES' ) { waitForQualityGate abortPipeline: true } updateGitlabCommitStatus name: '代码检测' , state: 'success' } catch (Exception err) { updateGitlabCommitStatus name: '代码检测' , state: 'failed' unstable '代码检测失败' } } } } stage ("项目构建" ) { when { expression { return params.PREJECT_OPERATION != "rollback" } } steps { gitlabCommitStatus(connection: gitLabConnection('Private-Gitlab' ),name: "项目构建" ) { sh script: '/usr/local/maven/bin/mvn clean package -Dmaven.test.skip=true' } } } stage ("测试部署" ) { steps { script { try { sh label: 'deploy' , script: '/tmp/script/jenkins-pipeline-gitlab-k8s.sh' updateGitlabCommitStatus name: '测试部署' , state: 'success' }catch (Exception err) { echo err.toString() unstable '部署失败' updateGitlabCommitStatus name: '测试部署' , state: 'failed' error "[-Error] : 测试部署失败\n [-Msg] : ${err.getMessage()} " } } } } stage('成品归档' ) { steps { script { try { archiveArtifacts artifacts: "target/*.war" ,fingerprint: true , followSymlinks: false , onlyIfSuccessful: true updateGitlabCommitStatus name: '成品归档' , state: 'success' } catch (Exception err) { updateGitlabCommitStatus name: '成品归档' , state: 'failed' echo err.toString() } } } } } post { always { echo 'One way or another, I have finished' qyWechatNotification aboutSend: true , failNotify: true , failSend: true , mentionedMobile: '' , startBuild: true , successSend: true , unstableSend: true , webhookUrl: 'https://qyapi.weixin.qq.com/cgi-bin/webhook/send?key=c222f3fc-f645-440a-ad24-0ce8d9626fa0' deleteDir() } success { echo 'I succeeeded!' } unstable { echo 'I am unstable - 不稳定 :/' } failure { echo 'I failed :(' } changed { echo 'Things were different before - 以前的情况不一样...' } } }
/tmp/script/jenkins-pipeline-gitlab-k8s.sh1 2 3 4 5 6 7 8 9 10 11 12 13 14 15 16 17 18 19 20 21 22 23 24 25 26 27 28 29 30 31 32 33 34 35 36 37 38 39 40 41 42 43 44 45 46 47 48 49 50 51 52 53 54 55 56 57 58 59 60 61 62 63 #!/bin/bash DATE=$(date +%Y%m%d-%H%M%S) WAR_PATH="/nfs/data4/war" WEBROOT_PATH="/nfs/data4/webapps" WEB_DIR="${JOB_NAME} -${DATE} -${RELEASE_VERSION} " WAR_DIR=" ${WAR_PATH} /${WEB_DIR} " WAR_NAME="${WEB_DIR} .war" K8S_MATER="WeiyiGeek@10.10.107.202" K8S_MATER_PORT="20211" echo "${RELEASE_VERSION} --------------- ${PREJECT_OPERATION} " deploy scp -P ${K8S_MATER_PORT} ${WORKSPACE} /target/*.war WeiyiGeek@10.10.107.202:${WAR_PATH} /${WAR_NAME} ssh -p ${K8S_MATER_PORT} ${K8S_MATER} "unzip ${WAR_PATH} /${WAR_NAME} -d ${WAR_DIR} && \ rm -rf ${WEBROOT_PATH} && \ ln -s ${WAR_PATH} /${WEB_DIR} ${WEBROOT_PATH} && \ kubectl delete pod -l app=java-maven" } rollback History_Version=$(ssh -p ${K8S_MATER_PORT} ${K8S_MATER} "find ${WAR_PATH} -maxdepth 1 -type d -name ${JOB_NAME} -*-${RELEASE_VERSION} " ) ssh -p ${K8S_MATER_PORT} ${K8S_MATER} "rm -rf ${WEBROOT_PATH} && \ ln -s ${History_Version} ${WEBROOT_PATH} && \ kubectl delete pod -l app=java-maven" } redeploy if [[ "v${GIT_COMMIT} " = "v${GIT_PREVIOUS_SUCCESSFUL_COMMIT} " ]];then echo -e "曾经部署过 ${RELEASE_VERSION} 版本,现在正在重新部署!" $(ssh -p ${K8S_MATER_PORT} ${K8S_MATER} "find ${WAR_PATH} -d -maxdepth 1 -type d -name ${JOB_NAME} -*-${RELEASE_VERSION} && find ${WAR_PATH} -d -maxdepth 1 -type f -name ${JOB_NAME} -*-${RELEASE_VERSION} .war" ) fi deploy } if [[ "${PREJECT_OPERATION} " = "deploy" ]]; then deploy elif [[ "${PREJECT_OPERATION} " = "rollback" ]];then rollback elif [[ "${PREJECT_OPERATION} " = "redeploy" ]];then redeploy else echo -e "无任何操作!停止执行脚本" exit 127 fi
Step 9.功能分析之Git与Gitlab拉取指定分支并切换分支1 2 3 4 5 6 7 8 9 10 11 12 13 14 15 16 17 18 19 20 21 1. 单击Git 2. 输入您的存储库URL,例如git@your.gitlab.server:gitlab_group/gitlab_project.git 3. 在“分支说明符”中输入: 4.在其他行为中: (1) 在GitLab Webhook配置中,添加“标签推送事件” (2) 在“源代码管理”下的作业配置中: 1.选择“高级...”并添加“ `+refs/tags/*:refs/remotes/origin/tags/*` ”作为参考规格 2.您还可以使用“分支说明符”来指定需要构建的标签(例如“ refs / tags / $ {TAGNAME}”示例)
简单示例:1 2 3 4 5 6 git branch: "${params.RELEASE_VERSION}" , credentialsId: 'b4c8b4e9-2777-44a1-a1ed-e9dc21d37f4f' , url: "${env.GITLAB_URL}" checkout([$class: 'GitSCM' , branches: [[name: "origin/${params.RELEASE_VERSION}" ]], doGenerateSubmoduleConfigurations: false , extensions: [], submoduleCfg: [], userRemoteConfigs: [[credentialsId: 'b4c8b4e9-2777-44a1-a1ed-e9dc21d37f4f' , url: '${env.GITLAB_URL}' ]]])
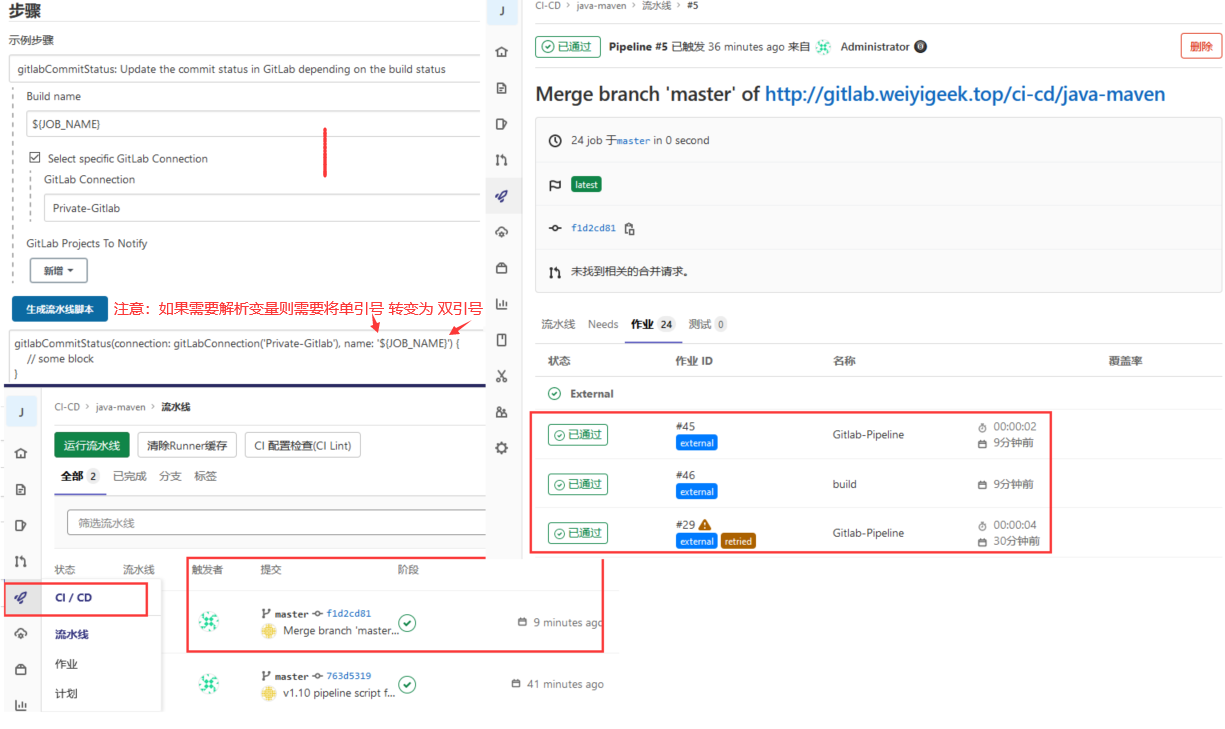
Step 9.功能分析之 Jenkins 同步到 Gitlab 流水线之中,并且从Gitlab中可以直接进入Jenkins Job页面查看构建情况;1 2 3 4 gitlabCommitStatus(connection: gitLabConnection('Private-Gitlab' ), name: '${JOB_NAME}' ) { sh label: 'build' , script: '/usr/local/maven/bin/mvn clean package -Dmaven.test.skip=true' }
weiyigeek.top-jenkins与Gitlab流水线
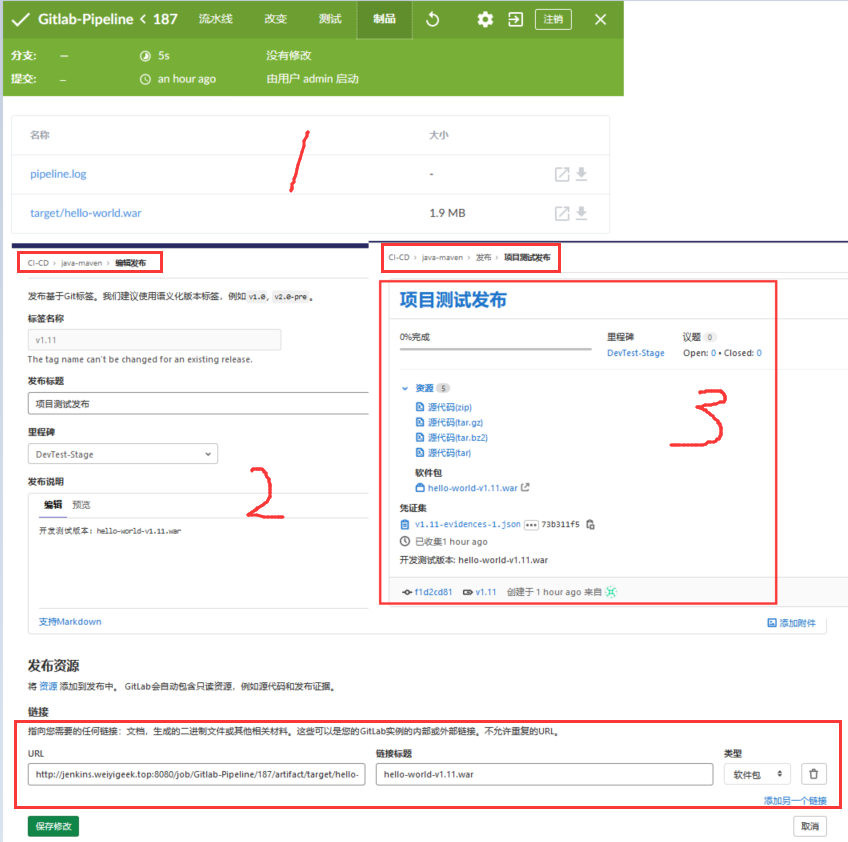
Step 10.功能分析之 Jenkins 中成品进行归档, 注意其路径为相对路径及其您生成的项目打包文件格式文件和Gitlab Relase 发布1 2 3 4 5 6 7 8 archiveArtifacts artifacts: 'target/*.jar' , fingerprint: true , followSymlinks: false , onlyIfSuccessful: true http://jenkins.weiyigeek.top:8080/job/Gitlab-Pipeline/187/artifact/target/hello-world.war
weiyigeek.top-Jenkins归档与Release发布
Tips : Gitlab 项目 Release 自动发布 GitLab CI 工具: https://gitlab.com/gitlab-org/release-cli/-/blob/master/docs/index.md#usage 后面有时间再扩充;
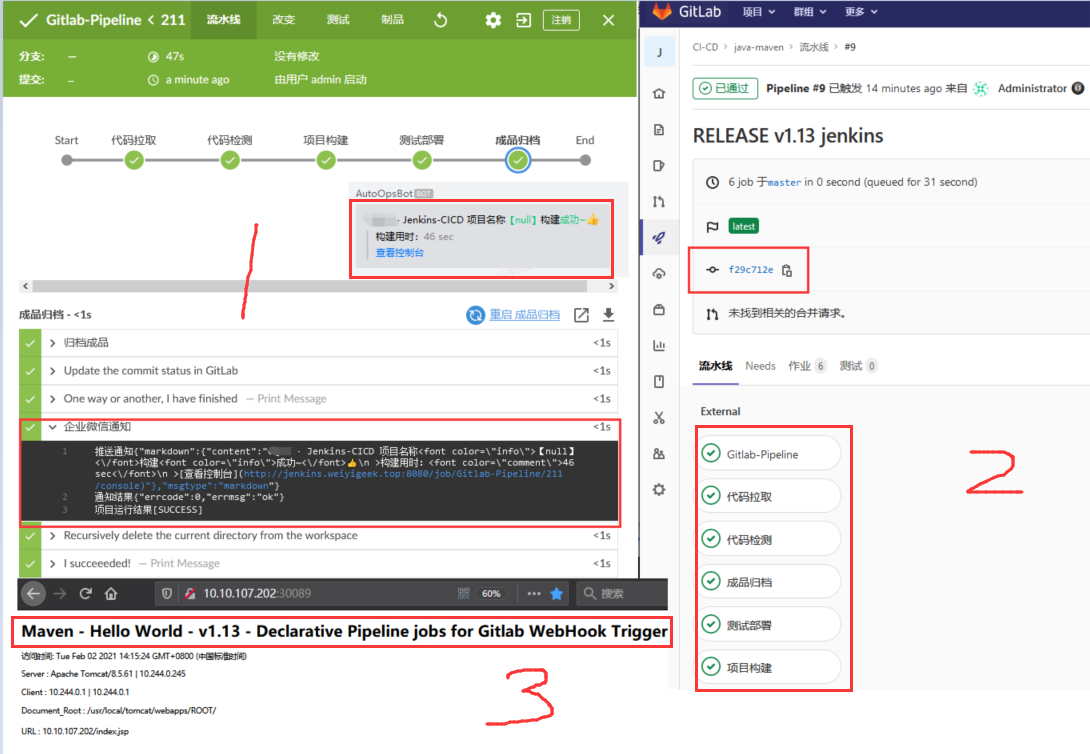
Step 11.同样访问我们的K8s部署的Pod查看是否部署成功URL: http://10.10.107.202:30089/;1 2 3 4 5 6 7 8 9 10 11 Maven - Hello World - v1.13 - Declarative Pipeline jobs for Gitlab WebHook Trigger 访问时间: Tue Feb 02 2021 14:15:24 GMT+0800 (中国标准时间) Server : Apache Tomcat/8.5.61 | 10.244.0.245 Client : 10.244.0.1 | 10.244.0.1 Document_Root : /usr/local /tomcat/webapps/ROOT/ URL : 10.10.107.202/index.jsp
weiyigeek.top-Jenkins & gitlab 自动触发
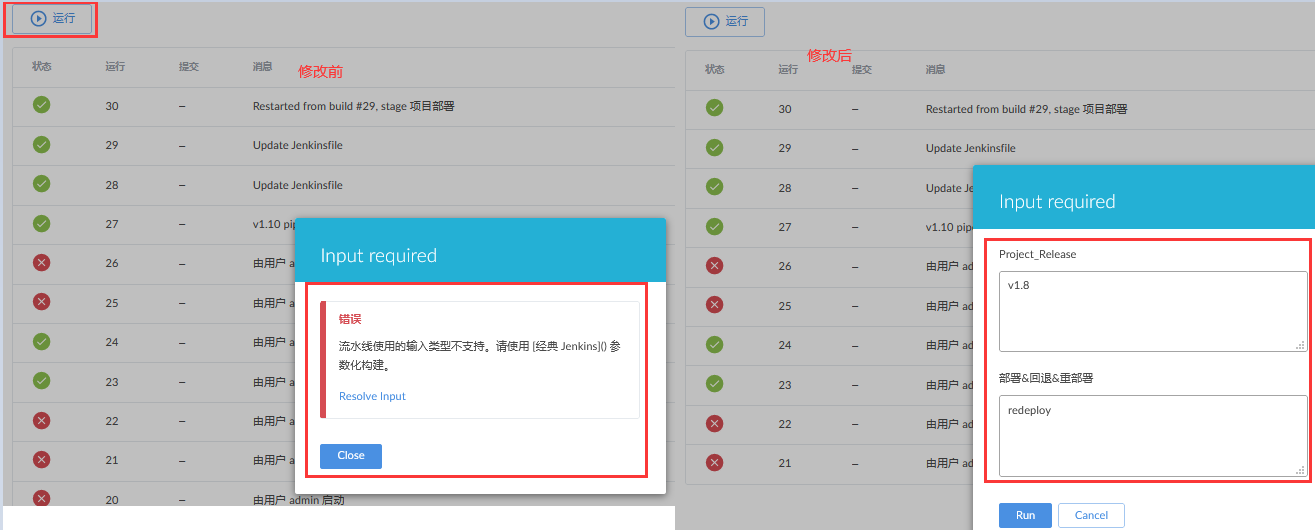
0x03 入坑与出坑 问题1.在BlueOcean中流水线使用的输入类型不支持。请使用 经典 Jenkins
git_tags 默认值 描述信息
deploy_option 默认值(deploy 、rollback、redeploy) 描述信息(部署&回退&重部署)
weiyigeek.top-BlueOcean输入
问题2.添加Webhook测试时显示Hook execution failed: URL ‘http://jenkins.weiyigeek.top:8080/project/Gitlab-Pipeline' is blocked: Requests to the local network are not allowed 1 Hook execution failed: URL 'http://jenkins.weiyigeek.top:8080/project/Gitlab-Pipeline' is blocked: Requests to the local network are not allowed
允许Webhook和服务对本地网络的请求 -> 然后输入 钩子和服务可以访问的本地IP地址和域名。
weiyigeek.top-外发请求设置
问题3.Jenkinsfile 编写过程中遇到的情况以及解决办法
1.字符串插值处理
1 2 3 4 5 6 7 8 9 10 11 12 13 14 15 16 17 18 19 environment { STATIC_VAR = "静态变量" def dynamic_var = "" } parameters { string(name: 'RELEASE_VERSION' , defaultValue: "master" , description: 'Message: 请选择部署的Tags版本?' , trim: 'True' ) choice(name: 'PREJECT_OPERATION' , choices: ['deploy' , 'rollback' , 'redeploy' ], description: 'Message: 选择项目操作方式?' ) } echo "${env.STATIC_VAR} " echo "${params.PREJECT_OPERATION} " dynamic_var = "动态设置环境变量" println(dynamic_var)
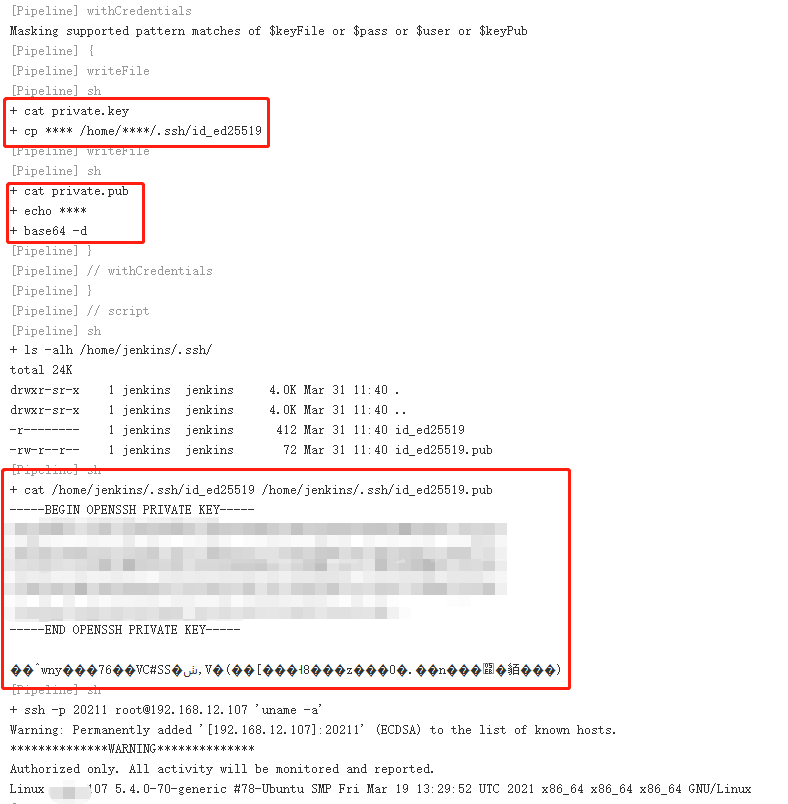
2.凭据处理
1 2 3 4 5 6 7 8 9 10 11 12 13 14 15 16 17 18 19 20 21 22 23 24 25 26 27 28 29 30 31 32 33 34 withCredentials([string(credentialsId: 'ce228573-ad3d-40e8-a3bf-b9de510080db' , variable: 'GITLAB_TOKEN' )]) { echo GITLAB_TOKEN # println(GITLAB_TOKEN) } $ cat id_ed25519.pub | base64 -w 0 echo "c3NoLWVkMjU1MTkgQUFBQUMzTnphQzFsWkRJMU5URTVBQUFBSUIinfozVnFFbyt1NmZXNExZeWN1bk9QKzBubnE3cWNJd3lBWXVtNUp1Qi8gbWFzdGVyQHdlaXlpZ2Vlay50b3AK" | base64 -d script { withCredentials([ sshUserPrivateKey(credentialsId: '1d4e61cb-5d59-4da8-813b-a5fb345770c9' , keyFileVariable: 'keyFile' , passphraseVariable: 'pass' , usernameVariable: 'user' ), string(credentialsId: '79a78423-e539-4b1f-a872-f0cf1dd3f9fa' , variable: 'keyPub' ) ]) { writeFile file: 'private.key' , text: keyFile sh "cp \$(cat private.key) ~/.ssh/id_ed25519" writeFile file: 'private.pub' , text: keyPub sh "echo \$(cat private.pub) | base64 -d > ~/.ssh/id_ed25519.pub" } } withCredentials([certificate(aliasVariable: 'aliase' , credentialsId: '6795a628-97a9-4a18-8dcc-1c913e6901d4' , keystoreVariable: 'private' , passwordVariable: 'pass' )]) { # // some block }
weiyigeek.top-SSH密钥与公钥处理
3.额外处理1 2 3 4 5 6 7 8 9 10 11 12 13 14 15 16 17 try { sh script: "./test.sh" timeout(time: 1, unit: 'MINUTES' ) { waitForQualityGate abortPipeline: true } updateGitlabCommitStatus name: '代码检测' , state: 'success' } catch(Exception err) { updateGitlabCommitStatus name: '代码检测' , state: 'failed' unstable '代码检测失败' }

