[TOC]
Listener与Filter监听器基础使用
|[TOC]
1.Listener
1) 基础介绍
Q:Listener是什么?有什么用?
答:Listener监听器,用于监听某一个事件的发生。
Q:监听器的内部机制是什么?
答:实就是接口回调,事件源->监听器;
需求:> A在执行循环当循环到5的时候通知B进行执行
事先先把一个对象传递给 A ,当A 执行到5的时候通过这个对象来调用B中的方法;但是注意不是直接传递B的实例,而是传递一个接口的实例过去。
基础实例(监听器内部机制):
A 和 B 两者中间接住去联系上,所以一开始在执行A的Print方法,先把一个接口的实现类传递给A,然后A在根据这个对象调用B的方法;
这样处理的好处在定义该方法的时候,不用考虑以后开发B类或者C类还是D类,只要预定义一种接口,并且方未来缩写的那些类实现这个借口,然后这个方法参数写接口类型即可;
1 | /**A.java |
执行结果:1
2
3
4
5
6
7
8
9
10
11
12
13
14
15
16
17
18
19
20
21
22
23
24
25
26
27
28
29
30
31
32
33
34
35
36
37
38
39
40
41
42
43
44
45
46
47
48
49
50
51
522018年A方法,当前Index:0
2018年A方法,当前Index:1
2018年A方法,当前Index:2
2018年A方法,当前Index:3
2018年A方法,当前Index:4
2018年A方法,当前Index:5
2018年A方法,已经到5正在通知B进行方法执行!
我是2020年B类方法我正在执行......
2018年A方法,当前Index:6
2018年A方法,当前Index:7
2018年A方法,当前Index:8
2018年A方法,当前Index:9
```
---
##### 1) Listener分类
描述: Web 监听器之Listener监听器的分类,总共有8个划分成三种类型;
- (1) application(作用域) -> ServletContext(类) -> `监听器: ServletContextListener`
- 该监听器作用:初始化项目加载基础资源,任务调度(`比如执行某一个定时任务Timer`),以及开发者想完成自己初始化工作的方法
- (2) request -> HttpServletRequest -> `监听器: ServletRequestListener`
- (3) session -> HttpSession -> `监听器: HttpSessionListener`
- 该监听器作用: 根据创建的session来统计在线人数;
<br>
##### 2) 生命周期
_类型1.监听三个作用域创建和销毁说明_
```bash
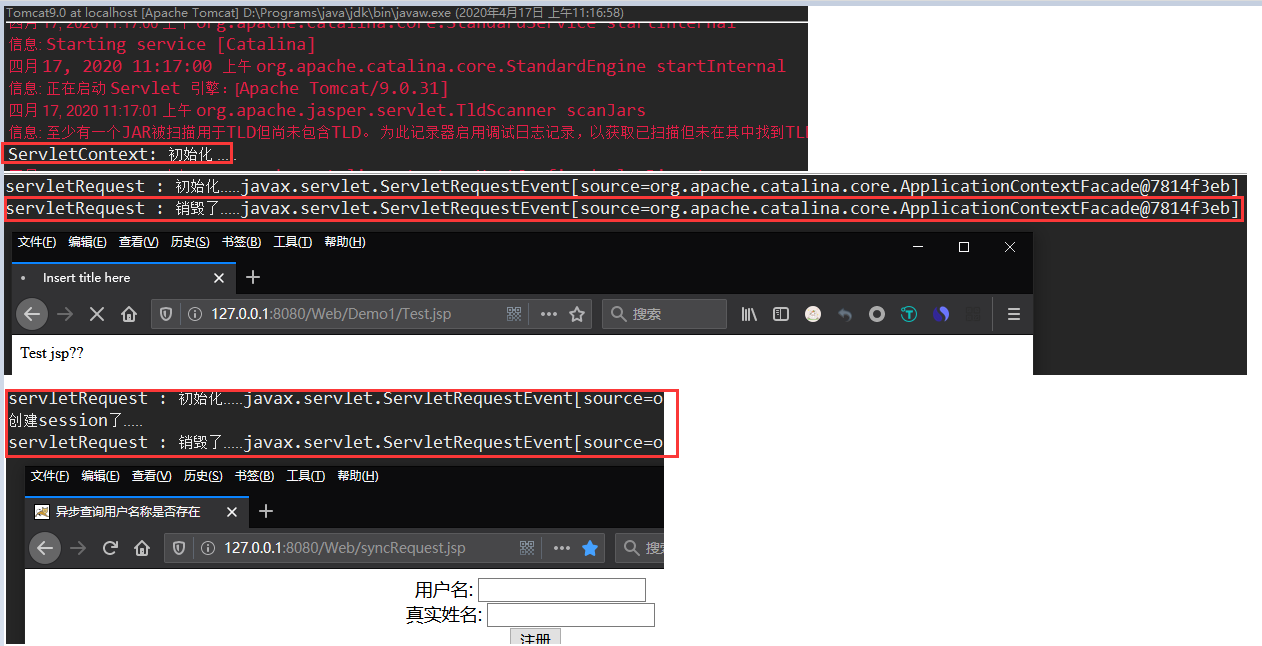
#ServletContextListener 监听器生命周期
#context创建:启动服务器的时候;
public void contextInitialized(ServletContextEvent sce) {...}
#context销毁:关闭服务器,从服务器移除项目;
public void contextDestroyed(ServletContextEvent sce) {...}
#ServletRequestListener 监听器生命周期
#request创建:访问服务器上的任意资源都会有请求出现,触发情况访问 html、 jsp、 servlet进行触发;
public void requestInitialized(ServletRequestEvent sre) {}
#request销毁:服务器已经对这次请求作出了响应。
public void requestDestroyed(ServletRequestEvent sre) {}
#HttpSessionListener 监听器生命周期
#session创建:首次访问页面就就会调用getSession,但是需要注意可以触发的jsp / Servlet 而 html不会进行触发
public void sessionCreated(HttpSessionEvent se) {}
- html:不会
- jsp:会 getSession();
- servlet:会
#session销毁,条件超时30分钟以及非正常关闭销毁
public void sessionDestroyed(HttpSessionEvent se) {}
补充:监听器的创建于注册流程定义一个类实现*Listener接口,其次在/Web/WebContent/WEB-INF/web.xml注册配置监听器1
2
3
4
5
6<web-app xmlns:xsi="http://www.w3.org/2001/XMLSchema-instance" xmlns="http://java.sun.com/xml/ns/javaee" xsi:schemaLocation="http://java.sun.com/xml/ns/javaee http://java.sun.com/xml/ns/javaee/web-app_2_5.xsd" id="WebApp_ID" version="2.5">
<display-name>Web</display-name>
<listener>
<listener-class>监听器类路径</listener-class>
</listener>
</web-app>
基础实例1: weiyigeek.top-三种作用域监听器初始化和销毁1
2
3
4
5
6
7
8
9
10
11
12
13
14
15
16
17
18
19
20
21
22
23
24
25
26
27
28
29
30
31
32
33
34
35
36//ServletContextListener 监听器
package top.weiyigeek.listener;
import javax.servlet.ServletContextEvent;
import javax.servlet.ServletContextListener;
public class MyServletContentListener implements ServletContextListener {
public void contextInitialized(ServletContextEvent sce) {
System.out.println("ServletContext: 初始化 .....");
}
public void contextDestroyed(ServletContextEvent sce) {
System.out.println("ServletContext: 销毁了 .....");
}
}
//ServletRequestListener 监听器
public class MyRequestListener implements ServletRequestListener {
public void requestInitialized(ServletRequestEvent sre) {
System.out.println("servletRequest : 初始化....." + sre);
}
public void requestDestroyed(ServletRequestEvent sre) {
System.out.println("servletRequest : 销毁了....." + sre);
}
}
//HttpsessionListener 监听器
public class MySessionListener implements HttpSessionListener {
@Override
public void sessionCreated(HttpSessionEvent se) {
System.out.println("HttpSession: 创建session了.....");
}
@Override
public void sessionDestroyed(HttpSessionEvent se) {
System.out.println("HttpSession: 销毁session了.....");
}
}
类型2.监听三个作用域属性状态变更
描述:三种作用域属性监听器的方法名称大致差不多只是方法参数Event事件不同,他们可以监听在作用域中值 添加 | 替换 | 移除 的动作,在实际开发中作用没上一类作用大。1
2
3
4
5
6
7
8
9
10
11
12
13
14
15#ServletContext -> ServletContextAttributeListener 属性监听器
#向servlet上下文添加/删除/替换新属性的通知
void attributeAdded(ServletContextAttributeEvent scab)
void attributeRemoved(ServletContextAttributeEvent scab)
void attributeReplaced(ServletContextAttributeEvent scab)
#HttpServletRequest -> ServletRequestAttributeListener 属性监听器
void attributeAdded(ServletRequestAttributeEvent srae)
void attributeRemoved(ServletRequestAttributeEvent srae)
void attributeReplaced(ServletRequestAttributeEvent srae)
#HttpSession -> HttpSessionAttributeListener 属性监听器
void attributeAdded(HttpSessionBindingEvent se)
void attributeRemoved(HttpSessionBindingEvent se)
void attributeReplaced(HttpSessionBindingEvent se)
基础示例(此处采用HttpSessionAttributeListener为例):1
2
3
4
5
6
7
8
9
10
11
12
13
14
15
16
17
18
19
20
21
22
23
24
25
26
27
28
29
30
31/**
/Web/src/top/weiyigeek/listener/MyHttpSessionAttributeListener.java
* @Desc 属性更改|替换|添加事件触发
* @author WeiyiGeek
*/
public class MyHttpSessionAttributeListener implements HttpSessionAttributeListener {
public void attributeAdded(HttpSessionBindingEvent hsbe) {
System.out.println("1.属性添加......");
}
public void attributeRemoved(HttpSessionBindingEvent hsbe) {
System.out.println("2.属性移除......");
}
public void attributeReplaced(HttpSessionBindingEvent hsbe) {
System.out.println("3.属性替换......");
}
}
///Web/WebContent/Demo1/TestAttribute.jsp
<body>
<h1> TestAttribute.jsp 测试 监听器属性</h1>
<%
//(1)session 作用域属性设置
session.setAttribute("name", "WeiyiGeek");
//(2)属性替换
session.setAttribute("name", "TestWeiyi");
//(3)移除属性
session.removeAttribute("name");
%>
</body>
执行结果:1
2
3
4
5
6
7
8
9#以此可以大概了解各个监听器的生命周期
ServletContext: 初始化 .....
servletRequest : 初始化.....javax.servlet.ServletRequestEvent[source=org.apache.catalina.core.ApplicationContextFacade@2f1d633b]
HttpSession: 创建session了.....
1.属性添加......
3.属性替换......
2.属性移除......
servletRequest : 销毁了.....javax.servlet.ServletRequestEvent[source=org.apache.catalina.core.ApplicationContextFacade@2f1d633b]
ServletContext: 销毁了 .....
注意事项:
- 第一类与第二类监听器在Web.xml中监听器才能在应用中正常使用;
类型3.监听httpSession里面存值的状态变更
描述:该类监听器不用在web.xml进行注册了,但是必须在您的Bean类中进行实现该类监听器的接口便可正常使用;
- (1) HttpSessionBindingListener:监听对象与session 绑定和解除绑定 的动作
1
2
3#基础方法
public void valueBound(HttpSessionBindingEvent event) {...}
public void valueUnbound(HttpSessionBindingEvent event) {...}
基础实例:1
2
3
4
5
6
7
8
9
10
11
12
13
14
15
16
17
18
19
20
21
22
23
24
25
26
27
28
29
30
31
32
33
34
35///Web/src/top/weiyigeek/main/BeanListener.java
/**
* @Desc 第三类HttpSessionBindingListener监听器的实现,监听Session传值的状态改变;
* @author WeiyiGeek
*/
public class BeanListener implements HttpSessionBindingListener {
private String name;
public String getName() {
return name;
}
public void setName(String name) {
this.name = name;
}
//由于 HttpSessionBindingListener 不用在Web.xml中进行注册,所以在使用中必须在Bean类中进行实现该接口
public void valueBound(HttpSessionBindingEvent event) {
System.out.println("HttpSessionBinding:对象值 被 绑定....");
}
public void valueUnbound(HttpSessionBindingEvent event) {
System.out.println("HttpSessionBinding:对象值被 解除 绑定....");
}
}
///Web/WebContent/Demo1/TestAttribute.jsp
<h1> TestAttribute.jsp 测试 监听器属性</h1>
<%
//(1)session 作用域属性设置
session.setAttribute("name", "WeiyiGeek");
//(2)属性替换
session.setAttribute("name", "TestWeiyi");
//(3)移除属性
session.removeAttribute("name");
%>
</body>
执行结果:1
2
3
4
5
6
7
8
9
10bashservletRequest : 初始化.....javax.servlet.ServletRequestEvent[source=org.apache.catalina.core.ApplicationContextFacade@11728c6]
HttpSession: 创建session了.....
HttpSessionBinding:对象值 被 绑定....
1.属性添加......
3.属性替换......
HttpSessionBinding:对象值被 解除 绑定....
2.属性移除......
servletRequest : 销毁了.....javax.servlet.ServletRequestEvent[source=org.apache.catalina.core.ApplicationContextFacade@11728c6]
#30分钟后
HttpSession:销毁session了.....
- (2) HttpSessionActivationListener: 用于监听现在session的值 是 钝化 (序列化)还是活化 (反序列化)的动作
什么是钝化(序列化) ?
答:把内存中的数据存储到硬盘上。
什么是活化 (反序列化)?
答:把硬盘中的数据读取到内存中。
session的钝化活化的用意何在?
答:session中的值可能会很多, 并且我们有很长一段时间不使用这个内存中的值, 那么可以考虑把session的值可以存储到硬盘上【钝化】,等下一次在使用的时候,在从硬盘上提取出来。 【活化】
补充上述钝化后存储在E:\Development\apache-tomcat-9.0.31\work\Catalina\localhost\您的项目名称\SESSIONS.ser之中
基础示例:1
2
3
4
5
6
7
8
9
10
11
12
13
14
15
16
17
18
19
20
21
22
23
24
25
26
27
28
29
30
31
32
33
34
35
36
37
38
39///Web/src/top/weiyigeek/main/BeanActivation.java #这里少不了Seariable他是用于序列化域反序列化;
public class BeanActivation implements HttpSessionActivationListener,Serializable {
private String name;
public String getName() {
return name;
}
public void setName(String name) {
this.name = name;
}
//钝化
public void sessionWillPassivate(HttpSessionEvent hse) {
System.out.println("- HttpSessionActivation(被钝化) , Session 值 = " + hse.getSession().getId());
}
//活化
public void sessionDidActivate(HttpSessionEvent hse) {
System.out.println("- HttpSessionActivation(被活化) , Session 值 = " + hse.getSession().getId());
}
}
///Web/WebContent/Demo1/TestActivation.jsp
<H1>TestActivation.jsp | 该页面设置session作用域的值 (钝化)</H1>
<%
//Session 钝化与活化
BeanActivation bl = new BeanActivation();
bl.setName("WeiyiGeek");
//session.值获取
session.setAttribute("bean", bl);
%>
</body>
///Web/WebContent/Demo1/TestActivation1.jsp
<H1>TestActivation1.jsp | 该页面获取session作用域的值(活化) </H1>
<%
session.getAttribute("bean");
%>
session 作用域活化后的值: ${bean.name}
</body>
执行结果(以首次访问的结果为例): weiyigeek.top-1
2
3
4
5
6
7
8
9
10
11
12
13
14
15
16
17
18ServletContext: 初始化 .....
#TestActivation.jsp请求时候
servletRequest : 初始化.....javax.servlet.ServletRequestEvent[source=org.apache.catalina.core.ApplicationContextFacade@7d8b8dd1]
HttpSession: 创建session了.....
1.属性添加......
servletRequest : 销毁了.....javax.servlet.ServletRequestEvent[source=org.apache.catalina.core.ApplicationContextFacade@7d8b8dd1]
#Server Stop
- HttpSessionActivation(被钝化) , Session 值 = 7BA6BBF40A180E2BF0CBFC8B51F1F422
ServletContext: 销毁了 .....
#Server Start
ServletContext: 初始化 .....
- HttpSessionActivation(被活化) , Session 值 = 7BA6BBF40A180E2BF0CBFC8B51F1F422
#TestActivation1.jsp请求时候
servletRequest : 初始化.....javax.servlet.ServletRequestEvent[source=org.apache.catalina.core.ApplicationContextFacade@4072236]
servletRequest : 销毁了.....javax.servlet.ServletRequestEvent[source=org.apache.catalina.core.ApplicationContextFacade@4072236]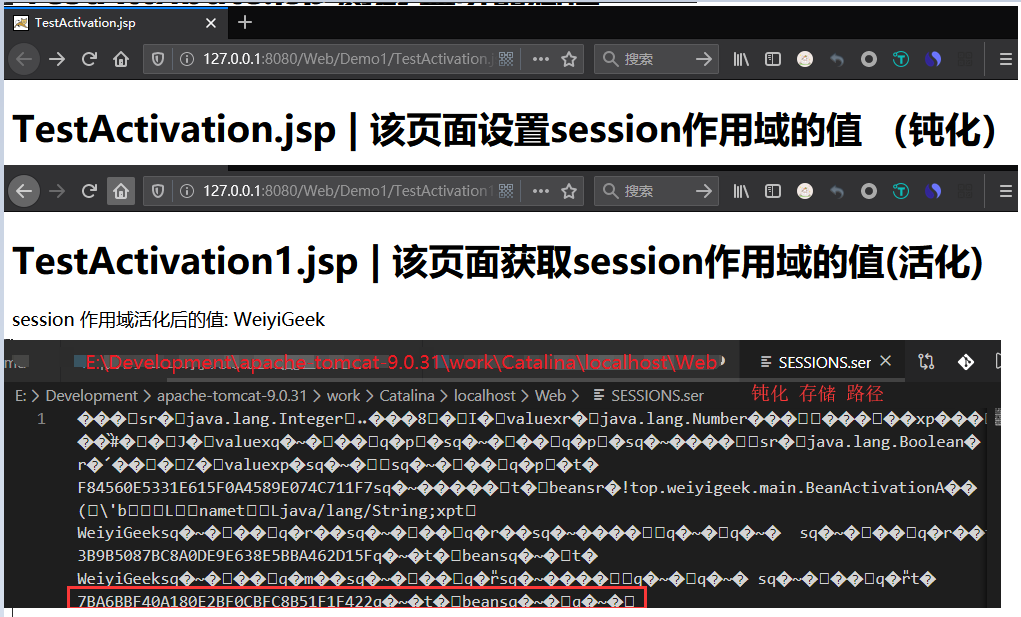
Q:如何让session的在一定时间内钝化?
答:在Tomcat容器配置文件中进行配置,可以从下面三处进行相应的配置;
- 在tomcat里面 conf/context.xml 里面配置,该配置
对所有的运行在这个服务器的项目生效; - 在conf/Catalina/localhost/context.xml 配置,该配置只对 localhost 生效即
localhost:8080 - 在自己的web工程项目中的 META-INF/context.xml,
只对当前的工程生效下面实践采用这样的方式。
1 | <Context> |

weiyigeek.top-
2.Filter
Q:什么是Filter?他有什么作用?
A:翻译过来是过滤器的意思, 主要是起到的是拦截作用 , 用于在客户端请求服务器资源的时候,执行过滤(拦截) 。
- 如果过滤器放行,那么这个请求才能到达服务器
- 如果过滤器拒绝放行,那么服务器就不会收到这个请求
应用场景比如:
1.对一些敏感词进行过滤替换;
2.设置统一的编码格式;
3.实现自动登录;
1) 基础使用
如何使用过滤器?其使用流程是什么? weiyigeek.top-
1.定义一个类实现Filter接口,在doFilter方法之中进行过滤然后转发请求;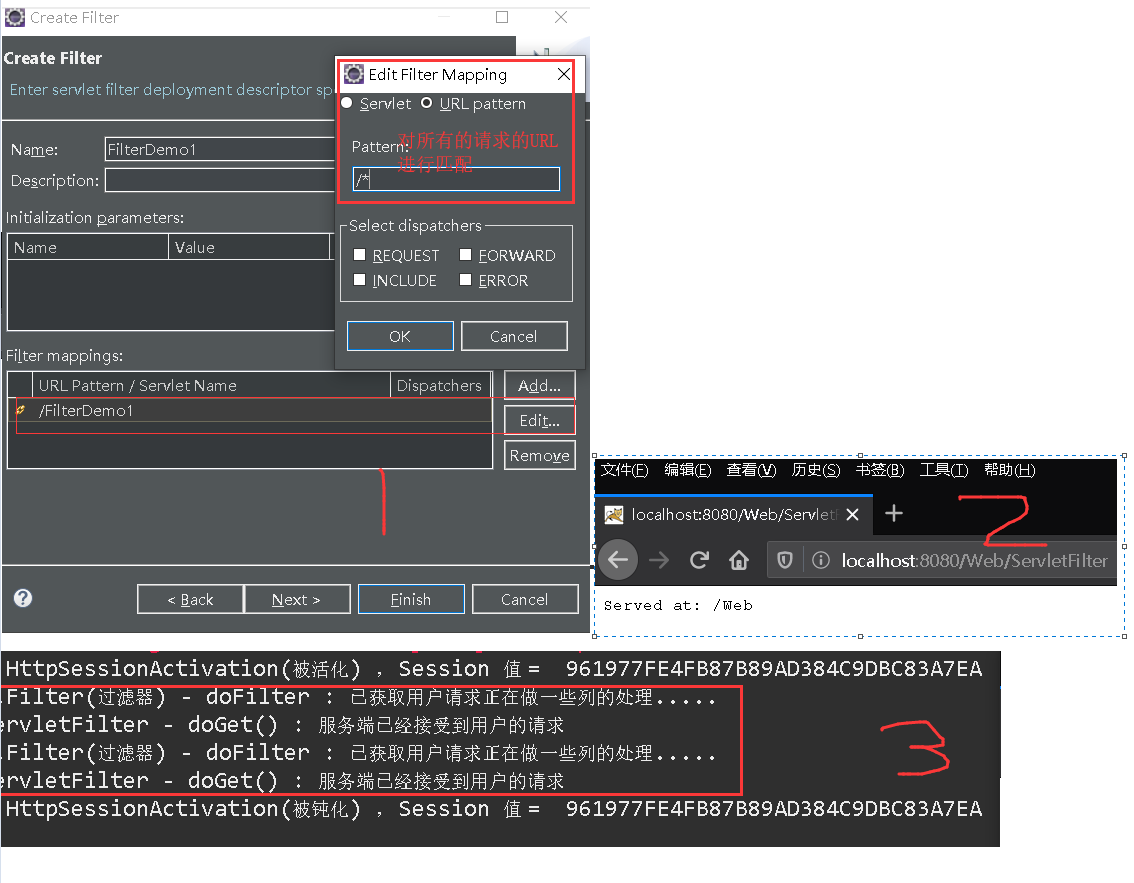
2.过滤器要想生效还必须在web.xml中进行配置,创建Filter实现类成功时你会在web.xml看到它注册了与Servlet进行比较发现只有两处名字不同:1
2
3
4
5
6
7
8
9<filter>
<display-name>FilterDemo1</display-name>
<filter-name>FilterDemo1</filter-name>
<filter-class>top.weiyigeek.filter.FilterDemo1</filter-class>
</filter>
<filter-mapping>
<filter-name>FilterDemo1</filter-name>
<url-pattern>/*</url-pattern> <!-- 过滤所有的Request请求 -->
</filter-mapping>
基础示例:1
2
3
4
5
6
7
8
9
10
11
12
13
14
15
16
17
18
19
20
21
22
23
24
25
26
27
28
29
30
31
32/**
* /Web/src/top/weiyigeek/filter/FilterDemo1.java
* Servlet Filter implementation class FilterDemo1
*/
public class FilterDemo1 implements Filter {
static int count = 0;
//自动生成:构造方法
public FilterDemo1() {}
/*** @see Filter#destroy()*/
public void destroy() {}
//Filter过滤的入口方法
/*** @see Filter#doFilter(ServletRequest, ServletResponse, FilterChain) */
public void doFilter(ServletRequest request, ServletResponse response, FilterChain chain) throws IOException, ServletException {
//此处统一对用户请求的数据进行编码
request.setCharacterEncoding("UTF-8");
System.out.println((++count) + ".Filter(过滤器) - doFilter : 已获取用户请求正在做一些列的处理.....");
// pass the request along the filter chain 链请求转发;
chain.doFilter(request, response);
}
/*** @see Filter#init(FilterConfig) */
public void init(FilterConfig fConfig) throws ServletException {
// TODO Auto-generated method stub
}
}
///Web/src/top/weiyigeek/servlet/ServletFilter.java
//HttpServlet
protected void doGet(HttpServletRequest request, HttpServletResponse response) throws ServletException, IOException {
System.out.println("ServletFilter - doGet() : 服务端已经接受到用户的请求 ");
response.getWriter().append("Served at: ").append(request.getContextPath());
}
2) 生命周期
描述:Filter生命周期按照下述顺序进行;
- 创建:
public void init(FilterConfig fConfig),服务器启动即创建过滤器实例, - 过滤:
public void doFilter(ServletRequest request, ServletResponse response, FilterChain chain),在过滤器创建完成之后在接受到用户请求的时候经过URL-Pattern匹配成功则进行响应的处理 - 销毁:
public void destroy(),服务器关闭即销毁过滤器实例,前提在服务器端被正常Stop时候触发执行;
3) 过滤器执行顺序
描述:如果项目中有多个过滤且多个Filter匹配路径都为全路径,那此时过滤器执行顺序如何?
答:过滤器拦截执行顺序与多个Filter过滤器在Web.xml注册的映射顺序有关(即按照此顺序来进行过滤执行);客户端向Servlet发起请求的时候必须先经过Filter如果Filter放行才能正在的访问Servlet;
基础示例:1
2
3
4
5
6
7
8
9
10
11
12
13
14
15
16
17
18
19
20
21
22
23
24
25
26
27
28
29
30///Web/src/top/weiyigeek/filter/FilterDemo2.java
/**
* Servlet Filter implementation class FilterDemo2
*/
public class FilterDemo2 implements Filter {
public FilterDemo2() {
// TODO Auto-generated constructor stub
}
/**
* @see Filter#destroy()
*/
public void destroy() {
System.out.println("FilterDemo2 : 过滤器被销毁......");
}
/**
* @see Filter#doFilter(ServletRequest, ServletResponse, FilterChain)
*/
public void doFilter(ServletRequest request, ServletResponse response, FilterChain chain) throws IOException, ServletException {
System.out.println("-请求进入 FilterDemo2 过滤器 .... Before Chain.doFilter");
chain.doFilter(request, response);
System.out.println("-响应进入 FilterDemo2 过滤器 .... Recevice");
}
/**
* @see Filter#init(FilterConfig)
*/
public void init(FilterConfig fConfig) throws ServletException {
System.out.println("FilterDemo2 : 初始化创建过滤器......"+ fConfig.getFilterName());
}
}
Web.xml 注册顺序:1
2
3
4
5
6
7
8
9
10
11
12
13
14
15
16
17
18
19
20
21
22
23<filter>
<display-name>FilterDemo1</display-name>
<filter-name>FilterDemo1</filter-name>
<filter-class>top.weiyigeek.filter.FilterDemo1</filter-class>
</filter>
<filter>
<display-name>FilterDemo2</display-name>
<filter-name>FilterDemo2</filter-name>
<filter-class>top.weiyigeek.filter.FilterDemo2</filter-class>
</filter>
<!-- 注意点1.映射顺序 -->
<filter-mapping>
<filter-name>FilterDemo2</filter-name>
<!-- 注意点2.URL匹配 -->
<url-pattern>/ServletFilter</url-pattern>
<!-- 注意点3.请求类型过滤-->
<dispatcher>REQUEST</dispatcher>
</filter-mapping>
<filter-mapping>
<filter-name>FilterDemo1</filter-name>
<url-pattern>/*</url-pattern>
</filter-mapping>
执行结果:1
2
3
4
5
6
7
8
9
10
11
12
13url:http://localhost:8080/Web/ServletFilter
#信息: 正在启动 Servlet 引擎:[Apache Tomcat/9.0.31]
FilterDemo2 : 初始化创建过滤器 ..... FilterDemo2
-请求进入 FilterDemo2 过滤器 .... Before Chain.doFilter
-请求进入 FilterDemo1过滤器 .... Before Chain.doFilter
ServletFilter - doGet() : 服务端已经接受到用户的请求
-响应进入 FilterDemo1 过滤器 .... Recevice
-响应进入 FilterDemo2 过滤器 .... Recevice
#信息: 正在停止服务[Catalina]
FilterDemo2 : 过滤器被销毁......
补充说明:
- 0.init方法的参数
FilterConfig可以用于获取filter在注册的名字以及初始化参数。其实这里的设计的初衷与ServletConfig是一样的,所以非必须的情况下我们不对齐进行操作; - 1.如果想放行请求那么必须在doFilter方法里面操作,使用
chain.doFilter(request, response); 放行, 让请求到达下一个目标; - 2.Web.xml注册映射的Filter
<url-pattern>/*</url-pattern>写法格式有三种(此处算是复习)1
2
3#全路径匹配 以 / 开始 : /LoginServlet
#以目录匹配 以 / 开始 以 * 结束: /demo01/*
#以后缀名匹配 以 * 开始 以后缀名结束 : *.jsp *.html *.do **** - 3.除了以上的配置,还可以在web.xml使用
<dispatcher>元素来对当前的请求类型进行过滤:- REQUEST:默认过滤器只会拦截请求
缺省 - FORWARD:过滤器拦截转发
- INCLUDE:过滤器拦截包含
- ERROR:过滤器拦截全局错误页面的跳转。
- REQUEST:默认过滤器只会拦截请求
4.基础实例
需求分析:实现自动登陆以及注册功能; weiyigeek.top-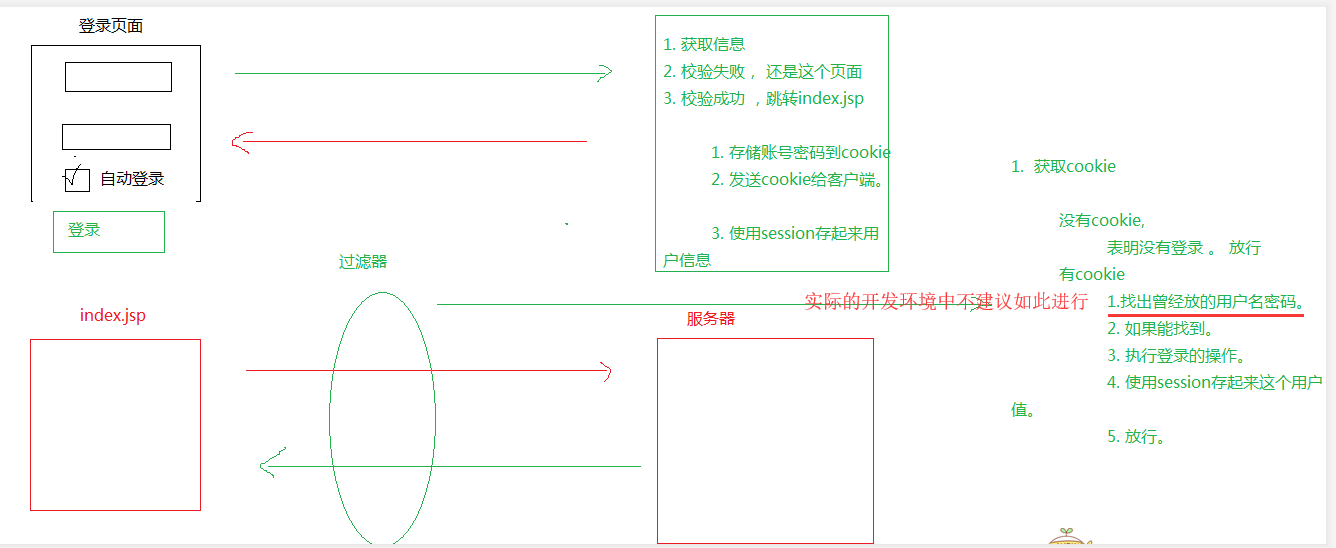
依赖的jar包:
- /Web/WebContent/WEB-INF/lib/commons-beanutils-1.8.3.jar
- /Web/WebContent/WEB-INF/lib/commons-logging-1.2.jar
beanutils 包常用方法:1
2
3
4
5
6
7
8#注册自己的日期转换器然后在BeanUtils中使用
ConvertUtils.register(new MyDateConverter(), Date.class);
#请求转化数据
Map map = request.getParameterMap();
UserBean bean = new UserBean();
#转化map中的数据放置到bean对象身上
BeanUtils.populate(bean, map);
基础实例:
首页:/Web/WebContent/default.jsp1
2
3
4
5
6
7
8
9
10
11
12
13
14
15
16
17
18
19<%@ page language="java" contentType="text/html; charset=UTF-8"
pageEncoding="UTF-8"%>
<%@taglib prefix="c" uri="http://java.sun.com/jsp/jstl/core" %>
<!DOCTYPE html>
<html>
<head>
<meta charset="UTF-8">
<title>首页</title>
</head>
<body>
<h3> WeiyiGeek blog </h3>
<c:if test="${not empty user}">
<p> 欢迎您, ${user.sname} 用户</p>
</c:if>
<c:if test="${empty user}">
<p> 您好, <a href="./Login.jsp">请登陆</a></p>
</c:if>
</body>
</html>
登陆和注册页:
- /Web/WebContent/Login.jsp
1
2
3
4
5
6
7
8
9<div class="login" style="border: 1px black solid">
<form action="LoginServlet" method="POST">
用户: <input type="text" name="username"> <br/>
密码: <input type="text" name="password"> <br/>
<input type="checkbox" name="autoLogin"> 自动登陆 <br/>
<input type="submit" value="登陆">
<input type="button" value="注册" onclick="location.href='./Register.jsp'">
</form>
</div> - /Web/WebContent/Register.jsp
1
2
3
4
5
6
7
8
9
10
11
12
13
14
15
16
17
18
19
20
21
22
23
24
25
26
27
28
29
30
31
32
33
34
35
36
37
38
39
40
41
42
43
44
45
46
47
48
49
50
51
52
53
54
55
56
57
58
59
60
61
62
63
64
65
66
67
68
69
70
71
72
73
74
75
76<script>
//## (2)JQuery实现Ajax异步请求(文档加载完毕时候进行)
$("document").ready(function(){
$("#username").blur(function(){
var user = $(this).val();
console.log(user);
$.post("CheckUserServlet",{checkuser:user},function(data,status){
if (status == "success"){
//Jquery 直接解析 json
if(data.status){
$("#msg").html("<font color='green'>姓名可用!</font>");
}else{
$("#msg").html("<font color='red'>姓名已存在!</font>");
}
}
});
});
});
</script>
<script>
function submit_check(){
var pass1 = document.getElementById('password1').value;
var pass2 = document.getElementById('password2').value;
if ( pass1 != pass2 ){
alert("两次输入的密码不一致!");
return false;
}
if (confirm("您是否进行添加提交?") ) {
return true;
}else{
return false;
}
}
</script>
<div class="register" style="border: 1px black solid">
<form action="RegisterServlet" method="POST" onsubmit="return submit_check()">
<label for="username">姓名:</label>
<input type="text" name="username" id="username" onblur="checkUser()"/> <span id="msg"></span>
<br>
<label for="password">密码:</label>
<input type="text" name="password" id="password1"/>
<br>
<label for="password2">密码确认:</label>
<input type="text" id="password2"/>
<br>
<label for="gender">性别:</label>
<input type="radio" name="gender" value="男">男
<input type="radio" name="gender" value="女">女
<br>
<label for="telephone">电话号码:</label>
<input type="tel" name="telephone" id="telephone"/>
<br>
<label for="job">工作职位:</label>
<input type="checkbox" name="job" value="安全">安全
<input type="checkbox" name="job" value="运维">运维
<input type="checkbox" name="job" value="开发">开发
<input type="checkbox" name="job" value="测试">测试
<input type="checkbox" name="job" value="主管">主管
<br>
<label for="jointime">加入时间:</label>
<input type="date" name="jointime"/>
<br>
<label for="info">备注:</label>
<textarea rows="5" cols="30" name="info" id="info"></textarea>
<br>
<input type="submit" value="注册">
<input type="reset" value="重置">
</form>
</div>
登陆注册Servlet:1
2
3
4
5
6
7
8
9
10
11
12
13
14
15
16
17
18
19
20
21
22
23
24
25
26
27
28
29
30
31
32
33
34
35
36
37
38
39
40
41
42
43
44
45
46
47
48
49
50
51
52
53
54
55
56
57
58
59
60
61
62
63
64
65
66
67
68
69
70
71
72
73
74
75
76
77
78
79// /Web/src/top/weiyigeek/servlet/LoginServlet.java
protected void doGet(HttpServletRequest request, HttpServletResponse response) throws ServletException, IOException {
try {
request.setCharacterEncoding("UTF-8");
//1.接收经过过滤器转发的数据
Map map = request.getParameterMap();
LoginBean lb = new LoginBean();
BeanUtils.populate(lb, map);
//2.调用dao进行数据库查询
User user = new UserLoginImpl();
Person result = user.userlogin(lb);
//3.判断用户是否登录成功以及后面是进行自动登陆
if(result != null) {
if("on".equals(lb.getAutoLogin())) {
//发送Cookies给客户端(实际开发中一定不要这么做不安全的-可以将session值传入redis+钝化)
Cookie cookie = new Cookie("autoLogin",lb.getUsername()+"-"+lb.getPassword());
cookie.setMaxAge(60*60*24*7);
cookie.setPath("/");
response.addCookie(cookie);
System.out.println("ok");
}
//4.通过session作用域进行传值
request.getSession().setAttribute("login", "true");
request.getSession().setAttribute("user", result);
response.sendRedirect("default.jsp");
}else {
//5.失败则跳转到登陆界面
response.setCharacterEncoding("utf-8");
response.setContentType("text/html; charset=UTF-8");
response.getWriter().write("<script> alert('账号或者密码错误!,请验证后登陆!');location.href='Login.jsp';</script>");
//request.getRequestDispatcher("Login.jsp").forward(request, response);
}
} catch (SQLException e) {
// TODO Auto-generated catch block
e.printStackTrace();
} catch (IllegalAccessException e) {
// TODO Auto-generated catch block
e.printStackTrace();
} catch (InvocationTargetException e) {
// TODO Auto-generated catch block
e.printStackTrace();
}
}
// /Web/src/top/weiyigeek/servlet/RegisterServlet.java
protected void doGet(HttpServletRequest request, HttpServletResponse response) throws ServletException, IOException {
try {
//1.注册自己的日期转化器
request.setCharacterEncoding("UTF-8");
ConvertUtils.register(new MyDateConverter(), Date.class);
//2.请求的数据转化
Map map = request.getParameterMap();
registerBean bean = new registerBean();
BeanUtils.populate(bean, map);
System.out.println(bean.toString());
//3.调用Dao插入数据
User uu = new UserLoginImpl();
int flag = uu.userregister(bean);
//4.根据注册情况进行跳转;
response.setCharacterEncoding("UTF-8");
response.setContentType("text/html;charset=utf-8");
if (flag > 0) {
response.getWriter().write("<script>alert('注册成功');window.location.href='./Login.jsp'</script>");
} else {
response.getWriter().write("<script>alert('注册失败');window.location.href='./Register.jsp'</script>");
}
} catch (IllegalAccessException | InvocationTargetException | SQLException e) {
// TODO Auto-generated catch block
e.printStackTrace();
}
}
过滤器Filter:/Web/src/top/weiyigeek/filter/AutoLogin.java1
2
3
4
5
6
7
8
9
10
11
12
13
14
15
16
17
18
19
20
21
22
23
24
25
26
27
28
29
30
31
32
33
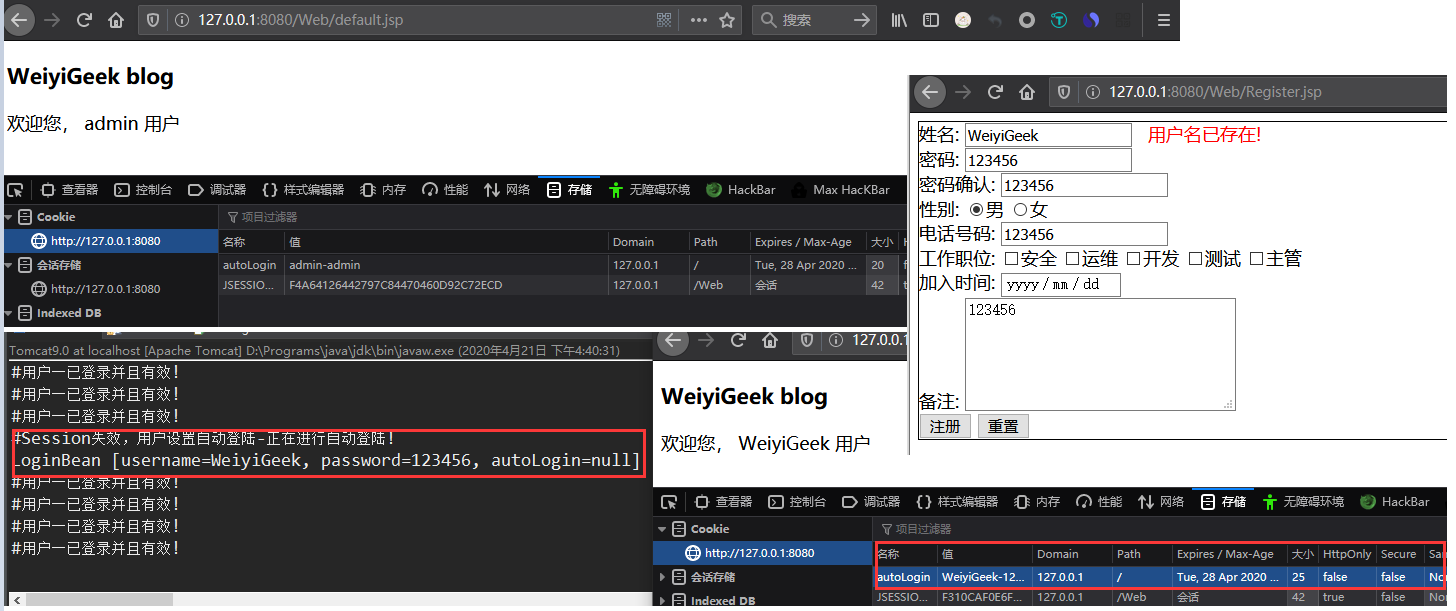
34
35
36
37
38
39
40
41
42
43public void doFilter(ServletRequest request, ServletResponse response, FilterChain chain) throws IOException, ServletException {
//1.过滤器创建ServletRequest作用域;
HttpServletRequest req = (HttpServletRequest) request;
Object login = req.getSession().getAttribute("login");
Person ps = (Person)req.getSession().getAttribute("user");
//2.判断用户session是否有效
if (login != null && ps != null) {
System.out.println("#用户一已登录并且有效!");
//有效则直接放行
chain.doFilter(request, response);
}else {
//3.如果session失效则看Cookies中是否有自动登陆字段;
Cookie[] cookies = req.getCookies();
Cookie c = CookieUtil.findCookie(cookies, "autoLogin");
if( c == null ) {
//4.如果没有设置自动登陆则放行
System.out.println("#用户未登陆或者未设置身份自动登陆....");
chain.doFilter(request, response);
}else {
System.out.println("#Session失效,用户设置自动登陆-正在进行自动登陆!");
//5.登陆字符串分隔
String loginStr = c.getValue();
String username = loginStr.split("-")[0];
String password = loginStr.split("-")[1];
LoginBean lb = new LoginBean(username,password,"on");
System.out.println(lb.toString());
//6.完成登陆对象的封装后直接调用Dao接口进行验证
User uu = new UserLoginImpl();
try {
ps = uu.userlogin(lb);
//7.使用session存这个值到域中,方便下一次未过期前还可以用。
req.getSession().setAttribute("user", ps);
chain.doFilter(request, response);
} catch (SQLException e) {
// TODO Auto-generated catch block
e.printStackTrace();
request.getRequestDispatcher("Login.jsp").forward(request, response);;
}
}
}
}
Dao 数据库接口实现:1
2
3
4
5
6
7
8
9
10
11
12
13
14
15
16
17
18
19
20public class UserLoginImpl implements User {
@Override
public Person userlogin(LoginBean user) throws SQLException {
QueryRunner qr = new QueryRunner(DB.getConn());
Person res = qr.query("SELECT sid,sname,gender,telephone,job,info,jointime FROM person WHERE sname = ? and spass = ?", new BeanHandler<Person>(Person.class) , user.getUsername() , user.getPassword());
return res;
}
@Override
public int userregister(registerBean user) throws SQLException {
QueryRunner runner = new QueryRunner(DB.getConn());
int flag = runner.update("INSERT INTO person VALUES (NULL,?,?,?,?,?,?,?)",user.getUsername(),user.getPassword(),user.getGender(),user.getTelephone(),user.getJob(),user.getInfo(),user.getJointime());
if(flag > 0) {
System.out.println("#插入成功");
}else {
System.out.println("#添加失败");
}
return flag;
}
}
工具类:/Web/src/top/weiyigeek/utils/MyDateConverter.java1
2
3
4
5
6
7
8
9
10
11
12
13
14
15
16
17
18
19/**
* 自定义 java.util.Date日期转换器*/
public class MyDateConverter implements Converter {
@Override
// 将value 转换 c 对应类型
// 存在Class参数目的编写通用转换器,如果转换目标类型是确定的,可以不使用c 参数
public Object convert(Class c, Object value) {
String strVal = (String) value;
// 将String转换为Date --- 需要使用日期格式化
DateFormat dateFormat = new SimpleDateFormat("yyyy-MM-dd");
try {
Date date = dateFormat.parse(strVal);
return date;
} catch (ParseException e) {
e.printStackTrace();
}
return null;
}
}
你好看友,欢迎关注博主微信公众号哟! ❤
这将是我持续更新文章的动力源泉,谢谢支持!(๑′ᴗ‵๑)
温馨提示: 未解锁的用户不能粘贴复制文章内容哟!
方式1.请访问本博主的B站【WeiyiGeek】首页关注UP主,
将自动随机获取解锁验证码。
Method 2.Please visit 【My Twitter】. There is an article verification code in the homepage.
方式3.扫一扫下方二维码,关注本站官方公众号
回复:验证码
将获取解锁(有效期7天)本站所有技术文章哟!

@WeiyiGeek - 为了能到远方,脚下的每一步都不能少
欢迎各位志同道合的朋友一起学习交流,如文章有误请在下方留下您宝贵的经验知识,个人邮箱地址【master#weiyigeek.top】或者个人公众号【WeiyiGeek】联系我。
更多文章来源于【WeiyiGeek Blog - 为了能到远方,脚下的每一步都不能少】, 个人首页地址( https://weiyigeek.top )

专栏书写不易,如果您觉得这个专栏还不错的,请给这篇专栏 【点个赞、投个币、收个藏、关个注、转个发、赞个助】,这将对我的肯定,我将持续整理发布更多优质原创文章!。
最后更新时间:
文章原始路径:_posts/编程世界/JavaWeb/4.DevlopmentModel/Listener与Filter监听器基础使用.md
转载注明出处,原文地址:https://blog.weiyigeek.top/2020/3-9-310.html
本站文章内容遵循 知识共享 署名 - 非商业性 - 相同方式共享 4.0 国际协议

