[TOC]

0x01 基础简介

K9s - Kubernetes CLI To Manage Your Clusters In Style!
描述: k9s 是用于管理 Kubernetes 集群的 CLI, K9s 提供了一个终端 UI 来与您的 Kubernetes 集群进行交互。通过封装 kubectl 功能 k9s 持续监视 Kubernetes 的变化并提供后续命令来与您观察到的资源进行交互,直白的说就是k9s可以让开发者快速查看并解决运行 Kubernetes 时的日常问题。

目前在 Github 上 该项目 star 将近 15k, 还是比较活跃的。

官网地址: https://k9scli.io/

k9s-Logo

k9s-Logo

功能特性:

  • 跟踪在 Kubernetes 集群运行的资源的实时活动
  • 处理 Kubernetes 标准资源和自定义资源
  • 跟踪与资源相关联的实时指标,如 pods、容器和节点
  • 支持定制外观
  • 支持多资源视图
  • 支持查看 RBAC 规则
  • 支持遍历 Kubernetes 资源及其相关资源

参考来源:
Github 项目地址: https://github.com/derailed/k9s
Gitee Mirrors 镜像地址: https://gitee.com/mirrors/K9s (国内推荐)


0x02 安装实践

K9s 在 Linux、macOS 和 Windows 平台上可用。

常用安装方式

1
2
3
4
5
6
7
8
9
10
11
12
13
14
15
16
17
# 编译后的二进制包
https://github.com/derailed/k9s/releases

# MacOS or LinuxBrew for Linux
brew install k9s

# On Arch Linux
pacman -S k9s

# Via Webi for Linux and macOS
curl -sS https://webinstall.dev/k9s | bash

# Via Webi for Windows
curl.exe -A MS https://webinstall.dev/k9s | powershell

# Running the official Docker image
docker run --rm -it -v ~/.kube/config:/root/.kube/config quay.io/derailed/k9s

Tips: 当然您也可以参照官方文档进行从源码构建, K9s 目前使用的是 go v1.14 或更高版本。


安装流程

此外以安装二进制包为例进行实践。

1
2
3
4
5
6
7
8
9
10
11
12
13
14
15
16
17
18
# 1. 利用 wget 命令 -c 短点续传和 -b 后台下载
wget -b -c https://github.com/derailed/k9s/releases/download/v0.25.18/k9s_Linux_x86_64.tar.gz

# 2.解压并删除多余文件
tar -zxf k9s_linux_x86_64.tar.gz
rm k9s_linux_x86_64.tar.gz LICENSE README.md

# 3.拷贝 kubernetes 控制配置文件到加目录中
mkdir -p $HOME/.kube
sudo cp -i /etc/kubernetes/admin.conf $HOME/.kube/config
sudo chown $(id -u):$(id -g) $HOME/.kube/config
export KUBECONFIG=/etc/kubernetes/admin.conf

# 4.直接运行即可,如果你对vim操作比较熟悉,那么恭喜你了你很快能上手k9s.
/nfsdisk-31/newK8s-Backup/tools# ./k9s

# 5.退出k9s指令
:quit

WeiyiGeek.k9s运行截图

WeiyiGeek.k9s运行截图


配置示例

  1. K9s 使用 256 色终端模式。 在 `Nix 系统上,确保相应地设置了 TERM。

    1
    export TERM=xterm-256color
  2. 为了发出清单编辑命令,请确保您的 EDITOR 环境已设置。

    1
    2
    3
    4
    # Kubectl edit command will use this env var.
    export EDITOR=my_fav_editor
    # Should your editor deals with streamed vs on disk files differently, also set...
    export K9S_EDITOR=my_fav_editor
  3. K9s 更喜欢最近的 kubernetes 版本,即 1.16+。

  4. K9s 将其配置保存在 k9s 目录中,位置取决于您的操作系统, 其利用 XDG 加载其各种配置文件。
    Unix : ~/.config/k9s
    Mac : ~/Library/Application Support/k9s
    Windows : %LOCALAPPDATA%\k9s

    1
    2
    3
    4
    5
    6
    7
    8
    9
    10
    11
    12
    13
    14
    15
    16
    17
    18
    19
    20
    21
    22
    23
    24
    25
    26
    27
    28
    29
    30
    31
    32
    33
    34
    35
    36
    37
    38
    39
    40
    41
    42
    43
    44
    45
    46
    47
    48
    49
    50
    51
    52
    53
    54
    55
    56
    57
    58
    59
    60
    61
    62
    63
    64
    65
    66
    67
    68
    69
    70
    # $XDG_CONFIG_HOME/k9s/config.yml 
    k9s :
    # 代表 ui 轮询间隔。 默认 2secs
    refreshRate : 2
    # 与 api-server 的连接丢失后的重试次数。 默认 15。
    maxConnRetry : 5
    # 启用鼠标支持。 默认 false
    enableMouse : true
    # 设置为 true 以隐藏 K9s 标头。 默认 false
    headless : false
    # 设置为 true 以隐藏 K9s crumbs。 默认 false
    crumbsless : false
    # 指示是否禁用删除/杀死/编辑等修改命令。 默认为 false
    readOnly : false
    # 切换图标显示,因为并非所有终端都支持这些字符。
    noIcons : false
    # 日志配置
    logger :
    # 定义要返回的行数。 Default 100
    tail : 200
    # 定义视图中允许的日志行总数。 Default 1000
    buffer : 500
    # 表示以秒为单位在日志时间线中返回多远。 设置为 -1 将显示所有可用的日志。 默认为 5 分钟。
    sinceSeconds : 300
    # 显示日志时全屏显示。 默认 false
    fullScreenLogs : false
    # 切换日志换行。 默认 false
    textWrap : false
    # 切换日志行时间戳信息。 默认假
    showTime : false
    # 表示当前的 kube 上下文。 默认为当前上下文
    currentContext : minikube
    # 表示当前的 kube 集群。 默认为当前上下文集群
    currentCluster : minikube
    # 保留每个集群首选项以获取最喜欢的命名空间和视图。
    clusters:
    coolio:
    namespace:
    active: coolio
    favorites:
    - cassandra
    - default
    view:
    active: po
    featureGates:
    # 切换NodeShell支持
    nodeShell : false
    # 启用功能门的 shell pod 自定义
    shellPod :
    # 要使用的 shell pod 映像。
    image : killerAdmin
    # 要启动到 shell pod 的命名空间。
    namespace : fred
    # 在 shell pod 上设置的资源限制。
    limits :
    cpu : 100m
    memory : 100Mi
    # 启动端口转发时使用的 IP 地址。
    portForwardAddress : 1.2.3.4
    kind :
    namespace :
    active : all
    favorites :
    - all
    - kube-system
    - default
    view :
    active : dp
    # 屏幕转储的路径。 默认值:'%temp_dir%/k9s-screens-%username%'(k9s 信息)
    screenDumpDir /tmp
  5. Node Shell 配置,通过在给定集群上启用 nodeShell 功能门,K9s 允许您在集群节点中进行 shell。

    1
    2
    3
    4
    5
    6
    7
    8
    9
    10
    11
    12
    13
    14
    15
    # $XDG_CONFIG_HOME/k9s/config.yml
    k9s:
    clusters:
    # Configures node shell on cluster blee
    blee:
    featureGates:
    # You must enable the nodeShell feature gate to enable shelling into nodes
    nodeShell: true
    # You can also further tune the shell pod specification
    shellPod:
    image: cool_kid_admin:42
    namespace: blee
    limits:
    cpu: 100m
    memory: 100Mi
  6. HotKey Support 设置: 允许用户定义自己的热键来激活他们最喜欢的资源视图。

    1
    2
    3
    4
    5
    6
    7
    8
    9
    10
    11
    12
    13
    14
    # $XDG_CONFIG_HOME/k9s/hotkey.yml
    cat <<'EOF' > ~/.config/k9s/hotkey.yml
    hotKey:
    # Hitting Shift-0 navigates to your pod view
    shift-0:
    shortCut: Shift-0
    description: Viewing pods
    command: pods
    # Hitting Shift-1 navigates to your deployments
    shift-1:
    shortCut: Shift-1
    description: View deployments
    command: dp
    EOF
  7. Command Aliases 设置: 命令别名设置。

    1
    2
    3
    4
    5
    6
    7
    # 使用此别名文件,您现在可以键入 pp/crb 以分别列出 pod 或 ClusterRoleBindings。
    # $XDG_CONFIG_HOME/k9s/alias.yml
    cat <<'EOF' > ~/.config/k9s/alias.yml
    alias:
    pp: v1/pods
    crb: rbac.authorization.k8s.io/v1/clusterrolebindings
    EOF
  8. FastForwards: 从 v0.25.0 开始,您可以利用 FastForwards 功能告诉 K9s 如何默认端口转发.

    1
    2
    3
    4
    5
    6
    7
    8
    9
    10
    11
    12
    13
    14
    15
    16
    17
    18
    19
    20
    21
    22
    23
    24
    25
    26
    27
    28
    29
    # 您现在可以使用以下注释来注释您的清单:
    k9scli.io/auto-portforwards -> 激活一个或多个端口转发,直接绕过端口转发对话框。
    k9scli.io/portforwards -> 在启动端口转发对话框时预先选择一个或多个端口转发。

    # 例如:
    # Pod fred
    apiVersion: v1
    kind: Pod
    metadata:
    name: fred
    annotations:
    k9scli.io/auto-portforwards: zorg::5556 # => 将默认为 zorg 容器端口5556和本地端口5566
    # Or...
    k9scli.io/portforward: bozo::9090:p1 # => 启动“端口转发”对话框,选择为 bozo 容器中的p1(8081)映射到本地端口9090
    ...
    spec:
    containers:
    - name: zorg
    ports:
    - name: p1
    containerPort: 5556
    ...
    - name: bozo
    ports:
    - name: p1
    containerPort: 8081
    - name: p2
    containerPort: 5555
    ...
  1. Resource Custom Columns:自定义显示的资源列,您可以通过自定义视图更改为给定资源显示哪些列。
    1
    2
    3
    4
    5
    6
    7
    8
    9
    10
    11
    12
    13
    14
    15
    16
    17
    18
    19
    20
    21
    # $XDG_CONFIG_HOME/k9s/views.yml
    cat <<'EOF' > ~/.config/k9s/views.yml
    k9s:
    views:
    v1/pods:
    columns:
    - AGE
    - NAMESPACE
    - NAME
    - IP
    - NODE
    - STATUS
    - READY
    v1/services:
    columns:
    - AGE
    - NAMESPACE
    - NAME
    - TYPE
    - CLUSTER-IP
    EOF
  1. plugin : K9s 允许您通过插件定义您自己的集群命令来扩展您的命令行和工具。
    1
    2
    3
    4
    5
    6
    7
    8
    9
    10
    11
    12
    13
    14
    15
    16
    17
    18
    19
    20
    21
    22
    23
    24
    25
    26
    27
    28
    29
    30
    31
    32
    33
    34
    35
    36
    37
    # k9s目前提供了额外的环境变量来自定义您的插件参数,可用的环境变量如下:
    $RESOURCE_GROUP-- 选定的资源组
    $RESOURCE_VERSION-- 选择的资源api版本
    $RESOURCE_NAME-- 选择的资源名称
    $NAMESPACE-- 选择的资源命名空间
    $NAME-- 选择的资源名称
    $CONTAINER-- 当前容器(如果适用)
    $FILTER-- 当前过滤器(如果有)
    $KUBECONFIG-- KubeConfig 位置。
    $CLUSTER -- 活动集群名称
    $CONTEXT -- 活动上下文名称
    $USER -- 活跃用户
    $GROUPS -- 活跃的群体
    $POD -- 在容器视图中
    $COL-<RESOURCE_COLUMN_NAME> -- 为查看的资源使用给定的列名。 必须以 COL-!

    # 例如, 此处定义了一个插件实现 `ctrl-l` 快捷方式来在 pod 视图中跟踪日志。
    # $XDG_CONFIG_HOME/k9s/plugin.yml
    cat <<'EOF' > ~/.config/k9s/plugin.yml
    plugin:
    fred:
    shortCut: Ctrl-L
    confirm: false
    description: Pod logs
    scopes:
    - pods
    command: kubectl
    background: false
    args:
    - logs
    - -f
    - $NAME
    - -n
    - $NAMESPACE
    - --context
    - $CONTEXT
    EOF
  • 11.Skins : 您可以根据自己的外观和风格来设计 K9s。
    1
    2
    3
    4
    5
    6
    7
    8
    9
    10
    11
    12
    13
    14
    15
    16
    17
    18
    19
    20
    21
    22
    23
    24
    25
    26
    27
    28
    29
    30
    31
    32
    33
    34
    35
    36
    37
    38
    39
    40
    41
    42
    43
    44
    45
    46
    47
    48
    49
    50
    51
    52
    53
    54
    55
    56
    57
    58
    59
    60
    61
    62
    63
    64
    65
    66
    67
    68
    69
    70
    71
    72
    73
    # $XDG_CONFIG_HOME/k9s/skin.yml
    cat <<'EOF' > ~/.config/k9s/skin.yml
    # Skin InTheNavy...
    k9s:
    # General K9s styles
    body:
    fgColor: dodgerblue
    bgColor: '#ffffff'
    logoColor: '#0000ff'
    # ClusterInfoView styles.
    info:
    fgColor: lightskyblue
    sectionColor: steelblue
    # Help panel styles
    help:
    fgColor: white
    bgColor: black
    keyColor: cyan
    numKeyColor: blue
    sectionColor: gray
    frame:
    # Borders styles.
    border:
    fgColor: dodgerblue
    focusColor: aliceblue
    # MenuView attributes and styles.
    menu:
    fgColor: darkblue
    keyColor: cornflowerblue
    # Used for favorite namespaces
    numKeyColor: cadetblue
    # CrumbView attributes for history navigation.
    crumbs:
    fgColor: white
    bgColor: steelblue
    activeColor: skyblue
    # Resource status and update styles
    status:
    newColor: '#00ff00'
    modifyColor: powderblue
    addColor: lightskyblue
    errorColor: indianred
    highlightcolor: royalblue
    killColor: slategray
    completedColor: gray
    # Border title styles.
    title:
    fgColor: aqua
    bgColor: white
    highlightColor: skyblue
    counterColor: slateblue
    filterColor: slategray
    views:
    # TableView attributes.
    table:
    fgColor: blue
    bgColor: darkblue
    cursorColor: aqua
    # Header row styles.
    header:
    fgColor: white
    bgColor: darkblue
    sorterColor: orange
    # YAML info styles.
    yaml:
    keyColor: steelblue
    colonColor: blue
    valueColor: royalblue
    # Logs styles.
    logs:
    fgColor: white
    bgColor: black
    EOF


0x02 命令实践

命令参数

1
2
3
4
5
6
7
8
9
10
11
12
13
14
15
16
17
# List all available CLI options
k9s help

# To get info about K9s runtime (logs, configs, etc..)
k9s info
# Configuration: /root/.config/k9s/config.yml
# Logs: /tmp/k9s-root.log
# Screen Dumps: /tmp/k9s-screens-root

# To run K9s in a given namespace
k9s -n mycoolns

# Start K9s in an existing KubeConfig context
k9s --context coolCtx

# Start K9s in readonly mode - with all cluster modification commands disabled
k9s --readonly
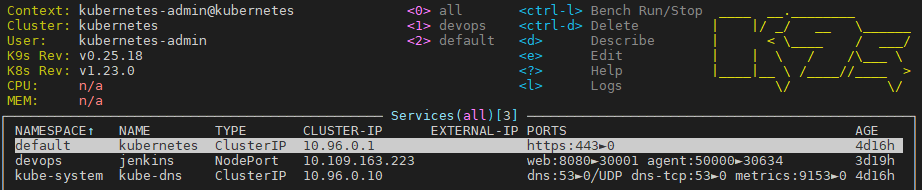

简单使用

使用截图

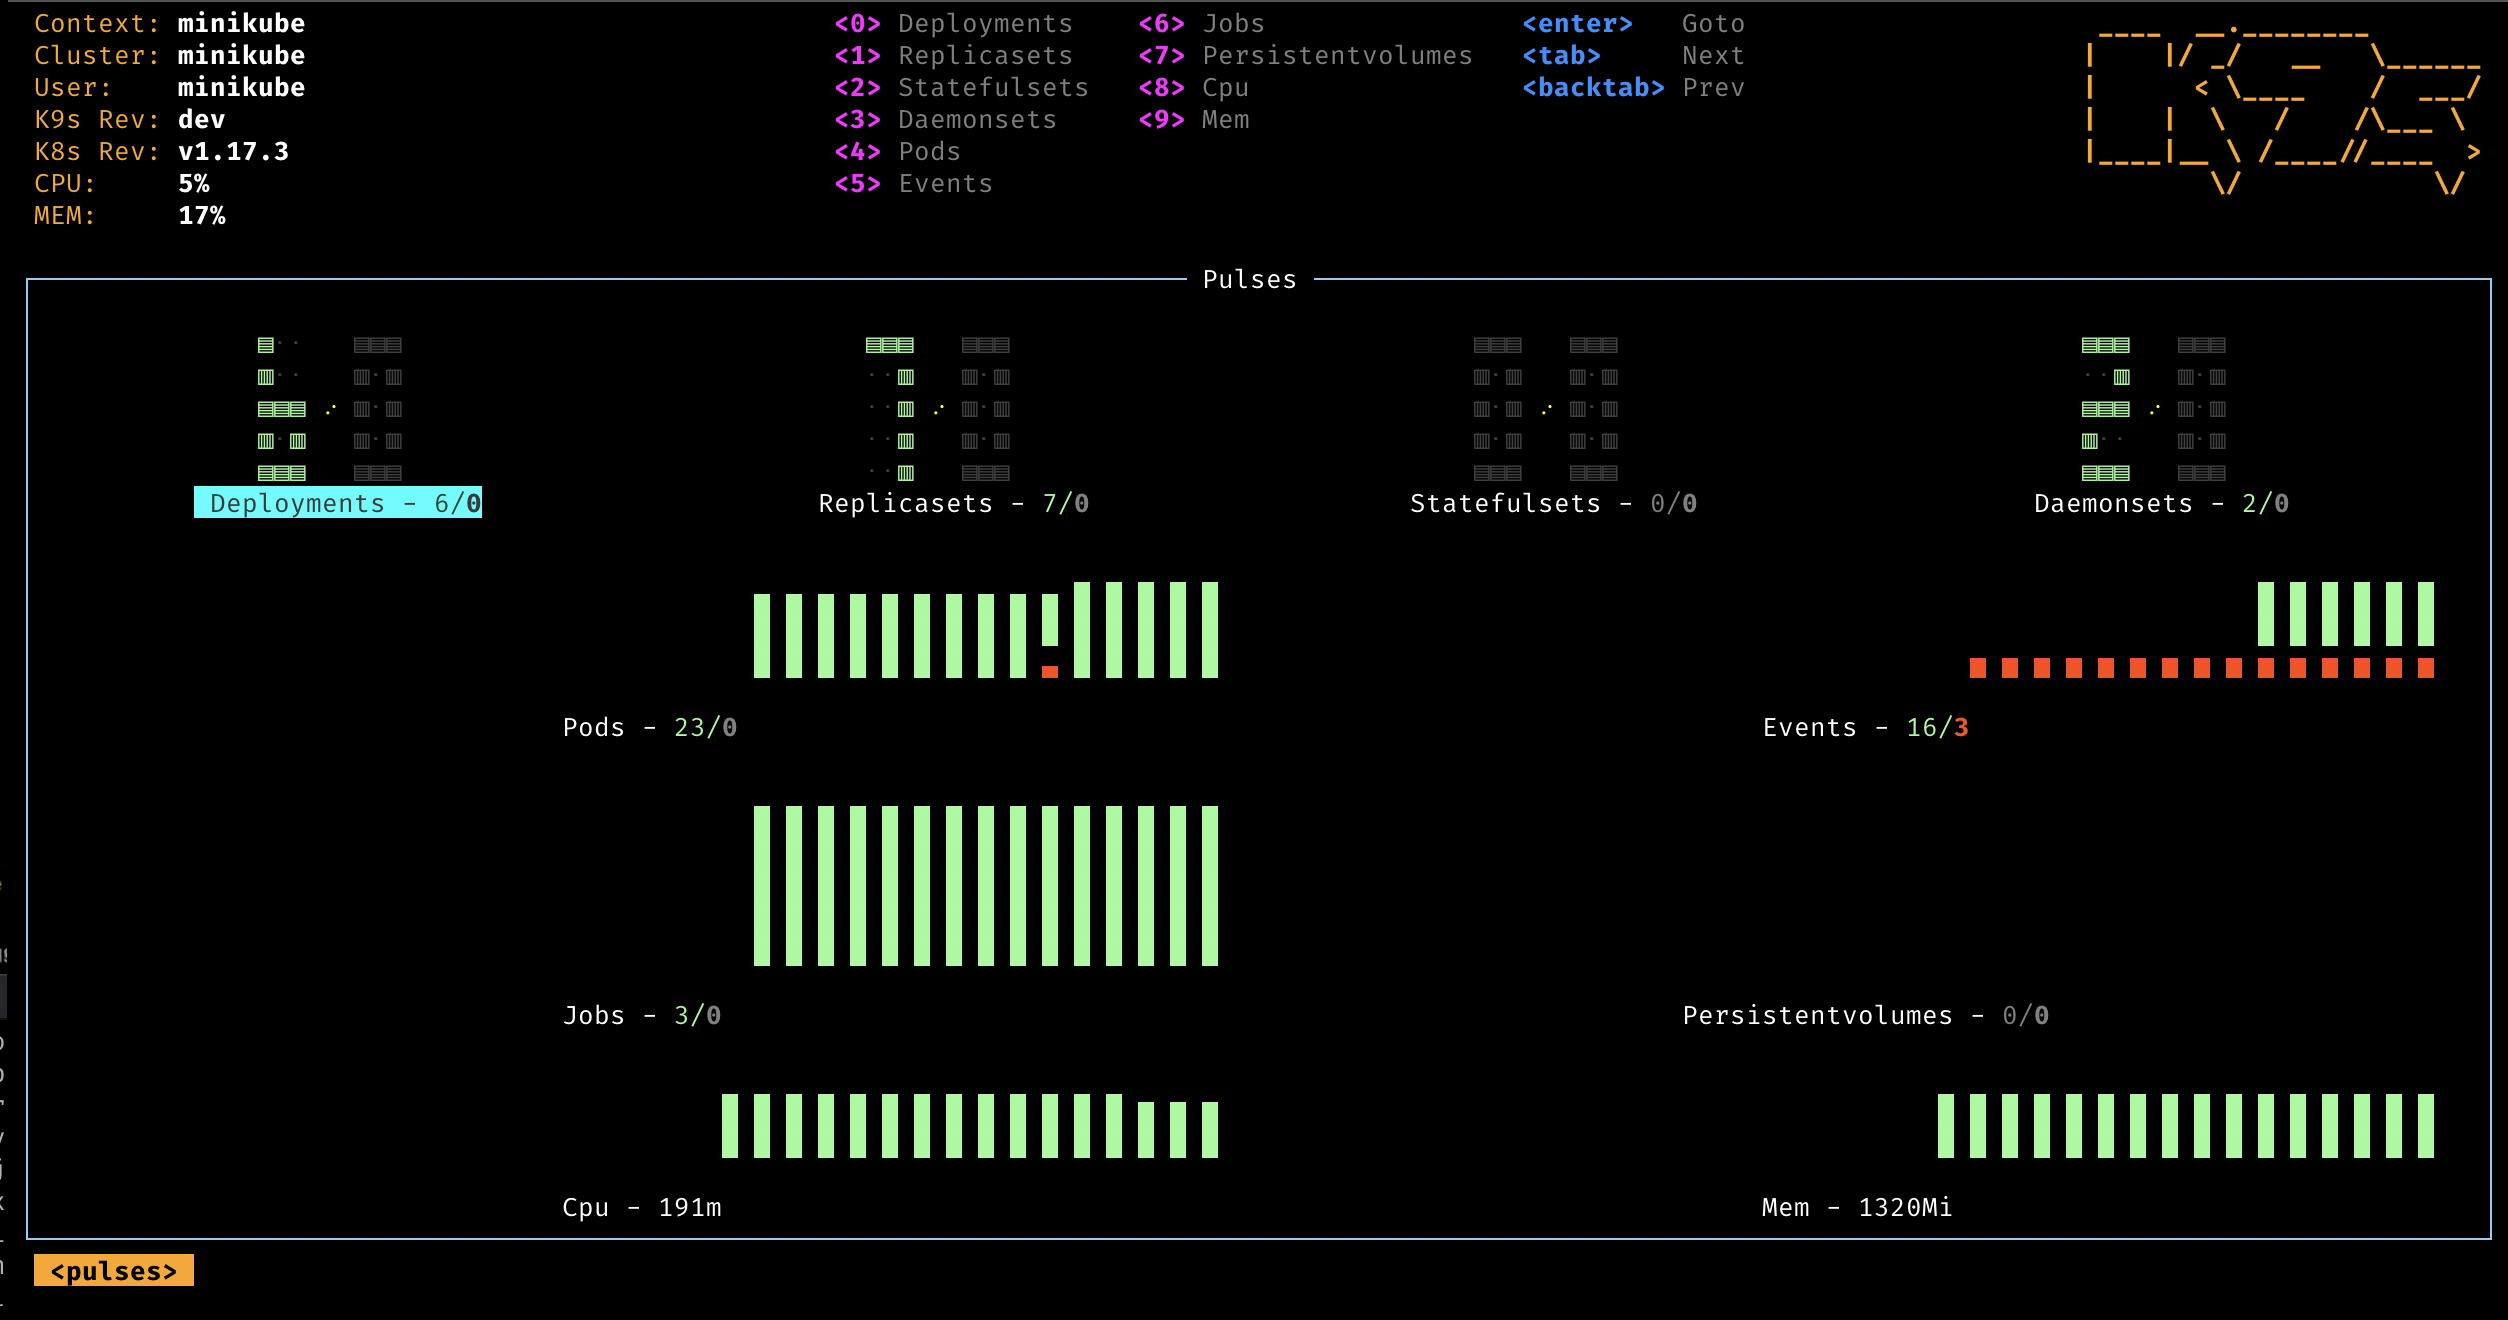
  • Pulses - A top level dashboard of the state of affairs of your cluster

    Pulses

    Pulses

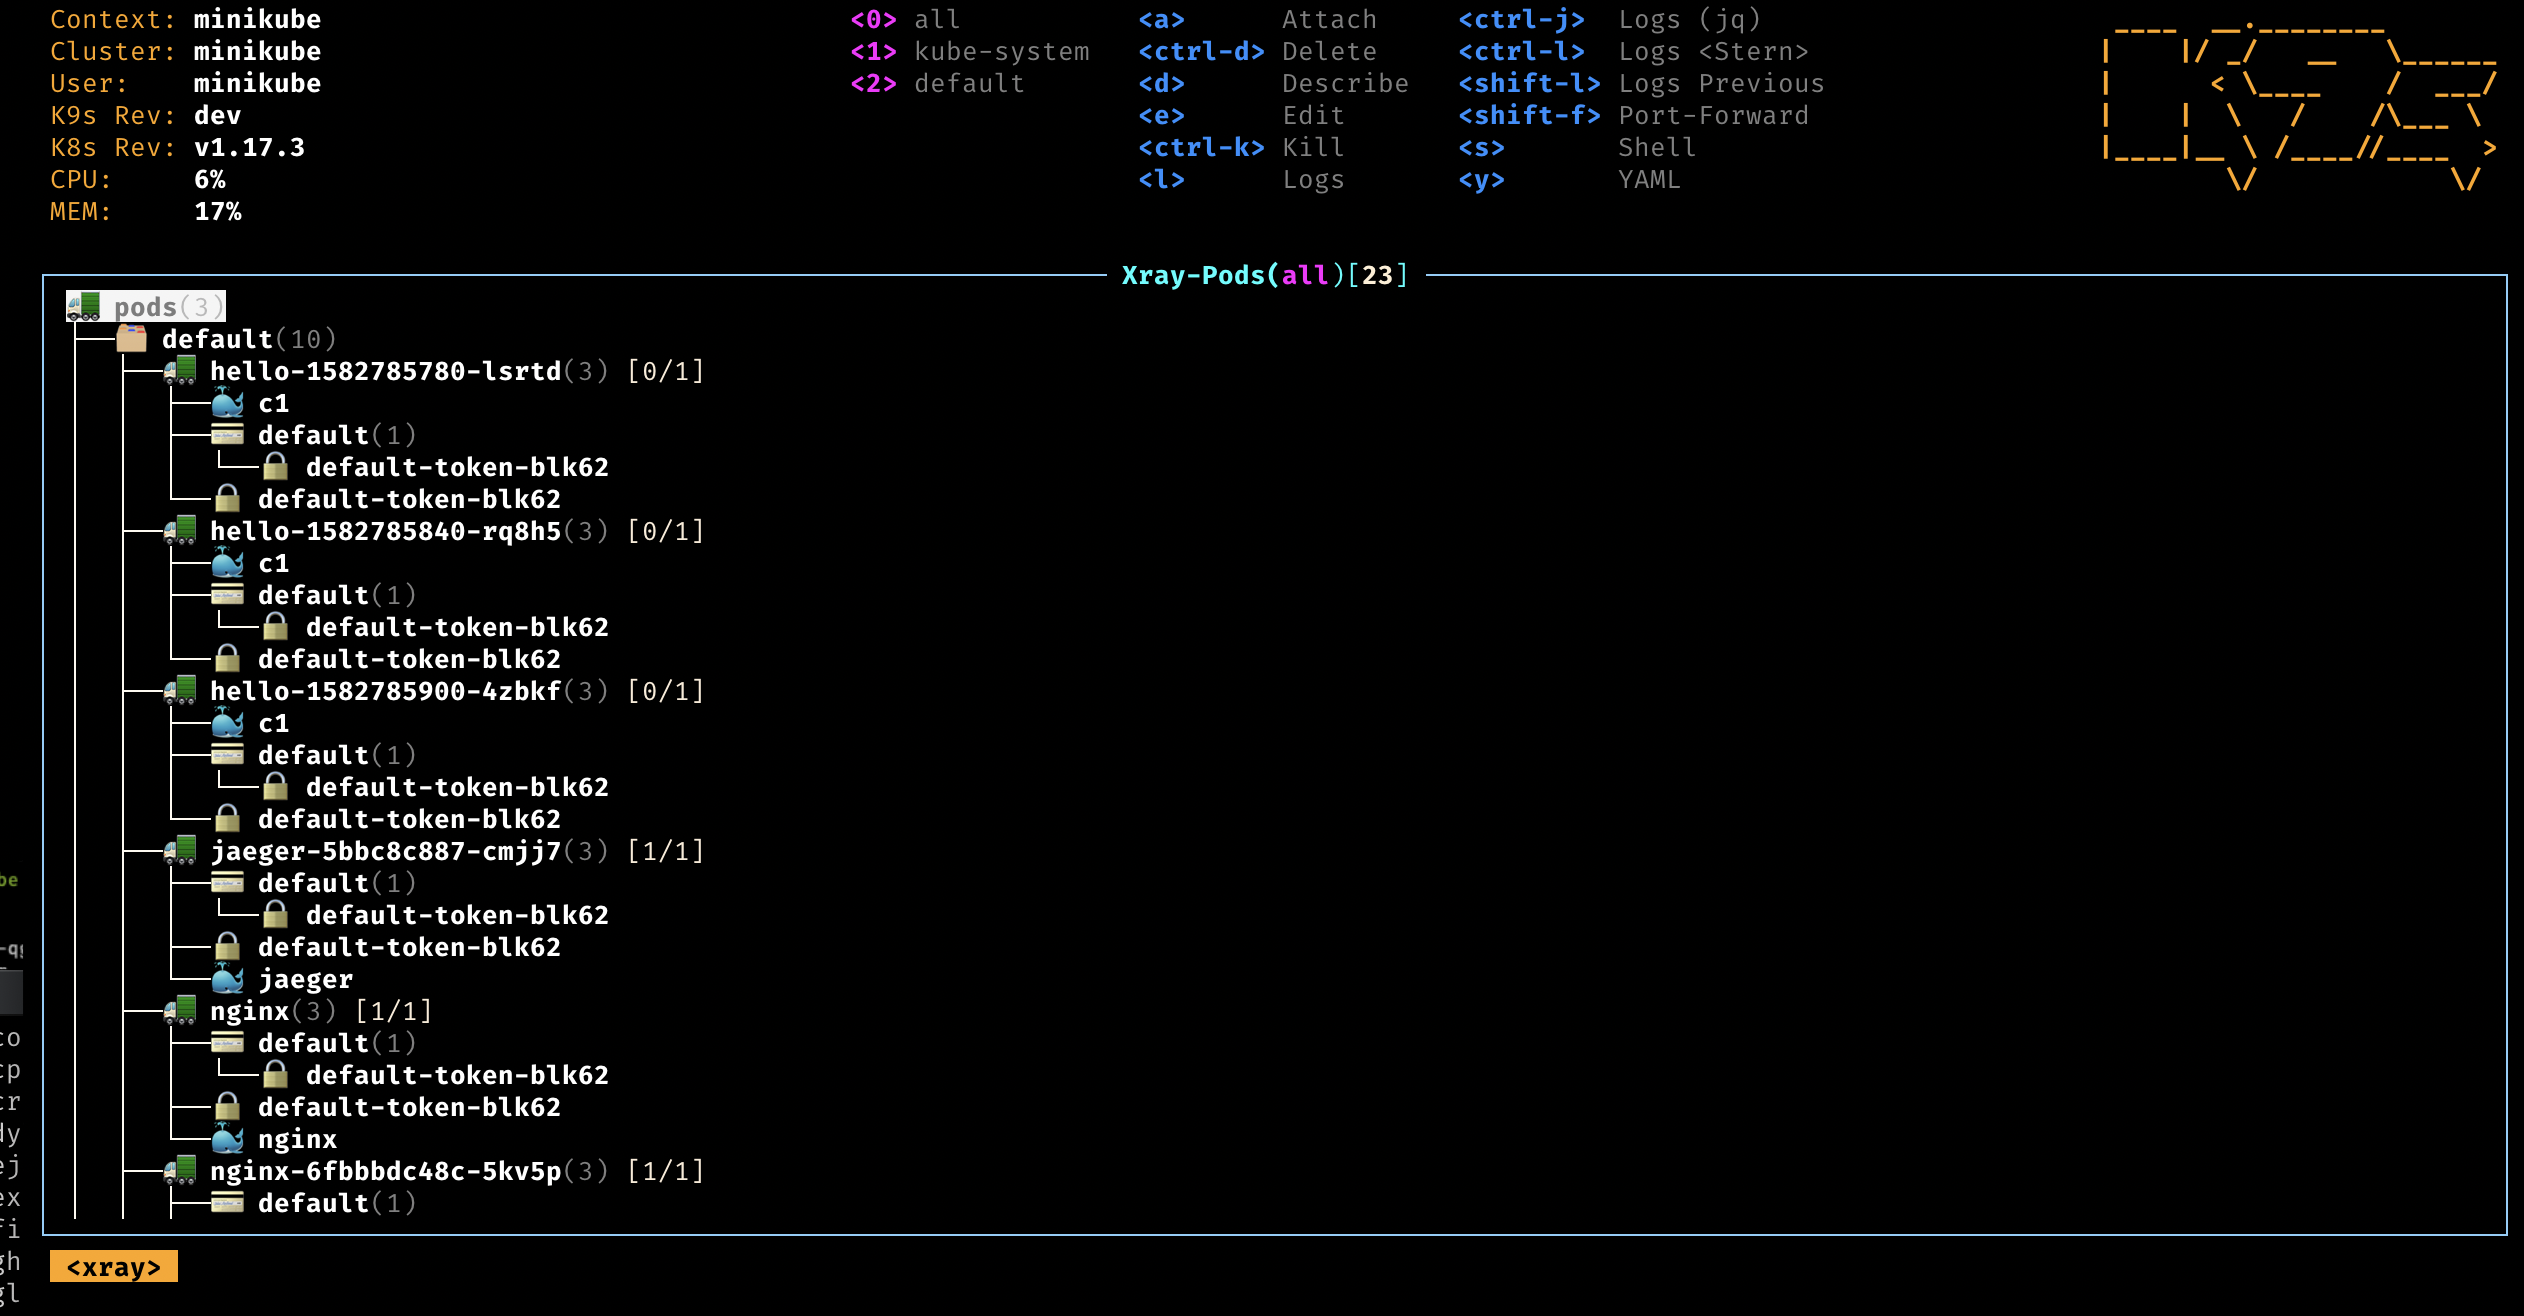
  • XRay - Dig in your cluster resources and view their dependencies

    XRay

    XRay

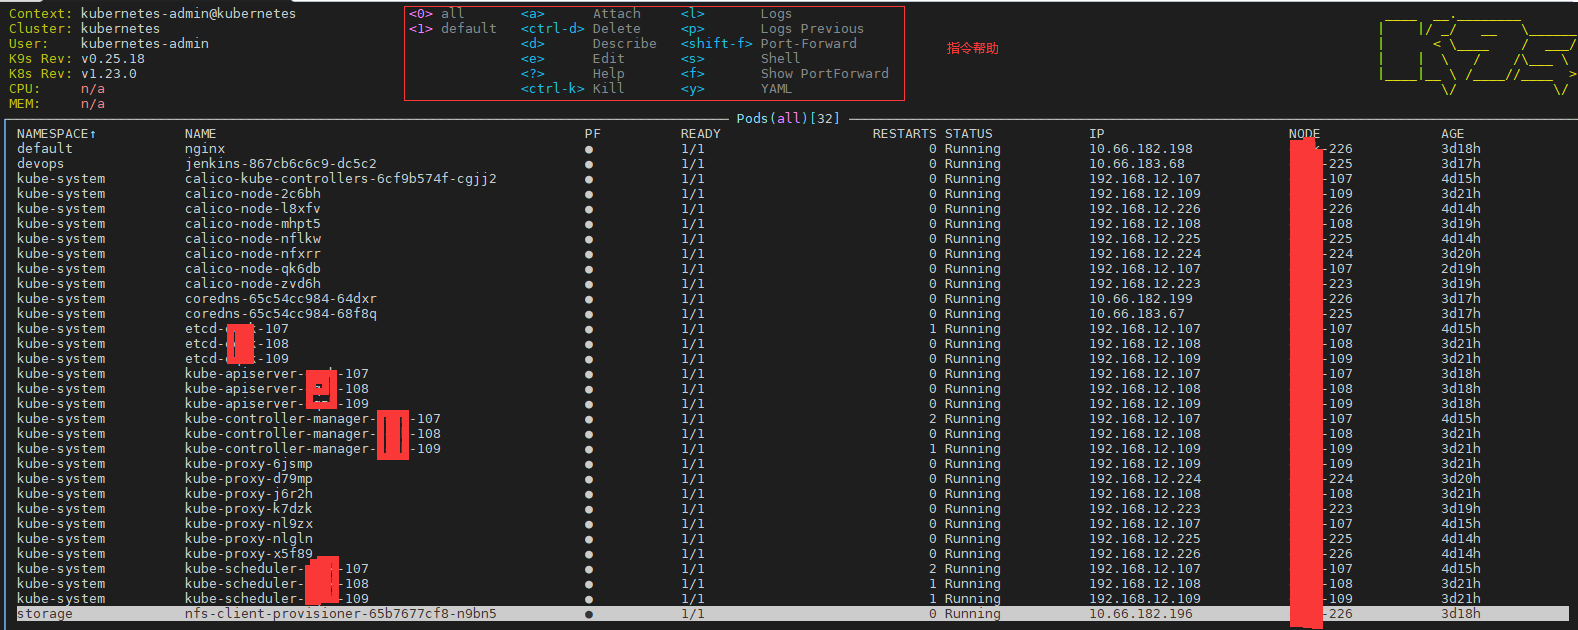
  • Pods - List out your pods status and resource consumption

    Pods

    Pods

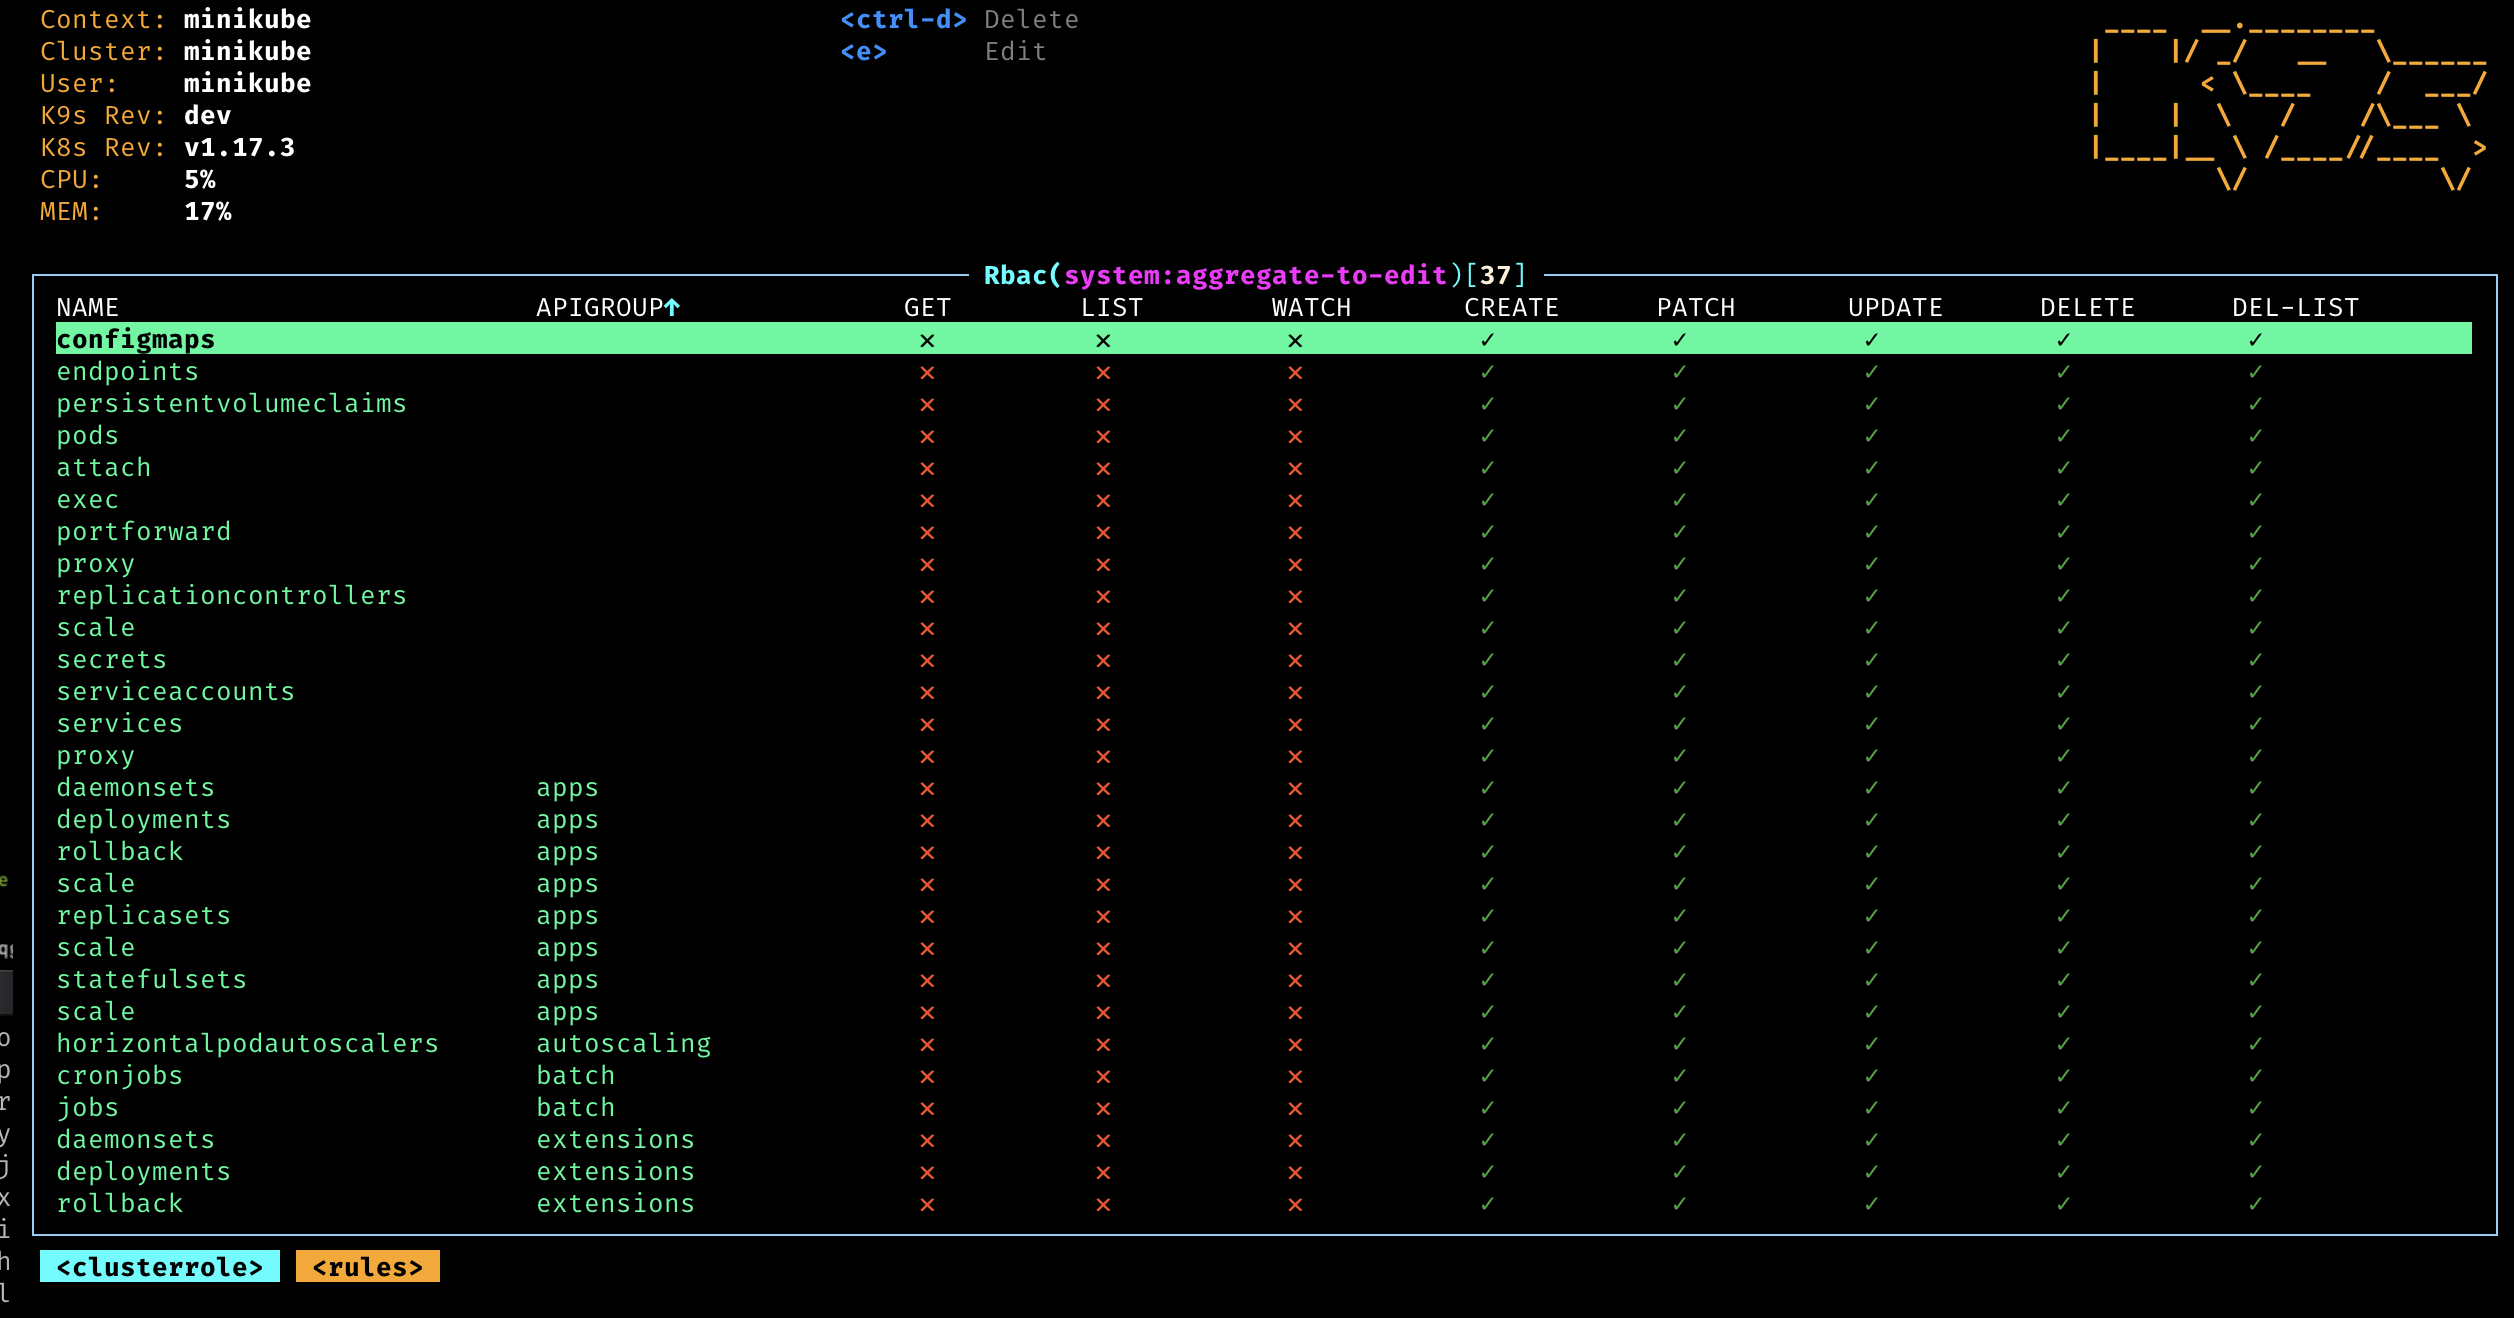
  • RBAC - View the who/what/how of authorizations on your cluster

    RBAC

    RBAC

实践使用

  • 0.查看Pod资源配置清单,按键流程: -> pods -> y.(返回上一步是按ESC按键)
WeiyiGeek.Pod资源配置清单

WeiyiGeek.Pod资源配置清单

  • 1.进入指定pod的shell终端中,按键流程: -> pods -> s.
WeiyiGeek.进入pod的shell

WeiyiGeek.进入pod的shell

  • 2.指定pod进行容器内部端口转发,按键流程: -> pods -> <shift-f>, 输入容器内部名称::端口, 然后在输入映射到本地的端口,如果要查看端口转发配置,按键流程: -> pods -> f 即可查看。
WeiyiGeek.内部端口转发

WeiyiGeek.内部端口转发

  • 3.pod 日志查看,按键流程: -> pods -> l

  • 4.namespace 查看,按键流程: -> ns -> l

  • 5.svc 查看,按键流程: -> svc -> l

WeiyiGeek.svc服务查看

WeiyiGeek.svc服务查看

  • 6.我们创建一个新的pod并采用k9s进行管理编辑, 按键流程: -> pods -> e 然后进行编辑该Pod资源清单,使用vim作为默认编辑器进行编辑,完成后输入:wq保存并退出。

    1
    2
    3
    4
    5
    6
    7
    8
    9
    10
    11
    12
    ~$ kubectl run myweb --image=nginx:latest --labels="app=web" --port=8080
    pod/myweb created
    ~$ k9s
    spec:
    containers:
    - image: nginx:latest
    imagePullPolicy: Always
    name: myweb
    ports:
    - containerPort: 80 # 此处将 8080 端口改成 80
    protocol: TCP
    resources: {}
  • 7.deployments/statefulset/pod删除操作: ,按键流程: -> pod|deploy|state -> ctrl+d

  • 8.查看集群中RBAC角色绑定信息,按键流程: -> rbac -> e 编辑。

WeiyiGeek.RBAC-Clusterrolebindings

WeiyiGeek.RBAC-Clusterrolebindings