[TOC]
0x00 influx 命令 - influxDB 客户端
语法参数
语法与参数:

[TOC]
语法与参数:1
2
3
4
5
6
7
8
9
10
11
12
13
14
15
16
17
18
19
20
21
22
23
24
25
26
27
28
29
30
31
32# influx 语法
Usage of influx:
-version # Display the version and exit.
-path-prefix 'url path' # Path that follows the host and port
-host 'host name' # Host to connect to.
-port 'port #' # Port to connect to.
-socket 'unix domain socket' # Unix socket to connect to.
-database 'database name' # Database to connect to the server.
-password 'password' # Password to connect to the server. Leaving blank will prompt for password (--password '').
-username 'username' # Username to connect to the server.
-ssl # Use https for requests.
-unsafeSsl # Set this when connecting to the cluster using https and not use SSL verification.
-execute 'command' # Execute command and quit.
-type 'influxql|flux' # Type specifies the query language for executing commands or when invoking the REPL.
-format 'json|csv|column' # Format specifies the format of the server responses: json, csv, or column.
-precision 'rfc3339|h|m|s|ms|u|ns' # Precision specifies the format of the timestamp: rfc3339, h, m, s, ms, u or ns.
-consistency 'any|one|quorum|all' # Set write consistency level: any, one, quorum, or all
-pretty # urns on pretty print for the json format.
-import # Import a previous database export from file
-pps # How many points per second the import will allow. By default it is zero and will not throttle importing.
-path # Path to file to import
-compressed # Set to true if the import file is compressed
Examples:
# 交互式 -> Connect to a specific database on startup and set database context:
$ influx -database 'metrics' -host 'db.weiyigeek.top' -port '8086'
# 命令行 -> Use influx in a non-interactive mode to query the database "metrics" and pretty print json:
$ influx -database 'metrics' -execute 'select * from cpu' -format 'json' -pretty
# API -> 使用此地址检查InfluxDB实例的状态以及InfluxDB的版本
$ curl -G http://db.weiyigeek.top:8086/ping
实践1.其可以利用类似于关系型数据库SQL语句语法,例如:1
2
3
4
5
6
7
8
9
10
11
12
13
14
15
16
17
18
19
20
21
22
23
24
25
26
27
28
29
30# 1) 数据库的操作
SHOW DATABASES # 查看数据库
CREATE DATABASE "weiyigeek" # 创建数据库
USE weiyigeek # 选择数据库
DROP DATABASES "weiyigeek" # 删除数据库
# 2) 数据库权限设置
GRANT all privileges on weiyigeek to admin # 给admin用户授权一个数据库的所有操作权限
GRANT write on weiyigeek to admin # 给某个用户授权一个数据库的写操作
GRANT read on weiyigeek to admin # 给某个用户授权一个数据库的读操
# 3) 表的数据操作
SHOW MEASUREMENTS # 显示采集的数据表
INSERT iot_sensor,host=host_name,region=cn value=66 1658823229 # 插入数据到 iot_sensor measurement,标签host=host_name,region=cn, field是value=66, 1658823229 是指定的时间戳
SELECT "host", "region", "value" FROM "iot_sensor" # 从 iot_sensor measurement 中查询指定字段(label、field)的数据
DROP MEASUREMENTS iot_sensor # 删除指定表
# 4) 数据查询
select * from test iot_sensor host='192.168.12.12' and value='4321' and time > '2022-01-11T02:52:55Z' # 多条件查询
# 通过limit和offset配合可以实现分页,offset后面的值为开始的位置
select * from test limit 5 OFFSET 0
select * from test limit 5 OFFSET 5
# 1.实现查询以给定字段开始的数据
select fieldName from measurementName where fieldName=~/^给定字段/
# 2.实现查询以给定字段结束的数据
select fieldName from measurementName where fieldName=~/给定字段$/
# 3.实现查询包含给定字段数据
select fieldName from measurementName where fieldName=~/给定字段/
温馨提示: 在influxdb中可以把 measurement 看为关系数据库中的table,tag和field是其中的列。其中Tag都加了索引、field不加, 和关系数据库不同的是,不用预先定义schema,没有value的点不会被保存。
实践2.利用Influx API接口请求
描述:接口中最重要的 /query 地址接受 GET 和 POST HTTP请求。使用此地址可以查询数据并管理数据库,保留策略和用户
类型方法:
1 | # 该/debug/requests返回写入和查询的数量每用户名和IP地址InfluxDB在指定时间范围内 |
实践3.influx 交互式1
2
3
4# 1.控制台指定输出格式,支持 column, csv, json 三种格式默认为column。
influx -format=csv
influx -format=json
influx -format=json -pretty
描述: InfluxDB 作为时间序列数据库,在处理时间数据时,有特殊的机制和规范,在使用时需要注意,本小节主要介绍 InfluxDB 中与时间相关的几个概念 precision,duration,epoch_time。
在互联网中常见是UTC时间(即世界标准时间), 它以 1970-01-01T00:00:00 为起点的毫秒数,不考虑闰秒。
在 InfluxDB 中显示时间通常以时间戳形式进行存储,其不分时区,在任意时间点,不同时区的 UTC 时间戳是相同的, 但时间戳在转换为日期时,会根据本地时区,转换为不同的日期值, 例如时间戳的起始时刻如下所示, 并且在1970年之前的日期对应的时间戳为负数。1
2
3
4# UTC+0
Thu Jan 01 1970 00:00:00 GMT+0000 (标准时间)
# UTC+8
Thu Jan 01 1970 08:00:00 GMT+0800 (中国标准时间)
precision - 时间戳转换显示
描述: 在写入和读取 influxdb 中的数据时,时间戳默认单位是纳秒,可以通过 precision 参数来指定为其他格式,比如 rfc3339 (YYYY-MM-DDTHH:MM:SS.nnnnnnnnnZ), h (小时), m (分钟), s (秒), ms (毫秒), u (微妙), ns (纳秒)
实践1.使用 curl 来请求写入时,通过 precision 指定时间戳单位1
2# 时间戳数据 1463683075 会按照秒来解析, 如果不指定 precision 默认会按照纳秒来解析其将会转换为 1463683075000000000
curl -i -XPOST "http://db.weiyigeek.top:8086/write?db=weiyigeek&precision=s" --data-binary 'mymeas,mytag=1 myfield=90 1463683075'
实践2.使用 influx 客户端 进行交互式时间与时区格式调整。
1 | # 命令行模式中指定 precision 默认是纳秒 |
实践3.使用 influx 客户端 命令式1
2$ influx -execute 'SELECT * FROM "weiyigeek" LIMIT 3' -database="NOAA_water_database" -precision=rfc3339
name: weiyigeek
epoch_time
描述: 在 InfluxDB Select 语句中, epoch 值就是时间戳,只不过 epoch 有更丰富的语义,使用起来更方便灵活, epoch 0 (1970-01-01T00:00:00Z)常被用来表示无意义的时间戳,也就是 null。
而 epoch time 就是 UTC 时间戳,默认单位为纳秒,可以通过 epoch_time 值后面跟 duration unit 来指定 precision, 并且 epoch_time 支持基本的算术运算,比如 + 或 -。
温馨提示: influxQL 要求运算符与 epoch_time 之间要有空格。
1 | # 1.now() : 本地服务器对应的纳秒时间戳, 并可以使用其来指定相对时间。 |
duration
描述: duration 用于指定一段时间长度 duration = integer + duration unit, 其中 duration units 可用单位 "ns" | "u" | "µ" | "ms" | "s" | "m" | "h" | "d" | "w".
1 | # 1.在 InfluxDB 中,配置数据库的 Retention Policy 中会用到 duration,比如: |
实践1.将influxDB中的数据进行(导出、导入)操作
1 | # 导出表中数据为csv格式 |
1 | # 查看当前保存策略 |
默认的配置文件路径为:/etc/influxdb/influxdb.conf1
2
3
4
5
6
7
8
9
10
11
12
13
14
15
16
17
18
19
20
21
22
23
24
25
26
27
28
29
30
31
32
33
34
35
36
37
38
39
40
41
42
43
44
45
46
47
48
49
50
51
52
53
54
55
56
57
58
59
60
61
62
63
64
65
66
67
68
69
70
71
72
73
74
75
76
77
78
79
80
81
82
83
84
85
86
87
88
89
90
91
92
93
94
95
96
97
98
99
100
101
102
103
104
105
106
107
108
109
110
111
112
113
114
115
116
117
118
119
120
121
122
123
124
125
126
127
128
129
130
131
132
133
134
135
136
137
138
139
140
141
142
143
144
145
146
147
148
149
150
151
152
153
154
155
156
157
158
159
160
161
162# reporting-disabled = false # 该选项用于上报influxdb的使用信息给InfluxData公司,默认值为false
bind-address = "127.0.0.1:8088" # 备份恢复时使用,默认值为8088
### [meta]
[meta]
dir = "/data/influxdb/meta" # meta数据存放目录
# retention-autocreate = true # 用于控制默认存储策略,数据库创建时,会自动生成autogen的存储策略,默认值:true
# logging-enabled = true # 是否开启meta日志,默认值:true
### [data]
[data]
dir = "/data/influxdb/data" # 最终数据(TSM文件)存储目录
wal-dir = "/data/influxdb/wal" # 预写日志存储目录
# wal-fsync-delay = "0s" # 在同步写入之前等待的总时间,默认0s
# index-version = "inmem" # 用于新碎片的切分索引的类型。
# trace-logging-enabled = false # 跟踪日志记录在tsm引擎周围提供了更详细的输出
# query-log-enabled = true # 是否开启tsm引擎查询日志,默认值: true
# Valid size suffixes are k, m, or g (case insensitive, 1024 = 1k).
# cache-max-memory-size = "1g" # 用于限定shard最大值,大于该值时会拒绝写入,默认值:1000MB,单位:byte
# Valid size suffixes are k, m, or g (case insensitive, 1024 = 1k).
# cache-snapshot-memory-size = "25m" # 用于设置快照大小,大于该值时数据会刷新到tsm文件,默认值:25MB,单位:byte
# cache-snapshot-write-cold-duration = "10m" # tsm引擎 snapshot写盘延迟,默认值:10Minute
# compact-full-write-cold-duration = "4h" # tsm文件在压缩前可以存储的最大时间,默认值:4Hour
# max-concurrent-compactions = 0 # 压缩并发的最大数量,默认设置为0表示runtime.GOMAXPROCS(0)*50% ,否则以设置的非零值为准
# Valid size suffixes are k, m, or g (case insensitive, 1024 = 1k).
# max-index-log-file-size = "1m" # 限制索引日志文件大小
# max-series-per-database = 1000000 # 限制数据库的级数,该值为0时取消限制,默认值:1000000
# max-values-per-tag = 100000 # 一个tag最大的value数,0取消限制,默认值:100000
# tsm-use-madv-willneed = false # 如果为true,mmap的建议值MADV_WILLNEED会被提供给内核
### [coordinator]
[coordinator]
# write-timeout = "10s" # 写操作超时时间,默认值: 10s
# max-concurrent-queries = 0 # 最大并发查询数,0无限制,默认值: 0
# query-timeout = "0s" # 查询操作超时时间,0无限制,默认值:0s
# log-queries-after = "0s" # 慢查询超时时间,0无限制,默认值:0s
# max-select-point = 0 # SELECT语句可以处理的最大点数(points),0无限制,默认值:0
# max-select-series = 0 # SELECT语句可以处理的最大级数(series),0无限制,默认值:0
# max-select-buckets = 0 # SELECT语句可以处理的最大"GROUP BY time()"的时间周期,0无限制,默认值:0
### [retention]
[retention]
# enabled = true # 是否启用该模块,默认值 : true
# check-interval = "30m" # 检查时间间隔,默认值 :"30m"
### [shard-precreation]
[shard-precreation]
# enabled = true # 是否启用该模块,默认值 : true
# check-interval = "10m" # 检查时间间隔,默认值 :"10m"
# advance-period = "30m" # 预创建分区的最大提前时间,默认值 :"30m"
[monitor]
# store-enabled = true # 是否启用该模块,默认值 :true
# store-database = "_internal" # 默认数据库:"_internal"
# store-interval = "10s" # 统计间隔,默认值:"10s"
### [http]
[http]
# enabled = true # 是否启用该模块,默认值 :true
# bind-address = ":8086" # 绑定地址,默认值 :":8086"
# auth-enabled = false # 是否开启认证,默认值:false
# realm = "InfluxDB" # 配置JWT realm,默认值: "InfluxDB"
# log-enabled = true # 是否开启日志,默认值:true
# suppress-write-log = false # 在启用日志时是否抑制HTTP写请求日志
# access-log-path = "" # 当启用HTTP请求日志时,该选项指定了路径。如influxd不能访问指定的路径,它将记录一个错误并将请求日志写入stderr
# write-tracing = false # 是否开启写操作日志,如果置成true,每一次写操作都会打日志,默认值:false
# pprof-enabled = true # 是否开启pprof,默认值:true
# debug-pprof-enabled = false # 是否开启pprof,默认值:true
# https-enabled = false # 是否开启https ,默认值 :false
# https-certificate = "/etc/ssl/influxdb.pem" # 设置https证书路径,默认值:"/etc/ssl/influxdb.pem"
# https-private-key = "" # 设置https私钥,无默认值
# shared-secret = "" # 用于JWT签名的共享密钥,无默认值
# max-row-limit = 0 # 配置查询返回最大行数,0无限制,默认值:0
# max-connection-limit = 0 # 配置最大连接数,0无限制,默认值:0
# unix-socket-enabled = false # 是否使用unix-socket,默认值:false
# bind-socket = "/var/run/influxdb.sock" # unix-socket路径,默认值:"/var/run/influxdb.sock"
# max-body-size = 25000000 # 客户端请求主体的最大值,以字节为单位。0无限制,默认值0
# max-concurrent-write-limit = 0 # 并发处理的最大写入次数,0无限制,默认值0
# max-enqueued-write-limit = 0 # 排队等待处理的最大数量,0无限制,默认值0
# enqueued-write-timeout = 0 # 在队列中等待处理的最长时间,0或者setting max-concurrent-write-limit=0无限制,默认值0
### [ifql]
[ifql]
# enabled = true # 是否启用该模块,默认值 :true
# log-enabled = true # 是否开启日志,默认值:true
# bind-address = ":8082" # ifql RPC服务使用的绑定地址默认是8082
### [logging]
[logging]
# format = "auto" # 日志格式,默认是自动
# level = "info" # 日志级别默认info
# suppress-logo = false # 当程序启动时,会抑制打印出来的logo输出
### [subscriber]
[subscriber]
# enabled = true # 是否启用该模块,默认值 :true
# http-timeout = "30s" # http超时时间,默认值:"30s"
# insecure-skip-verify = false # 是否允许不安全的证书
# ca-certs = "" # 设置CA证书
# write-concurrency = 40 # 设置并发数目,默认值:40
# write-buffer-size = 1000 # 设置buffer大小,默认值:1000
### [[graphite]]
[[graphite]]
# enabled = false # 是否启用该模块,默认值 :false
# database = "graphite" # 数据库名称,默认值:"graphite"
# retention-policy = "" # 存储策略,无默认值
# bind-address = ":2003" # 绑定地址,默认值:":2003"
# protocol = "tcp" # 协议,默认值:"tcp"
# consistency-level = "one" # 一致性级别,默认值:"one
# batch-size = 5000 # 批量size,默认值:5000
# batch-pending = 10 # 配置在内存中等待的batch数,默认值:10
# batch-timeout = "1s" # 超时时间,默认值:"1s"
# udp-read-buffer = 0 # udp读取buffer的大小,0表示使用操作系统提供的值,如果超过操作系统的默认配置则会出错。 该配置的默认值:0
# separator = "." # 多个measurement间的连接符,默认值: "."
# tags = ["region=us-east", "zone=1c"] # 将被添加到所有指标的默认标签。这些可以在模板级别上覆盖或者从指标中提取的标签
# templates = [
# "*.app env.service.resource.measurement",
# # Default template
# "server.*",
# ]
### [collectd]
[[collectd]]
# enabled = false # 是否启用该模块,默认值 :false
# bind-address = ":25826" # 绑定地址,默认值: ":25826"
# database = "collectd" # 数据库名称,默认值:"collectd"
# retention-policy = "" # 存储策略,无默认值
# typesdb = "/usr/local/share/collectd" # 路径,默认值:"/usr/share/collectd/types.db"
# security-level = "none" # 安全级别
# auth-file = "/etc/collectd/auth_file"
# batch-size = 5000 # 从缓存中批量获取数据的量,默认值:5000
# batch-pending = 10 # 可能在内存中等待的批次的数量,默认值:10
# batch-timeout = "10s" # 即使没有达到缓冲区的限制,至少要刷新一下,默认值:"10s"
# read-buffer = 0 # udp读取buffer的大小,0表示使用操作系统提供的值,如果超过操作系统的默认配置则会出错。默认值:0
# parse-multivalue-plugin = "split" # 两种处理方式split和join,split会分到不同的表中,join会将记录作为一个单独的记录处理。默认是split
### [opentsdb]
[[opentsdb]]
# enabled = false # 是否启用该模块,默认值 :false
# bind-address = ":4242" # 绑定地址,默认值:":4242"
# database = "opentsdb" # 默认数据库:"opentsdb"
# retention-policy = "" # 存储策略,无默认值
# consistency-level = "one" # 一致性级别,默认值:"one"
# tls-enabled = false # 是否开启tls,默认值:false
# certificate= "/etc/ssl/influxdb.pem" # 证书路径,默认值:"/etc/ssl/influxdb.pem"
# log-point-errors = true # 出错时是否记录日志,默认值:true
# batch-size = 1000 # 从缓存中批量获取数据的量,默认值:1000
# batch-pending = 5 # 可能在内存中等待的批次的数量,默认值:5
# batch-timeout = "1s" # 即使没有达到缓冲区的限制,至少要刷新一下,默认值:"1s"
### [[udp]]
[[udp]]
# enabled = false # 是否启用该模块,默认值 :false
# bind-address = ":8089" # 绑定地址,默认值:":8089"
# database = "udp" # 数据库名称,默认值:"udp"
# retention-policy = "" # 存储策略,无默认值
# precision = "" # 接收点的时间点的精度("" or "n", "u", "ms", "s", "m", "h")
# batch-size = 5000 # 从缓存中批量获取数据的量,默认值:5000
# batch-pending = 10 # 可能在内存中等待的批次的数量,默认值:10
# batch-timeout = "1s" # 即使没有达到缓冲区的限制,至少要刷新一下,默认值:"1s"
# read-buffer = 0 # udp读取buffer的大小,0表示使用操作系统提供的值,如果超过操作系统的默认配置则会出错。 该配置的默认值:0
### [continuous_queries]
[continuous_queries]
# enabled = true # 是否启用该模块,默认值 :true
# log-enabled = true # 是否开启日志,默认值:true
# query-stats-enabled = false # 控制查询是否被记录到自我监控数据存储中
# run-interval = "1s" # 时间间隔,默认值:"1s"
### [tls]
[tls]
# ciphers = [
# "TLS_ECDHE_ECDSA_WITH_CHACHA20_POLY1305",
# "TLS_ECDHE_RSA_WITH_AES_128_GCM_SHA256",
# ]
# min-version = "tls1.2"
# max-version = "tls1.2"
手动后台启动 influxd 服务并指定其配置文件1
nohup ./influxd -config /etc/conf/influxdb.conf > /var/log/influxdb.log 2>&1 &
influxdb 模块使用介绍
描述: 使用 pip 安装 influxdb 模块 pip install influxdb。
使用范例:1
2
3
4
5
6
7
8
9
10
11
12
13
14
15
16
17
18
19
20
21
22
23
24
25from influxdb import InfluxDBClient
json_body = [
{
"measurement": "meas01",
"tags": {
"name": "s1-2",
"addr": "10-2"
},
"fields": {
"id": 2
}
},
{
"measurement": "meas02",
"tags": {
"name": "s1-3",
"addr": "10-3"
},
"fields": {
"id": 3
}
}
]
client = InfluxDBClient('db.weiyigeek.top', 8086, 'root', 'weiyigeek', 'mydb') # 初始化(指定要操作的数据库)
client.write_points(json_body) # 写入数据,同时创建表
描述: InfluxDB Studio 是用于InfluxDB时间序列数据库的UI管理工具, 它的灵感来自其他类似的数据库管理工具,如 SQL Server management Studio 和 Robomongo 为InfluxData公司提供支持, Net的可移植InfluxDB客户端库(加上一些Kapacitor支持), Tips: 官网项目最后更新时间2017年11月。
官方使用文档: https://github.com/CymaticLabs/InfluxDBStudio/#managing-connections
下载链接: https://github.com/CymaticLabs/InfluxDBStudio/releases/download/v0.2.0-beta.1/InfluxDBStudio-0.2.0.zip
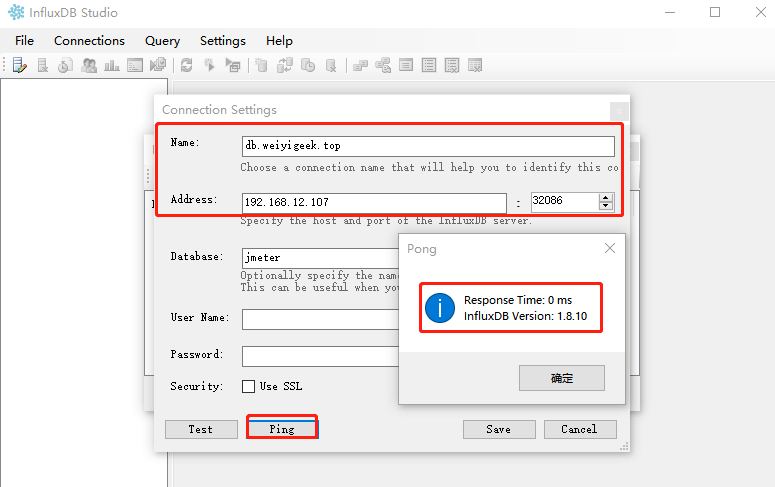
InfluxDBStudio 连接字符串配置: weiyigeek.top-influxDB Connection
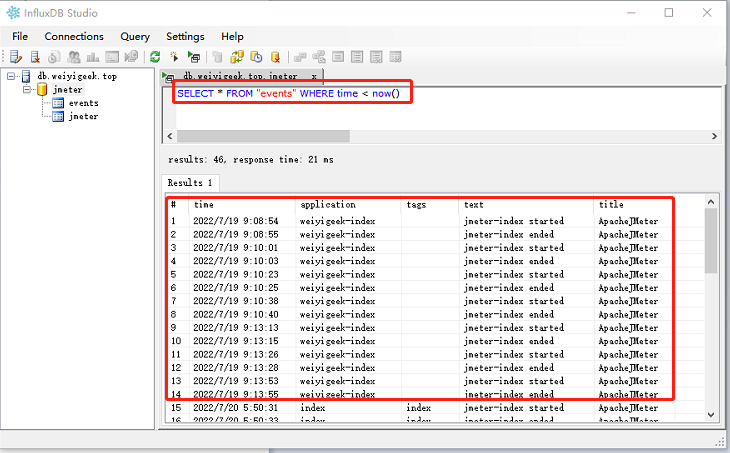
InfluxDBStudio 进行指定数据库 measurement 名称的数据查询: weiyigeek.top-influxDB Query Measurement1
2
3
4
5SELECT * FROM "events" WHERE time < now()
SELECT time,application,hit,count,avg,transaction,statut FROM "jmeter" WHERE time < now() - 5m order by time desc tz('Asia/Shanghai')
-- time application hit count avg transaction statut
-- 2022/7/21 9:42 index 15000 15000 32.42 all all
-- 2022/7/21 9:33 index 15000 15000 2.2 all all
你好看友,欢迎关注博主微信公众号哟! ❤
这将是我持续更新文章的动力源泉,谢谢支持!(๑′ᴗ‵๑)
温馨提示: 未解锁的用户不能粘贴复制文章内容哟!
方式1.请访问本博主的B站【WeiyiGeek】首页关注UP主,
将自动随机获取解锁验证码。
Method 2.Please visit 【My Twitter】. There is an article verification code in the homepage.
方式3.扫一扫下方二维码,关注本站官方公众号
回复:验证码
将获取解锁(有效期7天)本站所有技术文章哟!

@WeiyiGeek - 为了能到远方,脚下的每一步都不能少
欢迎各位志同道合的朋友一起学习交流,如文章有误请在下方留下您宝贵的经验知识,个人邮箱地址【master#weiyigeek.top】或者个人公众号【WeiyiGeek】联系我。
更多文章来源于【WeiyiGeek Blog - 为了能到远方,脚下的每一步都不能少】, 个人首页地址( https://weiyigeek.top )

专栏书写不易,如果您觉得这个专栏还不错的,请给这篇专栏 【点个赞、投个币、收个藏、关个注、转个发、赞个助】,这将对我的肯定,我将持续整理发布更多优质原创文章!。
最后更新时间:
文章原始路径:_posts/数据存储/InfluxDB/2.InfluxDB1.x数据库实践使用.md
转载注明出处,原文地址:https://blog.weiyigeek.top/2022/4-11-670.html
本站文章内容遵循 知识共享 署名 - 非商业性 - 相同方式共享 4.0 国际协议