# Make 构建安装后提示lib动态链接库地址。 - add LIBDIR to the 'LD_LIBRARY_PATH' environment variable during execution - add LIBDIR to the 'LD_RUN_PATH' environment variable during linking - use the '-Wl,-rpath -Wl,LIBDIR' linker flag # 或者在编译是添加依赖的Lib目录。 - have your system administrator add LIBDIR to '/etc/ld.so.conf'
$ nginx -t # nginx: the configuration file /usr/local/nginx/nginx.conf syntax is ok # nginx: configuration file /usr/local/nginx/nginx.conf test is successful
$ tree /usr/local/nginx/lua/lib/ /usr/local/nginx/lua/lib/ └── resty └── redis.lua
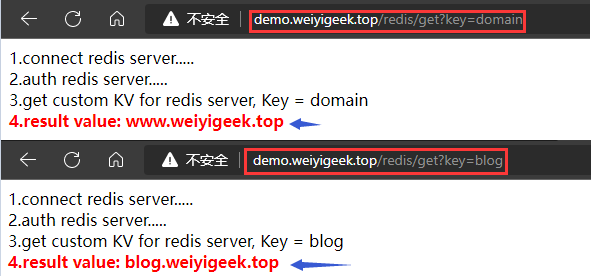
# Redis 数据库 & 为了演示数据准备两个Key即domain/blog 192.168.1.22 6379 weiyigeek.top /data # redis-cli 127.0.0.1:6379> auth weiyigeek.top OK 127.0.0.1:6379> ping PONG 127.0.0.1:6379> set domain www.weiyigeek.top OK 127.0.0.1:6379> set blog blog.weiyigeek.top OK
# /usr/local/nginx/conf.d/demo.conf server { ... location /redis/get { default_type 'text/html'; set$key$arg_key; content_by_lua_block { -- # 引入resty.redis模块与创建实例化对象 local redis = require "resty.redis" local client = redis:new() local REDIS_HOST = "192.168.1.22" local REDIS_PROT = 6379 local REDIS_AUTH = "weiyigeek.top" -- # ngx.log(ngx.ERR, ngx.var.key) -- # 分别设置连接、发送和读取超时阈值(以毫秒为单位),用于后续套接字操作。 client:set_timeouts(1000, 1000, 1000) -- # 创建链接对象, 连接到Redis数据库 ngx.say("1.connect redis server..... <br>"); local ok, err = client:connect(REDIS_HOST, REDIS_PROT) if not ok then ngx.say("failed to connect: ", err) return end -- # 认证 ngx.say("2.auth redis server..... <br>"); local res, err = client:auth(REDIS_AUTH) if not res then ngx.say("failed to authenticate: ", err) return end -- # 获取指定请求键值 ngx.say("3.get custom KV for redis server, Key = ",ngx.var.key," <br>"); local res, err = client:get(ngx.var.key) if not res then ngx.say("failed to get key: ", err) return end if res == ngx.null then ngx.say("key not found.") return end
-- # 使用完毕后立即关闭销毁Redis连接(短连接可以如此使用,如果是长链接建议回收该连接池对象即可) local ok, err = client:close() if not ok then ngx.say("failed to close: ", err) return else ngx.say("5.just close the Redis connection right away <br/>") end } } ... }
# 1) 操作 redis 数据库的 lua 脚本示例。 tee /usr/local/nginx/lua/custom/nginx-redis.lua <<'EOF' -- # 引入resty.redis模块与创建实例化对象 local redis = require "resty.redis" local client = redis:new() local REDIS_HOST = "192.168.1.22" local REDIS_PROT = 6379 local REDIS_AUTH = "weiyigeek.top" -- # ngx.log(ngx.ERR, ngx.var.key) -- # 分别设置连接、发送和读取超时阈值(以毫秒为单位),用于后续套接字操作。 client:set_timeouts(1000, 1000, 1000)
-- # 验证请求的参数是否存在 if (ngx.var.key == ngx.null and ngx.var.value == ngx.null) then ngx.say("Request parameters : key + value not found!") ngx.exit(404) end
-- # 创建链接对象, 连接到Redis数据库 ngx.say("1.connect redis server..... <br>"); local ok, err = client:connect(REDIS_HOST, REDIS_PROT) if not ok then ngx.say("failed to connect: ", err) return end
-- # 认证 ngx.say("2.auth redis server..... <br>"); local res, err = client:auth(REDIS_AUTH) if not res then ngx.say("failed to authenticate: ", err) return end
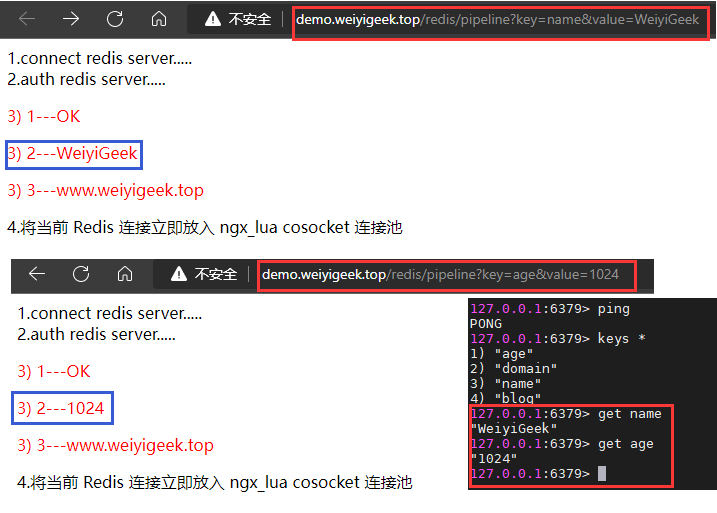
-- # 使用 pipeline 通道方式进行redis 数据库操作 client:init_pipeline() client:set(ngx.var.key, ngx.var.value) client:get(ngx.var.key) client:get("domain") local results, err = client:commit_pipeline() if not results then ngx.say("failed to commit the pipelined requests: ", err) return end
-- 结果遍历 for i, res in ipairs(results) do iftype(res) == "table"then if res[1] == falsethen ngx.say("failed to run command ", i, ": ", res[2],"<br/>") else -- process the table value ngx.say("3) 3.",i, ": ", res[2],"<br/>") end else -- process the scalar value ngx.say("<p style='color:red'>3) ",i,"---",res,"</p>") end end
-- 将当前 Redis 连接立即放入 ngx_lua cosocket 连接池(将其放入大小为100的连接池中,最大空闲时间为10秒)。 local ok, err = client:set_keepalive(10000, 100) if not ok then ngx.say("failed to set keepalive: ", err) return end ngx.say("4.将当前 Redis 连接立即放入 ngx_lua cosocket 连接池<br/>") EOF
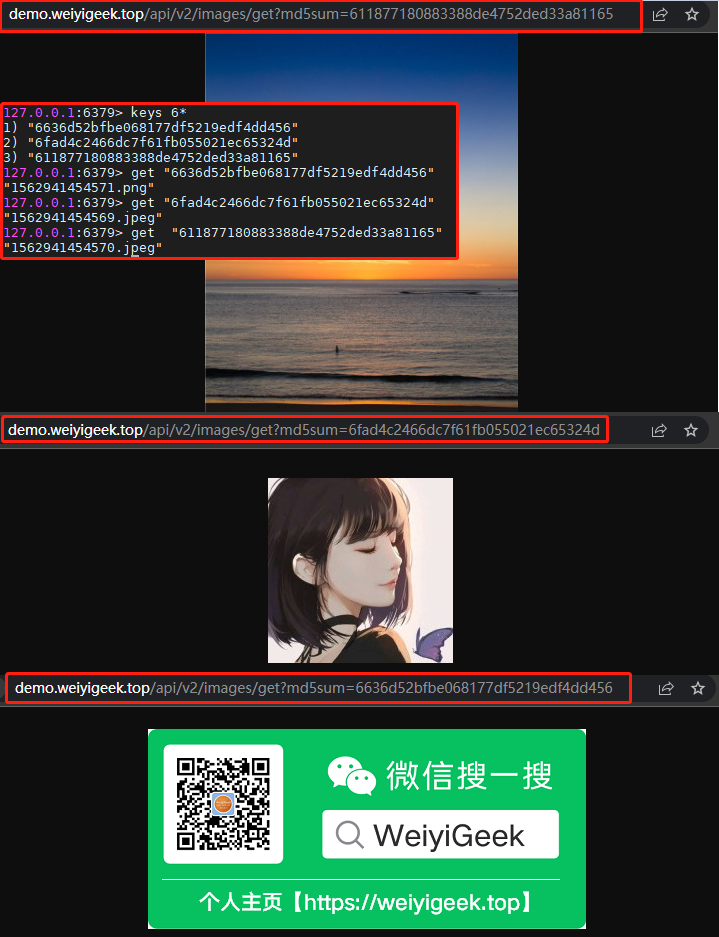
# 文件的MD5值 /usr/local/nginx/html/images# md5sum * | awk '{print "set "$1" "$2}' set 6fad4c2466dc7f61fb055021ec65324d 1562941454569.jpeg set 611877180883388de4752ded33a81165 1562941454570.jpeg set 6636d52bfbe068177df5219edf4dd456 1562941454571.png
# 写入KV到redis数据库中 127.0.0.1:6379> set 6fad4c2466dc7f61fb055021ec65324d 1562941454569.jpeg OK 127.0.0.1:6379> set 611877180883388de4752ded33a81165 1562941454570.jpeg OK 127.0.0.1:6379> set 6636d52bfbe068177df5219edf4dd456 1562941454571.png OK
$ vim conf.d/demo.conf server { ...... location = /api/v2/images/get { resolver 223.6.6.6; set$key$arg_md5sum; set$name""; access_by_lua_block { local redis = require "resty.redis" local client = redis:new() local REDIS_HOST = "192.168.1.22" local REDIS_PROT = 6379 local REDIS_AUTH = "weiyigeek.top" client:set_timeouts(1000, 1000, 1000) local ok, err = client:connect(REDIS_HOST, REDIS_PROT) if not ok then ngx.say("failed to connect: ", err) return end local res, err = client:auth(REDIS_AUTH) if not res then ngx.say("failed to authenticate: ", err) return end local res, err = client:get(ngx.var.key) if not res then ngx.say("failed to get key: ", err) return end if res == ngx.null then ngx.say("key not found.") return else -- # 关键点将redis中指定键的值赋予给nginx指定变量 ngx.var.name = res end local ok, err = client:set_keepalive(10000, 100) if not ok then ngx.say("failed to set keepalive: ", err) return end } proxy_pass $scheme://$server_name/images/$name; } ...... }
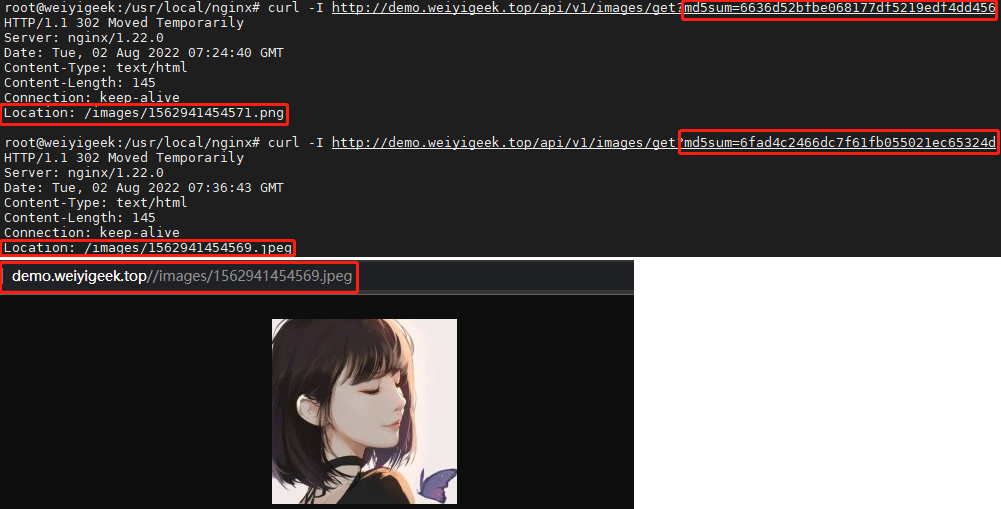
$ vim conf.d/demo.conf server { ...... location = /api/v1/images/get { resolver 223.6.6.6; set$key$arg_md5sum; rewrite_by_lua_block { local redis = require "resty.redis" local client = redis:new() local REDIS_HOST = "192.168.1.22" local REDIS_PROT = 6379 local REDIS_AUTH = "weiyigeek.top" client:set_timeouts(1000, 1000, 1000) local ok, err = client:connect(REDIS_HOST, REDIS_PROT) if not ok then ngx.say("failed to connect: ", err) return end local res, err = client:auth(REDIS_AUTH) if not res then ngx.say("failed to authenticate: ", err) return end local res, err = client:get(ngx.var.key) if not res then ngx.say("failed to get key: ", err) return end if res == ngx.null then ngx.say("key not found.") else -- # 关键点图片格式化。 return ngx.redirect(string.format("%s%s","/images/",res)) end local ok, err = client:set_keepalive(10000, 100) if not ok then ngx.say("failed to set keepalive: ", err) return end } # 若没有匹配搭配到进行跳转进行跳转则访问首页 proxy_pass $scheme://$server_name/index.html; } ...... }
# 此处根据业务的需求来写正则表达式,一定要个 redis 里的 KEY 对应上 location ~/[0-9].*\.(gif|jpg|jpeg|png)$ { set$target''; access_by_lua ' # 使用 nginx 的内部参数 ngx.var.uri 来获取请求的 uri 地址,如 /000001.jpg local key = ngx.var.uri # 根据正则匹配到 KEY ,从 redis 数据库里获取文件 ID (路径和文件名) local res = ngx.location.capture( "/Redis", { args = { key = key } } ) if res.status ~= 200 then ngx.log(ngx.ERR, "Redis server returned bad status: ",res.status) ngx.exit(res.status) end if not res.body then ngx.log(ngx.ERR, "Redis returned empty body") ngx.exit(500) end local parser = require "Redis.parser" local filename, typ = parser.parse_reply(res.body) if typ ~= parser.BULK_REPLY or not server then ngx.log(ngx.ERR, "bad Redis response: ", res.body) ngx.exit(500) end ngx.var.target = filename '; proxy_pass http://10.20.172.196/$target; }
示例2.Nginx在reponse返回的cookie中设置HttpOnly
1 2 3 4 5 6 7 8 9 10 11 12
local cookies = ngx.header.set_cookie if cookies then iftype(cookies) == "table"then for k,v in pairs(cookies) do cookies[k] = v .. "; HttpOnly" ngx.header.set_cookie = cookies end else local cookiesStr = cookies .. "; HttpOnly" ngx.header.set_cookie = cookiesStr; end end
# 永久生效 tee -a /etc/profile <<'EOF' export LUAJIT_LIB=/usr/local/luajit/lib export LUAJIT_INC=/usr/local/luajit/include/luajit-2.1 EOF source /etc/profile
问题2.在使用luajit官方主分支LuaJIT-2.1.0-beta3提供LuaJIT安装部署出现nginx: [alert] detected a LuaJIT version which is not OpenResty's;以及nginx: [alert] failed to load the 'resty.core' module警告。
错误信息:
1 2 3 4 5 6 7 8 9 10 11 12 13 14
$ /usr/sbin/nginx
nginx: [alert] detected a LuaJIT version which is not OpenResty's; many optimizations will be disabled and performance will be compromised (see https://github.com/openresty/luajit2 for OpenResty's LuaJIT or, even better, consider using the OpenResty releases from https://openresty.org/en/download.html)
nginx: [alert] failed to load the 'resty.core' module (https://github.com/openresty/lua-resty-core); ensure you are using an OpenResty release from https://openresty.org/en/download.html (reason: module 'resty.core' not found:
  no field package.preload['resty.core']
  no file './resty/core.lua'
  no file '/usr/local/share/luajit-2.1.0-beta3/resty/core.lua'
  no file '/usr/local/share/lua/5.1/resty/core.lua'
  no file '/usr/local/share/lua/5.1/resty/core/init.lua'
  no file './resty/core.so'
  no file '/usr/local/lib/lua/5.1/resty/core.so'
  no file '/usr/local/lib/lua/5.1/loadall.so'
  no file './resty.so'
  no file '/usr/local/lib/lua/5.1/resty.so'
  no file '/usr/local/lib/lua/5.1/loadall.so') in /usr/local/nginx/nginx.conf:117
# 你可能会进行 Lua 脚本解释器的安装 LuaJIT
http://luajit.org/download.html
wget -c https://luajit.org/download/LuaJIT-2.1.0-beta3.tar.gz
tar -zxf LuaJIT-2.1.0-beta3.tar.gz && cd LuaJIT-2.1.0-beta3
make && make install
ln -sf /usr/local/bin/luajit-2.1.0-beta3 /usr/local/bin/luajit
# 卸载LuaJIT官网主分支版本,然后重新安装openresty提供的luajit优化版即可
make uninstall
make clean
方式1.请访问本博主的B站【WeiyiGeek】首页关注UP主, 将自动随机获取解锁验证码。
Method 2.Please visit 【My Twitter】. There is an article verification code in the homepage.
方式3.扫一扫下方二维码,关注本站官方公众号
回复:验证码
将获取解锁(有效期7天)本站所有技术文章哟!