本章目录
[TOC]
0x00 前言简述 描述: 最近公司业务中有这么一个需求就是在保证图像的清晰度的情况下, 减少其体积大小使得减轻外部请求流量带宽对网关的请访问压力,同时提高用户访问体验。所以在进行前期需求、运维成本等综合分析后,还是建议将图片格式转为Google推出的一种现代图像格式 Webp,考虑到 WebP图片已经是一种趋势了,现在已经有很知名的网站支持了这种格式的图片,当然你也可以使用 Google 出品的PageSpeed模块有一个功能,会自动将图像转换成WebP格式或者是浏览器所支持的其它格式(比较吃配置)。
所以本章将主要针对webp格式的转换的相关命令进行实践使用,如果不想使用 Nginx+PageSpeed 模块,我们也可使用 Nginx+Lua 脚本针对请求非webp格式的图片进行自动转换后,并按照指定的分辨率进行显示。
WebP 介绍 An image format for the Web
温馨提示: 目前支持 PNG / JPEG / GIF /PNM (PGM, PPM, PAM),/ TIFF等图片格式转换为webp格式。
官网地址: https://developers.google.com/speed/webp
Webp 有何优点?
答: 使用WebP,网站管理员和Web开发人员可以创建更小,更丰富的图像,从而使Web解析访问更快。Google Chrome,Safari,Firefox,Edge,Opera 等主流浏览器以及许多其他工具和软件库(C/C++/Go/Python)中得到原生支持。
WebP 是如何工作的?
答: 有损WebP压缩使用预测编码对图像进行编码,与VP8视频编解码器压缩视频中关键帧的方法相同, 预测编码使用相邻像素块中的值来预测块中的数值,然后仅对差值进行编码。
TIPS: WebP文件由VP8或VP8L图像数据以及基于RIFF的容器组成.
0X01 部署安装 实践环境说明
本章目录
[TOC]
0x00 前言简述 描述: 最近公司业务中有这么一个需求就是在保证图像的清晰度的情况下, 减少其体积大小使得减轻外部请求流量带宽对网关的请访问压力,同时提高用户访问体验。所以在进行前期需求、运维成本等综合分析后,还是建议将图片格式转为Google推出的一种现代图像格式 Webp,考虑到 WebP图片已经是一种趋势了,现在已经有很知名的网站支持了这种格式的图片,当然你也可以使用 Google 出品的PageSpeed模块有一个功能,会自动将图像转换成WebP格式或者是浏览器所支持的其它格式(比较吃配置)。
所以本章将主要针对webp格式的转换的相关命令进行实践使用,如果不想使用 Nginx+PageSpeed 模块,我们也可使用 Nginx+Lua 脚本针对请求非webp格式的图片进行自动转换后,并按照指定的分辨率进行显示。
WebP 介绍 An image format for the Web
温馨提示: 目前支持 PNG / JPEG / GIF /PNM (PGM, PPM, PAM),/ TIFF等图片格式转换为webp格式。
官网地址: https://developers.google.com/speed/webp
Webp 有何优点?
答: 使用WebP,网站管理员和Web开发人员可以创建更小,更丰富的图像,从而使Web解析访问更快。Google Chrome,Safari,Firefox,Edge,Opera 等主流浏览器以及许多其他工具和软件库(C/C++/Go/Python)中得到原生支持。
WebP 是如何工作的?
答: 有损WebP压缩使用预测编码对图像进行编码,与VP8视频编解码器压缩视频中关键帧的方法相同, 预测编码使用相邻像素块中的值来预测块中的数值,然后仅对差值进行编码。
TIPS: WebP文件由VP8或VP8L图像数据以及基于RIFF的容器组成.
0X01 部署安装 实践环境说明 1 2 3 4 5 6 7 8 ~$ cat /etc/issue.net Ubuntu 20.04.3 LTS ~$ uname -a Linux weiyigeek.top 5.4.0-92-generic libwebp-1.2.3.tar.gz
温馨提示: 此处使用的是 Ubuntu 20.04 操作系统, 该系统已做安全加固和内核优化符合等保2.0要求【SecOpsDev/Ubuntu-InitializeSecurity.sh at master · WeiyiGeek/SecOpsDev 】, 如你的Linux未进行相应配置环境可能与读者有些许差异, 如需要进行(windows server、Ubuntu、CentOS)安全加固请参照如下加固脚本进行加固, 请大家疯狂的 star 。https://github.com/WeiyiGeek/SecOpsDev/blob/master/OS-%E6%93%8D%E4%BD%9C%E7%B3%BB%E7%BB%9F/Linux/Ubuntu/Ubuntu-InitializeSecurity.sh 】
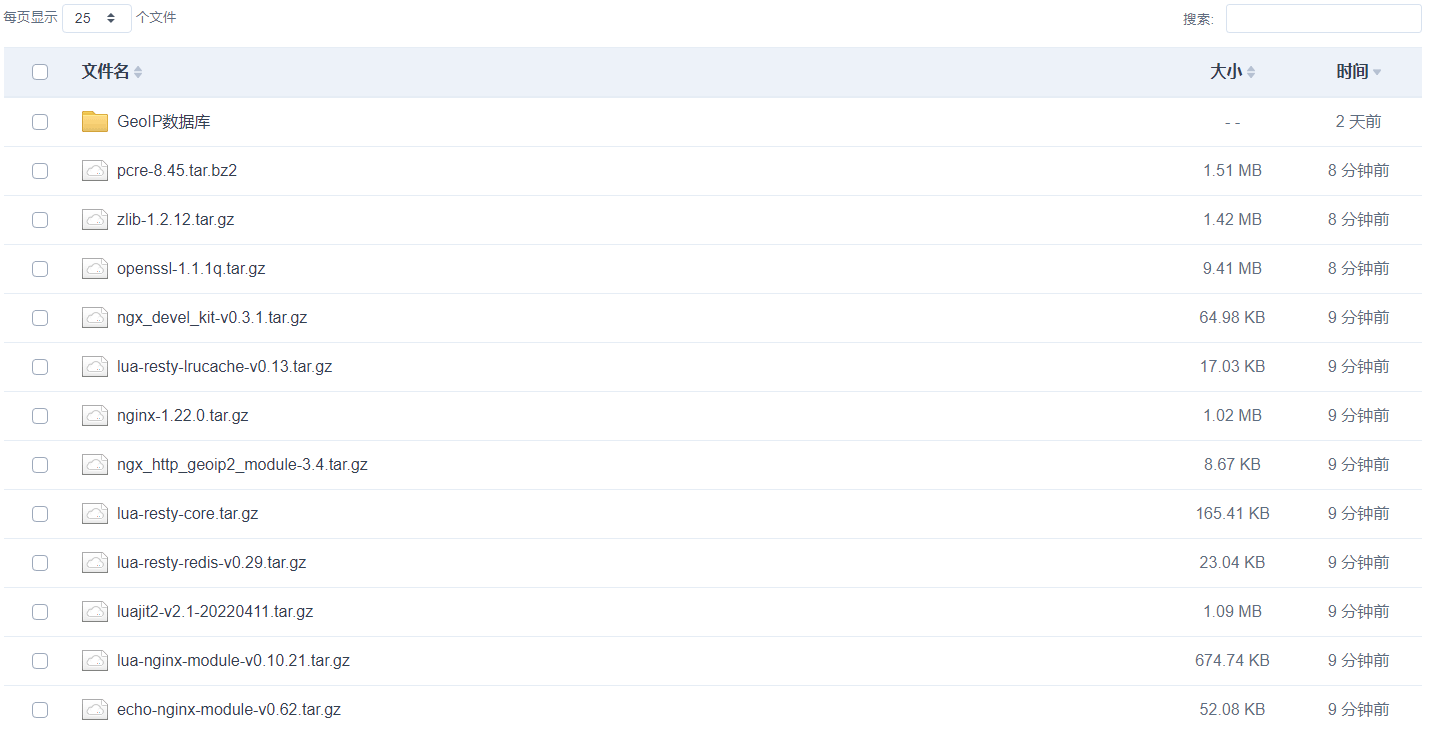
为了节省大家的实践时间,我已经把需要用到的源码包上传到空间中,有需要的朋友可以看一下,下载地址: http://share.weiyigeek.top/d/36158960-50338508-7c5982?p=2088(访问密码:2088)
weiyigeek.top-Nginx及其模块下载
WebP 工具库安装 Webp 包括轻量级编码和解码库libwebp[^libwebp]和命令行工具[cwebp][^cwebp]和[dwebp][^dwebp],用于将多种互联网图像与WebP格式相互转换,以及用于查看,复用和动画化WebP图像的工具,完整的源代码可在下载页面 上获得。
除此之外,我们还可下载适用于Linux、Windows或macOS的预编译cwebp转换工具(https://developers.google.com/speed/webp/docs/precompiled),将您喜爱的收藏从PNG和JPEG转换为WebP。
二进制包方式安装 描述: 用于Linux、Windows和macOS的预编译WebP实用程序和库。它们包括:
libwebp 库 : 可用于将WebP编码或解码添加到程序中 (windows/Linux)。
cwebp : WebP编码器工具dwebp : WebP解码器工具vwebp : WebP文件查看器
webpmux : WebP复用工具
gif2webp : 用于将GIF图像转换为WebP的工具
系统软件源方式 1 2 3 4 5 sudo apt-get install webp yum install libwebp-tools webp
源代码编译方式安装 描述: libwebp 是谷歌官方提供的webp格式图片parser以及解码的库,以下记录在Ubuntu 20.04编译libwebp及其安装webp相关工具的过程。
项目地址: https://github.com/webmproject/libwebp https://storage.googleapis.com/downloads.webmproject.org/releases/webp/index.html
Step 1.要从source code进行构建,我们首先必须下载源码的压缩包。
1 2 3 cd /usr/local /srcwget -c https://storage.googleapis.com/downloads.webmproject.org/releases/webp/libwebp-1.2.3.tar.gz tar -zxf libwebp-1.2.3.tar.gz && cd libwebp-1.2.3/
Step 2.在Ubuntu系统中安装编译libwebp前以及webp相关工具编译构建。
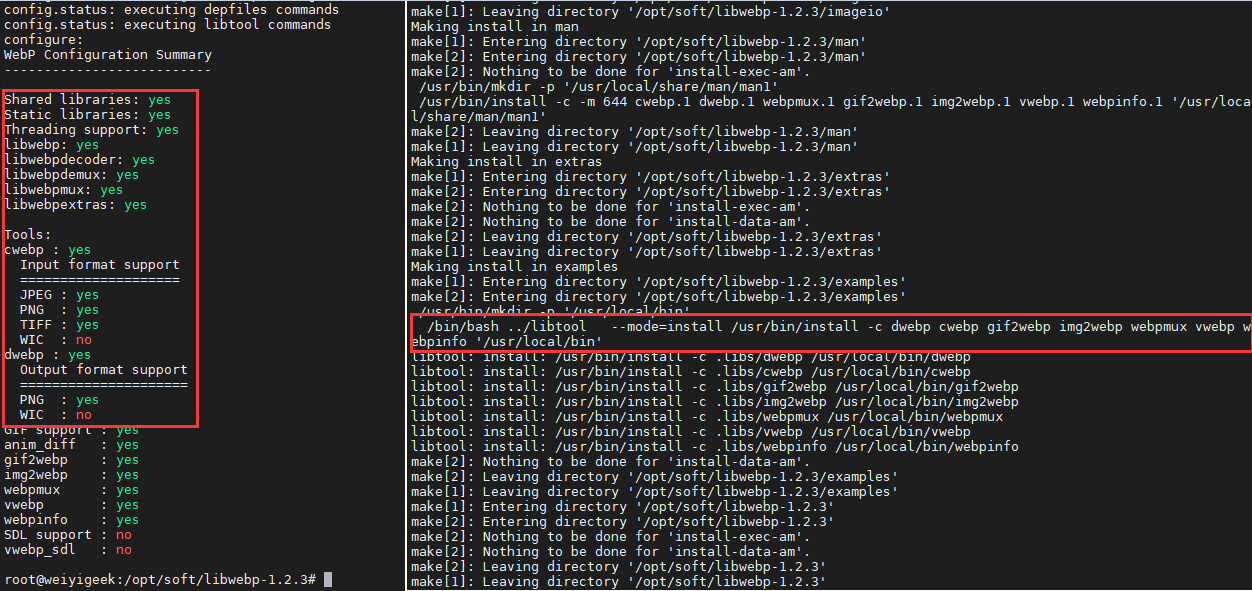
1 2 3 4 5 6 7 8 9 10 apt install -y gcc make autoconf automake libtool apt install -y libwebp-dev libjpeg-dev libpng-dev libtiff-dev libgif-dev apt install -y freeglut3-dev mesa-common-dev ./configure --enable -libwebpdecoder --enable -libwebpextras --enable -swap-16bit-csp make && make install
weiyigeek.top-build libwebp
温馨提示: 当你从git源代码构建时需要运行autogen.sh生成配置脚本 (When building from git sources, you will need to run autogen.sh to generate the
温馨提示: 如果在执行时出现如下错误 cwebp: error while loading shared libraries: libwebpdemux.so.2: cannot open shared object file: No such file or directory,我们可以执行如下命令进行解决该问题。
1 2 3 4 5 6 7 8 9 10 11 echo "export LD_LIBRARY_PATH=$LD_LIBRARY_PATH :/usr/local/lib" >> ~/.bashrcexport LD_LIBRARY_PATH=$LD_LIBRARY_PATH :/usr/local /libecho $LD_LIBRARY_PATH tee -a /etc/ld.so.conf.d/libc.conf <<'EOF' /usr/local /lib EOF sudo ldconfig
Step 3.在完成后您应该在如下目录中/usr/local/bin/,使用ls命令查看下述几个命令.1 2 3 4 5 6 7 8 ls /usr/local /bin/*webp* /usr/local /bin/cwebp /usr/local /bin/dwebp /usr/local /bin/gif2webp /usr/local /bin/vwebp /usr/local /bin/webpmux /usr/local /bin/img2webp /usr/local /bin/webpinfo
命令介绍 :
cwebp: 用于将jpeg、png或TIFF编码格式图片转为webp格式图片。(可以理解为编码)
dwebp: 用于将webp格式图片转换为png格式图片
vwebp: 用于播放webp动图和静图的工具
webpmux: 用于 WebP复用工具
gif2webp:用于将GIF图像转换为WebP的工具
img2webp:用于从一系列输入图像创建动画WebP文件。
webpinfo: 打印WebP文件的区块级结构以及基本的完整性检查。
Step 4.验证安装的相关工具并进行查看其版本号。
1 2 3 4 ~$ cwebp -version 1.2.3 ~$ dwebp -version 1.2.3
好的,二进制部署在此处实践部署到此就结束了。
补充说明: 其它发行版可以从源码进行编译构建。
1 2 3 4 5 6 7 8 9 apt install -y libtiff-dev http://download.osgeo.org/libtiff/ wget -c http://download.osgeo.org/libtiff/tiff-4.4.0.tar.gz apt install -y libgif-dev https://sourceforge.net/projects/giflib/files/latest/download wget -c https://onboardcloud.dl.sourceforge.net/project/giflib/giflib-5.2.1.tar.gz
0x02 工具命令浅析 cwebp 命令 - 转换 webp 图片格式 语法参数: 1 2 3 4 5 6 7 8 9 10 11 12 13 14 15 16 17 18 19 20 21 22 23 24 25 26 27 28 29 30 31 32 33 34 35 36 37 38 39 40 41 42 43 44 45 46 47 48 49 50 51 52 53 54 55 56 57 58 59 60 61 cwebp [-preset <...>] [options] in_file [-o out_file] -q <float > ............. quality factor (0:small..100:big), default=75 -alpha_q <int> ......... transparency-compression quality (0..100), default=100 -preset <string> ....... preset setting, one of: default, photo, picture, drawing, icon, text -preset must come first, as it overwrites other parameters -z <int> ............... activates lossless preset with given level in [0:fast, ..., 9:slowest] -m <int> ............... compression method (0=fast, 6=slowest), default=4 -segments <int> ........ number of segments to use (1..4), default=4 -size <int> ............ target size (in bytes) -psnr <float > .......... target PSNR (in dB. typically: 42) -s <int> <int> ......... input size (width x height) for YUV -sns <int> ............. spatial noise shaping (0:off, 100:max), default=50 -f <int> ............... filter strength (0=off..100), default=60 -sharpness <int> ....... filter sharpness (0:most .. 7:least sharp), default=0 -strong ................ use strong filter instead of simple (default) -nostrong .............. use simple filter instead of strong -sharp_yuv ............. use sharper (and slower) RGB->YUV conversion -partition_limit <int> . limit quality to fit the 512k limit on the first partition (0=no degradation ... 100=full) -pass <int> ............ analysis pass number (1..10) -qrange <min> <max> .... specifies the permissible quality range(default: 0 100) -crop <x> <y> <w> <h> .. crop picture with the given rectangle -resize <w> <h> ........ resize picture (*after* any cropping) -mt .................... use multi-threading if available -low_memory ............ reduce memory usage (slower encoding) -map <int> ............. print map of extra info -print_psnr ............ prints averaged PSNR distortion -print_ssim ............ prints averaged SSIM distortion -print_lsim ............ prints local -similarity distortion -d <file.pgm> .......... dump the compressed output (PGM file) -alpha_method <int> .... transparency-compression method (0..1), default=1 -alpha_filter <string> . predictive filtering for alpha plane,one of: none, fast (default) or best -exact ................. preserve RGB values in transparent area, default=off -blend_alpha <hex> ..... blend colors against background color expressed as RGB values written in hexadecimal, e.g. 0xc0e0d0 for red=0xc0 green=0xe0 and blue=0xd0 -noalpha ............... discard any transparency information -lossless .............. encode image losslessly, default=off -near_lossless <int> ... use near-lossless image preprocessing (0..100=off), default=100 -hint <string> ......... specify image characteristics hint,one of: photo, picture or graph -metadata <string> ..... comma separated list of metadata tocopy from the input to the output if present. Valid values: all, none (default), exif, icc, xmp -short ................. condense printed message -quiet ................. don\'t print anything -version ............... print version number and exit -noasm ................. disable all assembly optimizations -v ..................... verbose, e.g. print encoding/decoding times -progress .............. report encoding progress Experimental Options: -jpeg_like ............. roughly match expected JPEG size -af .................... auto-adjust filter strength -pre <int> ............. pre-processing filter
实践案例:
1 2 3 4 5 6 7 8 9 10 11 12 13 14 15 16 17 18 19 20 21 22 23 24 25 26 27 28 29 30 31 32 33 34 35 36 37 38 39 40 41 42 43 44 45 46 47 48 49 50 51 52 53 $ cwebp -o picture.webp -- picture.png $ cwebp -q 80 image.png -o image.webp $ cwebp -sns 70 -f 50 -size 60000 image.png -o image.webp $ cwebp -lossless wechat-search.png -o image_lossless.webp $ cwebp -resize 216 100 wechat-search.png -o image_resize.webp for i in $(find /tmp -name *.png; do png_suffix=${i/.png/.webp} ; /usr/local /bin/cwebp -q 80 $i -o ${png_suffix/image/convert} ; done for i in $(find /tmp -name *.png -o -name *.jpg -o -name *.jpeg -o -name *.tiff); do img_pathname=${i%%.*} ; /usr/local /bin/cwebp -short -q 80 $i -o ${img_pathname/image/convert} .webp ; done $ tree . . ├── convert │ ├── 1.webp │ └── 2.webp └── image ├── 1.jpg └── 2.png
dwebp 命令 - 将webp格式转换为png格式(解码) 语法参数: 1 2 3 4 5 6 7 8 9 10 11 12 13 14 15 16 17 18 19 20 21 22 23 24 25 Usage: dwebp in_file [options] [-o out_file] -pam ......... save the raw RGBA samples as a color PAM -ppm ......... save the raw RGB samples as a color PPM -bmp ......... save as uncompressed BMP format -tiff ........ save as uncompressed TIFF format -pgm ......... save the raw YUV samples as a grayscale PGM file with IMC4 layout -yuv ......... save the raw YUV samples in flat layout Other options are: -version ..... print version number and exit -nofancy ..... don't use the fancy YUV420 upscaler -nofilter .... disable in-loop filtering -nodither .... disable dithering -dither <d> .. dithering strength (in 0..100) # 抖动强度(0..100) -alpha_dither use alpha-plane dithering if needed # 如果需要,使用alpha平面抖动 -mt .......... use multi-threading # 使用多线程 -crop <x> <y> <w> <h> ... crop output with the given rectangle # 使用给定矩形裁剪输出 -resize <w> <h> ......... resize output (*after* any cropping) # 尺寸大小 -flip ........ flip the output vertically # 垂直翻转输出 -alpha ....... only save the alpha plane # 仅保存alpha平面 -incremental . use incremental decoding (useful for tests) -v ........... verbose (e.g. print encoding/decoding times) -quiet ....... quiet mode, don' t print anything -noasm ....... disable all assembly optimizations
简单示例:
1 2 3 4 5 6 7 8 9 10 11 12 dwebp image.webp -o image.png dwebp image.webp -flip -o image.png dwebp picture.webp -ppm -o output.ppm dwebp -o output.ppm -- ---picture.webp
gif2webp 命令 - 将gif格式图片转换为webp格式 语法参数: 1 2 3 4 5 6 7 8 9 10 11 12 13 14 15 16 17 18 gif2webp [options] gif_file -o webp_file -h / -help ............. this help -lossy ................. encode image using lossy compression -mixed ................. 混合压缩模式:通过启发式选择每帧的有损或无损压缩来优化图像的压缩。此全局选项禁用本地选项和 -lossy、lossless。 -q <float > ............. quality factor (0:small..100:big) -m <int> ............... compression method (0=fast, 6=slowest) -min_size .............. 对图像进行编码以实现最小尺寸。这将禁用关键帧插入并选取参数,从而获得每个帧的最小输出。默认情况下,它使用无损压缩,但可以与-q、-m、-lossy、-mixed选项组合使用。 -kmin <int> ............ -kmax <int> ............ 指定输出动画中连续关键帧(可独立解码帧)之间的最小和最大距离。该工具将根据需要将一些关键帧插入到输出动画中,以便满足此条件。 -f <int> ............... filter strength (0=off..100) -metadata <string> ..... comma separated list of metadata to copy from the input to the output if present Valid values: all, none, icc, xmp (default) -loop_compatibility .... 指定动画应循环的次数,使用0意味着“无限期循环” -mt .................... use multi-threading if available -version ............... print version number and exit -v ..................... verbose -quiet ................. don't print anything
简单实例: 1 2 3 4 5 6 7 gif2webp picture.gif -o picture.webp gif2webp -q 70 picture.gif -o picture.webp gif2webp -lossy -m 3 picture.gif -o picture_lossy.webp gif2webp -lossy -f 50 picture.gif -o picture.webp gif2webp -min_size -q 30 -o picture.webp -- ---picture.gif cat picture.gif | gif2webp -o - -- - > output.webp
img2webp 命令 - 从一系列输入图像创建动画WebP文件。 语法参数 1 2 3 4 5 6 7 8 9 10 11 12 13 14 15 16 img2webp [file_options] [[frame_options] frame_file]... -o string :指定输出 WebP 文件的名称。 -min_size : 对图像进行编码以实现最小尺寸 -kmin int -kmax int :指定输出动画中连续关键帧(可独立解码帧)之间的最小和最大距离。 -mixed:混合压缩模式:通过启发式选择每帧的有损或无损压缩来优化图像的压缩。 -loop int :指定动画应循环的次数,使用0意味着“无限期循环”。 -d int 以毫秒为单位指定图像持续时间。 -lossless, -lossy 使用无损或有损压缩模式压缩下一个图像。默认模式为无损。 -q float 指定介于 0 和 100 之间的压缩因子。默认值为 75。 -m int 指定要使用的压缩方法。此参数控制编码速度与压缩文件大小和质量之间的权衡。可能的值范围为 0 到 6。默认值为 4。
TIPS: 其支持的输入格式为 WebP, JPEG, PNG, PNM (PGM, PPM, PAM), TIFF.
简单实例: 1 2 img2webp -loop 2 in0.png -lossy in1.jpg -d 80 in2.tiff -o out.webp
webpmux 命令 - 从非动画WebP图像中创建动画WebP文件 描述: 从非动画WebP图像中创建动画WebP文件,从动画WebP图片中提取帧,以及管理XMP/EXIF元数据和ICC配置文件。
语法参数: 1 2 3 4 5 6 7 8 9 10 11 12 13 14 15 16 17 18 19 20 21 22 23 24 25 webpmux -get GET_OPTIONS INPUT -o OUTPUT webpmux -set SET_OPTIONS INPUT -o OUTPUT webpmux -strip STRIP_OPTIONS INPUT -o OUTPUT webpmux -frame FRAME_OPTIONS [ -frame ... ] [ -loop LOOP_COUNT ] [ -bgcolor BACKGROUND_COLOR ] -o OUTPUT webpmux -duration DURATION OPTIONS [ -duration ... ] INPUT -o OUTPUT webpmux -info INPUT icc Get ICC profile. exif Get EXIF metadata. xmp Get XMP metadata. frame n Get nth frame from an animated image. (n = 0 has a special meaning: last frame). loop loop_count : Set loop count on an animated file. bgcolor A,R,G,B : Set the background color of the canvas on an animated file. icc file.icc : Set ICC profile. exif file.exif : Set EXIF metadata. xmp file.xmp : Set XMP metadata.
示例演示: 1 2 webpmux -get exif test.webp -o test.webp.txt webpmux -get frame 0 test.webp -o test.webp.txt
webpinfo 命令 - 打印出WebP文件的块级结构以及基本的完整性检查。 语法参数: 1 2 3 4 5 6 7 Usage: webpinfo [options] in_files Options: -version ........... Print version number and exit . -quiet ............. Do not show chunk parsing information. -diag .............. Show parsing error diagnosis.(显示分析错误诊断) -summary ........... Show chunk stats summary.(显示块统计信息摘要) -bitstream_info .... Parse bitstream header.(解析位流头)
使用案例:
1 2 3 4 5 6 7 8 9 10 11 12 13 14 15 16 17 18 19 20 21 22 23 24 25 26 27 28 29 30 31 32 33 34 35 36 37 38 39 40 41 42 43 44 45 46 47 48 49 50 51 52 53 54 55 56 57 58 59 $ webpinfo -diag -summary wechat-search.webp File: wechat-search.webp RIFF HEADER: File size: 11298 Chunk VP8 at offset 12, length 11286 Width: 438 Height: 200 Alpha: 0 Animation: 0 Format: Lossy (1) Summary: Number of frames: 1 Chunk type : VP8 VP8L VP8X ALPH ANIM ANMF(VP8 /VP8L/ALPH) ICCP EXIF XMP Chunk counts: 1 0 0 0 0 0 0 0 0 0 0 0 No error detected. $ webpinfo -bitstream_info input_file_1.webp input_file_2.webp File: input_file_1.webp RIFF HEADER: File size: 11076 Chunk VP8 at offset 12, length 11064 Width: 493 Height: 424 Alpha: 0 Animation: 0 Format: Lossy (1) Parsing lossy bitstream... Key frame: Yes Profile: 0 Display: Yes Part. 0 length: 1619 Width: 493 X scale: 0 Height: 424 Y scale: 0 Color space: 0 Clamp type : 0 Use segment: 1 Update map: 1 Update data: 1 Absolute delta: 1 Quantizer: 27 27 23 17 Filter strength: 8 6 5 2 Prob segment: 35 55 40 Simple filter: 0 Level: 8 Sharpness: 0 Use lf delta: 0 Total partitions: 1 Base Q: 27 DQ Y1 DC: 0 DQ Y2 DC: 0 DQ Y2 AC: 0 DQ UV DC: -2 DQ UV AC: -3 File: input_file_2.webp .....
vwebp 命令 - 解压缩WebP文件并将其显示在窗口中 语法参数: 1 2 3 4 5 6 7 8 9 10 11 12 13 14 15 16 17 18 19 vwebp [options] input_file.webp -version ..... print version number and exit -noicc ....... don't use the icc profile if present -nofancy ..... don' t use the fancy YUV420 upscaler -nofilter .... disable in -loop filtering -dither <int> dithering strength (0..100), default=50 -noalphadither disable alpha plane dithering -usebgcolor .. display background color -mt .......... use multi-threading -info ........ print info -h ........... this help message 'c' ................ toggle use of color profile 'b' ................ toggle background color display 'i' ................ overlay file information 'd' ................ disable blending & disposal (debug) 'q' / 'Q' / ESC .... quit
使用示例: 1 2 3 vwebp picture.webp vwebp picture.webp -mt -dither 0 vwebp -- ---picture.webp
0x03 企业实践 1.请求访问Nginx服务器中承载的不同分辨率WebP格式图片。 描述: 在请求中指定图片分辨率大小,如何让Nginx识别指定的分辨率值并返回指定分辨率大小的webp图形资源。
答案当然可以从下述文章实践中找到答案,此前我们需要确定源代码编译nginx参数中是否启用了--with-http_image_filter_module该模块,如果没有启动则需要重新构建Nginx,具体操作如下所示。nginx -V 验证该其configure arguments:中是否存在http_image_filter模块。
温馨提示: 进行 Nginx 的源代码编译安装步骤流程可以参考我前面此篇文章【 https://blog.weiyigeek.top/2022/7-2-676.html 】 或者【 https://mp.weixin.qq.com/s/u-zb-BxG6VyaLY4EQLKlOQ 】直达。
此处演示在已安装Nginx环境下使用--with-http_image_filter_module参数生成模块动态链接库,当然你也可直接编译进nginx,不过笔者还是推荐前者。
1 2 3 ./configure --help | grep "image_filter_module" --with-http_image_filter_module --with-http_image_filter_module=dynamic
实践流程:
Step 1.实践项目web准备,此处采用我的主页作为展示,首先从gitee中拉取weiyigeek主页项目到本地/app/html/目录中.
1 2 mkdir /app/html/ && cd /app/html/ git clone --depth=1 https://gitee.com/WeiyiGeek/weiyigeek.git
Step 2.获取当前Nginx配置编译参数,并添加http_image_filter模块为动态链接。
1 2 3 4 5 6 7 8 nginx -V cd /usr/local /src/nginx-1.22.0./configure --prefix=/usr/local /nginx --user=nginx --group=nginx --with-pcre=../pcre-8.45 --with-zlib=../zlib-1.2.12 --with-openssl=../openssl-1.1.1q --sbin-path=/usr/sbin/nginx --conf-path=/usr/local /nginx/nginx.conf --pid-path=/usr/local /nginx/nginx.pid --error-log-path=/var/log /nginx/error.log --http-log-path=/var/log /nginx/access.log --lock-path=/var/run/nginx.lock --modules-path=/usr/local /nginx/modules --http-client-body-temp-path=/var/cache/nginx/client_temp --http-proxy-temp-path=/var/cache/nginx/proxy_temp --http-fastcgi-temp-path=/var/cache/nginx/fastcgi_temp --http-uwsgi-temp-path=/var/cache/nginx/uwsgi_temp --http-scgi-temp-path=/var/cache/nginx/scgi_temp --with-threads --with-http_sub_module --with-http_v2_module --with-http_auth_request_module --with-http_realip_module --with-http_secure_link_module --with-http_gunzip_module --with-http_gzip_static_module --with-http_ssl_module --with-http_slice_module --with-http_stub_status_module --with-http_dav_module --with-http_flv_module --with-http_mp4_module --with-stream --with-stream_realip_module --with-stream_ssl_module --with-stream_ssl_preread_module --with-stream_geoip_module --with-mail --with-mail_ssl_module --with-http_addition_module --with-http_random_index_module --with-compat --with-file-aio --with-cc-opt='-Os -fomit-frame-pointer -g' --with-ld-opt=-Wl,-rpath,/usr/local /luajit/lib,--as-needed,-O1,--sort-common --add-module=/usr/local /src/ngx_devel_kit-0.3.1 --add-module=/usr/local /src/lua-nginx-module-0.10.21 --add-dynamic-module=/usr/local /src/echo -nginx-module-0.62 --add-dynamic-module=/usr/local /src/ngx_http_geoip2_module-3.4 --with-http_image_filter_module=dynamic make
温馨提示: 当编译 Nginx 时报checking for LuaJIT 2.x ... not found, ./configure: error: unsupported LuaJIT version; ngx_http_lua_module requires LuaJIT 2.x. 错误时的解决办法。
问题描述: tell nginx’s build system where to find LuaJIT 2.11 2 3 export LUAJIT_LIB=/usr/local /luajit/libexport LUAJIT_INC=/usr/local /luajit/include/luajit-2.1
温馨提示: 如出现GD库没有部署即./configure: error: the HTTP image filter module requires the GD library. You can either do not enable the module or install the libraries.提示可以按照如下方式进行解决。1 apt-get install -y libgd-dev
Step 3.当执行make命令后你会发现在objs目录中生成了ngx_http_image_filter_module.so,此处我们需要将生成nginx二进制文件复制到/usr/sbin目录,并将动态链接库放入的modules目录中。
1 2 3 root@weiyigeek:/usr/local /src/nginx-1.22.0 root@weiyigeek:/usr/local /src/nginx-1.22.0 root@weiyigeek:/usr/local /src/nginx-1.22.0
Step 4.加载ngx_http_image_filter_module模块到nginx,并在demo.conf配置一个简单示例。1 2 3 4 5 6 7 8 9 10 11 12 13 14 15 16 17 18 19 20 21 22 23 24 25 26 27 28 29 30 31 32 33 34 35 36 37 38 39 40 $ vim /usr/local /nginx/nginx.conf ... load_module modules/ngx_http_image_filter_module.so; ... $ tee /usr/local /nginx/conf.d/demo.conf <<'EOF' server { listen 80; server_name demo.weiyigeek.top; charset utf-8; access_log /var/log /nginx/demo-access.log main buffer=128k flush=1m; location / { root /app/html/weiyigeek; index index.html index.htm; } location ~* /img/(.+)_(\d+)x(\d+)\.(jpg|jpeg|gif|png|webp)$ { try_files /$1 .$4 /404.png; set $width $2 ; set $height $3 ; image_filter resize $width $height ; image_filter_buffer 5M; image_filter_interlace on; image_filter_jpeg_quality 80; expires 1d; add_header 'Access-Control-Allow-Origin' '*' ; add_header 'Access-Control-Allow-Credentials' 'true' ; add_header 'Image-Filter' "Name $1 .$4 ,$width x $height " ; alias /app/html/weiyigeek/img; } } EOF --- [^libwebp]: WebpAPI帮助文档 https://developers.google.com/speed/webp/docs/api [^cwebp]: cwebp帮助文档 https://developers.google.com/speed/webp/docs/cwebp [^dwebp]: dwebp帮助文档 https://developers.google.com/speed/webp/docs/dwebp
温馨提示: root 指令与alias 指令的区别,root 可以让访问 /images/ 路径时,访问到 /User/WeiyiGeek/Desktop/images,若是将 root 替换为 alias,则访问的是 /User/WeiyiGeek/Desktop/;其中 /User/WeiyiGeek/Desktop/ 是本机中的绝对路径。
温馨提示: 上述image_filter配置简单解析位于location上下文中,该模块 (0.7.54+) 是一个过滤器,用于转换 JPEG、GIF、PNG 和 WebP 格式的图像,其模块 Module ngx_http_image_filter_module 文档参考(nginx.org) .
1 2 3 4 5 6 7 8 9 10 11 12 13 14 15 16 17 18 19 20 21 22 23 image_filter off; image_filter test ; image_filter size; image_filter rotate 90 | 180 | 270; image_filter resize width height; image_filter crop width height; image_filter_buffer size; image_filter_interlace on | off; image_filter_jpeg_quality quality; image_filter_webp_quality quality; image_filter_sharpen percent; image_filter_transparency on|off;
温馨提示: 此模块需要依赖与libgd 库,建议使用最新的可用版本的库。
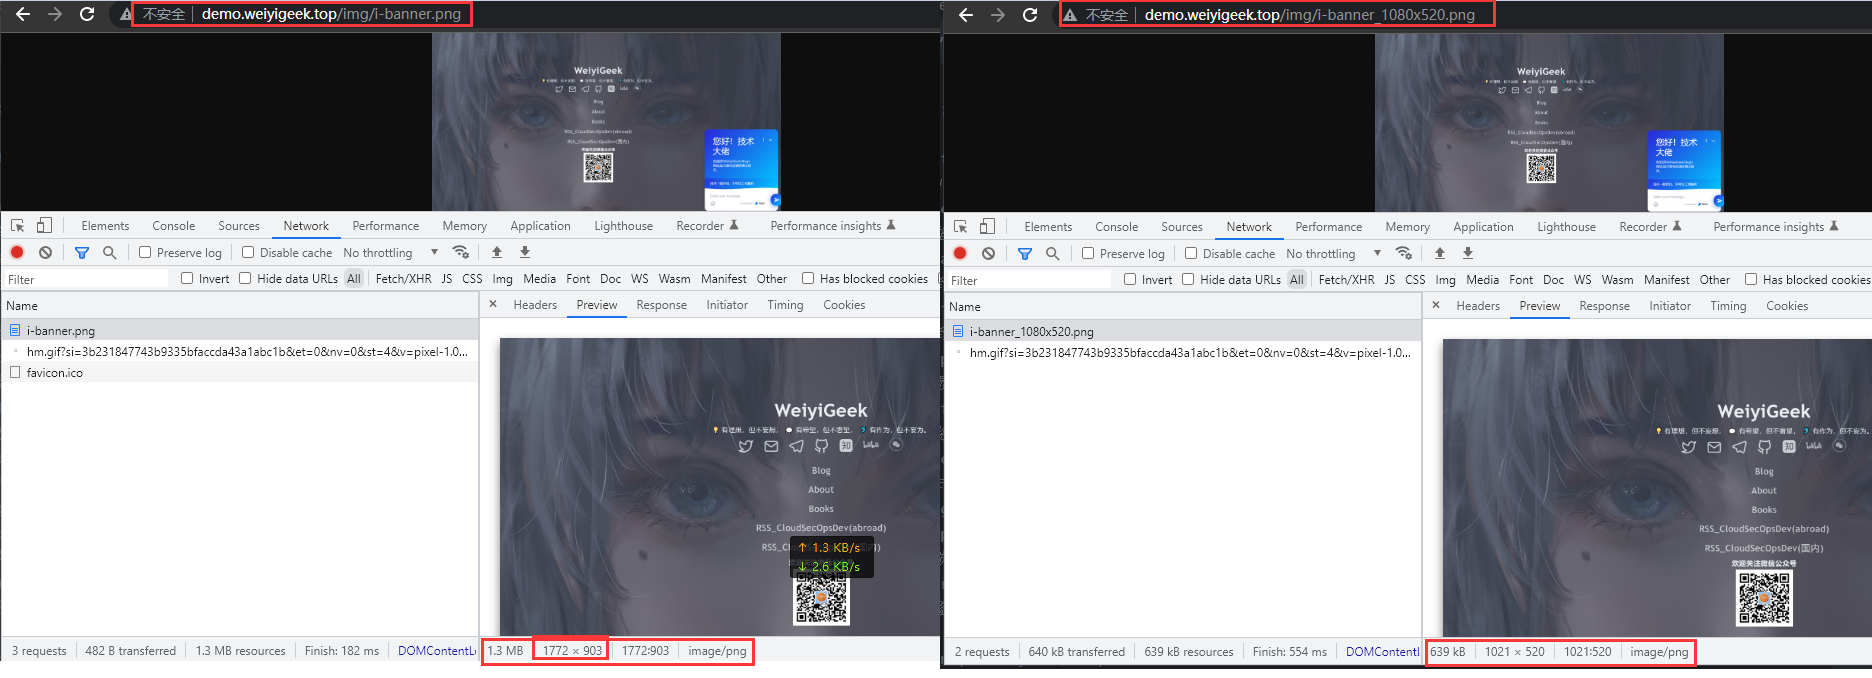
Step 5.配置检查与重载Nginx服务进程 nginx -t && nginx -s reload, 然后通过浏览器分别访问验证 http://demo.weiyigeek.top/img/i-banner.png 与 http://demo.weiyigeek.top/img/i-banner_1080x520.png ,查看其图片尺寸是否有变化,结果如下图所示。
1 2 $ ls /app/html/weiyigeek/img/ alipay.jpg bg.jpg bg.png i-banner.png wechat-gzh.jpg wechat-scan.png wechat-search.png wechat-search-white.png weiyigeek.jpg weiyigeek.png
weiyigeek.top-image_filter resize png
Step 6.在步骤五的实践中你会发现虽然在进行图片过滤器时设置了图像质量,从原图的1.3MB到现在的639KB,但是是否还是感觉此图片体积稍大,此时我们便可请出本章主人公webp转换工具cwebp,将png图片图片转换为webp格式图片。
1 2 3 4 5 6 7 8 9 10 11 12 13 14 15 16 17 18 19 $ cwebp -q 80 i-banner.png -o i-banner.webp Saving file 'i-banner.webp' File: i-banner.png Dimension: 1772 x 903 Output: 61096 bytes Y-U-V-All-PSNR 45.57 49.64 49.89 46.57 dB (0.31 bpp) block count: intra4: 2308 (36.48%) intra16: 4019 (63.52%) skipped: 1469 (23.22%) bytes used: header: 499 (0.8%) mode-partition: 10154 (16.6%) Residuals bytes |segment 1|segment 2|segment 3|segment 4| total macroblocks: | 1%| 4%| 10%| 85%| 6327 quantizer: | 27 | 27 | 23 | 18 | filter level: | 8 | 5 | 25 | 21 | $ ls -lah i-banner.* -rw-r--r-- 1 root root 1.3M Aug 8 15:00 i-banner.png -rw-r--r-- 1 root root 60K Aug 8 23:07 i-banner.webp
在设置质量为80后,转换后你会发现体积从1.3M一下就降到了60kb,可以看到其体积极大优化了在互联网上传播速度。
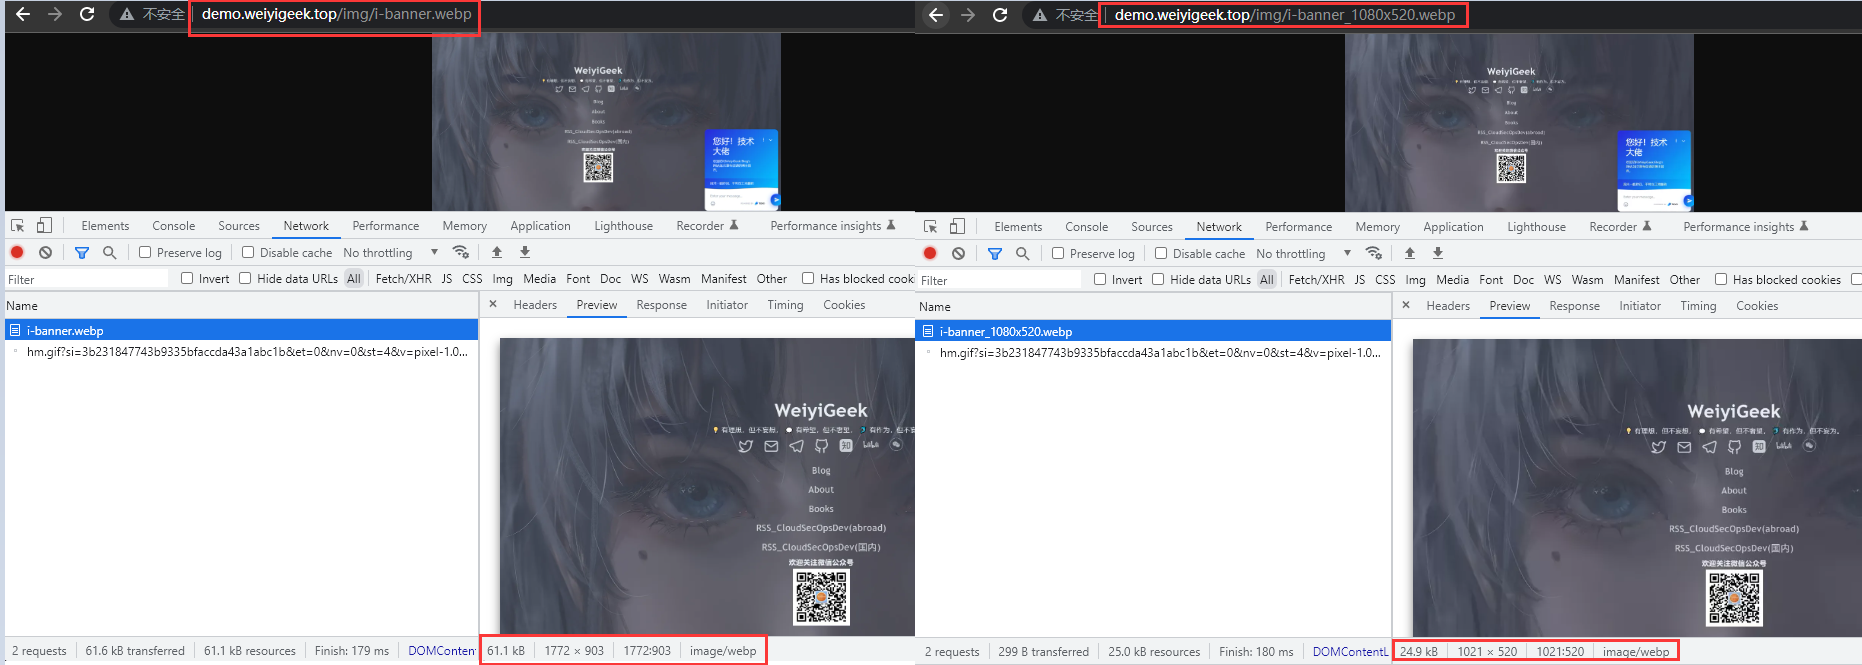
Step 7.同样图片过滤器也可以处理webp格式的图形文件,这一点模块官网已经说明,我们直接使用上述转换后的i-banner.webp图形进行验证,同样分别访问 http://demo.weiyigeek.top/img/i-banner.webp 与 http://demo.weiyigeek.top/img/i-banner_1080x520.webp, 查看其图片尺寸是否有变化,结果如下图所示。
weiyigeek.top-image_filter resize web
从上图中可以看出原始的webp的图形大小的尺寸为 1772x903 大小为 61kb,而经过图片过滤器后按照其纵横比设置为了 1021x520 其大小也降为 24.9 kb。


