[TOC]
0x00 Gitalk - 基于Github的评论系统 描述: 我想对于所有使用hexo、Hugo或者WordPress自建博客的博主来说GitTalk应该不陌生,GitTalk通过Github的OpenAPI以及issues功能实现社区评论确实还是很方便的,除开对国内访问速度较慢就没啥毛病,但是考虑到新手朋友此处还是简单介绍一下。
1.快速介绍 描述: Gitalk 是一个基于 Github Issue 和 Preact 的现代评论组件。
使用 github 帐号进行身份验证
无服务器,所有评论将存储为 github 问题
个人和组织的github项目都可以用来存储评论
本地化,支持多国语言 [en, zh-CN, zh-TW, es-ES, fr, ru, de, pl, ko, fa, ja]
类似 Facebook 的无干扰模式(可以通过 DistentionFreeMode 选项启用)
热键提交评论(cmd|ctrl + enter)
项目地址:https://github.com/gitalk/gitalk https://github.com/gitalk/gitalk/blob/master/readme-cn.md
温馨提示: 当前 Gitalk 最新版本为 1.7.2 (Mar 3, 2021), 如后续随着时间推移,可能会有些许变化,建议参考官网(https://github.com/gitalk/gitalk/tags)
2.安装部署 描述:安装引用Gitalk评论系统的两种方式,
安装实践
方式1.在你的HTML页面中使用 link 与 script 标签引入。
1 2 3 4 5 6 7 <link rel ="stylesheet" href ="https://cdn.jsdelivr.net/npm/gitalk@1/dist/gitalk.css" > <script src ="https://cdn.jsdelivr.net/npm/gitalk@1/dist/gitalk.min.js" > </script > <link rel ="stylesheet" href ="https://unpkg.com/gitalk/dist/gitalk.css" > <script src ="https://unpkg.com/gitalk/dist/gitalk.min.js" > </script >
1 2 3 4 5 6 npm i --save gitalk import 'gitalk/dist/gitalk.css' import Gitalk from 'gitalk'
配置实践
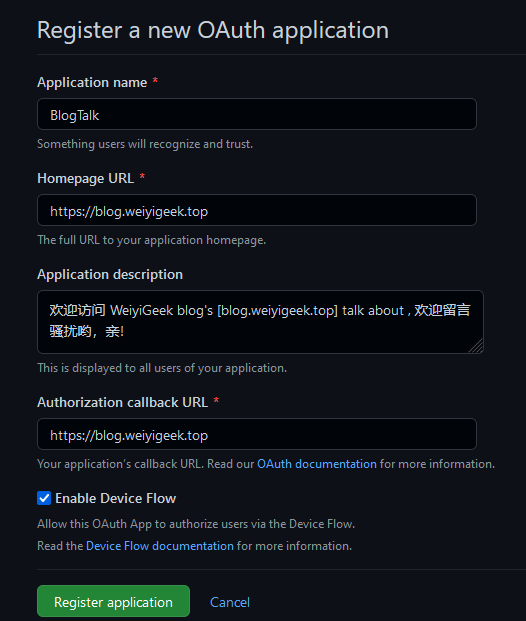
首先,您需要为商店评论选择一个公共 github 存储库(已存在或创建一个新存储库),然后创建一个 GitHub 应用程序,如果你没有,点击这里 (https://github.com/settings/applications/new ) 注册一个新的。
1
2
3
4
Application name : BlogTalk Homepage URL : https://blog.weiyigeek.top Application description : 欢迎访问 WeiyiGeek blog\'s [blog.weiyigeek.top] talk about , 欢迎留言骚扰哟,亲! Authorization callback URL : https://blog.weiyigeek.top
weiyigeek.top-Register a new OAuth application
注意:您必须在授权回调 URL 字段中指定网站域 url。
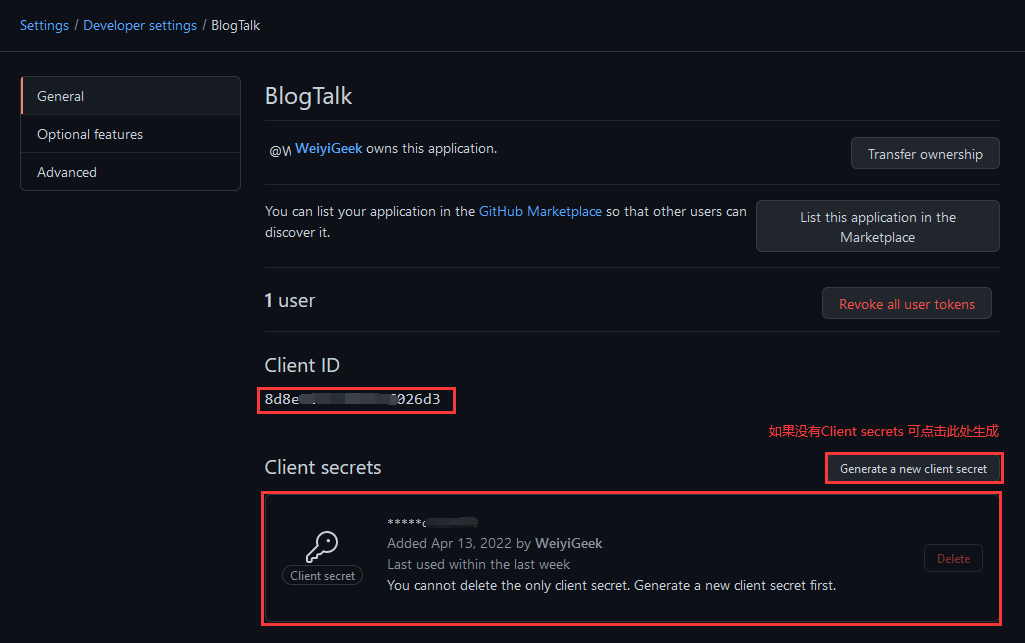
然后,创建完成后你将获取Client ID 与 Client Secret,如下所示:
weiyigeek.top-application ID and Secret
注意:后续更新修改可以进行访问 Settings/Developer settings ( https://github.com/settings/developers )
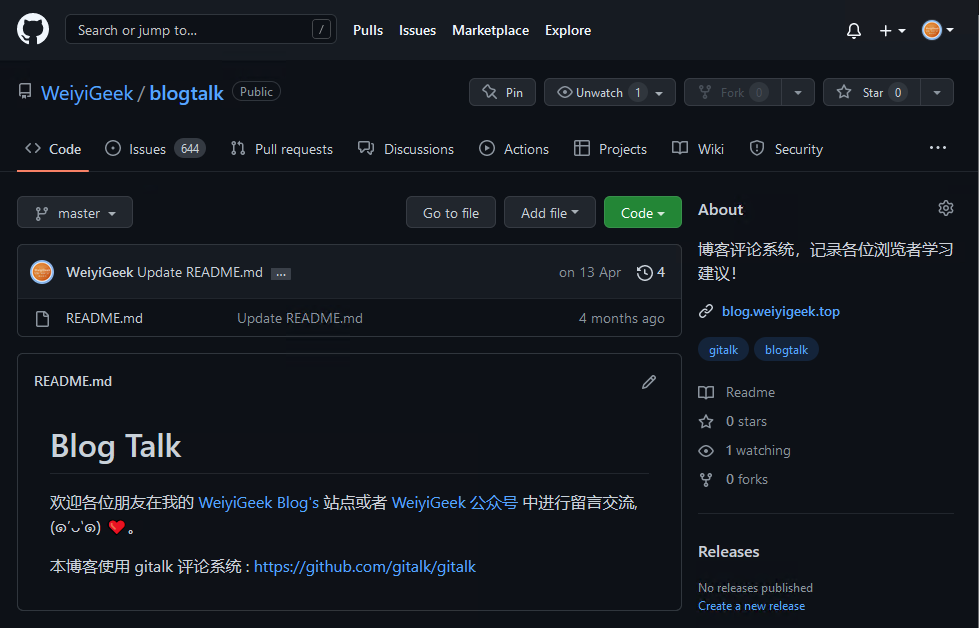
最后,创建一个公共仓库此处我创建的是blogtalk ,创建完后在项目的(https://github.com/WeiyiGeek/blogtalk/settings)中启用 issue 即可
weiyigeek.top-blogtalk
使用方式1.将如下代码添加到您的页面: 1 2 3 4 5 6 7 8 9 10 11 12 13 14 15 16 17 18 19 <head > <link rel ="stylesheet" href ="https://cdn.jsdelivr.net/npm/gitalk@1/dist/gitalk.css" > <script src ="https://cdn.jsdelivr.net/npm/gitalk@1/dist/gitalk.min.js" > </script > </head > <body > <div id ="gitalk-container" > </div > <script > const gitalk = new Gitalk({ clientID: 'GitHub Application Client ID' , clientSecret: 'GitHub Application Client Secret' , repo: 'GitHub repo' , owner: 'GitHub repo owner' , admin: ['GitHub repo owner and collaborators, only these guys can initialize github issues' ], id: location.pathname, distractionFreeMode: false }) gitalk.render('gitalk-container' ) </script > </body >
使用方式2.在React中使用 1 2 3 4 5 6 7 import GitalkComponent from "gitalk/dist/gitalk-component" ;<GitalkComponent options={{ clientID: "..." , }} />
温馨提示: Gitalk 对象实例化参数参考 (https://github.com/gitalk/gitalk#options )
3.使用实践 在 Hexo 中使用 https://blog.weiyigeek.top] 为例进行演示配置,此处笔者使用的是 hexo + mellow 主题 , 已经经过二次魔改(有需要该博客主题请在公众号回复【mellow博客主题】或者访问 https://weiyigeek.top/wechat.html?key=mellow博客主题 )。
Step 1.在 Hexo 主题中的 _config.yaml 配置加入如下配置片段。
1 2 3 4 5 6 7 8 9 10 gitalk: enable: true owner: WeiyiGeek repo: blogtalk proxy: /github/login/oauth/access_token oauth: client_id: 8 d8e965c******97026d3 client_secret: e9c6141cb1f02f721********d01cb4d7a8f069 perPage: 15
1 2 3 4 5 6 7 8 9 10 11 12 13 14 15 16 17 18 19 20 21 22 23 24 25 26 27 28 29 30 31 <div id ="gitalk-container" > </div > <script type ="text/javascript" src ="<%- url_for(theme_js('/js/plugins/gitalk.min', cache)) %>" > </script > <script type ="text/javascript" src ="<%- url_for(theme_js('/js/custom/gitalk.init', cache)) %>" > </script > var gitalk = new Gitalk({ clientID: '<%- theme.gitalk.oauth.client_id %> ', clientSecret: '<%- theme.gitalk.oauth.client_secret %> ', repo: '<%- theme.gitalk.repo %> ', owner: '<%- theme.gitalk.owner %> ', admin: ['<%- theme.gitalk.owner %> '], id: location.pathname, proxy: '<%- theme.gitalk.proxy %> ', distractionFreeMode: true }) # hexo g 生成静态文件后的样子 # var gitalk = new Gitalk({ # clientID: '8d8e965c******97026d3', # clientSecret: 'e9c6141cb1f02f721********d01cb4d7a8f069', # repo: 'blogtalk', # owner: 'WeiyiGeek', # admin: ['WeiyiGeek'], # id: location.pathname, # proxy: '/github/login/oauth/access_token', # distractionFreeMode: false # }) # 创建 gitalk-container gitalk.render('gitalk-container')
温馨提示: 建议将distractionFreeMode设置为false,因为True真心难看。new Gitalk 实例化参数进行js加密混淆 (http://www.esjson.com/jsEncrypt.html )
n.入坑出坑 1.使用Gitalk进行Github的Oauth认证无法跨域获取Token问题解决办法 描述: 在最开始之初我们也是使用官方演示代码中,使用的第三方提供的CORS代理服务,他会默认放行所有CORS请求,但是随着而来的问题是登陆会出现网络错误 Error: Network Error 或者在使用时出现 Forbidden 错误 (https://github.com/gitalk/gitalk/issues/514 ) 。
目前由于该CORS代理服务遭到滥用,因此做了限制,导致GitTalk失效,在实践中发现如下CORS代理服务其要么有限制要么根本不能使用,所以实践的朋友们就不要像使用如下CORS代理服务:
1 2 3 4 https://cors-anywhere.herokuapp.com/https://github.com/login/oauth/access_token https://cors-anywhere.azm.workers.dev/https://github.com/login/oauth/access_token
温馨提示: CORS Anywhere 是一个 NodeJS 代理,它将 CORS 标头添加到代理请求中。 项目地址 (https://github.com/Rob--W/cors-anywhere )
在 百度 CSDN 中捡了一圈垃圾之后,还是没有最好的解决方案,然后通过某种方式Google了一下,找到两种替代的方式利用cloudflare worker (不幸得是默认的cf worker的域名workers.dev被墙了)或者 Vercel 搭建在线代理(无vps推荐使用Vercel) 或者 使用VPS中的nginx服务器来反代 https://github.com (比较推荐-当前博主正在使用)。
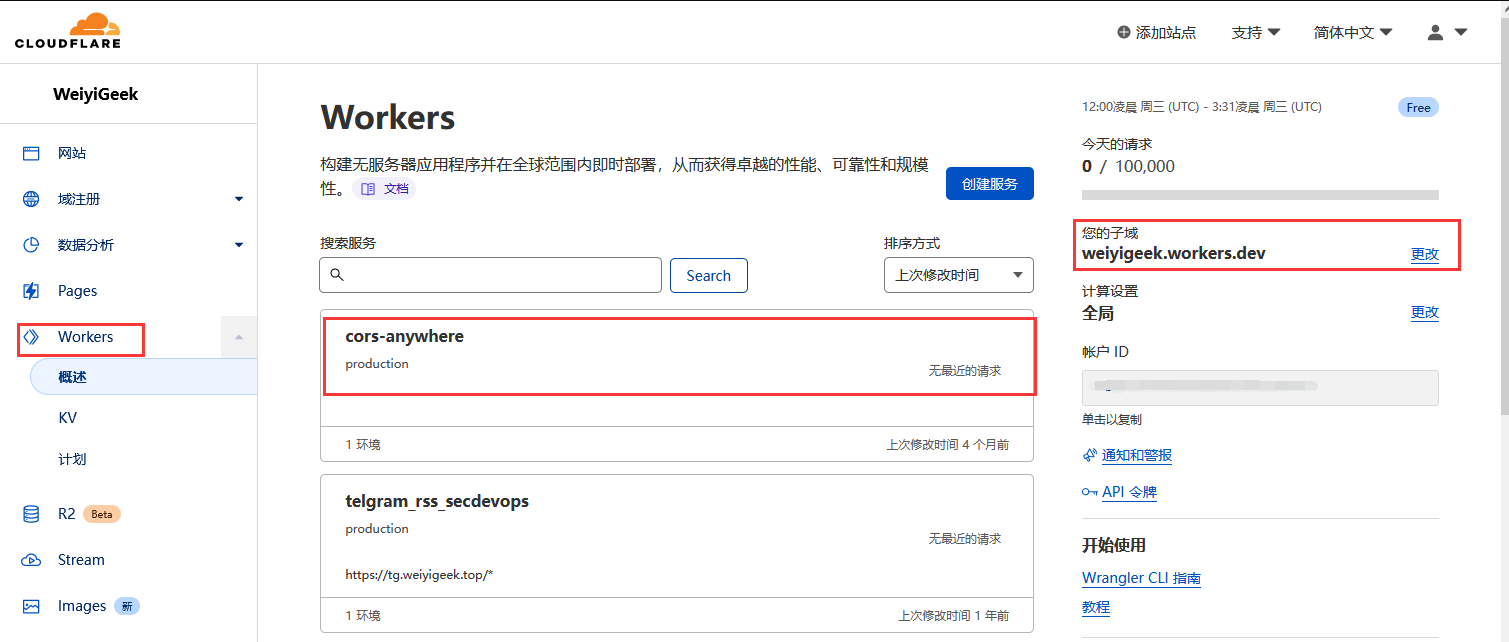
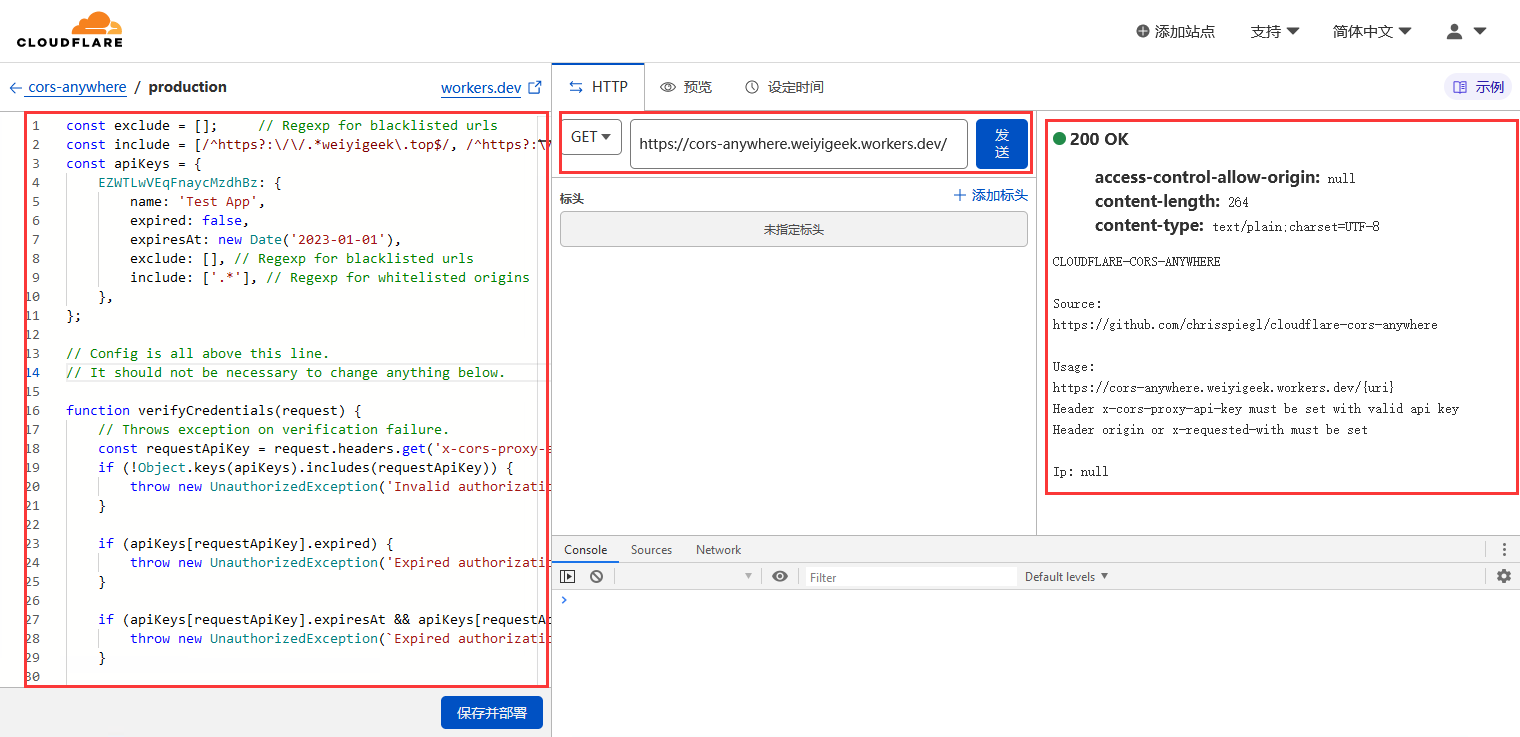
方式1.没有VPS或者自己的服务器(想白嫖的) https://dash.cloudflare.com/login/ ) 上创建一个免费的在线代理来解决gitalk授权登录跨域问题,利用CloudFlare Worker创建在线代理,不需要我们有服务器,也不需要搭建Node.js服务,只需要注册一个CloudFlare账号,创建一个Worker,部署一个JS脚本就可以了,简单方便,下面我们就来看看如何创建吧。
weiyigeek.top-cloudflare-cors-anywhere
创建好之后我们便可编辑其 Worker 服务代码,如下代码也可通过 https://github.com/WeiyiGeek/SecOpsDev/tree/master/Application/Blog/Hexo/Gitalk 获得。
1 2 3 4 5 6 7 8 9 10 11 12 13 14 15 16 17 18 19 20 21 22 23 24 25 26 27 28 29 30 31 32 33 34 35 36 37 38 39 40 41 42 43 44 45 46 47 48 49 50 51 52 53 54 55 56 57 58 59 60 61 62 63 64 65 66 67 68 69 70 71 72 73 74 75 76 77 78 79 80 81 82 83 84 85 86 87 88 89 90 91 92 93 94 95 96 97 98 99 100 101 102 103 104 105 106 107 108 109 110 111 112 113 114 115 116 117 118 119 120 121 122 123 124 125 126 127 128 129 130 131 132 133 134 135 136 137 138 139 140 141 142 143 144 145 146 147 148 149 150 151 152 153 154 155 156 157 158 159 160 161 162 163 164 165 166 167 168 169 170 171 172 173 174 175 176 177 178 179 180 181 182 183 184 185 186 187 188 189 190 191 192 193 194 195 196 197 198 199 200 201 202 203 204 205 206 207 208 209 210 211 212 213 214 215 216 217 218 219 220 221 222 223 224 225 226 227 228 229 230 231 232 233 234 235 236 237 238 239 240 241 242 243 244 245 246 247 248 249 250 251 252 253 254 255 256 257 258 259 260 261 262 263 264 265 266 267 268 269 270 271 272 273 274 275 276 277 278 279 280 281 282 283 284 285 286 287 288 289 290 291 const exclude = []; const include = [/^https?:\/\/.*weiyigeek\.top$/ , /^https?:\/\/localhost/]; const apiKeys = { EZWTLwVEqFnaycMzdhBz: { name: 'Test App' , expired: false , expiresAt: new Date ('2023-01-01' ), exclude: [], include: ["^http.?://www.weiyigeek.top$" , "weiyigeek.top$" , "^https?://localhost/" ], }, }; function verifyCredentials (request ) const requestApiKey = request.headers.get('x-cors-proxy-api-key' ); if (!Object .keys(apiKeys).includes(requestApiKey)) { throw new UnauthorizedException('Invalid authorization key.' ); } if (apiKeys[requestApiKey].expired) { throw new UnauthorizedException('Expired authorization key.' ); } if (apiKeys[requestApiKey].expiresAt && apiKeys[requestApiKey].expiresAt.getTime() < Date .now()) { throw new UnauthorizedException(`Expired authorization key.\nKey was valid until: ${apiKeys[requestApiKey].expiresAt} ` ); } return apiKeys[requestApiKey]; } function checkRequiredHeadersPresent (request ) if (!request.headers.get('Origin' ) && !request.headers.get('x-requested-with' )) { throw new BadRequestException('Missing required request header. Must specify one of: origin,x-requested-with' ); } } function UnauthorizedException (reason ) this .status = 401 ; this .statusText = 'Unauthorized' ; this .reason = reason; } function BadRequestException (reason ) this .status = 400 ; this .statusText = 'Bad Request' ; this .reason = reason; } function isListed (uri, listing ) let returnValue = false ; console .log(uri); if (typeof uri === 'string' ) { for (const m of listing) { if (uri.match(m) !== null ) { returnValue = true ; } } } else { returnValue = true ; } return returnValue; } function fix (myHeaders, request, isOPTIONS ) myHeaders.set('Access-Control-Allow-Origin' , request.headers.get('Origin' )); if (isOPTIONS) { myHeaders.set('Access-Control-Allow-Methods' , request.headers.get('access-control-request-method' )); const acrh = request.headers.get('access-control-request-headers' ); if (acrh) { myHeaders.set('Access-Control-Allow-Headers' , acrh); } myHeaders.delete('X-Content-Type-Options' ); } return myHeaders; } function parseURL (requestUrl ) const match = requestUrl.match(/^(?:(https?:)?\/\/)?(([^/?]+?)(?::(\d{0,5})(?=[/?]|$))?)([/?][\S\s]*|$)/i ); if (!match) { console .log('no match' ); throw new BadRequestException('Invalid URL for proxy request.' ); } console .log('parseURL:match:' , match); if (!match[1 ]) { console .log('nothing in match group 1' ); if (/^https?:/i .test(requestUrl)) { console .log('The pattern at top could mistakenly parse "http:///" as host="http:" and path=///.' ); throw new BadRequestException('Invalid URL for proxy request.' ); } if (requestUrl.lastIndexOf('//' , 0 ) === -1 ) { console .log('"//" is omitted' ); requestUrl = '//' + requestUrl; } requestUrl = (match[4 ] === '443' ? 'https:' : 'http:' ) + requestUrl; } const parsed = new URL(requestUrl); if (!parsed.hostname) { console .log('"http://:1/" and "http:/notenoughslashes" could end up here.' ); throw new BadRequestException('Invalid URL for proxy request.' ); } return parsed; } async function proxyRequest (request, activeApiKey ) const isOPTIONS = (request.method === 'OPTIONS' ); const originUrl = new URL(request.url); const origin = request.headers.get('Origin' ); const fetchUrl = parseURL(request.url.replace(originUrl.origin, '' ).slice(1 )); checkRequiredHeadersPresent(request); if (isListed(fetchUrl.toString(), [...exclude, ...(activeApiKey?.exclude || [])]) || !isListed(origin, [...include, ...(activeApiKey?.include || [])])) { throw new BadRequestException('Origin or Destination URL is not allowed.' ); } let corsHeaders = request.headers.get('x-cors-headers' ); if (corsHeaders !== null ) { try { corsHeaders = JSON .parse(corsHeaders); } catch {} } if (!originUrl.pathname.startsWith('/' )) { throw new BadRequestException('Pathname does not start with "/"' ); } const recvHpaireaders = {}; for (const pair of request.headers.entries()) { if ((pair[0 ].match('^origin' ) === null ) && (pair[0 ].match('eferer' ) === null ) && (pair[0 ].match('^cf-' ) === null ) && (pair[0 ].match('^x-forw' ) === null ) && (pair[0 ].match('^x-cors-headers' ) === null ) ) { recvHpaireaders[pair[0 ]] = pair[1 ]; } } if (corsHeaders !== null ) { for (const c of Object .entries(corsHeaders)) { recvHpaireaders[c[0 ]] = c[1 ]; } } const newRequest = new Request(request, { headers: recvHpaireaders, }); const response = await fetch(fetchUrl, newRequest); let myHeaders = new Headers(response.headers); const newCorsHeaders = []; const allh = {}; for (const pair of response.headers.entries()) { newCorsHeaders.push(pair[0 ]); allh[pair[0 ]] = pair[1 ]; } newCorsHeaders.push('cors-received-headers' ); myHeaders = fix(myHeaders, request, isOPTIONS); myHeaders.set('Access-Control-Expose-Headers' , newCorsHeaders.join(',' )); myHeaders.set('cors-received-headers' , JSON .stringify(allh)); const body = isOPTIONS ? null : await response.arrayBuffer(); return new Response(body, { headers: myHeaders, status: (isOPTIONS ? 200 : response.status), statusText: (isOPTIONS ? 'OK' : response.statusText), }); } function homeRequest (request ) const isOPTIONS = (request.method === 'OPTIONS' ); const originUrl = new URL(request.url); const origin = request.headers.get('Origin' ); const remIp = request.headers.get('CF-Connecting-IP' ); const corsHeaders = request.headers.get('x-cors-headers' ); let myHeaders = new Headers(); myHeaders = fix(myHeaders, request, isOPTIONS); let country = false ; let colo = false ; if (typeof request.cf !== 'undefined' ) { country = typeof request.cf.country === 'undefined' ? false : request.cf.country; colo = typeof request.cf.colo === 'undefined' ? false : request.cf.colo; } return new Response( 'CLOUDFLARE-CORS-ANYWHERE\n\n' + 'Source:\nhttps://github.com/chrisspiegl/cloudflare-cors-anywhere\n\n' + 'Usage:\n' + originUrl.origin + '/{uri}\n' + 'Header x-cors-proxy-api-key must be set with valid api key\n' + 'Header origin or x-requested-with must be set\n\n' + (origin === null ? '' : 'Origin: ' + origin + '\n' ) + 'Ip: ' + remIp + '\n' + (country ? 'Country: ' + country + '\n' : '' ) + (colo ? 'Datacenter: ' + colo + '\n' : '' ) + '\n' + ((corsHeaders === null ) ? '' : '\nx-cors-headers: ' + JSON .stringify(corsHeaders)), {status : 200 , headers : myHeaders}, ); } async function handleRequest (request ) const {protocol, pathname} = new URL(request.url); if (protocol !== 'https:' || request.headers.get('x-forwarded-proto' ) !== 'https' ) { throw new BadRequestException('Must use a HTTPS connection.' ); } switch (pathname) { case '/favicon.ico' : case '/robots.txt' : return new Response(null , {status : 204 }); case '/' : return homeRequest(request); default : { if (request.method === 'OPTIONS' ) { return new Response(null , { headers: fix(new Headers(), request, true ), status: 200 , statusText: 'OK' , }); } return proxyRequest(request); } } } addEventListener('fetch' , async event => { event.respondWith( handleRequest(event.request).catch(error => const message = error.reason || error.stack || 'Unknown Error' ; return new Response(message, { status: error.status || 500 , statusText: error.statusText || null , headers: { 'Content-Type' : 'text/plain;charset=UTF-8' , 'Cache-Control' : 'no-store' , 'Content-Length' : message.length, }, }); }), ); });
部署结果: https://cors-anywhere.weiyigeek.workers.dev/
weiyigeek.top-cloudflare-cors-anywhere-code
温馨提示: cloudflare 构建无服务器应用程序免费版本每天限额10万次请求,所有为了避免其它 people 恶意使用,请在使用时设置访问白名单, 上述源码来源于 (https://github.com/chrisspiegl/cloudflare-cors-anywhere)。
温馨提示: 除了使用 cloudflare 还可以使用 Vercel 免费部署node.js项目解决跨域问题,你可参考该项目 (https://github.com/Dedicatus546/cors-server ) ,此处就不在累述。
方式2.有公网VPS、服务器
1 2 3 4 5 6 7 8 9 10 11 12 13 14 15 16 17 18 19 20 21 22 23 24 25 26 27 server { listen 80; listen 443 ssl http2; server_name blog.weiyigeek.top; add_header Access-Control-Allow-Origin '*.weiyigeek.top' ; add_header Access-Control-Allow-Methods 'GET,POST,OPTIONS' ; add_header Access-Control-Allow-Headers 'DNT,X-Mx-ReqToken,Keep-Alive,User-Agent,X-Requested-With,If-Modified-Since,Cache-Control,Content-Type,Authorization' ; ... location /github { if ($request_method = 'OPTIONS' ) { return 204; } proxy_pass https://github.com/; } ... error_page 403 /warn/403.html; error_page 404 /warn/404.html; error_page 500 502 503 /warn/500.html; error_page 504 /warn/504.html; }
配置完成后检测blog.conf配置以及重载nginx服务 nginx -t && nginx -s reload, 然后修改Hexo 主题中的 _config.yaml 将 Gitalk 的 proxy 配置为 proxy: /github/login/oauth/access_token 即可。
1 2 3 4 5 6 7 8 9 10 gitalk: enable : true owner: WeiyiGeek repo: blogtalk proxy: /github/login/oauth/access_token oauth: client_id: 8d8e965c******97026d3 client_secret: e9c6141cb1f02f721********d01cb4d7a8f069 perPage: 15
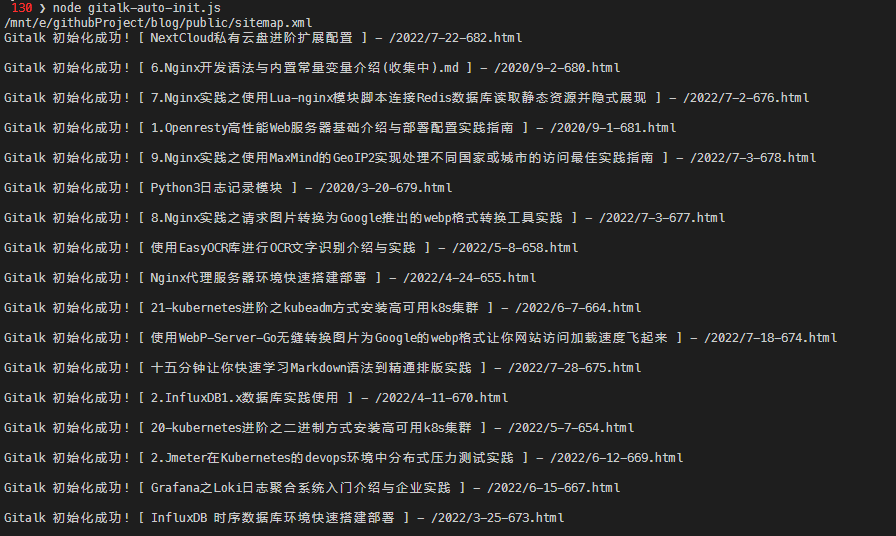
之后,我们需要批量初始每篇文章issue根据其路径/2020/3-20-658.html,此处采用了gitalk-auto-init.js脚本进行批量初始化文章issue。
温馨提示: 下述 gitalk-auto-init.js 脚本可以通过如下连接( https://github.com/WeiyiGeek/SecOpsDev/tree/master/Application/Blog/Hexo/Gitalk )进行获取
脚本依赖:1 2 3 4 5 6 7 $ npm i -S hexo-generator-sitemap $ npm i -D md5 moment request xml-parser + moment@2.29.2 + request@2.88.2 + md5@2.3.0 + xml-parser@1.2.1 added 55 packages from 70 contributors in 8.467s
配置运行:1 2 3 4 5 6 7 8 9 10 11 12 13 14 15 16 17 18 19 20 21 22 const config = { username: 'weiyigeek' , repo: "blogtalk" , token: 'ghp_wnpWqL********6RIf0NR5iD' , sitemap: path.join(__dirname, './public/sitemap.xml' ), cache: true , gitalkCacheFile: path.join(__dirname, './gitalk-init-cache.json' ), gitalkErrorFile: path.join(__dirname, './gitalk-init-error.json' ), }; <?xml version="1.0" encoding="UTF-8" ?> <urlset xmlns="http://www.sitemaps.org/schemas/sitemap/0.9" > <url> <loc>https: <lastmod>2022 -08 -15 T14:39 :08.638 Z</lastmod> <title>Ingress-Nginx进阶学习实践扩充配置记录</ title> </url> .... </u rlset>
weiyigeek.top-批量初始化文章issue
执行结果:1 2 3 4 5 --------- 运行结果 --------- 报错数据: 1 条。参考文件 /mnt/e/githubProject/blog/gitalk-init-error.json。 本次成功: 27 条。 写入缓存: 90 条,已初始化 63 条,本次成功: 27 条。参考文件 /mnt/e/githubProject/blog/gitalk-init-cache.json。
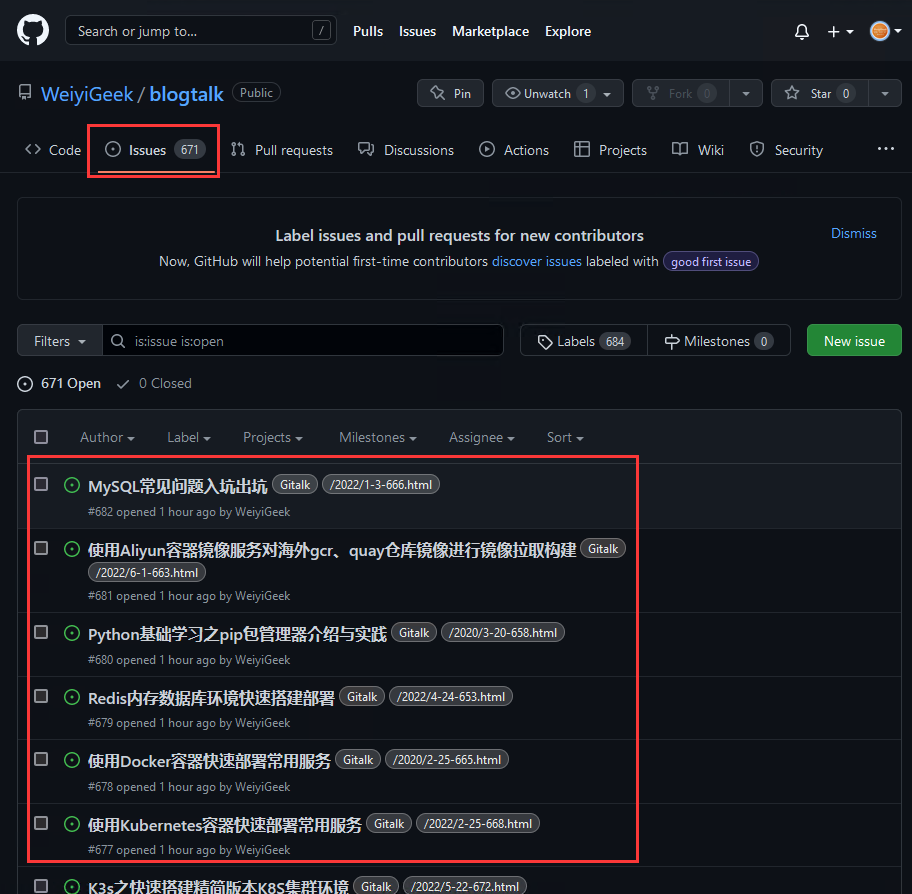
我们也可以通过 blogtalk 项目中 issue (https://github.com/WeiyiGeek/blogtalk/issues ) 查看初始化结果以及最新评论。
weiyigeek.top-blogtalk-issue
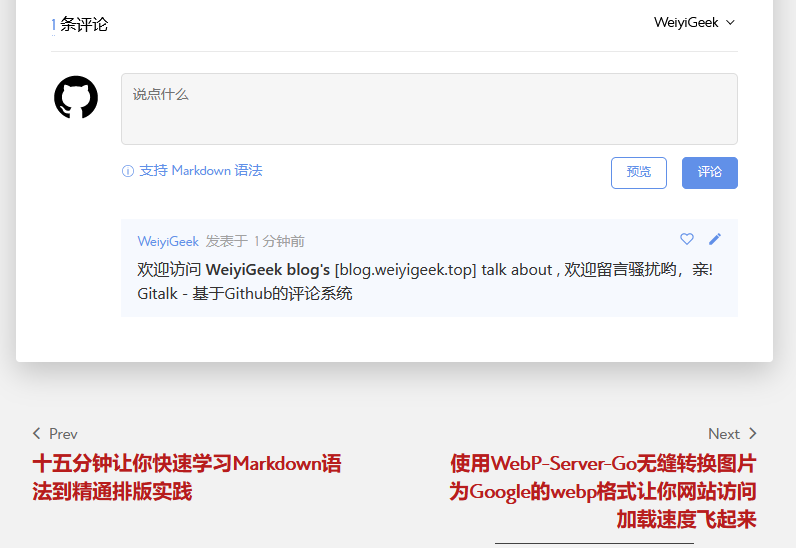
在初始化issue完成之后,我们可以找到一篇 https://blog.weiyigeek.top/about/ 文章进行留言验证。
weiyigeek.top-Gitalk 留言验证
首发地址 : https://mp.weixin.qq.com/s/2LLVDf7Fj4cX3IRZUtUfnA

